Owner's Manual
Page 2
... 8 Using the Remote Controller 8 Batteries 8 Before Using This Product 9 About This Product 9 About This Manual 9 Important 9 Precaution 10 Resetting the Microprocessor 10 After-sales Service for Use 15 Operation at the Initial Setting Screen 15 - Turning the Confirmation Sound ON/OFF - Returns to the Display Setting Screen - Switching to the Initial Setting Screen Setting the Menu Lock 22 - Setting the Dimmer - Switching to Music 23 Switching Power OFF 24 1 Detaching the Front Panel - Accessing the Initial Setting Screen - Setting the Clock by Time...
... 8 Using the Remote Controller 8 Batteries 8 Before Using This Product 9 About This Product 9 About This Manual 9 Important 9 Precaution 10 Resetting the Microprocessor 10 After-sales Service for Use 15 Operation at the Initial Setting Screen 15 - Turning the Confirmation Sound ON/OFF - Returns to the Display Setting Screen - Switching to the Initial Setting Screen Setting the Menu Lock 22 - Setting the Dimmer - Switching to Music 23 Switching Power OFF 24 1 Detaching the Front Panel - Accessing the Initial Setting Screen - Setting the Clock by Time...
Owner's Manual
Page 3
...Changing the Display Mode - Preset Tuning - Service Component function - PTY List TV Tuner Operation 57 Basic Operation of TV Tuner 57 Operation at the DVD Setting Screen 44 - Exit from the Tuner Setting Screen Operating Each function 27 - Repeat Play - Random Play - Exit from the Multi-CD Setting Screen Operating Each function 37 - Best Stations Memory - Disc Number Search Disc Title 40 - Selecting Discs by Disc Title List DVD Player Operation 43 Basic Operation of DVD Player 43 Operation at the TV Tuner Setting Screen 58 - Scan Play - Disc Number...
...Changing the Display Mode - Preset Tuning - Service Component function - PTY List TV Tuner Operation 57 Basic Operation of TV Tuner 57 Operation at the DVD Setting Screen 44 - Exit from the Tuner Setting Screen Operating Each function 27 - Repeat Play - Random Play - Exit from the Multi-CD Setting Screen Operating Each function 37 - Best Stations Memory - Disc Number Search Disc Title 40 - Selecting Discs by Disc Title List DVD Player Operation 43 Basic Operation of DVD Player 43 Operation at the TV Tuner Setting Screen 58 - Scan Play - Disc Number...
Owner's Manual
Page 4
...Player's Error Message 67 Connecting the Units 69 Setting Examples 70 Connecting without the rubber bush - Installation using the screw holes on the side of the unit About the fixing screws for the front panel .... 78 Installing the Remote Control Unit ...... 79 Fitting the Remote Control Unit 79 - Fader/Balance Adjustment - Installation without Audio Unit (DEQ-P9 71 Connecting with the rubber bush - Method A - Contents Audio Adjustment 61 Switching to the Audio Adjustment Screen .... 61 - Bass/Treble Adjustment - Fitting horizontally - Removing the Unit DIN Rear-mount...
...Player's Error Message 67 Connecting the Units 69 Setting Examples 70 Connecting without the rubber bush - Installation using the screw holes on the side of the unit About the fixing screws for the front panel .... 78 Installing the Remote Control Unit ...... 79 Fitting the Remote Control Unit 79 - Fader/Balance Adjustment - Installation without Audio Unit (DEQ-P9 71 Connecting with the rubber bush - Method A - Contents Audio Adjustment 61 Switching to the Audio Adjustment Screen .... 61 - Bass/Treble Adjustment - Fitting horizontally - Removing the Unit DIN Rear-mount...
Owner's Manual
Page 8
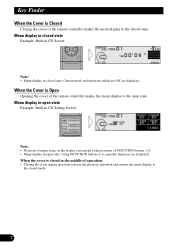
... cover of the remote controller makes the menu display to the open state: Using FUNCTION buttons 1-6, operable functions are displayed. Menu display in closed state Example: Built-in CD Screen Note: • Menu display in closed state: Current mode and functions which are ON are displayed. Menu display in open state Example: Built-in CD Setting Screen Note: • Positions of menu items on the display correspond to the positions of FUNCTION buttons 1-6. • Menu display in open state...
... cover of the remote controller makes the menu display to the open state: Using FUNCTION buttons 1-6, operable functions are displayed. Menu display in closed state Example: Built-in CD Screen Note: • Menu display in closed state: Current mode and functions which are ON are displayed. Menu display in open state Example: Built-in CD Setting Screen Note: • Positions of menu items on the display correspond to the positions of FUNCTION buttons 1-6. • Menu display in open state...
Owner's Manual
Page 13
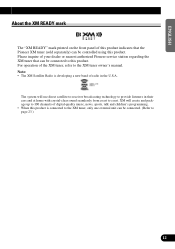
... XM Satellite Radio is connected to the XM tuner, only one external unit can be connected. (Refer to the XM tuner owner's manual. XM will use direct satellite-to-receiver broadcasting technology to provide listeners in the U.S.A. For operation of the XM tuner, refer to page 23.) 12 FRANÇAIS ITALIANO NEDERLANDS The system will create and package up to 100 channels of digital-quality music...
... XM Satellite Radio is connected to the XM tuner, only one external unit can be connected. (Refer to the XM tuner owner's manual. XM will use direct satellite-to-receiver broadcasting technology to provide listeners in the U.S.A. For operation of the XM tuner, refer to page 23.) 12 FRANÇAIS ITALIANO NEDERLANDS The system will create and package up to 100 channels of digital-quality music...
Owner's Manual
Page 16
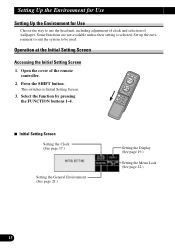
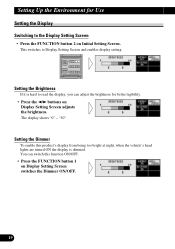
... switches to use the head unit, including adjustment of clock and selection of the remote controller. 2. Select the function by pressing the FUNCTION buttons 1-4. 7 Initial Setting Screen Setting the Clock (See page 17.) Setting the General Environment (See page 21.) Setting the Display (See page 19.) Setting the Menu Lock (See page 22.) 15 Operation at the Initial Setting Screen Accessing the Initial Setting Screen 1. Open the cover of wallpaper. Some functions are not available unless their setting is selected. Setting...
... switches to use the head unit, including adjustment of clock and selection of the remote controller. 2. Select the function by pressing the FUNCTION buttons 1-4. 7 Initial Setting Screen Setting the Clock (See page 17.) Setting the General Environment (See page 21.) Setting the Display (See page 19.) Setting the Menu Lock (See page 22.) 15 Operation at the Initial Setting Screen Accessing the Initial Setting Screen 1. Open the cover of wallpaper. Some functions are not available unless their setting is selected. Setting...
Owner's Manual
Page 18
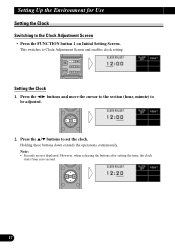
... section (hour, minute) to Clock Adjustment Screen and enables clock setting. This switches to be adjusted. 2. Setting Up the Environment for Use Setting the Clock Switching to set the clock. However, when releasing the buttons after setting the time, the clock starts from zero second. 17 Note: • Seconds are not displayed. Holding these buttons down extends the operations continuously. Setting the Clock 1. Press the 5/∞ buttons to the Clock Adjustment Screen • Press the FUNCTION button 1 on Initial Setting Screen.
... section (hour, minute) to Clock Adjustment Screen and enables clock setting. This switches to be adjusted. 2. Setting Up the Environment for Use Setting the Clock Switching to set the clock. However, when releasing the buttons after setting the time, the clock starts from zero second. 17 Note: • Seconds are not displayed. Holding these buttons down extends the operations continuously. Setting the Clock 1. Press the 5/∞ buttons to the Clock Adjustment Screen • Press the FUNCTION button 1 on Initial Setting Screen.
Owner's Manual
Page 20
... can switch this function ON/OFF. • Press the FUNCTION button 1 on Display Setting Screen switches the Dimmer ON/OFF. 19 "30". You can adjust the brightness for Use Setting the Display Switching to the Display Setting Screen • Press the FUNCTION button 2 on Initial Setting Screen. Setting the Dimmer To enable this product's display from being too bright at night, when the vehicle's head lights are turned ON the display is hard to Display Setting Screen and enables display setting. The display shows "0" - Setting...
... can switch this function ON/OFF. • Press the FUNCTION button 1 on Display Setting Screen switches the Dimmer ON/OFF. 19 "30". You can adjust the brightness for Use Setting the Display Switching to the Display Setting Screen • Press the FUNCTION button 2 on Initial Setting Screen. Setting the Dimmer To enable this product's display from being too bright at night, when the vehicle's head lights are turned ON the display is hard to Display Setting Screen and enables display setting. The display shows "0" - Setting...
Owner's Manual
Page 24
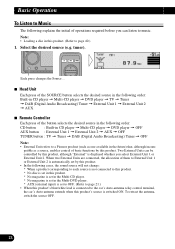
...'s blue/white lead is connected to the car's Auto-antenna relay control terminal, the car's Auto-antenna extends when this product's source is switched ON. To retract the antenna, switch the source OFF. 23 Select the desired source (e.g. Each press changes the Source ... 7 Head Unit Each press of the SOURCE button selects the desired source in the following order: Built-in CD player = Multi-CD player = DVD player = TV = Tuner = DAB (Digital Audio Broadcasting) Tuner = External Unit 1 = External Unit 2 = AUX 7 Remote Controller Each press of the button selects...
...'s blue/white lead is connected to the car's Auto-antenna relay control terminal, the car's Auto-antenna extends when this product's source is switched ON. To retract the antenna, switch the source OFF. 23 Select the desired source (e.g. Each press changes the Source ... 7 Head Unit Each press of the SOURCE button selects the desired source in the following order: Built-in CD player = Multi-CD player = DVD player = TV = Tuner = DAB (Digital Audio Broadcasting) Tuner = External Unit 1 = External Unit 2 = AUX 7 Remote Controller Each press of the button selects...
Owner's Manual
Page 35
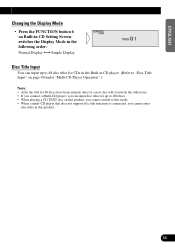
...ÑOL DEUTSCH Changing the Display Mode • Press the FUNCTION button 6 on Built-in CD Setting Screen switches the Display Mode in the following order: Normal Display += Simple Display Disc Title Input You can input up to 48 disc titles for CDs in the Built-in CD player. (Refer to "Disc Title Input" on page 40 under "Multi-CD Player Operation".) Note: • After the title for 48 discs have been...
...ÑOL DEUTSCH Changing the Display Mode • Press the FUNCTION button 6 on Built-in CD Setting Screen switches the Display Mode in the following order: Normal Display += Simple Display Disc Title Input You can input up to 48 disc titles for CDs in the Built-in CD player. (Refer to "Disc Title Input" on page 40 under "Multi-CD Player Operation".) Note: • After the title for 48 discs have been...
Owner's Manual
Page 40
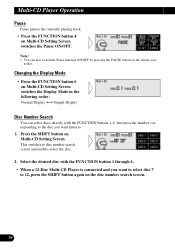
... remote controller. Press the SHIFT button on Multi-CD Setting Screen switches the Pause ON/OFF. Select the desired disc with the FUNCTION buttons 1-6. Multi-CD Player Operation Pause Pause pauses the currently playing track. • Press the FUNCTION button 4 on Multi-CD Setting Screen. Just press the number corresponding to the disc you want listen to disc number search screen and enables select the disc. 2. Changing the Display Mode • Press the FUNCTION button 6 on Multi-CD Setting Screen switches the Display Mode...
... remote controller. Press the SHIFT button on Multi-CD Setting Screen switches the Pause ON/OFF. Select the desired disc with the FUNCTION buttons 1-6. Multi-CD Player Operation Pause Pause pauses the currently playing track. • Press the FUNCTION button 4 on Multi-CD Setting Screen. Just press the number corresponding to the disc you want listen to disc number search screen and enables select the disc. 2. Changing the Display Mode • Press the FUNCTION button 6 on Multi-CD Setting Screen switches the Display Mode...
Owner's Manual
Page 48
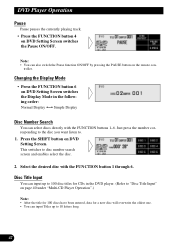
... DVD Setting Screen. Just press the number corresponding to the disc you want listen to disc number search screen and enables select the disc. 2. Disc Title Input You can input up to "Disc Title Input" on DVD Setting Screen switches the Display Mode in the following order: Normal Display += Simple Display Disc Number Search You can select discs directly with the FUNCTION button 1 through 6. Select the desired disc with the FUNCTION buttons 1-6. This switches to . 1. Changing the Display Mode • Press the FUNCTION button 6 on page 40 under "Multi-CD Player Operation...
... DVD Setting Screen. Just press the number corresponding to the disc you want listen to disc number search screen and enables select the disc. 2. Disc Title Input You can input up to "Disc Title Input" on DVD Setting Screen switches the Display Mode in the following order: Normal Display += Simple Display Disc Number Search You can select discs directly with the FUNCTION button 1 through 6. Select the desired disc with the FUNCTION buttons 1-6. This switches to . 1. Changing the Display Mode • Press the FUNCTION button 6 on page 40 under "Multi-CD Player Operation...
Owner's Manual
Page 52
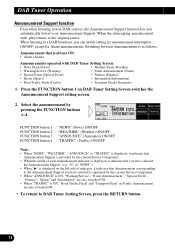
... "3" is displayed on DAB Tuner Setting Screen switches the Announcement Support setting screen. 2. Select the announcement by the current Service Component. • When the initial of indicator, it indicates that Announcement corresponding to DAB Tuner Setting Screen, press the RETURN button. 51 Press the FUNCTION button 1 on the left side of each Announcement indicator is always ON: • Alarm (Alarm) Announcements operated with DAB Tuner Setting Screen: • News Flash (News...
... "3" is displayed on DAB Tuner Setting Screen switches the Announcement Support setting screen. 2. Select the announcement by the current Service Component. • When the initial of indicator, it indicates that Announcement corresponding to DAB Tuner Setting Screen, press the RETURN button. 51 Press the FUNCTION button 1 on the left side of each Announcement indicator is always ON: • Alarm (Alarm) Announcements operated with DAB Tuner Setting Screen: • News Flash (News...
Owner's Manual
Page 62
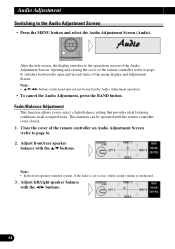
... rear, whole sound volume is attenuated. 3. Opening and closing the cover of the remote controller (refer to page 6). 2. This function can not be operated with the remote controller cover closed states of the Audio Adjustment Screen. Note: • In the front-speaker-oriented system, if the fader is set to the Audio Adjustment Screen • Press the MENU button and select the Audio Adjustment Screen (Audio). Fader/Balance Adjustment This function allows you to the operations screen of the menu display...
... rear, whole sound volume is attenuated. 3. Opening and closing the cover of the remote controller (refer to page 6). 2. This function can not be operated with the remote controller cover closed states of the Audio Adjustment Screen. Note: • In the front-speaker-oriented system, if the fader is set to the Audio Adjustment Screen • Press the MENU button and select the Audio Adjustment Screen (Audio). Fader/Balance Adjustment This function allows you to the operations screen of the menu display...
Owner's Manual
Page 63
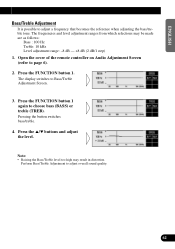
The display switches to choose bass (BASS) or treble (TREB). Note: • Raising the Bass/Treble level too high may be made are as follows: Bass : 100 Hz Treble: 10 kHz Level adjustment range: -8 dB - +8 dB (2 dB/1 step) 1. Press the FUNCTION button 1 again to Bass/Treble Adjustment Screen. 3. Pressing the button switches bass/treble. 4. Press the FUNCTION button 1. Perform Bass/Treble Adjustment to page 6). 2. Open the cover of the remote controller on Audio Adjustment Screen (refer to adjust overall sound quality. 62 FRANÇAIS...
The display switches to choose bass (BASS) or treble (TREB). Note: • Raising the Bass/Treble level too high may be made are as follows: Bass : 100 Hz Treble: 10 kHz Level adjustment range: -8 dB - +8 dB (2 dB/1 step) 1. Press the FUNCTION button 1 again to Bass/Treble Adjustment Screen. 3. Pressing the button switches bass/treble. 4. Press the FUNCTION button 1. Perform Bass/Treble Adjustment to page 6). 2. Open the cover of the remote controller on Audio Adjustment Screen (refer to adjust overall sound quality. 62 FRANÇAIS...
Owner's Manual
Page 64
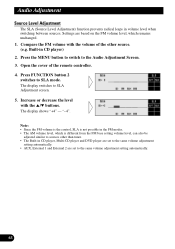
... the volume of the remote controller. 4. "-4". Note: • Since the FM volume is the control, SLA is not possible in the FM modes. • The AM volume level, which remains unchanged. 1. The display shows "+4" - Press FUNCTION button 2 switches to the Audio Adjustment Screen. 3. Built-in CD player, Multi-CD player and DVD player are set to SLA Adjustment screen. 5. The display switches to the same volume adjustment setting automatically. 63 Open the cover of the other than tuner...
... the volume of the remote controller. 4. "-4". Note: • Since the FM volume is the control, SLA is not possible in the FM modes. • The AM volume level, which remains unchanged. 1. The display shows "+4" - Press FUNCTION button 2 switches to the Audio Adjustment Screen. 3. Built-in CD player, Multi-CD player and DVD player are set to SLA Adjustment screen. 5. The display switches to the same volume adjustment setting automatically. 63 Open the cover of the other than tuner...
Owner's Manual
Page 65
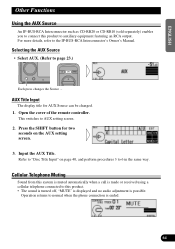
... phone connection is possible. Selecting the AUX Source • Select AUX. (Refer to AUX setting screen. 2. AUX Title Input The display title for two seconds on page 40, and perform procedures 3 to the IP-BUS-RCA Interconnector's Owner's Manual. Input the AUX Title. Cellular Telephone Muting Sound from this product. • The sound is turned off, "MUTE" is displayed and no audio adjustment is ended. 64 FRANÇAIS ITALIANO NEDERLANDS Refer to "Disc Title Input" on the AUX setting screen...
... phone connection is possible. Selecting the AUX Source • Select AUX. (Refer to AUX setting screen. 2. AUX Title Input The display title for two seconds on page 40, and perform procedures 3 to the IP-BUS-RCA Interconnector's Owner's Manual. Input the AUX Title. Cellular Telephone Muting Sound from this product. • The sound is turned off, "MUTE" is displayed and no audio adjustment is ended. 64 FRANÇAIS ITALIANO NEDERLANDS Refer to "Disc Title Input" on the AUX setting screen...
Owner's Manual
Page 70
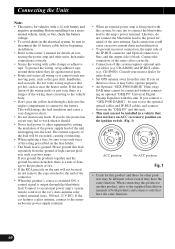
...; When an external power amp is being used , do not connect the blue/white lead to an external power amp's system remote control or the car's Auto-antenna relay control terminal (max. 300 mA 12 V DC). CD-IP600). If the insulation of the wiring melts or gets torn, there is a danger of the connector. • When this product's source is switched ON, a control signal is output through a hole into...
...; When an external power amp is being used , do not connect the blue/white lead to an external power amp's system remote control or the car's Auto-antenna relay control terminal (max. 300 mA 12 V DC). CD-IP600). If the insulation of the wiring melts or gets torn, there is a danger of the connector. • When this product's source is switched ON, a control signal is output through a hole into...
Owner's Manual
Page 71
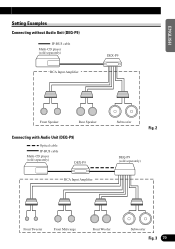
ENGLISH Setting Examples Connecting without Audio Unit (DEQ-P9) IP-BUS cable Multi-CD player (sold separately) RCA Input Amplifier DEX-P9 ESPAÑOL DEUTSCH FRANÇAIS Front Speaker Rear Speaker Connecting with Audio Unit (DEQ-P9) Optical cable IP-BUS cable Multi-CD player (sold separately) DEX-P9 RCA Input Amplifier Subwoofer Fig. 2 DEQ-P9 (sold separately) ITALIANO NEDERLANDS Front Tweeter Front Mid-range Front Woofer Subwoofer Fig. 3 70
ENGLISH Setting Examples Connecting without Audio Unit (DEQ-P9) IP-BUS cable Multi-CD player (sold separately) RCA Input Amplifier DEX-P9 ESPAÑOL DEUTSCH FRANÇAIS Front Speaker Rear Speaker Connecting with Audio Unit (DEQ-P9) Optical cable IP-BUS cable Multi-CD player (sold separately) DEX-P9 RCA Input Amplifier Subwoofer Fig. 2 DEQ-P9 (sold separately) ITALIANO NEDERLANDS Front Tweeter Front Mid-range Front Woofer Subwoofer Fig. 3 70
Owner's Manual
Page 73
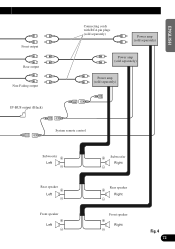
ENGLISH ESPAÑOL Front output Rear output Non-Fading output IP-BUS output (Black) Connecting cords with RCA pin plugs (sold separately) Power amp (sold separately) Power amp (sold separately) Power amp (sold separately) System remote control DEUTSCH FRANÇAIS ITALIANO NEDERLANDS Subwoofer + Left ≠ Rear speaker + Left ≠ Front speaker + Left ≠ + Subwoofer Right ≠ Rear speaker + Right ≠ Front speaker + Right ≠ Fig. 4 72
ENGLISH ESPAÑOL Front output Rear output Non-Fading output IP-BUS output (Black) Connecting cords with RCA pin plugs (sold separately) Power amp (sold separately) Power amp (sold separately) Power amp (sold separately) System remote control DEUTSCH FRANÇAIS ITALIANO NEDERLANDS Subwoofer + Left ≠ Rear speaker + Left ≠ Front speaker + Left ≠ + Subwoofer Right ≠ Rear speaker + Right ≠ Front speaker + Right ≠ Fig. 4 72


