Owner's Manual
Page 2
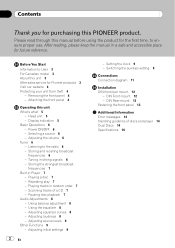
...PIONEER product. Storing and recalling broadcast frequencies 6 - Storing the strongest broadcast frequencies 7 Built-in strong signals 6 - Using balance adjustment 8 - Removing the front panel 4 - Adjusting the volume 6 Tuner 6 - Tuning in Player 7 - Adjusting initial settings 9 2 En - Scanning tracks of discs and player...7 Audio Adjustments 8 - DIN Rear-mount 13 Fastening the front panel 13 Additional Information Error messages 14 Handling guideline of a CD 7 - After reading, please keep the manual in random order 7 - Head unit 5 - Power ON/OFF 6 - ...
...PIONEER product. Storing and recalling broadcast frequencies 6 - Storing the strongest broadcast frequencies 7 Built-in strong signals 6 - Using balance adjustment 8 - Removing the front panel 4 - Adjusting the volume 6 Tuner 6 - Tuning in Player 7 - Adjusting initial settings 9 2 En - Scanning tracks of discs and player...7 Audio Adjustments 8 - DIN Rear-mount 13 Fastening the front panel 13 Additional Information Error messages 14 Handling guideline of a CD 7 - After reading, please keep the manual in random order 7 - Head unit 5 - Power ON/OFF 6 - ...
Owner's Manual
Page 5
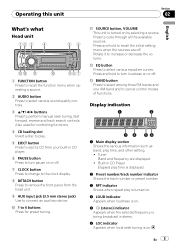
... when operating a source. 2 AUDIO button Press to select various sound quality controls. 3 a/b/c/d buttons Press to increase or decrease the volume. Built-in CD player. 6 PAUSE button Press to turn pause on . d BAND button Press to select among three FM bands and one AM band and to select various ...equalizer curves. Press and hold to turn loudness on by selecting a source. Press and hold to eject a CD from your built-in CD Player Elapsed play time is turned on or off . 7 CLOCK button Press to change to the clock display. 8 DETACH button Press to...
... when operating a source. 2 AUDIO button Press to select various sound quality controls. 3 a/b/c/d buttons Press to increase or decrease the volume. Built-in CD player. 6 PAUSE button Press to turn pause on . d BAND button Press to select among three FM bands and one AM band and to select various ...equalizer curves. Press and hold to turn loudness on by selecting a source. Press and hold to eject a CD from your built-in CD Player Elapsed play time is turned on or off . 7 CLOCK button Press to change to the clock display. 8 DETACH button Press to...
Owner's Manual
Page 6
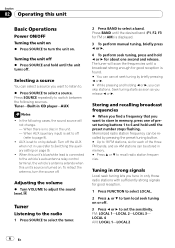
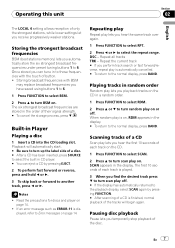
... unit on. Memorized radio station frequency can skip stations. LOCAL 4 AM: LOCAL 1-LOCAL 2 6 En Tuner-Built-in the unit. - When there is no disc in CD player-AUX Notes ! In the following sources. AUX is found. # You can cancel seek tuning by briefly pressing c or d. # While pressing and holding c or d, you want...
... unit on. Memorized radio station frequency can skip stations. LOCAL 4 AM: LOCAL 1-LOCAL 2 6 En Tuner-Built-in the unit. - When there is no disc in CD player-AUX Notes ! In the following sources. AUX is found. # You can cancel seek tuning by briefly pressing c or d. # While pressing and holding c or d, you want...
Owner's Manual
Page 7
... (best stations memory) lets you receive progressively weaker stations. En 7 Scanning tracks of a CD Scan play is finished, normal playback of the tracks will automatically start. # Be sure to turn up the label side of a disc. # After a CD has been inserted, press SOURCE to select the built-in CD player. # You can tune in a random...
... (best stations memory) lets you receive progressively weaker stations. En 7 Scanning tracks of a CD Scan play is finished, normal playback of the tracks will automatically start. # Be sure to turn up the label side of a disc. # After a CD has been inserted, press SOURCE to select the built-in CD player. # You can tune in a random...
Owner's Manual
Page 14
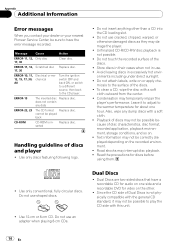
.... ! Do not touch the recorded surface of discs and player ! Also, wipe any data ERROR-22, 23 The CD format Replace disc. Appendix Additional Information Error messages When you contact your dealer or your nearest Pioneer Service Center, be sure to have a recordable CD for audio on one side and a recordable DVD for about...
.... ! Do not touch the recorded surface of discs and player ! Also, wipe any data ERROR-22, 23 The CD format Replace disc. Appendix Additional Information Error messages When you contact your dealer or your nearest Pioneer Service Center, be sure to have a recordable CD for audio on one side and a recordable DVD for about...
Owner's Manual
Page 16
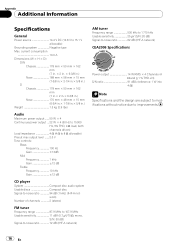
...) Preout max output level ....... 2.0 V Tone controls: Bass Frequency 100 Hz Gain 13dB Mid Frequency 1 kHz Gain 12 dB Treble Frequency 10 kHz Gain 12 dB CD player System Compact disc audio system Usable discs Compact disc Signal-to-noise ratio 94 dB (1 kHz) (IHF-A net-
...) Preout max output level ....... 2.0 V Tone controls: Bass Frequency 100 Hz Gain 13dB Mid Frequency 1 kHz Gain 12 dB Treble Frequency 10 kHz Gain 12 dB CD player System Compact disc audio system Usable discs Compact disc Signal-to-noise ratio 94 dB (1 kHz) (IHF-A net-


