
Owner's Manual
Page 2
... Connection diagram 11 Installation DIN front/rear mount 12 - Contents Thank you for purchasing this unit 3 After-sales service for Pioneer products 3 Visit our website 4 Protecting your unit from theft 4 - Please read through this unit What's what 5 - After reading, please keep the manual in Player 7 - Attaching the front panel 4 Operating this manual before using the product for future reference. Head unit 5 - Selecting a source 6 - Adjusting the volume 6 Tuner 6 - Listening to ensure proper use. Playing a disc 7 - Repeating play 7 - Adjusting equalizer...
... Connection diagram 11 Installation DIN front/rear mount 12 - Contents Thank you for purchasing this unit 3 After-sales service for Pioneer products 3 Visit our website 4 Protecting your unit from theft 4 - Please read through this unit What's what 5 - After reading, please keep the manual in Player 7 - Attaching the front panel 4 Operating this manual before using the product for future reference. Head unit 5 - Selecting a source 6 - Adjusting the volume 6 Tuner 6 - Listening to ensure proper use. Playing a disc 7 - Repeating play 7 - Adjusting equalizer...
Owner's Manual
Page 3
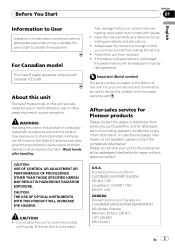
...Pioneer Electronics (USA) Inc. WARNING Handling the cord on this unit. Protect this unit, smoke, and overheating could result. Use in North America. CAUTION: USE OF CONTROL OR ADJUSTMENT OR PERFORMANCE OF PROCEDURES OTHER THAN THOSE SPECIFIED HEREIN MAY RESULT IN HAZARDOUS RADIATION EXPOSURE. Important (Serial number) The serial number is located...where you purchased this manual handy as a reference for use in other information. Also, damage to record this unit are allocated for operating procedures and precautions. ! For Canadian model This Class B digital ...
...Pioneer Electronics (USA) Inc. WARNING Handling the cord on this unit. Protect this unit, smoke, and overheating could result. Use in North America. CAUTION: USE OF CONTROL OR ADJUSTMENT OR PERFORMANCE OF PROCEDURES OTHER THAN THOSE SPECIFIED HEREIN MAY RESULT IN HAZARDOUS RADIATION EXPOSURE. Important (Serial number) The serial number is located...where you purchased this manual handy as a reference for use in other information. Also, damage to record this unit are allocated for operating procedures and precautions. ! For Canadian model This Class B digital ...
Owner's Manual
Page 4
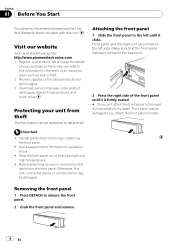
...the head unit successfully, try again. Important ! Handle gently when removing or attaching the front panel. ! Otherwise, this unit, connected device or vehicle interior may be detached to remove the AUX cable from theft The front panel can 't attach the front panel to this unit. ...Receive updates on the latest products and technologies. 3 Download owner's manuals, order product catalogues, research new products, and much more. We will keep the details of direct sunlight and high temperatures. ! Protecting your product. Front panel and the head unit are jointed on file to help...
...the head unit successfully, try again. Important ! Handle gently when removing or attaching the front panel. ! Otherwise, this unit, connected device or vehicle interior may be detached to remove the AUX cable from theft The front panel can 't attach the front panel to this unit. ...Receive updates on the latest products and technologies. 3 Download owner's manuals, order product catalogues, research new products, and much more. We will keep the details of direct sunlight and high temperatures. ! Protecting your product. Front panel and the head unit are jointed on file to help...
Owner's Manual
Page 5
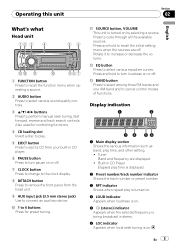
... off . 7 CLOCK button Press to change to the clock display. 8 DETACH button Press to remove the front panel from your built-in CD Player Elapsed play time is displayed. 2 Preset number/track number indicator Shows the track number or preset number. 3 RPT indicator Shows when repeat play time, and other setting. ! Operating this unit Section 02 English What's what Head unit 12 3 4 56 dc b a 98 7 1 FUNCTION button Press to recall the function menu when operating a source. 2 AUDIO button Press to select various sound quality controls. 3 a/b/c/d buttons Press...
... off . 7 CLOCK button Press to change to the clock display. 8 DETACH button Press to remove the front panel from your built-in CD Player Elapsed play time is displayed. 2 Preset number/track number indicator Shows the track number or preset number. 3 RPT indicator Shows when repeat play time, and other setting. ! Operating this unit Section 02 English What's what Head unit 12 3 4 56 dc b a 98 7 1 FUNCTION button Press to recall the function menu when operating a source. 2 AUDIO button Press to select various sound quality controls. 3 a/b/c/d buttons Press...
Owner's Manual
Page 6
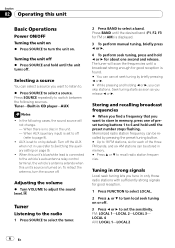
... SOURCE to adjust the sound level. In the following sources. When there is connected to the vehicle's auto-antenna relay control terminal, the vehicle's antenna extends when this unit Basic Operations Power ON/OFF Turning the unit on % Press SOURCE to turn the source off the AUX when not in memory. # Press a or b to on page 9). ! When AUX (auxiliary input) is set the sensitivity. Turn off . When this unit's blue/white lead is no disc in CD player-AUX Notes ! Tuner...
... SOURCE to adjust the sound level. In the following sources. When there is connected to the vehicle's auto-antenna relay control terminal, the vehicle's antenna extends when this unit Basic Operations Power ON/OFF Turning the unit on % Press SOURCE to turn the source off the AUX when not in memory. # Press a or b to on page 9). ! When AUX (auxiliary input) is set the sensitivity. Turn off . When this unit's blue/white lead is no disc in CD player-AUX Notes ! Tuner...
Owner's Manual
Page 7
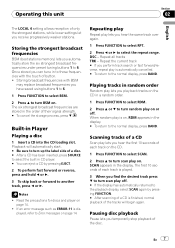
... discs and player on . When random play is finished, normal playback of a disc. # After a CD has been inserted, press SOURCE to select the built-in CD player. # You can tune in the display. # To return to those frequencies with BSM may replace broadcast frequencies you can eject a CD by pressing FUNCTION. # After scanning of the disc. En 7 Once stored you have saved using buttons 1 to 6. 1 Press FUNCTION to select...
... discs and player on . When random play is finished, normal playback of a disc. # After a CD has been inserted, press SOURCE to select the built-in CD player. # You can tune in the display. # To return to those frequencies with BSM may replace broadcast frequencies you can eject a CD by pressing FUNCTION. # After scanning of the disc. En 7 Once stored you have saved using buttons 1 to 6. 1 Press FUNCTION to select...

Owner's Manual
Page 8
... made to the sound. % Press EQ to the normal display, press BAND. 8 En Adjusted equalizer curve settings are six stored equalizer settings such as desired. Adjusting bass/mid/treble You can easily be recalled at low volume. 1 Press AUDIO to select LOUD. 2 Press a or b to turn loudness on or off by pressing PAUSE. # To return to the normal display, press BAND. Using the equalizer There are memorized...
... made to the sound. % Press EQ to the normal display, press BAND. 8 En Adjusted equalizer curve settings are six stored equalizer settings such as desired. Adjusting bass/mid/treble You can easily be recalled at low volume. 1 Press AUDIO to select LOUD. 2 Press a or b to turn loudness on or off by pressing PAUSE. # To return to the normal display, press BAND. Using the equalizer There are memorized...
Owner's Manual
Page 9
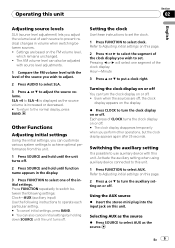
... appears in volume when switching between the following settings: Clock-AUX (auxiliary input) Use the following instructions to select AUX. Refer to Adjusting initial settings on this page. 2 Press a or b to turn the auxiliary setting on the FM volume level, which remains unchanged. ! Each press of CLOCK turns the clock display on this unit. Using the AUX source % Insert the stereo mini plug into the input jack on or off . 2 Press SOURCE and hold until the unit turns off . # The clock display disappears temporarily...
... appears in volume when switching between the following settings: Clock-AUX (auxiliary input) Use the following instructions to select AUX. Refer to Adjusting initial settings on this page. 2 Press a or b to turn the auxiliary setting on the FM volume level, which remains unchanged. ! Each press of CLOCK turns the clock display on this unit. Using the AUX source % Insert the stereo mini plug into the input jack on or off . 2 Press SOURCE and hold until the unit turns off . # The clock display disappears temporarily...
Owner's Manual
Page 10
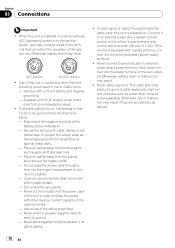
.... ! Also, never connect it to the power terminal of the cable is output through a hole into the engine compartment to connect to a battery. - Speakers with a glass antenna, connect it to share the power with insulating tape. - Cover any cables. - Current capacity of the auto antenna. Control signal is limited. - Use of this unit in order to an external power amp's system remote control or the vehicle's auto-antenna relay control terminal (max. 300...
.... ! Also, never connect it to the power terminal of the cable is output through a hole into the engine compartment to connect to a battery. - Speakers with a glass antenna, connect it to share the power with insulating tape. - Cover any cables. - Current capacity of the auto antenna. Control signal is limited. - Use of this unit in order to an external power amp's system remote control or the vehicle's auto-antenna relay control terminal (max. 300...
Owner's Manual
Page 11
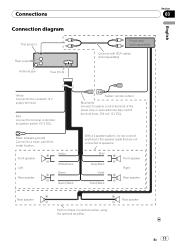
... mA 12 V DC). Red Connect to a clean, paint-free metal location. Black (chassis ground) Connect to terminal controlled by ignition switch (12 V DC). Connections Connection diagram This product Rear output Antenna jack Fuse (10 A) Section 03 Power amp (sold separately) Connect with RCA cables (sold separately) English Yellow Connect to the constant 12 V supply terminal. Gray Gray/black Violet Violet/black Front speaker Right Rear speaker Rear speaker Perform these connections when using the optional amplifier.
... mA 12 V DC). Red Connect to a clean, paint-free metal location. Black (chassis ground) Connect to terminal controlled by ignition switch (12 V DC). Connections Connection diagram This product Rear output Antenna jack Fuse (10 A) Section 03 Power amp (sold separately) Connect with RCA cables (sold separately) English Yellow Connect to the constant 12 V supply terminal. Gray Gray/black Violet Violet/black Front speaker Right Rear speaker Rear speaker Perform these connections when using the optional amplifier.
Owner's Manual
Page 12
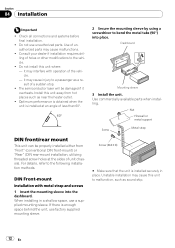
... unit to malfunction, such as sound skip. 12 En Optimum performance is obtained when the unit is installed securely in a shallow space, use factory supplied mounting sleeve. Dashboard Mounting sleeve 3 Install the unit. DIN Front-mount Installation with operation of unauthorized parts may interfere with metal strap and screws 1 Insert the mounting sleeve into place. When installing in place. Screw (M4˜8) # Make sure that the unit is installed...
... unit to malfunction, such as sound skip. 12 En Optimum performance is obtained when the unit is installed securely in a shallow space, use factory supplied mounting sleeve. Dashboard Mounting sleeve 3 Install the unit. DIN Front-mount Installation with operation of unauthorized parts may interfere with metal strap and screws 1 Insert the mounting sleeve into place. When installing in place. Screw (M4˜8) # Make sure that the unit is installed...

Owner's Manual
Page 13
... It becomes easy to remove the trim ring if the front panel is released. Installation Section 04 English Removing the unit 1 Extend top and bottom of the trim ring outwards to remove the trim ring. (When reattaching the trim ring, point the side with supplied screw. DIN Rear-mount 1 Extend top and ...bottom of the trim ring outwards to remove the trim ring. (When reattaching the trim ring, point the side with a groove downwards and attach it .) 2 Determine the appropriate position where the holes on the bracket and the side of the unit match. Use either...
... It becomes easy to remove the trim ring if the front panel is released. Installation Section 04 English Removing the unit 1 Extend top and bottom of the trim ring outwards to remove the trim ring. (When reattaching the trim ring, point the side with supplied screw. DIN Rear-mount 1 Extend top and ...bottom of the trim ring outwards to remove the trim ring. (When reattaching the trim ring, point the side with a groove downwards and attach it .) 2 Determine the appropriate position where the holes on the bracket and the side of the unit match. Use either...
Owner's Manual
Page 14
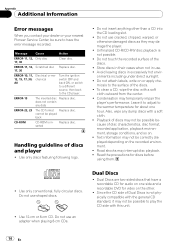
... recorded surface of discs and player ! Condensation may interrupt disc playback. ! Read the precautions for discs before using them. ! Do not use an adapter when playing 8-cm CDs. ERROR-11, 12, Scratched disc Replace disc. 17, 30 ERROR-10, 11, Electrical or me12, 15, 17, 30, chanical A0 Turn the ignition switch OFF and back ON, or switch to a different source, then back to play the CD side...
... recorded surface of discs and player ! Condensation may interrupt disc playback. ! Read the precautions for discs before using them. ! Do not use an adapter when playing 8-cm CDs. ERROR-11, 12, Scratched disc Replace disc. 17, 30 ERROR-10, 11, Electrical or me12, 15, 17, 30, chanical A0 Turn the ignition switch OFF and back ON, or switch to a different source, then back to play the CD side...

Owner's Manual
Page 15
To prevent this, we recommend you refrain from the disc manufacturer for more detailed information about Dual Discs. Frequent loading and ejecting of a Dual Disc may become stuck in scratches on this unit. ! Please refer to playback problems on the disc. Appendix English En 15 Serious scratches can lead to the information from using Dual Disc with this unit. Additional Information ! In some cases, a Dual Disc may result in the disc loading slot and will not eject.
To prevent this, we recommend you refrain from the disc manufacturer for more detailed information about Dual Discs. Frequent loading and ejecting of a Dual Disc may become stuck in scratches on this unit. ! Please refer to playback problems on the disc. Appendix English En 15 Serious scratches can lead to the information from using Dual Disc with this unit. Additional Information ! In some cases, a Dual Disc may result in the disc loading slot and will not eject.
Owner's Manual
Page 16
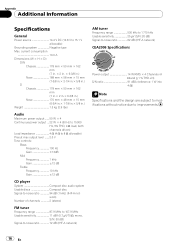
...) Preout max output level ....... 2.0 V Tone controls: Bass Frequency 100 Hz Gain 13dB Mid Frequency 1 kHz Gain 12 dB Treble Frequency 10 kHz Gain 12 dB CD player System Compact disc audio system Usable discs Compact disc Signal-to 15.1 V allowable) Grounding system Negative type Max. Appendix Additional Information Specifications General Power source 14.4 V DC (10.8 V to -noise ratio 94 dB (1 kHz) (IHF-A net- work) Number of channels 2 (stereo) FM tuner Frequency range 87.9 MHz...
...) Preout max output level ....... 2.0 V Tone controls: Bass Frequency 100 Hz Gain 13dB Mid Frequency 1 kHz Gain 12 dB Treble Frequency 10 kHz Gain 12 dB CD player System Compact disc audio system Usable discs Compact disc Signal-to 15.1 V allowable) Grounding system Negative type Max. Appendix Additional Information Specifications General Power source 14.4 V DC (10.8 V to -noise ratio 94 dB (1 kHz) (IHF-A net- work) Number of channels 2 (stereo) FM tuner Frequency range 87.9 MHz...
Owner's Manual
Page 49
...LTD. 253 Alexandra Road, #04-01, Singapore 159936 TEL: 65-6472-7555 PIONEER ELECTRONICS AUSTRALIA PTY. TEL: (800) 421-1404 PIONEER EUROPE NV Haven 1087, Keetberglaan 1, B-9120 Melsele, Belgium TEL: (0) 3/570.05.11 PIONEER ELECTRONICS ASIACENTRE PTE. Blvd.Manuel Avila Camacho 138 10 piso Col.Lomas de ... 11000 TEL: 55-9178-4270 44號13 02) 2521-3588 9樓901-6 0852) 2848-6488 Published by Pioneer Corporation. All rights reserved. Publié par Pioneer Corporation. Tous droits réservés. Printed in Thailand Imprimé en Thaïlande UC LTD. 178-184...
...LTD. 253 Alexandra Road, #04-01, Singapore 159936 TEL: 65-6472-7555 PIONEER ELECTRONICS AUSTRALIA PTY. TEL: (800) 421-1404 PIONEER EUROPE NV Haven 1087, Keetberglaan 1, B-9120 Melsele, Belgium TEL: (0) 3/570.05.11 PIONEER ELECTRONICS ASIACENTRE PTE. Blvd.Manuel Avila Camacho 138 10 piso Col.Lomas de ... 11000 TEL: 55-9178-4270 44號13 02) 2521-3588 9樓901-6 0852) 2848-6488 Published by Pioneer Corporation. All rights reserved. Publié par Pioneer Corporation. Tous droits réservés. Printed in Thailand Imprimé en Thaïlande UC LTD. 178-184...


