Owner's Manual
Page 2
Contents Dear Customer 3 Key Finder 4 Before Using This Product 5 Features 5 About this product 5 About this manual 5 Important 5 Precaution 5 After-sales service for Pioneer products 6 About WMA 6 Switching the DSP setting mode 7 About the XM READY mark 7 Resetting the microprocessor 7 About the demo modes 8 About basic displays 8 Remote controller ...
Contents Dear Customer 3 Key Finder 4 Before Using This Product 5 Features 5 About this product 5 About this manual 5 Important 5 Precaution 5 After-sales service for Pioneer products 6 About WMA 6 Switching the DSP setting mode 7 About the XM READY mark 7 Resetting the microprocessor 7 About the demo modes 8 About basic displays 8 Remote controller ...
Owner's Manual
Page 6
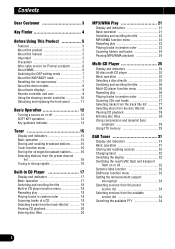
... enclosed warranty card. All are designed for the easiest possible use, but many are allocated for use in North America. This manual explains head unit operation. Precaution CAUTION: USE OF CONTROL OR ADJUSTMENT OR PERFORMANCE OF PROCEDURES OTHER THAN THOSE SPECIFIED HEREIN MAY RESULT...CD-R/CD-RW discs (recordings complying with ISO9660 Level 1/Level 2 standards). (See page 62.) About this product The tuner frequencies on this manual handy as a reference for operating procedures and precautions. • Always keep the volume low enough for outside sounds to be audible. •...
... enclosed warranty card. All are designed for the easiest possible use, but many are allocated for use in North America. This manual explains head unit operation. Precaution CAUTION: USE OF CONTROL OR ADJUSTMENT OR PERFORMANCE OF PROCEDURES OTHER THAN THOSE SPECIFIED HEREIN MAY RESULT...CD-R/CD-RW discs (recordings complying with ISO9660 Level 1/Level 2 standards). (See page 62.) About this product The tuner frequencies on this manual handy as a reference for operating procedures and precautions. • Always keep the volume low enough for outside sounds to be audible. •...
Owner's Manual
Page 8
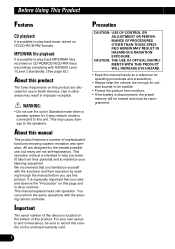
.... You can be reset under the following conditions: When using this product indicates that can be connected to the XM tuner owner's manual. For operation of this product. Resetting the microprocessor The microprocessor must be controlled using this product. Note: • The XM Satellite... fails to coast. Initially, the DSP setting is developing a new band of your dealer or nearest authorized Pioneer service station regarding the XM tuner that the Pioneer XM tuner (sold separately) can switch between modes as desired. XM will use direct satellite-to-receiver broadcasting...
.... You can be reset under the following conditions: When using this product indicates that can be connected to the XM tuner owner's manual. For operation of this product. Resetting the microprocessor The microprocessor must be controlled using this product. Note: • The XM Satellite... fails to coast. Initially, the DSP setting is developing a new band of your dealer or nearest authorized Pioneer service station regarding the XM tuner that the Pioneer XM tuner (sold separately) can switch between modes as desired. XM will use direct satellite-to-receiver broadcasting...
Owner's Manual
Page 13
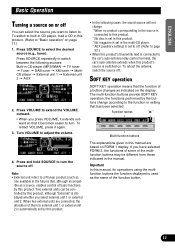
Press SOURCE to adjust the volume. 4. Note: • External unit refers to a Pioneer product (such as one available in this manual are connected, the allocation of them to "Basic operation" on the display. Function names "3" Multi-function buttons The explanations given ... (Refer to external unit 1 or external unit 2 is automatically set in the manual. If you have selected FORM 2, the functions of some of the multifunction buttons may be controlled by this manual, for operations using the multifunction buttons the function displayed is displayed whether you select ...
Press SOURCE to adjust the volume. 4. Note: • External unit refers to a Pioneer product (such as one available in this manual are connected, the allocation of them to "Basic operation" on the display. Function names "3" Multi-function buttons The explanations given ... (Refer to external unit 1 or external unit 2 is automatically set in the manual. If you have selected FORM 2, the functions of some of the multifunction buttons may be controlled by this manual, for operations using the multifunction buttons the function displayed is displayed whether you select ...
Owner's Manual
Page 15
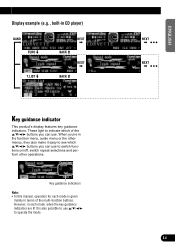
... make it is given mainly in CD player) Key guidance indicator This product's display features key guidance indicators. Key guidance indicators Note: • In this manual, operation for each mode, when the key guidance indicators are lit it easy to see which 5/∞/2/3 buttons you 're in each mode is also...
... make it is given mainly in CD player) Key guidance indicator This product's display features key guidance indicators. Key guidance indicators Note: • In this manual, operation for each mode, when the key guidance indicators are lit it easy to see which 5/∞/2/3 buttons you 're in each mode is also...
Owner's Manual
Page 26
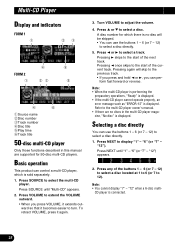
...ERROR-12" is connected. 25 Press NEXT to select a track. "6" (or "7" - Press 5 or ∞ to 12). Refer to the multi-CD player owner's manual. • If there are supported for which is sold separately. 1. Press NEXT until "Multi-CD" appears. 2. "12" when a 6-disc multi- "12") appears....we t r y qSource name wDisc number eTrack number rDisc title tPlay time yTrack title 50-disc multi-CD player Only those functions described in this manual are no disc will skip to the previous track. • If you press and hold 2 or 3, you press VOLUME, it extends outward so...
...ERROR-12" is connected. 25 Press NEXT to select a track. "6" (or "7" - Press 5 or ∞ to 12). Refer to the multi-CD player owner's manual. • If there are supported for which is sold separately. 1. Press NEXT until "Multi-CD" appears. 2. "12" when a 6-disc multi- "12") appears....we t r y qSource name wDisc number eTrack number rDisc title tPlay time yTrack title 50-disc multi-CD player Only those functions described in this manual are no disc will skip to the previous track. • If you press and hold 2 or 3, you press VOLUME, it extends outward so...
Owner's Manual
Page 32
... VOLUME to extend the VOLUME outward. • When you can operate three addi- For details of DAB tuner-specific operation/features, see your DAB tuner's manual. • This product does not have the language filter function. • With this product to select the DAB tuner. To retract VOLUME, press it again...
... VOLUME to extend the VOLUME outward. • When you can operate three addi- For details of DAB tuner-specific operation/features, see your DAB tuner's manual. • This product does not have the language filter function. • With this product to select the DAB tuner. To retract VOLUME, press it again...
Owner's Manual
Page 36
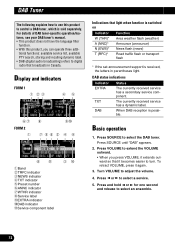
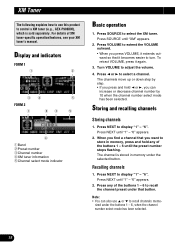
... preset under that you press VOLUME, it extends outward so that it again. 3. Press any of XM tuner-specific operation/features, see your XM tuner's manual. Display and indicators FORM 1 q w er t FORM 2 q we t r qBand wPreset number eChannel number rXM tuner information tChannel select mode indicator Basic operation 1. The channels move up...
... preset under that you press VOLUME, it extends outward so that it again. 3. Press any of XM tuner-specific operation/features, see your XM tuner's manual. Display and indicators FORM 1 q w er t FORM 2 q we t r qBand wPreset number eChannel number rXM tuner information tChannel select mode indicator Basic operation 1. The channels move up...
Owner's Manual
Page 38
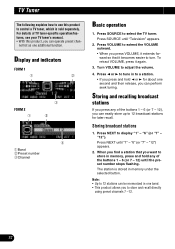
... station is sold separately. Press SOURCE to a station. • If you press and hold any of TV tuner-specific operation/features, see your TV tuner's manual. • With this product to store and recall directly using preset channels 7 -12. 37 "6" (or "7" - Press SOURCE until "1" - Storing broadcast stations 1. nel list as one...
... station is sold separately. Press SOURCE to a station. • If you press and hold any of TV tuner-specific operation/features, see your TV tuner's manual. • With this product to store and recall directly using preset channels 7 -12. 37 "6" (or "7" - Press SOURCE until "1" - Storing broadcast stations 1. nel list as one...
Owner's Manual
Page 40
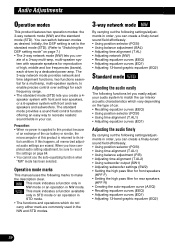
... alignment (T.AL1) • Adjusting equalizer curves (EQ1) Adjusting the audio finely By carrying out the following settings/adjustments in your car. Operation mode marks This manual uses the following marks to make the description clear. : This mark indicates a function only in NW mode or an operation in NW mode. : This mark...
... alignment (T.AL1) • Adjusting equalizer curves (EQ1) Adjusting the audio finely By carrying out the following settings/adjustments in your car. Operation mode marks This manual uses the following marks to make the description clear. : This mark indicates a function only in NW mode or an operation in NW mode. : This mark...
Owner's Manual
Page 58
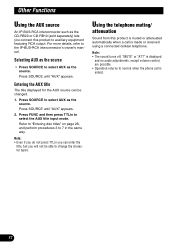
... press TTLin you can be able to auxiliary equipment featuring RCA output. Press FUNC and then press TTLin to the IP-BUS-RCA interconnector's owner's manual. Entering the AUX title The title displayed for the AUX source can enter the title, but you connect this product is muted or attenuated automatically...
... press TTLin you can be able to auxiliary equipment featuring RCA output. Press FUNC and then press TTLin to the IP-BUS-RCA interconnector's owner's manual. Entering the AUX title The title displayed for the AUX source can enter the title, but you connect this product is muted or attenuated automatically...
Other Manual
Page 1
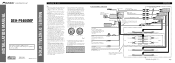
Before installing it cannot touch any moving parts, such as power amps. Likewise, do not connect the blue/white lead to the owner's manual for vehicles with minimum rating of 50 W and impedance of 4 to other equipment by ignition switch (12 V DC) ON/OFF. Especially, ...control terminal of the power amp or Auto-antenna relay control terminal (max. 300 mA 12 V DC). INSTALLATION MANUAL OF OF DEH-P9400MP This product conforms to the supplied Installation manuals of both products and connect cords that have the same function. To protect the wiring, wrap adhesive tape around them...
Before installing it cannot touch any moving parts, such as power amps. Likewise, do not connect the blue/white lead to the owner's manual for vehicles with minimum rating of 50 W and impedance of 4 to other equipment by ignition switch (12 V DC) ON/OFF. Especially, ...control terminal of the power amp or Auto-antenna relay control terminal (max. 300 mA 12 V DC). INSTALLATION MANUAL OF OF DEH-P9400MP This product conforms to the supplied Installation manuals of both products and connect cords that have the same function. To protect the wiring, wrap adhesive tape around them...
Other Manual
Page 3
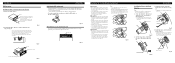
... panel to be prevented. If this unit is set to the standard mode (STD). • After switching, reset the microprocessor. (Refer to operation manual.) • Use a thin standard tip screwdriver to remove the frame. (When reattaching the frame, point the side with a groove downwards and attach ...installed on each side. Initially, the DSP setting is loose, it disturbs driving stability, causing a traffic accident. Otherwise, there is prevented by this manual. Incursion of water into the hole in the bottom of the steering wheel as shown. (Fig. 14) Note: • Do not install this...
... panel to be prevented. If this unit is set to the standard mode (STD). • After switching, reset the microprocessor. (Refer to operation manual.) • Use a thin standard tip screwdriver to remove the frame. (When reattaching the frame, point the side with a groove downwards and attach ...installed on each side. Initially, the DSP setting is loose, it disturbs driving stability, causing a traffic accident. Otherwise, there is prevented by this manual. Incursion of water into the hole in the bottom of the steering wheel as shown. (Fig. 14) Note: • Do not install this...


