Owner's Manual
Page 2
Contents Dear Customer 3 Key Finder 4 Before Using This Product 5 Features 5 About this product 5 About this manual 5 Important 5 Precaution 5 After-sales service for Pioneer products 6 About WMA 6 Switching the DSP setting mode 7 About the XM READY mark 7 Resetting the microprocessor 7 About the demo modes 8 About basic displays 8 Remote controller ...
Contents Dear Customer 3 Key Finder 4 Before Using This Product 5 Features 5 About this product 5 About this manual 5 Important 5 Precaution 5 After-sales service for Pioneer products 6 About WMA 6 Switching the DSP setting mode 7 About the XM READY mark 7 Resetting the microprocessor 7 About the demo modes 8 About basic displays 8 Remote controller ...
Owner's Manual
Page 6
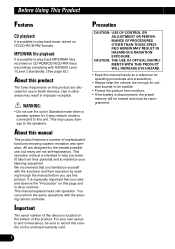
... 3-way network mode is connected to this product. It is especially important that you familiarize yourself with the steering remote controller. This manual explains head unit operation. You can perform the same operations with the functions and their potential and to maximize your own security and convenience...WITH THIS PRODUCT WILL INCREASE EYE HAZARD. • Keep this page and in improper reception. All are not self-explanatory. This operation manual is intended to help you benefit fully from moisture. • If the battery is disconnected, the preset memory will be erased and ...
... 3-way network mode is connected to this product. It is especially important that you familiarize yourself with the steering remote controller. This manual explains head unit operation. You can perform the same operations with the functions and their potential and to maximize your own security and convenience...WITH THIS PRODUCT WILL INCREASE EYE HAZARD. • Keep this page and in improper reception. All are not self-explanatory. This operation manual is intended to help you benefit fully from moisture. • If the battery is disconnected, the preset memory will be erased and ...
Owner's Manual
Page 8
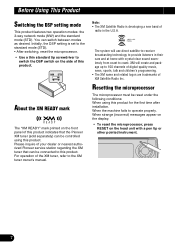
...be reset under the following conditions: When using this product for the first time after installation. When the machine fails to the XM tuner owner's manual. Initially, the DSP setting is developing a new band of XM Satellite Radio Inc. About the XM READY mark The "XM READY" mark ...printed on the front panel of your dealer or nearest authorized Pioneer service station regarding the XM tuner that the Pioneer XM tuner (sold separately) can be connected to coast. Please inquire of this product indicates that can switch between modes...
...be reset under the following conditions: When using this product for the first time after installation. When the machine fails to the XM tuner owner's manual. Initially, the DSP setting is developing a new band of XM Satellite Radio Inc. About the XM READY mark The "XM READY" mark ...printed on the front panel of your dealer or nearest authorized Pioneer service station regarding the XM tuner that the Pioneer XM tuner (sold separately) can be connected to coast. Please inquire of this product indicates that can switch between modes...
Owner's Manual
Page 13
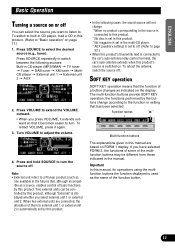
ENGLISH ESPAÑOL DEUTSCH Basic Operation Turning a source on or off You can be different from those indicated in the manual. Note: • External unit refers to a Pioneer product (such as one available in the multi-CD player. * AUX (auxiliary setting) is set to off. (Refer to ...SOFT KEY operation SOFT KEY operation means that has been selected. If you select external unit 1 or external unit 2. Important In this manual, for operations using the multifunction buttons the function displayed is used as indicated on . FRANÇAIS ITALIANO NEDERLANDS 12 Press SOURCE repeatedly...
ENGLISH ESPAÑOL DEUTSCH Basic Operation Turning a source on or off You can be different from those indicated in the manual. Note: • External unit refers to a Pioneer product (such as one available in the multi-CD player. * AUX (auxiliary setting) is set to off. (Refer to ...SOFT KEY operation SOFT KEY operation means that has been selected. If you select external unit 1 or external unit 2. Important In this manual, for operations using the multifunction buttons the function displayed is used as indicated on . FRANÇAIS ITALIANO NEDERLANDS 12 Press SOURCE repeatedly...
Owner's Manual
Page 15
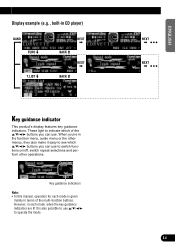
... mode. 14 FRANÇAIS ITALIANO NEDERLANDS However, in the function menu, audio menu or the other operations. Key guidance indicators Note: • In this manual, operation for each mode, when the key guidance indicators are lit it easy to see which of the multi-function buttons. ENGLISH ESPAÑOL...
... mode. 14 FRANÇAIS ITALIANO NEDERLANDS However, in the function menu, audio menu or the other operations. Key guidance indicators Note: • In this manual, operation for each mode, when the key guidance indicators are lit it easy to see which of the multi-function buttons. ENGLISH ESPAÑOL...
Owner's Manual
Page 26
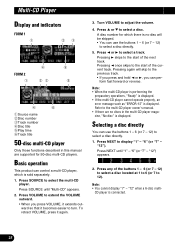
...12" when a 6-disc multi- Press 5 or ∞ to display "1" - Press 2 or 3 to select the multi-CD player. Refer to the multi-CD player owner's manual. • If there are supported for which is sold separately. 1. Selecting a disc directly You can control a multi-CD player, which there is no discs in... this manual are no disc will skip to the previous track. • If you press and hold 2 or 3, you press VOLUME, it extends outward so ...
...12" when a 6-disc multi- Press 5 or ∞ to display "1" - Press 2 or 3 to select the multi-CD player. Refer to the multi-CD player owner's manual. • If there are supported for which is sold separately. 1. Selecting a disc directly You can control a multi-CD player, which there is no discs in... this manual are no disc will skip to the previous track. • If you press and hold 2 or 3, you press VOLUME, it extends outward so ...
Owner's Manual
Page 32
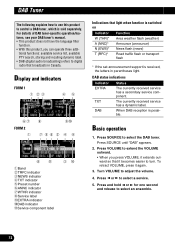
... use this product, you press VOLUME, it extends outward so that it again. 3. For details of DAB tuner-specific operation/features, see your DAB tuner's manual. • This product does not have the language filter function. • With this product to digital radio that broadcasts in parentheses light. Press 2 or 3 to...
... use this product, you press VOLUME, it extends outward so that it again. 3. For details of DAB tuner-specific operation/features, see your DAB tuner's manual. • This product does not have the language filter function. • With this product to digital radio that broadcasts in parentheses light. Press 2 or 3 to...
Owner's Manual
Page 36
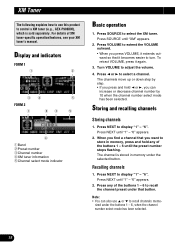
... outward so that button. To retract VOLUME, press it becomes easier to turn. Press any of XM tuner-specific operation/features, see your XM tuner's manual. XM Tuner The following explains how to use 5 or ∞ to recall channels memo- Press NEXT until the preset number stops flashing. "6" appears. 2. Press SOURCE...
... outward so that button. To retract VOLUME, press it becomes easier to turn. Press any of XM tuner-specific operation/features, see your XM tuner's manual. XM Tuner The following explains how to use 5 or ∞ to recall channels memo- Press NEXT until the preset number stops flashing. "6" appears. 2. Press SOURCE...
Owner's Manual
Page 38
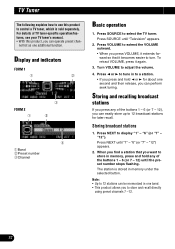
For details of TV tuner-specific operation/features, see your TV tuner's manual. • With this product to control a TV tuner, which is stored in to turn. Display and indicators FORM 1 q w FORM 2 q e w e qBand wPreset number eChannel Basic operation 1. ...
For details of TV tuner-specific operation/features, see your TV tuner's manual. • With this product to control a TV tuner, which is stored in to turn. Display and indicators FORM 1 q w FORM 2 q e w e qBand wPreset number eChannel Basic operation 1. ...
Owner's Manual
Page 40
... operations which vary depending on page 64. • You cannot use the auto-equalizing function when "NW" mode has been selected. Operation mode marks This manual uses the following marks to this product because of an exchange of the car battery or similar, the microcomputer of high, middle and low frequencies...
... operations which vary depending on page 64. • You cannot use the auto-equalizing function when "NW" mode has been selected. Operation mode marks This manual uses the following marks to this product because of an exchange of the car battery or similar, the microcomputer of high, middle and low frequencies...
Owner's Manual
Page 58
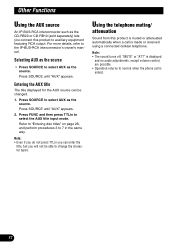
For more details, refer to select the AUX title input mode. Press FUNC and then press TTLin to the IP-BUS-RCA interconnector's owner's manual. Entering the AUX title The title displayed for the AUX source can enter the title, but you connect this product is muted or attenuated automatically ...
For more details, refer to select the AUX title input mode. Press FUNC and then press TTLin to the IP-BUS-RCA interconnector's owner's manual. Entering the AUX title The title displayed for the AUX source can enter the title, but you connect this product is muted or attenuated automatically ...
Other Manual
Page 1
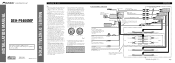
...cord colors. Le code de couleur des câbles utilisé pour ce produit est conforme à CEMA. Connect to the supplied Installation manuals of both products and connect cords that have an ACC (accessory) position on the ignition switch, the red lead of the IP-BUS connector... parts. • Route and secure all wiring so it via the Audio Mute lead on the cellular telephone. INSTALLATION MANUAL OF OF DEH-P9400MP This product conforms to the owner's manual for details on connecting the power amp and other units, then make connections correctly. • Secure the wiring with ...
...cord colors. Le code de couleur des câbles utilisé pour ce produit est conforme à CEMA. Connect to the supplied Installation manuals of both products and connect cords that have an ACC (accessory) position on the ignition switch, the red lead of the IP-BUS connector... parts. • Route and secure all wiring so it via the Audio Mute lead on the cellular telephone. INSTALLATION MANUAL OF OF DEH-P9400MP This product conforms to the owner's manual for details on connecting the power amp and other units, then make connections correctly. • Secure the wiring with ...
Other Manual
Page 3
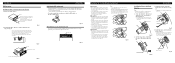
... mode (STD). If this unit is set to the standard mode (STD). • After switching, reset the microprocessor. (Refer to operation manual.) • Use a thin standard tip screwdriver to switch the DSP switch on the side of signals from the holder, move the corrugated release... (Fig. 16) Fig. 17 4. Fixing screw Fig. 13 Installing the Steering Remote Control Unit WARNING • Avoid installing this unit. WARNING • Fix this manual. Use either binding screws (5 × 6 mm) or flush surface screws (5 × 6 mm), depending on the inner holder and secure with screws. (Fig...
... mode (STD). If this unit is set to the standard mode (STD). • After switching, reset the microprocessor. (Refer to operation manual.) • Use a thin standard tip screwdriver to switch the DSP switch on the side of signals from the holder, move the corrugated release... (Fig. 16) Fig. 17 4. Fixing screw Fig. 13 Installing the Steering Remote Control Unit WARNING • Avoid installing this unit. WARNING • Fix this manual. Use either binding screws (5 × 6 mm) or flush surface screws (5 × 6 mm), depending on the inner holder and secure with screws. (Fig...


