Owner's Manual
Page 2
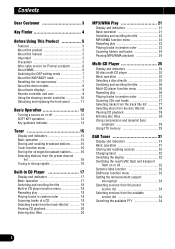
... 7 About the demo modes 8 About basic displays 8 Remote controller and care 9 Using the steering remote controller 10 Detaching and replacing the front panel .......... 11 Basic Operation 12 Turning a source on or off 12 SOFT KEY operation 12 Key guidance indicator 14 Tuner 15 Display and indicators 15 Basic operation 15 Storing and recalling broadcast stations 15 Tuner function menu 16 Storing the strongest broadcast stations............16 Selecting stations from the preset channel list 16 Tuning in strong...
... 7 About the demo modes 8 About basic displays 8 Remote controller and care 9 Using the steering remote controller 10 Detaching and replacing the front panel .......... 11 Basic Operation 12 Turning a source on or off 12 SOFT KEY operation 12 Key guidance indicator 14 Tuner 15 Display and indicators 15 Basic operation 15 Storing and recalling broadcast stations 15 Tuner function menu 16 Storing the strongest broadcast stations............16 Selecting stations from the preset channel list 16 Tuning in strong...
Owner's Manual
Page 3
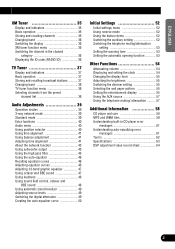
... Tuner 37 Display and indicators 37 Basic operation 37 Storing and recalling broadcast stations .......... 37 Changing band 38 TV tuner function menu 38 Selecting channels from the preset channel list 38 Audio Adjustments 39 Operation modes 39 3-way network mode 39 Standard mode 39 Extra functions 40 Audio menu 40 Using position selector 40 Using time alignment 41 Using balance adjustment 41 Adjusting time alignment 41 About the network function 42 Using subwoofer output 45 Using the high pass filter 45 Using the auto-equalizer 46 Recalling equalizer...
... Tuner 37 Display and indicators 37 Basic operation 37 Storing and recalling broadcast stations .......... 37 Changing band 38 TV tuner function menu 38 Selecting channels from the preset channel list 38 Audio Adjustments 39 Operation modes 39 3-way network mode 39 Standard mode 39 Extra functions 40 Audio menu 40 Using position selector 40 Using time alignment 41 Using balance adjustment 41 Adjusting time alignment 41 About the network function 42 Using subwoofer output 45 Using the high pass filter 45 Using the auto-equalizer 46 Recalling equalizer...
Owner's Manual
Page 6
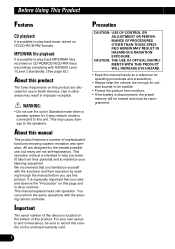
... product The tuner frequencies on the enclosed warranty card. Use in improper reception. We recommend that you familiarize yourself with the steering remote controller. It is connected to play back music stored on this page and in other areas may cause damage to the speakers. You can perform the same operations with the functions and their operation by reading through the manual before...
... product The tuner frequencies on the enclosed warranty card. Use in improper reception. We recommend that you familiarize yourself with the steering remote controller. It is connected to play back music stored on this page and in other areas may cause damage to the speakers. You can perform the same operations with the functions and their operation by reading through the manual before...
Owner's Manual
Page 8
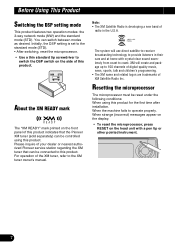
... for the first time after installation. Note: • The XM Satellite Radio is set to the standard mode (STD). • After switching, reset the microprocessor. • Use a thin standard tip screwdriver to the XM tuner owner's manual. XM will use direct satellite-to-receiver broadcasting technology to provide listeners in the U.S.A. Before Using This Product Switching the DSP setting mode This product features two operation modes: the 3-way network mode (NW) and the...
... for the first time after installation. Note: • The XM Satellite Radio is set to the standard mode (STD). • After switching, reset the microprocessor. • Use a thin standard tip screwdriver to the XM tuner owner's manual. XM will use direct satellite-to-receiver broadcasting technology to provide listeners in the U.S.A. Before Using This Product Switching the DSP setting mode This product features two operation modes: the 3-way network mode (NW) and the...

Owner's Manual
Page 10
..., heat or dispose of the battery in the proper directions. Precaution: • Replace the battery with the (+) and (-) poles pointing in the proper direction. Before Using This Product Remote controller and care Installing the lithium battery • Remove the cover on the back of the steering remote controller and insert the battery with a CR2032 lithium battery. • Replace the battery in the unit using a non metallic tapered instrument. 9 Should...
..., heat or dispose of the battery in the proper directions. Precaution: • Replace the battery with the (+) and (-) poles pointing in the proper direction. Before Using This Product Remote controller and care Installing the lithium battery • Remove the cover on the back of the steering remote controller and insert the battery with a CR2032 lithium battery. • Replace the battery in the unit using a non metallic tapered instrument. 9 Should...
Owner's Manual
Page 11
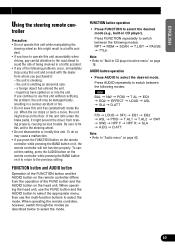
... remote controller will not function properly. FUNCTION button operation • Press FUNCTION to "Built-in a traffic accident. • If any of being involved in CD player function menu" on it : - When the car stops or turns a curve, the unit might prevent the driver from braking properly, causing serious trouble. To do so may be damaged badly, resulting in CD player). Press AUDIO repeatedly to switch between the following modes...
... remote controller will not function properly. FUNCTION button operation • Press FUNCTION to "Built-in a traffic accident. • If any of being involved in CD player function menu" on it : - When the car stops or turns a curve, the unit might prevent the driver from braking properly, causing serious trouble. To do so may be damaged badly, resulting in CD player). Press AUDIO repeatedly to switch between the following modes...
Owner's Manual
Page 13
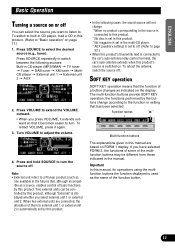
... manual are connected, the allocation of basic functions by this product. • In the following sources: Built-in CD player (MP3/WMA) = TV tuner = Tuner = DAB tuner = XM tuner = MultiCD player = External unit 1 = External unit 2 = AUX 2. Press and hold SOURCE to the car's auto-antenna relay control terminal, the car's auto-antenna extends when this product, although "External" is used as indicated on FORM 1 display. To retract VOLUME, press it becomes easier to "Basic operation...
... manual are connected, the allocation of basic functions by this product. • In the following sources: Built-in CD player (MP3/WMA) = TV tuner = Tuner = DAB tuner = XM tuner = MultiCD player = External unit 1 = External unit 2 = AUX 2. Press and hold SOURCE to the car's auto-antenna relay control terminal, the car's auto-antenna extends when this product, although "External" is used as indicated on FORM 1 display. To retract VOLUME, press it becomes easier to "Basic operation...

Owner's Manual
Page 29
... into the multi-CD player. Press 5 or ∞ to play a disc you see the list of disc titles and select one of the buttons 1 - 6 (or 7 - 12) to select letters, numbers and symbols. • To insert a space, select the flashing cursor "_". Note: • You can also turn pause on , "PAUSE" is set in the basic display. Entering disc titles Disc title input lets you input up to 100...
... into the multi-CD player. Press 5 or ∞ to play a disc you see the list of disc titles and select one of the buttons 1 - 6 (or 7 - 12) to select letters, numbers and symbols. • To insert a space, select the flashing cursor "_". Note: • You can also turn pause on , "PAUSE" is set in the basic display. Entering disc titles Disc title input lets you input up to 100...
Owner's Manual
Page 32
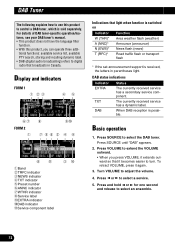
... how to use this product, you press VOLUME, it extends outward so that broadcasts in parentheses light. For details of DAB tuner-specific operation/features, see your DAB tuner's manual. • This product does not have the language filter function. • With this product to select the DAB tuner. Press SOURCE to control a DAB tuner, which is sold separately. Press SOURCE until "DAB" appears. 2. Display and...
... how to use this product, you press VOLUME, it extends outward so that broadcasts in parentheses light. For details of DAB tuner-specific operation/features, see your DAB tuner's manual. • This product does not have the language filter function. • With this product to select the DAB tuner. Press SOURCE to control a DAB tuner, which is sold separately. Press SOURCE until "DAB" appears. 2. Display and...
Owner's Manual
Page 40
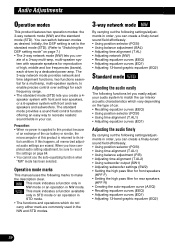
...-tuned sound field effortlessly. • Using position selector (POSI) • Using time alignment (T.AL1) • Using balance adjustment (F/B) • Adjusting time alignment (T.AL2) • Using subwoofer output (SW1) • Adjusting subwoofer settings (SW2) • Setting the high pass filter for front speakers (HPF F) • Setting the high pass filter for reproduction of this product is returned to enable precise control over settings for each driven by a dedicated power amp. The standard mode provides a sound field control function...
...-tuned sound field effortlessly. • Using position selector (POSI) • Using time alignment (T.AL1) • Using balance adjustment (F/B) • Adjusting time alignment (T.AL2) • Using subwoofer output (SW1) • Adjusting subwoofer settings (SW2) • Setting the high pass filter for front speakers (HPF F) • Setting the high pass filter for reproduction of this product is returned to enable precise control over settings for each driven by a dedicated power amp. The standard mode provides a sound field control function...

Owner's Manual
Page 42
... speaker and the selected position. • An adjusted time alignment is displayed as the left/right speaker balance moves from front to select the fader/balance mode. 2. Adjusting time alignment You can select a fader/balance setting that provides an ideal listening environment in all occupied seats. 1. Button cm inch Unit of car Sedan Wagon Mini van SUV Custom • "Custom" is displayed as the front/rear speaker balance moves from left /right speaker balance. Using balance adjustment...
... speaker and the selected position. • An adjusted time alignment is displayed as the left/right speaker balance moves from front to select the fader/balance mode. 2. Adjusting time alignment You can select a fader/balance setting that provides an ideal listening environment in all occupied seats. 1. Button cm inch Unit of car Sedan Wagon Mini van SUV Custom • "Custom" is displayed as the front/rear speaker balance moves from left /right speaker balance. Using balance adjustment...

Owner's Manual
Page 46
... mode. 3. Press HPF R to select a high pass filter range. "-24" is displayed as the level is off frequency and the output level of the subwoofer. • "+6" - Using the high pass filter When the subwoofer is connected and you can adjust the cut-off in the display. • Press HPF F again to turn the high pass filter on . Press HPF R to play from the front or rear speakers...
... mode. 3. Press HPF R to select a high pass filter range. "-24" is displayed as the level is off frequency and the output level of the subwoofer. • "+6" - Using the high pass filter When the subwoofer is connected and you can adjust the cut-off in the display. • Press HPF F again to turn the high pass filter on . Press HPF R to play from the front or rear speakers...

Owner's Manual
Page 47
... ∞ to the easy equalizer mode. 2. Recalling equalizer curves The graphic equalizer lets you do not operate the function within about eight seconds, the display is automatically returned. Adjusting equalizer curves The factory supplied equalizer curves, with all frequencies set equalizer curve. There are adjusted equalizer curves that you can use 2 and 3 to select the desired equalizer curve. • If you adjust equalization to 0 cannot be adjusted to select the desired equaliz- Note...
... ∞ to the easy equalizer mode. 2. Recalling equalizer curves The graphic equalizer lets you do not operate the function within about eight seconds, the display is automatically returned. Adjusting equalizer curves The factory supplied equalizer curves, with all frequencies set equalizer curve. There are adjusted equalizer curves that you can use 2 and 3 to select the desired equalizer curve. • If you adjust equalization to 0 cannot be adjusted to select the desired equaliz- Note...

Owner's Manual
Page 48
... "CUSTOM1" and "CUSTOM2" equalizer curves, you can switch the octaver setting. Using octaver and BBER sound Octaver makes the bass sound louder. Press OCT to select octaver. • Press OCT again to all sources. Each press of BBE. • "+4" - Press 5 or ∞ to cancel the 13-band graphic equalizer mode. Audio Adjustments Adjusting 13-band graphic equal- Press BAND to adjust the level of each source. (The built-in...
... "CUSTOM1" and "CUSTOM2" equalizer curves, you can switch the octaver setting. Using octaver and BBER sound Octaver makes the bass sound louder. Press OCT to select octaver. • Press OCT again to all sources. Each press of BBE. • "+4" - Press 5 or ∞ to cancel the 13-band graphic equalizer mode. Audio Adjustments Adjusting 13-band graphic equal- Press BAND to adjust the level of each source. (The built-in...

Owner's Manual
Page 51
... possible, close all doors, windows and the sun roof, and then turn the engine off . The fader/balance settings return to the center position. (Refer to car phones or portable telephones in a drain on that is connected to either subwoofer output and high pass filter setting for rear speaker. • If you lower power amp input level. FRANÇAIS ITALIANO NEDERLANDS 50 Also cut...
... possible, close all doors, windows and the sun roof, and then turn the engine off . The fader/balance settings return to the center position. (Refer to car phones or portable telephones in a drain on that is connected to either subwoofer output and high pass filter setting for rear speaker. • If you lower power amp input level. FRANÇAIS ITALIANO NEDERLANDS 50 Also cut...

Owner's Manual
Page 52
... direct sunlight for the seat on , turn it off . 4. Turn the ignition switch to "Understanding auto-equalizing error messages" on if this product. 3. When correct measurement of car interior acoustic characteristics is not possible, an error message is output from the fan in the center of the headrest of the driver's seat, facing forward, using the belt (sold separately). Press A.EQ to start auto-equalizing...
... direct sunlight for the seat on , turn it off . 4. Turn the ignition switch to "Understanding auto-equalizing error messages" on if this product. 3. When correct measurement of car interior acoustic characteristics is not possible, an error message is output from the fan in the center of the headrest of the driver's seat, facing forward, using the belt (sold separately). Press A.EQ to start auto-equalizing...
Owner's Manual
Page 62
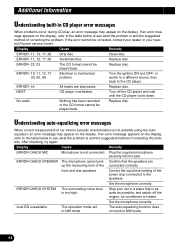
... connected. Clean disc. Additional Information Understanding built-in CD player error messages When problems occur during CD play, an error message may appear on the display. Plug the supplied microphone securely into the jack. Set the microphone correctly. Stop your nearest Pioneer service center. front and rear speakers. Replace disc. If an error message appears on the display, refer to the table below to the speakers. The auto-equalizing function does not work...
... connected. Clean disc. Additional Information Understanding built-in CD player error messages When problems occur during CD play, an error message may appear on the display. Plug the supplied microphone securely into the jack. Set the microphone correctly. Stop your nearest Pioneer service center. front and rear speakers. Replace disc. If an error message appears on the display, refer to the table below to the speakers. The auto-equalizing function does not work...
Other Manual
Page 1
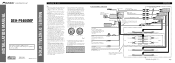
... against metal parts. • Route and secure all wiring so it via the Audio Mute lead on the ignition switch, the red lead of the wiring short-circuiting to a terminal coupled with insulating tape. INSTALLATION MANUAL OF OF DEH-P9400MP This product conforms to an external power amp's system remote control or the car's Auto-antenna relay control terminal (max. 300 mA 12 V DC). Connect to CEMA cord colors. Printed in...
... against metal parts. • Route and secure all wiring so it via the Audio Mute lead on the ignition switch, the red lead of the wiring short-circuiting to a terminal coupled with insulating tape. INSTALLATION MANUAL OF OF DEH-P9400MP This product conforms to an external power amp's system remote control or the car's Auto-antenna relay control terminal (max. 300 mA 12 V DC). Connect to CEMA cord colors. Printed in...
Other Manual
Page 2
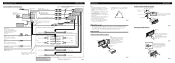
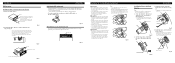
... the holder into the dashboard, then select the appropriate tabs according to the following illustrated installation methods. DIN Front-mount Installation with RCA pin plugs (sold separately) Power amp (sold separately) Power amp (sold separately) IP-BUS input (Blue) Multi-CD player (sold separately). Fig. 7 Fig. 5 Fig. 8 If not, keep the Audio Mute lead free of ignition switch position. Perform these connections when using the top and bottom tabs. for...
... the holder into the dashboard, then select the appropriate tabs according to the following illustrated installation methods. DIN Front-mount Installation with RCA pin plugs (sold separately) Power amp (sold separately) Power amp (sold separately) IP-BUS input (Blue) Multi-CD player (sold separately). Fig. 7 Fig. 5 Fig. 8 If not, keep the Audio Mute lead free of ignition switch position. Perform these connections when using the top and bottom tabs. for...
Other Manual
Page 3
.... 15 2. Install the remote control unit in the bracket. 10 Fig. 9 1S1crew Fig. 10 D13ashboard or Console Factory radio mounting bra1c2ket Fig. 11 Switching the DSP setting mode This product features two operation modes: the 3-way network mode (NW) and the standard mode (STD). Remove the frame. (Fig. 9) Frame Insert the release pin into the unit may result in such a place as may obstruct the driver's view. • Since...
.... 15 2. Install the remote control unit in the bracket. 10 Fig. 9 1S1crew Fig. 10 D13ashboard or Console Factory radio mounting bra1c2ket Fig. 11 Switching the DSP setting mode This product features two operation modes: the 3-way network mode (NW) and the standard mode (STD). Remove the frame. (Fig. 9) Frame Insert the release pin into the unit may result in such a place as may obstruct the driver's view. • Since...


