
Owner's Manual
Page 5
...CD player and care 74 CD-R/CD-RW discs 75 Dual Discs 75 MP3, WMA, AAC and WAV files 76 - Setting the AUX title 69 Using different entertainment displays 70 - Setting the background display 71 Using the PGM button 72 Rewriting the entertainment displays 72 Additional... Information Understanding built-in CD player error messages 74 Understanding error message on or off 69 Using the AUX source 69 - Selecting AUX as the source 69 - WMA additional information 77 - Setting the entertainment display 70 - AAC additional information 77 - About AUX1 ...
...CD player and care 74 CD-R/CD-RW discs 75 Dual Discs 75 MP3, WMA, AAC and WAV files 76 - Setting the AUX title 69 Using different entertainment displays 70 - Setting the background display 71 Using the PGM button 72 Rewriting the entertainment displays 72 Additional... Information Understanding built-in CD player error messages 74 Understanding error message on or off 69 Using the AUX source 69 - Selecting AUX as the source 69 - WMA additional information 77 - Setting the entertainment display 70 - AAC additional information 77 - About AUX1 ...
Owner's Manual
Page 14
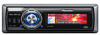
... can be controlled by pressing EJECT. Selecting a source You can select a source you select a source, the unit is inserted. When the AUX (auxiliary input) is closed automatically, and playback will not change: - Front panel is set by this unit's blue/white lead is turned ...External unit refers to the vehicle's auto-antenna relay control terminal, the vehicle's antenna extends when this unit's source is connected to a Pioneer product (such as one standard, 12- When two external units are automatically read is no disc in the future) that, although incompatible ...
... can be controlled by pressing EJECT. Selecting a source You can select a source you select a source, the unit is inserted. When the AUX (auxiliary input) is closed automatically, and playback will not change: - Front panel is set by this unit's blue/white lead is turned ...External unit refers to the vehicle's auto-antenna relay control terminal, the vehicle's antenna extends when this unit's source is connected to a Pioneer product (such as one standard, 12- When two external units are automatically read is no disc in the future) that, although incompatible ...
Owner's Manual
Page 56
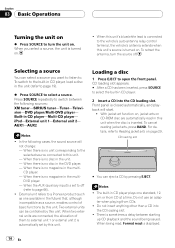
... All All seats # To cancel the selected listening position, push MULTI-CONTROL in the same direction again. Position appears in Subwoofer1. # When tuner, television or AUX is pushed left or right, the left/right speaker balance moves towards the front or rear. Subwoofer1 (subwoofer on in the display. 2 Push MULTI-CONTROL...
... All All seats # To cancel the selected listening position, push MULTI-CONTROL in the same direction again. Position appears in Subwoofer1. # When tuner, television or AUX is pushed left or right, the left/right speaker balance moves towards the front or rear. Subwoofer1 (subwoofer on in the display. 2 Push MULTI-CONTROL...

Owner's Manual
Page 62
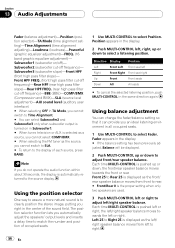
... on the FM tuner volume level, which remains unchanged. 1 Compare the FM tuner volume level with source level adjustments. 62 En When tuner, television or AUX is a trademark of the functions has a two-step adjustment. Loudness appears in volume when switching between sources. ! Each time MULTI-CONTROL is pushed left or...
... on the FM tuner volume level, which remains unchanged. 1 Compare the FM tuner volume level with source level adjustments. 62 En When tuner, television or AUX is a trademark of the functions has a two-step adjustment. Loudness appears in volume when switching between sources. ! Each time MULTI-CONTROL is pushed left or...
Owner's Manual
Page 66
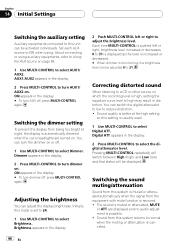
... switch the digital attenuator to low to select AUX1/ AUX2. Each time MULTI-CONTROL is received. ! Digital ATT appears in the display. # To turn AUX off, press MULTI-CONTROL again. Sound from the equipment with mute function is pushed left or right to select Digital ATT. You can turn dimmer... Initially this mode is set to 24. 1 Use MULTI-CONTROL to this system returns to ON when using auxiliary equipments, refer to Using the AUX source on which the recording level is high, setting the equalizer curve level to high may result in the display. 2 Push MULTI-CONTROL left or...
... switch the digital attenuator to low to select AUX1/ AUX2. Each time MULTI-CONTROL is received. ! Digital ATT appears in the display. # To turn AUX off, press MULTI-CONTROL again. Sound from the equipment with mute function is pushed left or right to select Digital ATT. You can turn dimmer... Initially this mode is set to 24. 1 Use MULTI-CONTROL to this system returns to ON when using auxiliary equipments, refer to Using the AUX source on which the recording level is high, setting the equalizer curve level to high may result in the display. 2 Push MULTI-CONTROL left or...
Owner's Manual
Page 69
... setting is automatically set to AUX1. The allocation of CLOCK turns the clock display on or off , the clock display appears on , AUX cannot be changed. 1 After you have two methods to connect auxiliary equipments to this auxiliary equipment is explained below. For more details, refer... to the installation manual. Setting the AUX title The title displayed for each AUX1 or AUX2 source can be selected. AUX1 source: When connecting auxiliary equipment using an IP-...
... setting is automatically set to AUX1. The allocation of CLOCK turns the clock display on or off , the clock display appears on , AUX cannot be changed. 1 After you have two methods to connect auxiliary equipments to this auxiliary equipment is explained below. For more details, refer... to the installation manual. Setting the AUX title The title displayed for each AUX1 or AUX2 source can be selected. AUX1 source: When connecting auxiliary equipment using an IP-...
Other Manual
Page 1
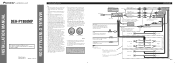
... ≠ speaker leads are not connected to CEMA cord colors. Please ground this unit is output through a hole into the lead. Antenna jack AUX input jack (3.5 ø) Use a stereo mini plug cable to an external power amp's system remote control or the car's Auto-antenna relay ... tape. If not, keep the Audio Mute lead free of high-current products such as near the heater outlet. INSTALLATION MANUAL OF OF DEH-P7800MP This product conforms to speakers. Likewise, do not connect anything to the speaker leads that are common. • Speakers connected to the owner...
... ≠ speaker leads are not connected to CEMA cord colors. Please ground this unit is output through a hole into the lead. Antenna jack AUX input jack (3.5 ø) Use a stereo mini plug cable to an external power amp's system remote control or the car's Auto-antenna relay ... tape. If not, keep the Audio Mute lead free of high-current products such as near the heater outlet. INSTALLATION MANUAL OF OF DEH-P7800MP This product conforms to speakers. Likewise, do not connect anything to the speaker leads that are common. • Speakers connected to the owner...


