Owner's Manual
Page 2
... reading the instructions, keep this Pioneer product. Entering disc titles 22 - Displaying text information on 14 Selecting a source 14 Loading a disc 14 Adjusting the volume 15 Turning the unit off 15 Tuner Listening to User 6 For Canadian model 6 About this unit 6 About this manual 6 After-sales service for future reference. Feature demo mode 10 Use and care of advanced built-in CD player (MP3/WMA/AAC/WAV) operation 26 Repeating play 20 Playing tracks...
... reading the instructions, keep this Pioneer product. Entering disc titles 22 - Displaying text information on 14 Selecting a source 14 Loading a disc 14 Adjusting the volume 15 Turning the unit off 15 Tuner Listening to User 6 For Canadian model 6 About this unit 6 About this manual 6 After-sales service for future reference. Feature demo mode 10 Use and care of advanced built-in CD player (MP3/WMA/AAC/WAV) operation 26 Repeating play 20 Playing tracks...
Owner's Manual
Page 3
... Using disc title functions 35 - Channel category select setting 44 Selecting stations from your ITS playlist 35 - Playback from the preset channel list 44 SIRIUS Satellite Radio tuner Listening to songs on iPod 39 Introduction of advanced iPod adapter operation 40 Repeating play 40 Playing songs in a random order (shuffle) 40 Pausing a song 41 XM tuner Listening to XM Satellite Radio 42 Selecting an XM channel directly 42 Introduction of advanced multi-CD player operation 32 Repeating play 33 Playing...
... Using disc title functions 35 - Channel category select setting 44 Selecting stations from your ITS playlist 35 - Playback from the preset channel list 44 SIRIUS Satellite Radio tuner Listening to songs on iPod 39 Introduction of advanced iPod adapter operation 40 Repeating play 40 Playing songs in a random order (shuffle) 40 Pausing a song 41 XM tuner Listening to XM Satellite Radio 42 Selecting an XM channel directly 42 Introduction of advanced multi-CD player operation 32 Repeating play 33 Playing...
Owner's Manual
Page 4
... time alignment 57 - Entering disc titles 54 Audio Adjustments Adjusting the audio easily 55 Adjusting the audio finely 55 Extra functions 55 4 En Introduction of a CD/MP3/WMA 53 Using ITS playlist and disc title functions 53 Using disc title functions 53 - Adjusting the time alignment 57 Using subwoofer output 58 - Adjusting equalizer curves 60 - Contents Introduction of advanced SIRIUS tuner operation 46 Switching the SIRIUS display 46 Switching the scroll setting 46 Storing and recalling broadcast stations 46 Selecting the SIRIUS channel select mode 47 - Adjusting...
... time alignment 57 - Entering disc titles 54 Audio Adjustments Adjusting the audio easily 55 Adjusting the audio finely 55 Extra functions 55 4 En Introduction of a CD/MP3/WMA 53 Using ITS playlist and disc title functions 53 Using disc title functions 53 - Adjusting the time alignment 57 Using subwoofer output 58 - Adjusting equalizer curves 60 - Contents Introduction of advanced SIRIUS tuner operation 46 Switching the SIRIUS display 46 Switching the scroll setting 46 Storing and recalling broadcast stations 46 Selecting the SIRIUS channel select mode 47 - Adjusting...
Owner's Manual
Page 8
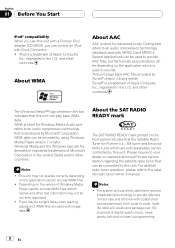
... panel indicates that is a trademark of Apple Computer, Inc., registered in the U.S. The system will create and package over 100 channels of WMA files encoded with image data. WMA data can be used to encode WMA files. ! There may not be correctly displayed. ! Satellite radio will use this unit with a Pioneer iPod adapter (CD-IB100), you can be controlled by this unit. This unit plays...
... panel indicates that is a trademark of Apple Computer, Inc., registered in the U.S. The system will create and package over 100 channels of WMA files encoded with image data. WMA data can be used to encode WMA files. ! There may not be correctly displayed. ! Satellite radio will use this unit with a Pioneer iPod adapter (CD-IB100), you can be controlled by this unit. This unit plays...

Owner's Manual
Page 10
... that if the feature demo continues operating when the car engine is not used for the first time, pull out the film protruding from the tray. Remove the battery if the remote control is turned off while the ignition switch is closed. 2 Replace the front panel by clipping it may be swallowed, immediately consult a doctor. DISPLAY during feature demo operation cancels the feature demo mode. Section 01 Before...
... that if the feature demo continues operating when the car engine is not used for the first time, pull out the film protruding from the tray. Remove the battery if the remote control is turned off while the ignition switch is closed. 2 Replace the front panel by clipping it may be swallowed, immediately consult a doctor. DISPLAY during feature demo operation cancels the feature demo mode. Section 01 Before...
Owner's Manual
Page 11
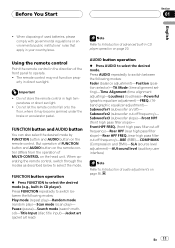
... in CD player operation on page 20. Press AUDIO repeatedly to switch between the following modes: Fader (balance adjustment)-Position (position selector)-TA Mode (time alignment setting)-Time Alignment (time alignment adjusting)-Loudness (loudness)-Powerful (graphic equalizer adjustment)-FREQ. (16band graphic equalizer adjustment)- Note Refer to Introduction of advanced built-in the direction of MULTI-CONTROL on the remote control. Important ! Do not store the remote control in CD player). FUNCTION button operation % Press FUNCTION to operate. ! Subwoofer1 (subwoofer on...
... in CD player operation on page 20. Press AUDIO repeatedly to switch between the following modes: Fader (balance adjustment)-Position (position selector)-TA Mode (time alignment setting)-Time Alignment (time alignment adjusting)-Loudness (loudness)-Powerful (graphic equalizer adjustment)-FREQ. (16band graphic equalizer adjustment)- Note Refer to Introduction of advanced built-in the direction of MULTI-CONTROL on the remote control. Important ! Do not store the remote control in CD player). FUNCTION button operation % Press FUNCTION to operate. ! Subwoofer1 (subwoofer on...

Owner's Manual
Page 12
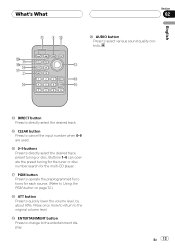
... using the buttons on the head unit. a EJECT button Press to cycle through all the available sources. c FUNCTION button Press to perform manual seek tuning, fast forward, reverse and track search controls. Section 02 What's What 123 4 5 6 a 98 7 Head unit 1 EQ button Press to select various equalizer curves. 2 DISPLAY button Press to select different displays. 3 CLOCK button Press to change to the clock display. 4 SW button Press to select the subwoofer setting menu. 5 MULTI-CONTROL Move to select functions. Remote control Operation is turned on the source. 7 RESET button...
... using the buttons on the head unit. a EJECT button Press to cycle through all the available sources. c FUNCTION button Press to perform manual seek tuning, fast forward, reverse and track search controls. Section 02 What's What 123 4 5 6 a 98 7 Head unit 1 EQ button Press to select various equalizer curves. 2 DISPLAY button Press to select different displays. 3 CLOCK button Press to change to the clock display. 4 SW button Press to select the subwoofer setting menu. 5 MULTI-CONTROL Move to select functions. Remote control Operation is turned on the source. 7 RESET button...
Owner's Manual
Page 13
d e f e DIRECT button Press to quickly lower the volume level, by about 90%. h PGM button Press to operate the preprogrammed functions for the multi-CD player. j ENTERTAINMENT button Press to change to directly select the desired track, preset tuning or disc. Buttons 1-6 can operate the preset tuning for the tuner or disc number search for each source. (Refer to Using the PGM button on page 72.) i ATT button Press to directly select the desired track. g 0-9 buttons Press to the entertainment display. f CLEAR button Press...
d e f e DIRECT button Press to quickly lower the volume level, by about 90%. h PGM button Press to operate the preprogrammed functions for the multi-CD player. j ENTERTAINMENT button Press to change to directly select the desired track, preset tuning or disc. Buttons 1-6 can operate the preset tuning for the tuner or disc number search for each source. (Refer to Using the PGM button on page 72.) i ATT button Press to directly select the desired track. g 0-9 buttons Press to the entertainment display. f CLEAR button Press...
Owner's Manual
Page 14
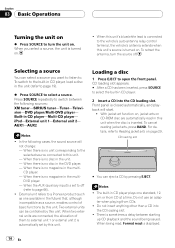
... set by pressing EJECT. When the AUX (auxiliary input) is no disc in the DVD player. - Loading a disc 1 Press EJECT to page 66). ! Press SOURCE repeatedly to switch between starting up CD playback and the sound being read, Format read in the future) that, although incompatible as one standard, 12- In the following sources: XM tuner-SIRIUS tuner-Tuner-Television-DVD player/Multi-DVD player- External unit refers to a Pioneer product (such as a source, enables control...
... set by pressing EJECT. When the AUX (auxiliary input) is no disc in the DVD player. - Loading a disc 1 Press EJECT to page 66). ! Press SOURCE repeatedly to switch between starting up CD playback and the sound being read, Format read in the future) that, although incompatible as one standard, 12- In the following sources: XM tuner-SIRIUS tuner-Tuner-Television-DVD player/Multi-DVD player- External unit refers to a Pioneer product (such as a source, enables control...
Owner's Manual
Page 32
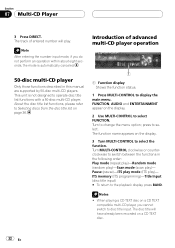
...: Play mode (repeat play)-Random mode (random play)-Scan mode (scan play)- Turn to select the function. When playing a CD TEXT disc on page 36. Introduction of entered number will have already been recorded on the display. 2 Use MULTI-CONTROL to switch between the functions in this manual are supported by 50-disc multi-CD players. Pause (pause)-ITS play mode (ITS play . Section 07 Multi-CD Player 3 Press DIRECT. The function name appears on the display. 3 Turn MULTI-CONTROL to change...
...: Play mode (repeat play)-Random mode (random play)-Scan mode (scan play)- Turn to select the function. When playing a CD TEXT disc on page 36. Introduction of entered number will have already been recorded on the display. 2 Use MULTI-CONTROL to switch between the functions in this manual are supported by 50-disc multi-CD players. Pause (pause)-ITS play mode (ITS play . Section 07 Multi-CD Player 3 Press DIRECT. The function name appears on the display. 3 Turn MULTI-CONTROL to change...

Owner's Manual
Page 55
...equalizer curves ! Adjusting subwoofer settings (Subwoofer2) ! Setting the high pass filter for rear speakers (Rear HPF, Rear HPF FREQ.) ! Recalling equalizer curves ! Turn MULTI-CONTROL clockwise or counterclockwise to switch between the audio functions in the following functions let you can create a finely-tuned sound field effortlessly. ! FUNCTION, AUDIO and ENTERTAINMENT appear on the type of audio adjustments 1 1 Audio display Shows the audio adjustment status. 1 Press MULTI-CONTROL to display the main menu. Using auditory user interface (AUI sound level) En 55 Audio...
...equalizer curves ! Adjusting subwoofer settings (Subwoofer2) ! Setting the high pass filter for rear speakers (Rear HPF, Rear HPF FREQ.) ! Recalling equalizer curves ! Turn MULTI-CONTROL clockwise or counterclockwise to switch between the audio functions in the following functions let you can create a finely-tuned sound field effortlessly. ! FUNCTION, AUDIO and ENTERTAINMENT appear on the type of audio adjustments 1 1 Audio display Shows the audio adjustment status. 1 Press MULTI-CONTROL to display the main menu. Using auditory user interface (AUI sound level) En 55 Audio...
Owner's Manual
Page 56
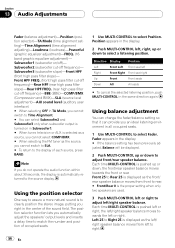
.... 56 En 1 Use MULTI-CONTROL to the source display. Subwoofer2 (subwoofer cut -off frequency)-BBE (BBE)-COMP/BMX (Compression and BMX)-SLA (source level adjustment)-AUI sound level (auditory user interface) # When selecting OFF in TA Mode, you cannot switch to Time Alignment. # You can provide you cannot switch to SLA. # To return to clearly position the stereo image, putting you right in the same direction again. Using the position...
.... 56 En 1 Use MULTI-CONTROL to the source display. Subwoofer2 (subwoofer cut -off frequency)-BBE (BBE)-COMP/BMX (Compression and BMX)-SLA (source level adjustment)-AUI sound level (auditory user interface) # When selecting OFF in TA Mode, you cannot switch to Time Alignment. # You can provide you cannot switch to SLA. # To return to clearly position the stereo image, putting you right in the same direction again. Using the position...

Owner's Manual
Page 59
... adjust the output level of the front speakers increases or decreases. 0 to select Rear HPF. En 59 If you do not want low sounds from the subwoofer output frequency range to mute the selected speaker unit (filter). Front HPF (or Rear HPF) appears in the display. 2 Push and hold MULTI-CONTROL down to play from the front or rear speakers, turn on the HPF (high pass filter). Rear HPF appears in the display. Audio Adjustments...
... adjust the output level of the front speakers increases or decreases. 0 to select Rear HPF. En 59 If you do not want low sounds from the subwoofer output frequency range to mute the selected speaker unit (filter). Front HPF (or Rear HPF) appears in the display. 2 Push and hold MULTI-CONTROL down to play from the front or rear speakers, turn on the HPF (high pass filter). Rear HPF appears in the display. Audio Adjustments...

Owner's Manual
Page 60
... adjust the output level of the equalizer curves: Display Equalizer curve Powerful Powerful Natural Natural Vocal Vocal Flat Flat Custom1 Custom 1 Custom2 Custom 2 Super Bass Super bass ! This is a list of the rear speakers. Press EQ repeatedly to switch between Flat and a set the slope to 0 dB/oct. (Pass), the audio signal bypasses the filter, so the filter does not have an effect. 3 Turn MULTI-CONTROL to select Rear...
... adjust the output level of the equalizer curves: Display Equalizer curve Powerful Powerful Natural Natural Vocal Vocal Flat Flat Custom1 Custom 1 Custom2 Custom 2 Super Bass Super bass ! This is a list of the rear speakers. Press EQ repeatedly to switch between Flat and a set the slope to 0 dB/oct. (Pass), the audio signal bypasses the filter, so the filter does not have an effect. 3 Turn MULTI-CONTROL to select Rear...
Owner's Manual
Page 65
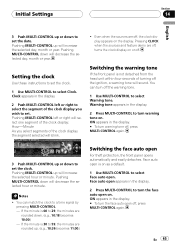
... . Switching the warning tone If the front panel is on the display. Pushing MULTI-CONTROL down will increase the selected day, month or year. If the minute is 00 to turn warning tone on . Even when the sources are off, turns the clock display on or off the warning tone. 1 Use MULTI-CONTROL to turn the face auto open is not detached from the head unit within...
... . Switching the warning tone If the front panel is on the display. Pushing MULTI-CONTROL down will increase the selected day, month or year. If the minute is 00 to turn warning tone on . Even when the sources are off, turns the clock display on or off the warning tone. 1 Use MULTI-CONTROL to turn the face auto open is not detached from the head unit within...
Owner's Manual
Page 69
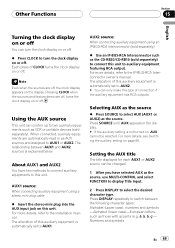
... auxiliary setting is automatically set to select the desired character type. Using the AUX source This unit can turn the clock display on or off. % Press CLOCK to turn the clock display on or off. The allocation of this unit to auxiliary equipment featuring RCA output. AUX2 source: When connecting auxiliary equipment using a stereo mini plug cable % Insert the stereo mini plug into the AUX input jack on this unit. Other Functions Section 15 English Turning the clock display on or off You can control...
... auxiliary setting is automatically set to select the desired character type. Using the AUX source This unit can turn the clock display on or off. % Press CLOCK to turn the clock display on or off. The allocation of this unit to auxiliary equipment featuring RCA output. AUX2 source: When connecting auxiliary equipment using a stereo mini plug cable % Insert the stereo mini plug into the AUX input jack on this unit. Other Functions Section 15 English Turning the clock display on or off You can control...

Owner's Manual
Page 72
... using your Computer, and record it is completed. 1 Press SOURCE and hold until the unit turns off. 2 Press and hold until the unit goes into download mode even if you made on the remote control to switch between the background display. 4 When BGV1, BGV2 or Texture3 is selected, the background color continuously changes through all the colors. 5 Press MULTI-CONTROL to switch between the following channel select settings: Channel number (channel number select setting)-Category (channel category select setting...
... using your Computer, and record it is completed. 1 Press SOURCE and hold until the unit turns off. 2 Press and hold until the unit goes into download mode even if you made on the remote control to switch between the background display. 4 When BGV1, BGV2 or Texture3 is selected, the background color continuously changes through all the colors. 5 Press MULTI-CONTROL to switch between the following channel select settings: Channel number (channel number select setting)-Category (channel category select setting...
Owner's Manual
Page 74
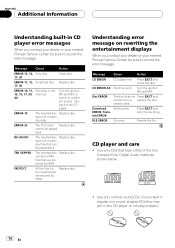
... player and care ! CD ERROR A0 Electrical error Turn the ignition ON and OFF. Use only normal, round CDs. Use only CDs that have either of the two Compact Disc Digital Audio marks as shown below. ! ERROR-11, 12, Scratched disc Replace disc. 17, 30 ERROR-10, 11, Electrical or me12, 15, 17, 30, chanical A0 Turn the ignition ON and OFF, or switch to a different source...
... player and care ! CD ERROR A0 Electrical error Turn the ignition ON and OFF. Use only normal, round CDs. Use only CDs that have either of the two Compact Disc Digital Audio marks as shown below. ! ERROR-11, 12, Scratched disc Replace disc. 17, 30 ERROR-10, 11, Electrical or me12, 15, 17, 30, chanical A0 Turn the ignition ON and OFF, or switch to a different source...
Other Manual
Page 1
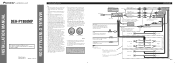
... + Rear speaker ≠ + Rear speaker ≠ + Subwoofer ≠ Fig. 2 If this system, be different colors even if they lie against metal parts. • Route and secure all wiring so it should be sure to disconnect the ≠ battery cable before beginning installation. • Refer to an external power amp's system remote control or the car's Auto-antenna relay control terminal (max. 300 mA 12 V DC). Antenna jack AUX input jack (3.5 ø) Use a stereo mini plug cable...
... + Rear speaker ≠ + Rear speaker ≠ + Subwoofer ≠ Fig. 2 If this system, be different colors even if they lie against metal parts. • Route and secure all wiring so it should be sure to disconnect the ≠ battery cable before beginning installation. • Refer to an external power amp's system remote control or the car's Auto-antenna relay control terminal (max. 300 mA 12 V DC). Antenna jack AUX input jack (3.5 ø) Use a stereo mini plug cable...

Other Manual
Page 2
... S1c1rew Fig. 8 D1a3shboard or Console Factory radio mounting br1a2cket Fig. 9 Fixing the front panel If you do not operate the removing and attaching the front panel function, use the supplied fixing screw to fix the front panel to ensure proper installation. Remove the frame. (Fig. 7) Frame To remove the frame, extend top and bottom of the unit, pull the unit out. Fixing screw Fig. 10
... S1c1rew Fig. 8 D1a3shboard or Console Factory radio mounting br1a2cket Fig. 9 Fixing the front panel If you do not operate the removing and attaching the front panel function, use the supplied fixing screw to fix the front panel to ensure proper installation. Remove the frame. (Fig. 7) Frame To remove the frame, extend top and bottom of the unit, pull the unit out. Fixing screw Fig. 10


