
Owner's Manual
Page 2
... and operation 18 - Listening to User 3 For Canadian model 3 About this unit 3 After-sales service for Pioneer products 3 In case of trouble 4 Visit our website 4 Demo mode 4 Resetting the microprocessor 4 Operating this unit Head unit 5 Remote control 5 Display indication 6 Basic Operations 6 Use and care of audio files 25 Copyright and trademark 26 Specifications...
... and operation 18 - Listening to User 3 For Canadian model 3 About this unit 3 After-sales service for Pioneer products 3 In case of trouble 4 Visit our website 4 Demo mode 4 Resetting the microprocessor 4 Operating this unit Head unit 5 Remote control 5 Display indication 6 Basic Operations 6 Use and care of audio files 25 Copyright and trademark 26 Specifications...

Owner's Manual
Page 5
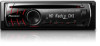
...5 4 678 Remote control i h g f e dc ba 9 Part Part 1 SRC/OFF a 6/PAUSE 2 TAG b 1 to 6 3 (list) c 3/ 4 MULTI-CONTROL (M.C.) d 2/ 5 Disc loading slot e 1/iPod 6 h (eject) f /DISP/SCRL. 7 USB port g S.Rtrv/SAT 8 AUX input jack (3.5 mm stereo jack) h BAND/ESC 9 Detach button CAUTION Use an optional Pioneer USB cable ... is projected forward from the unit, it is dangerous to perform manual seek tuning, fast forward, reverse and track search controls. Do not use the unauthorized product. p LIST/ ENTER Press to select different displays. Press to display the disc title...
...5 4 678 Remote control i h g f e dc ba 9 Part Part 1 SRC/OFF a 6/PAUSE 2 TAG b 1 to 6 3 (list) c 3/ 4 MULTI-CONTROL (M.C.) d 2/ 5 Disc loading slot e 1/iPod 6 h (eject) f /DISP/SCRL. 7 USB port g S.Rtrv/SAT 8 AUX input jack (3.5 mm stereo jack) h BAND/ESC 9 Detach button CAUTION Use an optional Pioneer USB cable ... is projected forward from the unit, it is dangerous to perform manual seek tuning, fast forward, reverse and track search controls. Do not use the unauthorized product. p LIST/ ENTER Press to select different displays. Press to display the disc title...

Owner's Manual
Page 7
...unit Section 02 English Removing the front panel to protect your country/area. Keep the battery out of the reach of the remote control Using the remote control 1 Point the remote control in damage. Use one CR2025 (3 V) lithium battery. ! Do not handle the battery with the plus (+) and minus...! trol. 2 Insert the battery with metallic tools. ! to excessive heat such as protection case. If the battery leaks, wipe the remote control completely clean and install a new battery. ! Use and care of children. tection device such as sunshine, fire or the like. Re-...
...unit Section 02 English Removing the front panel to protect your country/area. Keep the battery out of the reach of the remote control Using the remote control 1 Point the remote control in damage. Use one CR2025 (3 V) lithium battery. ! Do not handle the battery with the plus (+) and minus...! trol. 2 Insert the battery with metallic tools. ! to excessive heat such as protection case. If the battery leaks, wipe the remote control completely clean and install a new battery. ! Use and care of children. tection device such as sunshine, fire or the like. Re-...

Owner's Manual
Page 8
Do not store the remote control in direct sunlight. ! The remote control may not function properly in high temperatures or direct sunlight. ! Tuner Basic Operations Selecting a band 1 Press BAND/ESC until the preset number stops flashing. 2 Press ..., FM2, FM3 for each band as you can also recall stored radio stations by step) 1 Push M.C. Section 02 Operating this unit ! Do not let the remote control fall onto the floor, where it may apply. Using preset screen 1 Press to switch to select. Turn to store in memory. special handling may become...
Do not store the remote control in direct sunlight. ! The remote control may not function properly in high temperatures or direct sunlight. ! Tuner Basic Operations Selecting a band 1 Press BAND/ESC until the preset number stops flashing. 2 Press ..., FM2, FM3 for each band as you can also recall stored radio stations by step) 1 Push M.C. Section 02 Operating this unit ! Do not let the remote control fall onto the floor, where it may apply. Using preset screen 1 Press to switch to select. Turn to store in memory. special handling may become...

Installation Manual
Page 2
...Antenna jack IP-BUS input (Blue) This product Fuse (10 A) Rear output or subwoofer output Front output Pioneer IP-BUS accessories IP-BUS cable Wired remote input Hard-wired remote control adaptor can be sure to the constant 12 V supply terminal. When using a subwoofer of 70 W (2 ...jack IP-BUS input (Blue) This product Fuse (10 A) Rear output or subwoofer output Front output Pioneer IP-BUS accessories IP-BUS cable Wired remote input Hard-wired remote control adaptor can be connected (sold separately) Yellow Connect to the constant 12 V supply terminal. Red ...
...Antenna jack IP-BUS input (Blue) This product Fuse (10 A) Rear output or subwoofer output Front output Pioneer IP-BUS accessories IP-BUS cable Wired remote input Hard-wired remote control adaptor can be sure to the constant 12 V supply terminal. When using a subwoofer of 70 W (2 ...jack IP-BUS input (Blue) This product Fuse (10 A) Rear output or subwoofer output Front output Pioneer IP-BUS accessories IP-BUS cable Wired remote input Hard-wired remote control adaptor can be connected (sold separately) Yellow Connect to the constant 12 V supply terminal. Red ...


