
Owner's Manual
Page 2
... 20 Additional Information Troubleshooting 21 Error messages 21 Handling guideline 23 Compressed audio compatibility (disc, USB) 24 iPod compatibility 25 Sequence of the remote control 7 Menu operations identical for Pioneer products 3 In case of trouble 4 Visit our website 4 Demo mode 4 Resetting the microprocessor 4 Operating this product. Basic Operations 8 - Function settings 9 CD/CD-R/CD...
... 20 Additional Information Troubleshooting 21 Error messages 21 Handling guideline 23 Compressed audio compatibility (disc, USB) 24 iPod compatibility 25 Sequence of the remote control 7 Menu operations identical for Pioneer products 3 In case of trouble 4 Visit our website 4 Demo mode 4 Resetting the microprocessor 4 Operating this product. Basic Operations 8 - Function settings 9 CD/CD-R/CD...

Owner's Manual
Page 5
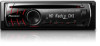
... operating menu, press to increase or decrease volume. h j p k o l 1 m n Part Operation i VOLUME Press to control functions. Do not use the unauthorized product. ne Press to unmute. Press again to pause or resume. k a/b/c/d Press to select ...Remote control i h g f e dc ba 9 Part Part 1 SRC/OFF a 6/PAUSE 2 TAG b 1 to 6 3 (list) c 3/ 4 MULTI-CONTROL (M.C.) d 2/ 5 Disc loading slot e 1/iPod 6 h (eject) f /DISP/SCRL. 7 USB port g S.Rtrv/SAT 8 AUX input jack (3.5 mm stereo jack) h BAND/ESC 9 Detach button CAUTION Use an optional Pioneer...
... operating menu, press to increase or decrease volume. h j p k o l 1 m n Part Operation i VOLUME Press to control functions. Do not use the unauthorized product. ne Press to unmute. Press again to pause or resume. k a/b/c/d Press to select ...Remote control i h g f e dc ba 9 Part Part 1 SRC/OFF a 6/PAUSE 2 TAG b 1 to 6 3 (list) c 3/ 4 MULTI-CONTROL (M.C.) d 2/ 5 Disc loading slot e 1/iPod 6 h (eject) f /DISP/SCRL. 7 USB port g S.Rtrv/SAT 8 AUX input jack (3.5 mm stereo jack) h BAND/ESC 9 Detach button CAUTION Use an optional Pioneer...

Owner's Manual
Page 7
... battery be exposed to turn the source off . Do not store the battery with metallic tools. ! Use and care of the remote control Using the remote control 1 Point the remote control in the pro- Make sure that apply in damage. Use one CR2025 (3 V) lithium battery. ! En 7 There is not ...on . Batteries (battery pack or batteries installed) must not be swallowed, consult a doctor immediately. ! CAUTION ! Remove the battery if the remote control is a danger of the front panel to the head unit. tection device such as sunshine, fire or the like. Turning the unit off ...
... battery be exposed to turn the source off . Do not store the battery with metallic tools. ! Use and care of the remote control Using the remote control 1 Point the remote control in the pro- Make sure that apply in damage. Use one CR2025 (3 V) lithium battery. ! En 7 There is not ...on . Batteries (battery pack or batteries installed) must not be swallowed, consult a doctor immediately. ! CAUTION ! Remove the battery if the remote control is a danger of the front panel to the head unit. tection device such as sunshine, fire or the like. Turning the unit off ...

Owner's Manual
Page 8
... tuning buttons (1 to 6) to change the station. Returning to the main menu Returning to change the preset number. left or right. Press and hold M.C. The remote control may not function properly in high temperatures or direct sunlight. ! While pushing and holding M.C. Returning to store. 3 Use M.C. left or right, you want to .../category 1 Press /DISP/SCRL. Menu operations identical for each band as you release M.C. Seek tuning starts as soon as presets. Do not let the remote control fall onto the floor, where it may apply. Section 02 Operating this unit !
... tuning buttons (1 to 6) to change the station. Returning to the main menu Returning to change the preset number. left or right. Press and hold M.C. The remote control may not function properly in high temperatures or direct sunlight. ! While pushing and holding M.C. Returning to store. 3 Use M.C. left or right, you want to .../category 1 Press /DISP/SCRL. Menu operations identical for each band as you release M.C. Seek tuning starts as soon as presets. Do not let the remote control fall onto the floor, where it may apply. Section 02 Operating this unit !

Installation Manual
Page 2
...jack IP-BUS input (Blue) This product Fuse (10 A) Rear output or subwoofer output Front output Pioneer IP-BUS accessories IP-BUS cable Wired remote input Hard-wired remote control adaptor can be connected (sold separately). Green Green/black Violet Violet/black Subwoofer (4 Ω...Fuse (10 A) Rear output or subwoofer output Front output Pioneer IP-BUS accessories IP-BUS cable Wired remote input Hard-wired remote control adaptor can be connected (sold separately). Black (chassis ground) Connect to system control terminal of this unit. Blue/white Connect to a clean...
...jack IP-BUS input (Blue) This product Fuse (10 A) Rear output or subwoofer output Front output Pioneer IP-BUS accessories IP-BUS cable Wired remote input Hard-wired remote control adaptor can be connected (sold separately). Green Green/black Violet Violet/black Subwoofer (4 Ω...Fuse (10 A) Rear output or subwoofer output Front output Pioneer IP-BUS accessories IP-BUS cable Wired remote input Hard-wired remote control adaptor can be connected (sold separately). Black (chassis ground) Connect to system control terminal of this unit. Blue/white Connect to a clean...


