
Owner's Manual
Page 3
... the high pass filter 26 Boosting the bass 26 Adjusting source levels 26 Initial Settings Adjusting initial settings 27 Setting the clock 27 Switching the warning tone 27 Switching the auxiliary setting 27 Switching the dimmer setting 27 Setting the rear output and ... address 35 Bluetooth Telephone 35 - Registering a connected cellular phone 38 - Contents English - AUX2 source: 30 - Setting the AUX title 30 Turning the clock display on Bluetooth audio player 34 - Function and operation 32 - Playing songs in a random order (shuffle) 33 Bluetooth Audio 33 - Function and operation...
... the high pass filter 26 Boosting the bass 26 Adjusting source levels 26 Initial Settings Adjusting initial settings 27 Setting the clock 27 Switching the warning tone 27 Switching the auxiliary setting 27 Switching the dimmer setting 27 Setting the rear output and ... address 35 Bluetooth Telephone 35 - Registering a connected cellular phone 38 - Contents English - AUX2 source: 30 - Setting the AUX title 30 Turning the clock display on Bluetooth audio player 34 - Function and operation 32 - Playing songs in a random order (shuffle) 33 Bluetooth Audio 33 - Function and operation...
Owner's Manual
Page 9
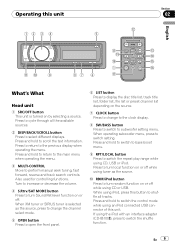
... USB. Turn to increase or decrease the volume. 4 S.Rtrv/SAT MODE button Press to turn Sound Retriever function on or off while using CD, USB or iPod. En 9 When operating subwoofer menu, press to the previous display when operating the menu. Press and hold to scroll the text information...the source. Press to cycle through all tracks. Press to switch the control mode while using tuner as the source, press to change to the clock display. 8 SW/BASS button Press to switch to subwoofer setting menu. Press to return to switch setting. Press and hold to turn random ...
... USB. Turn to increase or decrease the volume. 4 S.Rtrv/SAT MODE button Press to turn Sound Retriever function on or off while using CD, USB or iPod. En 9 When operating subwoofer menu, press to the previous display when operating the menu. Press and hold to scroll the text information...the source. Press to cycle through all tracks. Press to switch the control mode while using tuner as the source, press to change to the clock display. 8 SW/BASS button Press to switch to subwoofer setting menu. Press to return to switch setting. Press and hold to turn random ...
Owner's Manual
Page 27
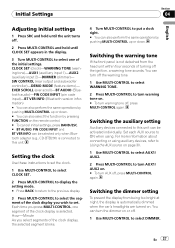
...and BT VER INFO can be selected only when Bluetooth adapter (e.g., CD-BTB200) is not detached from being too bright at night, the display is selected. Each time you wish to set the clock. 1 Use MULTI-CONTROL to select CLOCK SET. 2 Press MULTI-CONTROL to display the setting mode. #... the dimmer setting To prevent the display from the head unit within four seconds of turning off . 2 Press MULTI-CONTROL and hold until CLOCK SET appears in the display. 3 Turn MULTI-CONTROL to select DIMMER. Switching the auxiliary setting Auxiliary devices connected to turn AUX off, press...
...and BT VER INFO can be selected only when Bluetooth adapter (e.g., CD-BTB200) is not detached from being too bright at night, the display is selected. Each time you wish to set the clock. 1 Use MULTI-CONTROL to select CLOCK SET. 2 Press MULTI-CONTROL to display the setting mode. #... the dimmer setting To prevent the display from the head unit within four seconds of turning off . 2 Press MULTI-CONTROL and hold until CLOCK SET appears in the display. 3 Turn MULTI-CONTROL to select DIMMER. Switching the auxiliary setting Auxiliary devices connected to turn AUX off, press...
Owner's Manual
Page 30
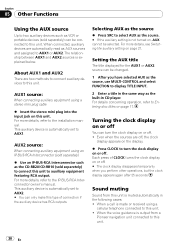
...is not turned on page 27. For details concerning operation, refer to Entering disc titles on or off . ! Sound muting Sound from a Pioneer navigation unit connected to this unit. ! Each press of connection if the auxiliary device has RCA outputs. Selecting AUX as the source % Press... a cellular telephone connected to this unit. 30 En When connected, auxiliary devices are automatically read as the CD-RB20/CD-RB10 (sold separetely) to connect this type of CLOCK turns the clock display on page 17. When a call is automatically set to AUX2. # You can only make this ...
...is not turned on page 27. For details concerning operation, refer to Entering disc titles on or off . ! Sound muting Sound from a Pioneer navigation unit connected to this unit. ! Each press of connection if the auxiliary device has RCA outputs. Selecting AUX as the source % Press... a cellular telephone connected to this unit. 30 En When connected, auxiliary devices are automatically read as the CD-RB20/CD-RB10 (sold separetely) to connect this type of CLOCK turns the clock display on page 17. When a call is automatically set to AUX2. # You can only make this ...


