
Owner's Manual
Page 2
... (shuffle) 21 - Removing the front panel 7 - Using the remote control 8 Operating this unit's iPod function from theft 7 - Head unit 9 - Remote control 10 - Storing and recalling broadcast frequencies 12 - Displaying text information on... so you will know how to User 5 For Canadian model 5 About this unit 5 After-sales service for Pioneer products 7 Visit our website 7 In case of trouble 7 Protecting your model properly...Basic Operations 11 - Introduction of an audio file 18 - Playing tracks in CD Player 14 - Introduction of audio adjustments 23 Using balance adjustment 23 Using the...
... (shuffle) 21 - Removing the front panel 7 - Using the remote control 8 Operating this unit's iPod function from theft 7 - Head unit 9 - Remote control 10 - Storing and recalling broadcast frequencies 12 - Displaying text information on... so you will know how to User 5 For Canadian model 5 About this unit 5 After-sales service for Pioneer products 7 Visit our website 7 In case of trouble 7 Protecting your model properly...Basic Operations 11 - Introduction of an audio file 18 - Playing tracks in CD Player 14 - Introduction of audio adjustments 23 Using balance adjustment 23 Using the...

Owner's Manual
Page 7
...the front panel. ! Box 1760 Long Beach, CA 90801-1760 800-421-1404 CANADA Pioneer Electronics of direct sunlight and high temperatures. In case the necessary information is not detached from the head unit within five seconds of an insurance claim such as loss or theft. 2 Receive updates on... page 27. U.S.A. Avoid subjecting the front panel to operate properly, contact your purchase on file to help you purchased this unit. En 7 In case of ...
...the front panel. ! Box 1760 Long Beach, CA 90801-1760 800-421-1404 CANADA Pioneer Electronics of direct sunlight and high temperatures. In case the necessary information is not detached from the head unit within five seconds of an insurance claim such as loss or theft. 2 Receive updates on... page 27. U.S.A. Avoid subjecting the front panel to operate properly, contact your purchase on file to help you purchased this unit. En 7 In case of ...
Owner's Manual
Page 9
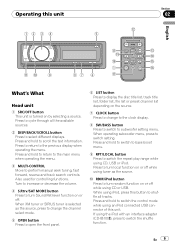
... to scroll the text information. Press to select different displays. When XM tuner or SIRIUS tuner is turned on or off . While using CD, USB or iPod. Press and hold to the previous display when operating the menu. Press to turn local function on by selecting a source...Retriever function on or off while using an iPod connected USB connector of this unit 12 3 4 5 Section 02 English ba 9 87 6 What's What Head unit 1 SRC/OFF button This unit is selected as the source. Operating this unit. Press to return to switch the control mode while using tuner as the source...
... to scroll the text information. Press to select different displays. When XM tuner or SIRIUS tuner is turned on or off . While using CD, USB or iPod. Press and hold to the previous display when operating the menu. Press to turn local function on by selecting a source...Retriever function on or off while using an iPod connected USB connector of this unit 12 3 4 5 Section 02 English ba 9 87 6 What's What Head unit 1 SRC/OFF button This unit is selected as the source. Operating this unit. Press to return to switch the control mode while using tuner as the source...

Owner's Manual
Page 10
Section 02 Operating this unit 1 2 4 6789 b c d e 35 a b BAND/ESC button Press to perform manual seek tuning, fast forward, reverse and track search controls. e a/b/c/d buttons Press to select among three FM ... g DISP button Press to select functions. i FUNCTION button Press to select different displays. Appears when album search refinement on the head unit. Press to return to scroll the text information. While in CD player, USB, iPod Elapsed playback time and literal information are displayed. ! Press and hold to the ordinary display when operating...
Section 02 Operating this unit 1 2 4 6789 b c d e 35 a b BAND/ESC button Press to perform manual seek tuning, fast forward, reverse and track search controls. e a/b/c/d buttons Press to select among three FM ... g DISP button Press to select functions. i FUNCTION button Press to select different displays. Appears when album search refinement on the head unit. Press to return to scroll the text information. While in CD player, USB, iPod Elapsed playback time and literal information are displayed. ! Press and hold to the ordinary display when operating...
Owner's Manual
Page 18
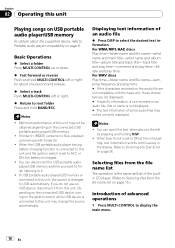
... you want to finish listening to USB automatically. If folder 01 (ROOT) contains no files, playback commences with the head unit, those characters are not compatible with folder 02. ! For WMA/MP3/AAC discs Play time-folder name and file name-artist name and track title-...while USB device is not displayed. # The text information of some audio files may not be obtained depending on page 15.) Introduction of the builtin CD player. (Refer to Selecting files from the file name list on the connected USB portable audio player/USB memory. ! You can disconnect the USB portable...
... you want to finish listening to USB automatically. If folder 01 (ROOT) contains no files, playback commences with the head unit, those characters are not compatible with folder 02. ! For WMA/MP3/AAC discs Play time-folder name and file name-artist name and track title-...while USB device is not displayed. # The text information of some audio files may not be obtained depending on page 15.) Introduction of the builtin CD player. (Refer to Selecting files from the file name list on the connected USB portable audio player/USB memory. ! You can disconnect the USB portable...
Owner's Manual
Page 27
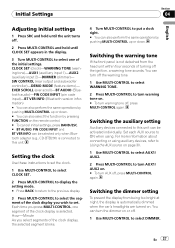
...Bluetooth adapter (e.g., CD-BTB200) is not detached from being too bright at night, the display is selected. Setting the clock Use these instructions to set . For more information about connecting or using . En 27 Switching the dimmer setting To prevent the display from the head unit within four ... source to select one segment of the initial settings. Initial Settings Section 04 English Adjusting initial settings 1 Press SRC and hold until the unit turns off. 2 Press MULTI-CONTROL and hold until CLOCK SET appears in the display. 3 Turn MULTI-CONTROL to ON when using auxiliary...
...Bluetooth adapter (e.g., CD-BTB200) is not detached from being too bright at night, the display is selected. Setting the clock Use these instructions to set . For more information about connecting or using . En 27 Switching the dimmer setting To prevent the display from the head unit within four ... source to select one segment of the initial settings. Initial Settings Section 04 English Adjusting initial settings 1 Press SRC and hold until the unit turns off. 2 Press MULTI-CONTROL and hold until CLOCK SET appears in the display. 3 Turn MULTI-CONTROL to ON when using auxiliary...

Owner's Manual
Page 37
...SEARCH PHONE (search and connect) ! CONNECTION OPEN (connection open the connection. CONNECTION OPEN (connection open) ! You can change this unit via Bluetooth wireless technology with HSP (Head Set Profile), CLEAR MEMORY and NUMBER DIAL cannot be operated. ! To return to the previous display, press BACK. ! DEVICE INFO... cellular phones 1 Use MULTI-CONTROL to 0000 as that of the Blue- To complete the connection, check the device name (PIONEER BT UNIT) and enter the link code on page 29. CONNECT PHONE (connect phone) ! SET PHONE (registering phone) Notes ! ALWAYS WAITING flashes ...
...SEARCH PHONE (search and connect) ! CONNECTION OPEN (connection open the connection. CONNECTION OPEN (connection open) ! You can change this unit via Bluetooth wireless technology with HSP (Head Set Profile), CLEAR MEMORY and NUMBER DIAL cannot be operated. ! To return to the previous display, press BACK. ! DEVICE INFO... cellular phones 1 Use MULTI-CONTROL to 0000 as that of the Blue- To complete the connection, check the device name (PIONEER BT UNIT) and enter the link code on page 29. CONNECT PHONE (connect phone) ! SET PHONE (registering phone) Notes ! ALWAYS WAITING flashes ...

