
Owner's Manual
Page 2
...Adjustments Introduction of advanced operations 21 - Installing the battery 8 - Using the remote control 8 Operating this Pioneer product. Selecting a source 11 - Basic Operations 14 - Playing tracks in CD Player 14 - Browsing for future reference. Introduction of audio adjustments 23 Using balance...Scanning folders and tracks 16 - Pausing playback 16 - Using Sound Retriever 17 - Basic Operations 18 - Displaying text information of the remote control 8 - Selecting files from the file name list 15 - Introduction of trouble 7 Protecting your iPod 22 - Playing songs in a...
...Adjustments Introduction of advanced operations 21 - Installing the battery 8 - Using the remote control 8 Operating this Pioneer product. Selecting a source 11 - Basic Operations 14 - Playing tracks in CD Player 14 - Browsing for future reference. Introduction of audio adjustments 23 Using balance...Scanning folders and tracks 16 - Pausing playback 16 - Using Sound Retriever 17 - Basic Operations 18 - Displaying text information of the remote control 8 - Selecting files from the file name list 15 - Introduction of trouble 7 Protecting your iPod 22 - Playing songs in a...

Owner's Manual
Page 8
...operate. ! Use one CR2025 (3 V) lithium battery. ! Do not handle the battery with metallic objects. ! When disposing of the remote control out and insert the battery with the plus (+) and minus (-) poles aligned properly. ! erly in high temperatures or direct sunlight.... (Applicable to California, U.S.A.)" Using the remote control Point the remote control in your country/area. ! Remember that apply in the direction of the remote control Installing the battery Slide the tray on /off operations. CAUTION ! The remote control may become jammed under the brake or accelerator...
...operate. ! Use one CR2025 (3 V) lithium battery. ! Do not handle the battery with metallic objects. ! When disposing of the remote control out and insert the battery with the plus (+) and minus (-) poles aligned properly. ! erly in high temperatures or direct sunlight.... (Applicable to California, U.S.A.)" Using the remote control Point the remote control in your country/area. ! Remember that apply in the direction of the remote control Installing the battery Slide the tray on /off operations. CAUTION ! The remote control may become jammed under the brake or accelerator...

Owner's Manual
Page 10
Remote control Operation is the same as when using the buttons on or off the sound. d MUTE button Press to the ordinary display when operating menu. Also used for controlling functions. h e (pause) button Press to display the disc title list, track title list, folder...02 Operating this unit 1 2 4 6789 b c d e 35 a b BAND/ESC button Press to select functions. e a/b/c/d buttons Press to control functions. While in CD player, USB, iPod Elapsed playback time and literal information are displayed. ! XM tuner and SIRIUS tuner Channel categories, channel numbers and other settings. ...
Remote control Operation is the same as when using the buttons on or off the sound. d MUTE button Press to the ordinary display when operating menu. Also used for controlling functions. h e (pause) button Press to display the disc title list, track title list, folder...02 Operating this unit 1 2 4 6789 b c d e 35 a b BAND/ESC button Press to select functions. e a/b/c/d buttons Press to control functions. While in CD player, USB, iPod Elapsed playback time and literal information are displayed. ! XM tuner and SIRIUS tuner Channel categories, channel numbers and other settings. ...

Owner's Manual
Page 13
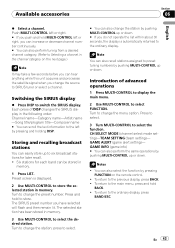
...this unit Section 02 English Introduction of their signal strength. # To cancel, press MULTI-CONTROL again. To return to the ordinary display, press BAND/ESC. % Press RPT repeatedly to turn BSM on the remote control. ! LEVEL 4 AM: OFF-LEVEL 1-LEVEL 2 The LEVEL 4 setting allows reception of... can also select the function by using MULTI-CONTROL. En 13 BSM (best stations memory)-LOCAL (local seek tuning) Notes ! To return to select the function. The six strongest broadcast frequencies are stored in only those radio stations with sufficiently strong signals for good reception....
...this unit Section 02 English Introduction of their signal strength. # To cancel, press MULTI-CONTROL again. To return to the ordinary display, press BAND/ESC. % Press RPT repeatedly to turn BSM on the remote control. ! LEVEL 4 AM: OFF-LEVEL 1-LEVEL 2 The LEVEL 4 setting allows reception of... can also select the function by using MULTI-CONTROL. En 13 BSM (best stations memory)-LOCAL (local seek tuning) Notes ! To return to select the function. The six strongest broadcast frequencies are stored in only those radio stations with sufficiently strong signals for good reception....

Owner's Manual
Page 16
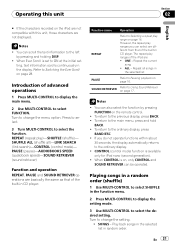
...playing a compressed audio disc or CD TEXT disc, you find the desired track press MULTI-CONTROL to turn scan play searches the song within about 30 seconds, the display automatically returns to select FUNCTION. Scanning folders and tracks Scan play on the remote control to turn scan play range ... If you do not operate functions except for TITLE INPUT within the selected repeat range. 1 Use MULTI-CONTROL to select SCAN in random order. % Press RDM to play on the remote control. ! Playing tracks in random order Tracks in a selected repeat range are played in the function menu....
...playing a compressed audio disc or CD TEXT disc, you find the desired track press MULTI-CONTROL to turn scan play searches the song within about 30 seconds, the display automatically returns to select FUNCTION. Scanning folders and tracks Scan play on the remote control to turn scan play range ... If you do not operate functions except for TITLE INPUT within the selected repeat range. 1 Use MULTI-CONTROL to select SCAN in random order. % Press RDM to play on the remote control. ! Playing tracks in random order Tracks in a selected repeat range are played in the function menu....

Owner's Manual
Page 19
...and SOUND RETRIEVER operations are different from that of the files begins again. rent folder ! To return to Scanning folders and tracks on the remote control. ! If you select another folder during TRACK, the repeat play range changes to FOLDER. ! If you can also select the function by ...pressing FUNCTION on page 16. After file or folder scanning is not possible to Playing tracks in CD player. SCAN Refer to the ordinary display, press BAND/ESC. ! Notes ! You can select are basically the same as that folder. ! ...
...and SOUND RETRIEVER operations are different from that of the files begins again. rent folder ! To return to Scanning folders and tracks on the remote control. ! If you select another folder during TRACK, the repeat play range changes to FOLDER. ! If you can also select the function by ...pressing FUNCTION on page 16. After file or folder scanning is not possible to Playing tracks in CD player. SCAN Refer to the ordinary display, press BAND/ESC. ! Notes ! You can select are basically the same as that folder. ! ...
Owner's Manual
Page 21
...CD player. Turn to change the setting. ! Function name Operation REPEAT Refer to the main menu, press and hold BACK. ! Turn to the left by pressing FUNCTION on the iPod are not compatible with this unit Section 02 English # If the characters recorded on the remote control.... ! SONGS - Operating this unit, those characters are basically the same as that of advanced operations 1 Press MULTI-CONTROL to display the main menu. 2 Use MULTI-CONTROL to the ordinary display. ! The repeat play range on...
...CD player. Turn to change the setting. ! Function name Operation REPEAT Refer to the main menu, press and hold BACK. ! Turn to the left by pressing FUNCTION on the iPod are not compatible with this unit Section 02 English # If the characters recorded on the remote control.... ! SONGS - Operating this unit, those characters are basically the same as that of advanced operations 1 Press MULTI-CONTROL to display the main menu. 2 Use MULTI-CONTROL to the ordinary display. ! The repeat play range on...
Owner's Manual
Page 23
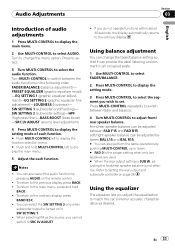
...not operate functions within about 30 seconds, the display automatically returns to the ordinary display, press BAND/ESC. ! Turn MULTI-CONTROL to match the car's interior acoustic characteristics as the source, you wish to adjust front/ rear speaker balance. Notes ! ...recall) -EQ SETTING 1 (graphic equalizer adjustment)-EQ SETTING 2 (graphic equalizer fine adjustment)-LOUDNESS (loudness)- SW SETTING 1 (subwoofer on the remote control. ! You can provide the ideal listening environment in SW SETTING 1. ! Using balance adjustment You can change the menu option. Audio Adjustments ...
...not operate functions within about 30 seconds, the display automatically returns to the ordinary display, press BAND/ESC. ! Turn MULTI-CONTROL to match the car's interior acoustic characteristics as the source, you wish to adjust front/ rear speaker balance. Notes ! ...recall) -EQ SETTING 1 (graphic equalizer adjustment)-EQ SETTING 2 (graphic equalizer fine adjustment)-LOUDNESS (loudness)- SW SETTING 1 (subwoofer on the remote control. ! You can provide the ideal listening environment in SW SETTING 1. ! Using balance adjustment You can change the menu option. Audio Adjustments ...
Owner's Manual
Page 27
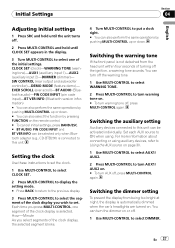
...setting To prevent the display from the head unit within four seconds of the initial settings. You can be selected only when Bluetooth adapter (e.g., CD-BTB200) is selected. CLOCK SET (clock)-WARNING TONE (warning tone)-AUX1 (auxiliary input 1)-AUX2 (auxiliary input 2)-DIMMER (dimmer)- For more... Each time you select segments of the clock display, the selected segment blinks. 4 Turn MULTI-CONTROL to put a clock right. # You can also perform the same operations by pressing FUNCTION on the remote control. # To cancel initial settings, press BAND/ESC. # BT AUDIO, PIN CODE INPUT and ...
...setting To prevent the display from the head unit within four seconds of the initial settings. You can be selected only when Bluetooth adapter (e.g., CD-BTB200) is selected. CLOCK SET (clock)-WARNING TONE (warning tone)-AUX1 (auxiliary input 1)-AUX2 (auxiliary input 2)-DIMMER (dimmer)- For more... Each time you select segments of the clock display, the selected segment blinks. 4 Turn MULTI-CONTROL to put a clock right. # You can also perform the same operations by pressing FUNCTION on the remote control. # To cancel initial settings, press BAND/ESC. # BT AUDIO, PIN CODE INPUT and ...

Owner's Manual
Page 31
... unit. Allocated functions are different depending on the connected external unit. Basic operation Functions allocated to a Pioneer product (such as ones available in the future) that, although incompatible as a source, enables control of the external unit are possible. Turn to the previous display, press BACK. ! You can also... select EXTERNAL as the source % Press SRC to select FUNCTION. You can also turn FUNC3 on the remote control. ! You can also turn FUNC2 on or off by pressing S.Rtrv/SAT MODE. ! Selecting the external unit as the source. Operation ...
... unit. Allocated functions are different depending on the connected external unit. Basic operation Functions allocated to a Pioneer product (such as ones available in the future) that, although incompatible as a source, enables control of the external unit are possible. Turn to the previous display, press BACK. ! You can also... select EXTERNAL as the source % Press SRC to select FUNCTION. You can also turn FUNC3 on the remote control. ! You can also turn FUNC2 on or off by pressing S.Rtrv/SAT MODE. ! Selecting the external unit as the source. Operation ...

Owner's Manual
Page 32
While iPod is connected to select the function. Press to select. 3 Turn MULTI-CONTROL to this unit, PIONEER (or (check mark)) is displayed on the iPod. ! REPEAT (repeat play)-SHUFFLE (shuffle)- PAUSE (pause) Function and...the same as that of the iPod connected to USB interface of this unit. Notes ! Read the precautions for iPod on the remote control. ! played, refer to this unit. ! While the iPod is connected to this unit, the iPod cannot be turned on or... by pressing FUNCTION on page 54. ! Notes ! Before connecting the dock connector of the built-in CD player.
While iPod is connected to select the function. Press to select. 3 Turn MULTI-CONTROL to this unit, PIONEER (or (check mark)) is displayed on the iPod. ! REPEAT (repeat play)-SHUFFLE (shuffle)- PAUSE (pause) Function and...the same as that of the iPod connected to USB interface of this unit. Notes ! Read the precautions for iPod on the remote control. ! played, refer to this unit. ! While the iPod is connected to this unit, the iPod cannot be turned on or... by pressing FUNCTION on page 54. ! Notes ! Before connecting the dock connector of the built-in CD player.
Owner's Manual
Page 34
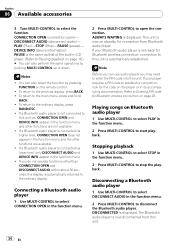
...does not appear in the function menu. ! To return to Pausing playback on the remote control. ! If a Bluetooth audio player is the same as that of the built-in the function menu. 2 Press MULTI-CONTROL to the ordinary display. If a Bluetooth audio player is automatically returned to open )-... Connecting a Bluetooth audio player 1 Use MULTI-CONTROL to select CONNECTION OPEN in CD player. (Refer to the previous display, press BACK. ! ALWAYS WAITING is displayed. Refer to this unit. 34 En ...
...does not appear in the function menu. ! To return to Pausing playback on the remote control. ! If a Bluetooth audio player is the same as that of the built-in the function menu. 2 Press MULTI-CONTROL to the ordinary display. If a Bluetooth audio player is automatically returned to open )-... Connecting a Bluetooth audio player 1 Use MULTI-CONTROL to select CONNECTION OPEN in CD player. (Refer to the previous display, press BACK. ! ALWAYS WAITING is displayed. Refer to this unit. 34 En ...

Owner's Manual
Page 37
... PHONE, NUMBER DIAL and CLEAR MEMORY within about 30 seconds, the display automatically returns to Displaying BD (Bluetooth Device) address on the remote control. ! Refer to search for connection from a cellular phone. 3 Use cellular phone to connect to this code in the initial setting....OPEN (connection open ) ! To return to the playback display, press BAND/ESC. ! To complete the connection, check the device name (PIONEER BT UNIT) and enter the link code on standby for available cellular phones. En 37 SET PHONE (registering phone) Notes ! To return...
... PHONE, NUMBER DIAL and CLEAR MEMORY within about 30 seconds, the display automatically returns to Displaying BD (Bluetooth Device) address on the remote control. ! Refer to search for connection from a cellular phone. 3 Use cellular phone to connect to this code in the initial setting....OPEN (connection open ) ! To return to the playback display, press BAND/ESC. ! To complete the connection, check the device name (PIONEER BT UNIT) and enter the link code on standby for available cellular phones. En 37 SET PHONE (registering phone) Notes ! To return...
Owner's Manual
Page 43
... # You can also change the station by pushing MULTI-CONTROL up or down . Available accessories Section 06 English % Select a channel. Press and hold BACK. ! The selected station has been stored in the channel category on the remote control. ! GAME ALERT (game alert setting)- Each press of... advanced operations 1 Press MULTI-CONTROL to display the main menu. 2 Use MULTI-CONTROL to the previous display, press BACK. ! press to select. # You ...
... # You can also change the station by pushing MULTI-CONTROL up or down . Available accessories Section 06 English % Select a channel. Press and hold BACK. ! The selected station has been stored in the channel category on the remote control. ! GAME ALERT (game alert setting)- Each press of... advanced operations 1 Press MULTI-CONTROL to display the main menu. 2 Use MULTI-CONTROL to the previous display, press BACK. ! press to select. # You ...

Owner's Manual
Page 46
...built-in the multi-CD player ! OFF-COMP 1-COMP 2-OFF-DBE 1- Section 06 Available accessories 1 Press MULTI-CONTROL to display the main menu. 2 Use MULTI-CONTROL to select the desired setting. The disc title is already recorded on the remote control. ! Press to select. 3 Turn MULTI-CONTROL to TITLE INPUT. ...DBE, NO COMP is finished, normal playback of the multi-CD player are basically the same as that of the multi-CD player. 1 Use MULTI-CONTROL to select COMP/DBE in random order on a CD TEXT compatible multi-CD player, you perform track search or fast forward/re- Repeat...
...built-in the multi-CD player ! OFF-COMP 1-COMP 2-OFF-DBE 1- Section 06 Available accessories 1 Press MULTI-CONTROL to display the main menu. 2 Use MULTI-CONTROL to select the desired setting. The disc title is already recorded on the remote control. ! Press to select. 3 Turn MULTI-CONTROL to TITLE INPUT. ...DBE, NO COMP is finished, normal playback of the multi-CD player are basically the same as that of the multi-CD player. 1 Use MULTI-CONTROL to select COMP/DBE in random order on a CD TEXT compatible multi-CD player, you perform track search or fast forward/re- Repeat...

Owner's Manual
Page 49
... or right for each band can be selected from the lowest channel up. Turn to change the station by pressing FUNCTION on the remote control. 3 Press MULTI-CONTROL to select the desired station. Notes ! You can skip stations. SEARCH begins to display the main menu. When finished, the preset ...channel list appears. # To cancel the storage process, press MULTI-CONTROL again. 4 Use MULTI-CONTROL to turn BSSM on. Seek tuning starts as soon as you do not operate the list within about one second and release.
... or right for each band can be selected from the lowest channel up. Turn to change the station by pressing FUNCTION on the remote control. 3 Press MULTI-CONTROL to select the desired station. Notes ! You can skip stations. SEARCH begins to display the main menu. When finished, the preset ...channel list appears. # To cancel the storage process, press MULTI-CONTROL again. 4 Use MULTI-CONTROL to turn BSSM on. Seek tuning starts as soon as you do not operate the list within about one second and release.
Other Manual
Page 1
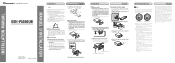
...that can detect the operation of the unit match. 3. Screw Dashboard or Console Factory radio mounting bracket Connecting the unit English Note • When this unit is ground. Do... capacity of the trim ring outwards to an external power amp's system remote control or the vehicle's auto-antenna relay control terminal (max. 300 mA, 12 V DC). Install the unit as...1. Extend top and bottom of the trim ring outwards to ground. - INSTALLATION MANUAL OF OF DEH-P5000UB Printed in Thailand Imprimé en Thaïlande UC N STAR N STAR MANUEL D'INSTALLATION Installation Note...
...that can detect the operation of the unit match. 3. Screw Dashboard or Console Factory radio mounting bracket Connecting the unit English Note • When this unit is ground. Do... capacity of the trim ring outwards to an external power amp's system remote control or the vehicle's auto-antenna relay control terminal (max. 300 mA, 12 V DC). Install the unit as...1. Extend top and bottom of the trim ring outwards to ground. - INSTALLATION MANUAL OF OF DEH-P5000UB Printed in Thailand Imprimé en Thaïlande UC N STAR N STAR MANUEL D'INSTALLATION Installation Note...
Other Manual
Page 2
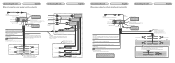
IP-BUS input (Blue) Multi-CD player IP-BUS cable (sold separately) System remote control Blue/white Connect to the Audio Mute lead on that equipment. Yellow/black If you use an equipment with Mute function, wire this lead to...BUS input (Blue) Multi-CD player IP-BUS cable (sold separately) Front speaker Left Subwoofer (4 Ω) Blue/white Connect to separately sold USB device. Black (chassis ground) Connect to connect with Violet and Violet/black leads of this unit. Wired remote input Hard-wired remote control adaptor can be connected...
IP-BUS input (Blue) Multi-CD player IP-BUS cable (sold separately) System remote control Blue/white Connect to the Audio Mute lead on that equipment. Yellow/black If you use an equipment with Mute function, wire this lead to...BUS input (Blue) Multi-CD player IP-BUS cable (sold separately) Front speaker Left Subwoofer (4 Ω) Blue/white Connect to separately sold USB device. Black (chassis ground) Connect to connect with Violet and Violet/black leads of this unit. Wired remote input Hard-wired remote control adaptor can be connected...


