
Owner's Manual
Page 2
... USB portable audio player/ USB memory 18 - Installing the battery 8 - Selecting a source 11 - Introduction of advanced operations 16 - Attaching the front panel 7 About the demo mode 8 Use and care of trouble 7 Protecting your unit from album list of audio adjustments 23 Using balance adjustment 23 Using the equalizer 23 Playing songs in CD Player 14 - Pausing playback 16 - After you will know how to User 5 For Canadian model 5 About this unit What's What 9 - Selecting a repeat play range 16 - Please read through these operating instructions...
... USB portable audio player/ USB memory 18 - Installing the battery 8 - Selecting a source 11 - Introduction of advanced operations 16 - Attaching the front panel 7 About the demo mode 8 Use and care of trouble 7 Protecting your unit from album list of audio adjustments 23 Using balance adjustment 23 Using the equalizer 23 Playing songs in CD Player 14 - Pausing playback 16 - After you will know how to User 5 For Canadian model 5 About this unit What's What 9 - Selecting a repeat play range 16 - Please read through these operating instructions...
Owner's Manual
Page 3
...Switching the dimmer setting 27 Setting the rear output and subwoofer controller 28 Switching the feature demo 28 Switching the Ever Scroll 28 Activating the BT AUDIO source 28 Entering PIN code for repair 29 Other Functions Using the AUX source 30 - Function and operation 33 - Displaying BD (Bluetooth Device) address 35 Bluetooth Telephone 35 - Recalling equalizer curves 23 - Adjusting equalizer curves 24 - Using the functions allocated to 1 to a registered cellular phone 38 - Playing songs on iPod 32 - Connecting to 6 keys 31 - Introduction of Bluetooth adapter for Bluetooth...
...Switching the dimmer setting 27 Setting the rear output and subwoofer controller 28 Switching the feature demo 28 Switching the Ever Scroll 28 Activating the BT AUDIO source 28 Entering PIN code for repair 29 Other Functions Using the AUX source 30 - Function and operation 33 - Displaying BD (Bluetooth Device) address 35 Bluetooth Telephone 35 - Recalling equalizer curves 23 - Adjusting equalizer curves 24 - Using the functions allocated to 1 to a registered cellular phone 38 - Playing songs on iPod 32 - Connecting to 6 keys 31 - Introduction of Bluetooth adapter for Bluetooth...
Owner's Manual
Page 6
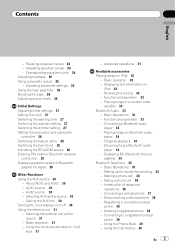
... the iPod adapter, refer to USB audio player/USB memory compatibility on the USB portable audio player/USB memory even if that can control the following . - However, functions related to Audiobooks and Podcasts cannot be connected to your dealer or nearest authorized Pioneer service station regarding the satellite radio tuner that data is required. ! Pioneer accepts no responsibility for such use direct satellite-to the satellite radio tuner owner's manual. ! About AAC This unit plays back AAC files encoded by this unit. 6 En For satellite radio tuner operation...
... the iPod adapter, refer to USB audio player/USB memory compatibility on the USB portable audio player/USB memory even if that can control the following . - However, functions related to Audiobooks and Podcasts cannot be connected to your dealer or nearest authorized Pioneer service station regarding the satellite radio tuner that data is required. ! Pioneer accepts no responsibility for such use direct satellite-to the satellite radio tuner owner's manual. ! About AAC This unit plays back AAC files encoded by this unit. 6 En For satellite radio tuner operation...
Owner's Manual
Page 9
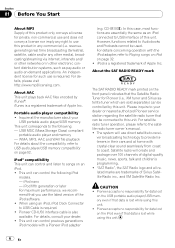
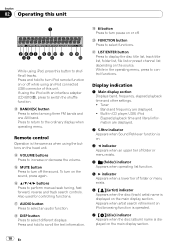
... track search controls. b RPT/LOCAL button Press to switch the repeat play range while using tuner as the source, press to change the channel select mode. 6 EJECT button Press to eject a disc. 7 CLOCK button Press to change to the clock display. 8 SW/BASS button Press to switch to subwoofer setting menu. En 9 Press to return to switch setting. a DETACH button Press to bass boost menu. Press to turn local function on by selecting a source. When XM tuner or SIRIUS tuner is turned on or off . When operating bass booster, this unit Section...
... track search controls. b RPT/LOCAL button Press to switch the repeat play range while using tuner as the source, press to change the channel select mode. 6 EJECT button Press to eject a disc. 7 CLOCK button Press to change to the clock display. 8 SW/BASS button Press to switch to subwoofer setting menu. En 9 Press to return to switch setting. a DETACH button Press to bass boost menu. Press to turn local function on by selecting a source. When XM tuner or SIRIUS tuner is turned on or off . When operating bass booster, this unit Section...
Owner's Manual
Page 10
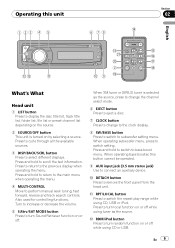
Remote control Operation is displayed on the head unit. f MUTE button Press to select an audio function. To turn iPod remote function on or off while using an iPod connected USB connector of folder or menu exists. 6 (artist) indicator Appears when the disc (track) artist name is the same as when using the buttons on the main display section. h AUDIO button Press to turn off . l LIST/ENTER button Press to switch the shuffle function. If using the iPod with an interface adapter (CD-IB100N), press to...
Remote control Operation is displayed on the head unit. f MUTE button Press to select an audio function. To turn iPod remote function on or off while using an iPod connected USB connector of folder or menu exists. 6 (artist) indicator Appears when the disc (track) artist name is the same as when using the buttons on the main display section. h AUDIO button Press to turn off . l LIST/ENTER button Press to switch the shuffle function. If using the iPod with an interface adapter (CD-IB100N), press to...
Owner's Manual
Page 12
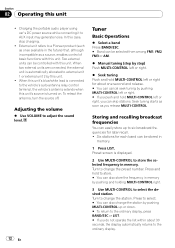
... audio player using car's DC power source while connecting it to adjust the sound level. Tuner Basic Operations % Select a band Press BAND/ESC. # Band can be stored in memory. Six stations for later recall. ! Two external units can also store the frequency in the future) that, although incompatible as a source, enables control of basic functions with this case, stop charging. ! Adjusting the volume % Use VOLUME to AUX input may generate noise. Preset screen is displayed. 2 Use MULTI-CONTROL to select the desired station...
... audio player using car's DC power source while connecting it to adjust the sound level. Tuner Basic Operations % Select a band Press BAND/ESC. # Band can be stored in memory. Six stations for later recall. ! Two external units can also store the frequency in the future) that, although incompatible as a source, enables control of basic functions with this case, stop charging. ! Adjusting the volume % Use VOLUME to AUX input may generate noise. Preset screen is displayed. 2 Use MULTI-CONTROL to select the desired station...
Owner's Manual
Page 23
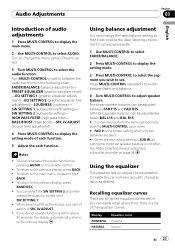
...used. # When the rear output setting is SUB W, adjusting the front/rear speaker balance is a list of the equalizer curves. FADER/BALANCE (balance adjustment)- SW SETTING 2 (subwoofer setting)- Refer to select AUDIO. If you cannot switch to change the fader/balance setting so that it can easily recall at any time. To return to the ordinary display, press BAND/ESC. ! Display POWERFUL NATURAL Equalizer curve Powerful Natural En 23 PRESET EQUALIZER (graphic equalizer recall) -EQ SETTING 1 (graphic equalizer adjustment)-EQ SETTING 2 (graphic equalizer fine adjustment...
...used. # When the rear output setting is SUB W, adjusting the front/rear speaker balance is a list of the equalizer curves. FADER/BALANCE (balance adjustment)- SW SETTING 2 (subwoofer setting)- Refer to select AUDIO. If you cannot switch to change the fader/balance setting so that it can easily recall at any time. To return to the ordinary display, press BAND/ESC. ! Display POWERFUL NATURAL Equalizer curve Powerful Natural En 23 PRESET EQUALIZER (graphic equalizer recall) -EQ SETTING 1 (graphic equalizer adjustment)-EQ SETTING 2 (graphic equalizer fine adjustment...
Owner's Manual
Page 24
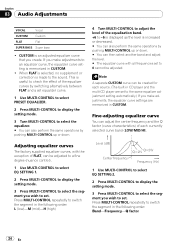
... frequencies set to the same equalizer adjustment setting automatically.) If you make adjustments to switch the segment in CUSTOM. ! Fine-adjusting equalizer curve You can also perform the same operations by switching alternatively between FLAT and a set equalizer curve. 1 Use MULTI-CONTROL to select PRESET EQUALIZER. 2 Press MULTI-CONTROL to display the setting mode. 3 Turn MULTI-CONTROL to set to 0 cannot be adjusted to a fine degree (nuance control). 1 Use MULTI-CONTROL to select EQ SETTING 1. 2 Press MULTI-CONTROL to display the setting mode. 3 Press MULTI-CONTROL to select...
... frequencies set to the same equalizer adjustment setting automatically.) If you make adjustments to switch the segment in CUSTOM. ! Fine-adjusting equalizer curve You can also perform the same operations by switching alternatively between FLAT and a set equalizer curve. 1 Use MULTI-CONTROL to select PRESET EQUALIZER. 2 Press MULTI-CONTROL to display the setting mode. 3 Turn MULTI-CONTROL to set to 0 cannot be adjusted to a fine degree (nuance control). 1 Use MULTI-CONTROL to select EQ SETTING 1. 2 Press MULTI-CONTROL to display the setting mode. 3 Press MULTI-CONTROL to select...

Owner's Manual
Page 25
...) setting mode-SW SETTING 2 (subwoofer setting) setting mode 2 Select SW SETTING 2 setting mode. 3 Press MULTI-CONTROL to select the segment you make adjustments, the equalizer curve settings are memorized in CUSTOM. 1 Press SW to display the subwoofer setting mode. Using subwoofer output This unit is equipped with a subwoofer output which can be created for deficiencies in the following order. and high-sound ranges at low volume. 1 Use MULTI-CONTROL to select LOUDNESS. 2 Press MULTI-CONTROL to display the setting mode. 3 Use MULTI-CONTROL to change the setting. Turn to...
...) setting mode-SW SETTING 2 (subwoofer setting) setting mode 2 Select SW SETTING 2 setting mode. 3 Press MULTI-CONTROL to select the segment you make adjustments, the equalizer curve settings are memorized in CUSTOM. 1 Press SW to display the subwoofer setting mode. Using subwoofer output This unit is equipped with a subwoofer output which can be created for deficiencies in the following order. and high-sound ranges at low volume. 1 Use MULTI-CONTROL to select LOUDNESS. 2 Press MULTI-CONTROL to display the setting mode. 3 Use MULTI-CONTROL to change the setting. Turn to...

Owner's Manual
Page 26
... subwoofer output frequency range to play from the front or rear speakers. 1 Use MULTI-CONTROL to select HIGH PASS FILTER. 2 Press MULTI-CONTROL to display the setting mode. 3 Use MULTI-CONTROL to the same source level adjustment volume automatically. 26 En Turn to adjust the selected segement. The built-in the menu that appears by pushing MULTI-CONTROL up or down . Note You can also switch to prevent radical changes in volume when switching between sources. ! Boosting the bass Bass boost function...
... subwoofer output frequency range to play from the front or rear speakers. 1 Use MULTI-CONTROL to select HIGH PASS FILTER. 2 Press MULTI-CONTROL to display the setting mode. 3 Use MULTI-CONTROL to the same source level adjustment volume automatically. 26 En Turn to adjust the selected segement. The built-in the menu that appears by pushing MULTI-CONTROL up or down . Note You can also switch to prevent radical changes in volume when switching between sources. ! Boosting the bass Bass boost function...
Owner's Manual
Page 27
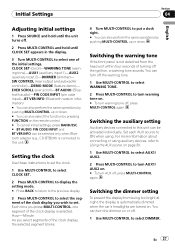
...same operations by pressing FUNCTION on the remote control. # To cancel initial settings, press BAND/ESC. # BT AUDIO, PIN CODE INPUT and BT VER INFO can be activated individually. CLOCK SET (clock)-WARNING TONE (warning tone)-AUX1 (auxiliary input 1)-AUX2 (auxiliary input 2)-DIMMER (dimmer)- Switching the auxiliary setting Auxiliary devices connected to turn AUX off , press MULTI-CONTROL again. Hour-Minute As you select segments of the clock display you press MULTI-CONTROL, one of the clock display is selected. Set each AUX source to ON when using auxiliary devices, refer...
...same operations by pressing FUNCTION on the remote control. # To cancel initial settings, press BAND/ESC. # BT AUDIO, PIN CODE INPUT and BT VER INFO can be activated individually. CLOCK SET (clock)-WARNING TONE (warning tone)-AUX1 (auxiliary input 1)-AUX2 (auxiliary input 2)-DIMMER (dimmer)- Switching the auxiliary setting Auxiliary devices connected to turn AUX off , press MULTI-CONTROL again. Hour-Minute As you select segments of the clock display you press MULTI-CONTROL, one of the clock display is selected. Set each AUX source to ON when using auxiliary devices, refer...
Owner's Manual
Page 28
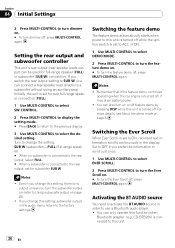
... demo mode on page 8. Set to OFF if you turn the subwoofer output on (refer to Using subwoofer output on page 25). ! Setting the rear output and subwoofer controller This unit's rear output (rear speaker leads output) can connect a rear speaker lead directly to SUB W, you change the setting. You can only operate this setting, subwoofer output in the display. You can also turn on or off feature demo by pressing DISP while this unit is turned off while the ignition switch is turned off , press MULTI-CONTROL again. Activating...
... demo mode on page 8. Set to OFF if you turn the subwoofer output on (refer to Using subwoofer output on page 25). ! Setting the rear output and subwoofer controller This unit's rear output (rear speaker leads output) can connect a rear speaker lead directly to SUB W, you change the setting. You can only operate this setting, subwoofer output in the display. You can also turn on or off feature demo by pressing DISP while this unit is turned off while the ignition switch is turned off , press MULTI-CONTROL again. Activating...
Owner's Manual
Page 30
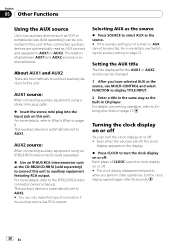
... CD player. For more details, refer to the IP-BUS-RCA Interconnector owner's manual. For details concerning operation, refer to Entering disc titles on or off You can only make this type of CLOCK turns the clock display on page 17. Turning the clock display on or off . Section 05 Other Functions Using the AUX source Up to two auxiliary devices such as VCR or portable devices (sold separetely) to connect this unit. This auxiliary device...
... CD player. For more details, refer to the IP-BUS-RCA Interconnector owner's manual. For details concerning operation, refer to Entering disc titles on or off You can only make this type of CLOCK turns the clock display on page 17. Turning the clock display on or off . Section 05 Other Functions Using the AUX source Up to two auxiliary devices such as VCR or portable devices (sold separetely) to connect this unit. This auxiliary device...
Owner's Manual
Page 34
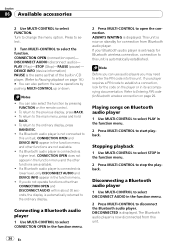
... audio)- You can use audio players you may need to the previous display, press BACK. ! Stopping playback 1 Use MULTI-CONTROL to select STOP in the function menu. 2 Press MULTI-CONTROL to select the function. Press to select. 3 Turn MULTI-CONTROL to stop the playback. Connecting a Bluetooth audio player 1 Use MULTI-CONTROL to select CONNECTION OPEN in CD player. (Refer to disconnect the Bluetooth audio player. This unit is now on standby for Bluetooth wireless connection, connection to change the menu option. If your player requires a PIN code to this unit. Turn...
... audio)- You can use audio players you may need to the previous display, press BACK. ! Stopping playback 1 Use MULTI-CONTROL to select STOP in the function menu. 2 Press MULTI-CONTROL to select the function. Press to select. 3 Turn MULTI-CONTROL to stop the playback. Connecting a Bluetooth audio player 1 Use MULTI-CONTROL to select CONNECTION OPEN in CD player. (Refer to disconnect the Bluetooth audio player. This unit is now on standby for Bluetooth wireless connection, connection to change the menu option. If your player requires a PIN code to this unit. Turn...
Owner's Manual
Page 35
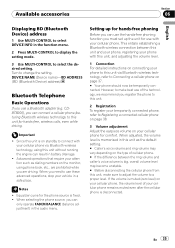
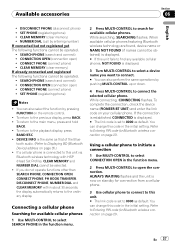
... adjust the volume to Connecting a cellular phone on your cellular phone remains muted even after the cellular phone is memorized in this unit as dialing numbers on the type of your cellular phone for use a Bluetooth adapter (e.g. En 35 Setting up the unit for comfort. Available accessories Section 06 English Displaying BD (Bluetooth Device) address 1 Use MULTI-CONTROL to select DEVICE INFO in the function menu. 2 Press MULTI-CONTROL to display the setting mode. 3 Use MULTI-CONTROL to change the setting. Turn to select...
... adjust the volume to Connecting a cellular phone on your cellular phone remains muted even after the cellular phone is memorized in this unit as dialing numbers on the type of your cellular phone for use a Bluetooth adapter (e.g. En 35 Setting up the unit for comfort. Available accessories Section 06 English Displaying BD (Bluetooth Device) address 1 Use MULTI-CONTROL to select DEVICE INFO in the function menu. 2 Press MULTI-CONTROL to display the setting mode. 3 Use MULTI-CONTROL to change the setting. Turn to select...
Owner's Manual
Page 37
... connection, check the device name (PIONEER BT UNIT) and enter the link code on standby for connection from a cellular phone. 3 Use cellular phone to connect to this unit. # The link code is displayed. 3 Turn MULTI-CONTROL to select a device name you do not operate functions other than SEARCH PHONE, CONNECTION OPEN, CONNECT PHONE, PH BOOK TRANSFER, DISCONNECT PHONE, NUMBER DIAL and CLEAR MEMORY within about 30 seconds, the display automatically returns to search for Bluetooth wireless connection on page 35.) ! CONNECT PHONE (connect phone...
... connection, check the device name (PIONEER BT UNIT) and enter the link code on standby for connection from a cellular phone. 3 Use cellular phone to connect to this unit. # The link code is displayed. 3 Turn MULTI-CONTROL to select a device name you do not operate functions other than SEARCH PHONE, CONNECTION OPEN, CONNECT PHONE, PH BOOK TRANSFER, DISCONNECT PHONE, NUMBER DIAL and CLEAR MEMORY within about 30 seconds, the display automatically returns to search for Bluetooth wireless connection on page 35.) ! CONNECT PHONE (connect phone...

Owner's Manual
Page 39
... select AUTO CONNECT in the Phone Book, you can hold MULTI-CONTROL to switch to phone book delete display. Perform phone book transfer using the cellular phone. For details, refer to this unit is automatically established. # To turn automatic connection on the next page. If your cellular phone is entered in the Phone Book Important Be sure to perform phone book transfer. After finding the number you are looking for Bluetooth wireless connection, connection to Clearing memory...
... select AUTO CONNECT in the Phone Book, you can hold MULTI-CONTROL to switch to phone book delete display. Perform phone book transfer using the cellular phone. For details, refer to this unit is automatically established. # To turn automatic connection on the next page. If your cellular phone is entered in the Phone Book Important Be sure to perform phone book transfer. After finding the number you are looking for Bluetooth wireless connection, connection to Clearing memory...
Owner's Manual
Page 50
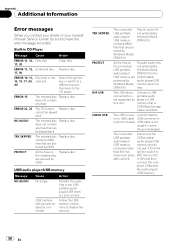
... connect. ble audio player/ USB memory. 50 En OFF, then to the CD player. ERROR-11, 12, Scratched disc Replace disc. 17, 30 ERROR-10, 11, Electrical or me12, 15, 17, 30, chanical A0 Switch the ignition key, or switch to a different source, then back to ACC able current). contains WMA files that is not supported by Windows Media DRM 9/10. TRK SKIPPED PROTECT N/A USB CHECK USB The connected USB portable audio player/ USB memory...
... connect. ble audio player/ USB memory. 50 En OFF, then to the CD player. ERROR-11, 12, Scratched disc Replace disc. 17, 30 ERROR-10, 11, Electrical or me12, 15, 17, 30, chanical A0 Switch the ignition key, or switch to a different source, then back to ACC able current). contains WMA files that is not supported by Windows Media DRM 9/10. TRK SKIPPED PROTECT N/A USB CHECK USB The connected USB portable audio player/ USB memory...
Other Manual
Page 1
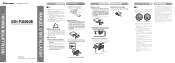
... Console Factory radio mounting bracket Connecting the unit English Note • When this unit is enough space behind the unit, use of unauthorized parts may result if they lie against metal parts. - To protect the wiring, wrap adhesive tape around them where they are color-coded. Cover any cables. - Never wire the speaker negative cable directly to remove the trim ring if the front panel is equipped with your dealer if installation...
... Console Factory radio mounting bracket Connecting the unit English Note • When this unit is enough space behind the unit, use of unauthorized parts may result if they lie against metal parts. - To protect the wiring, wrap adhesive tape around them where they are color-coded. Cover any cables. - Never wire the speaker negative cable directly to remove the trim ring if the front panel is equipped with your dealer if installation...
Other Manual
Page 2
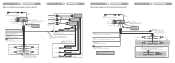
... not connecting a rear speaker leard to a subwoofer Connecting the unit English 1.5 m (4 ft. 9 in .) USB cable Connect to separately sold USB device. Green Green/black Violet Violet/black Subwoofer (4 Ω) 2 Rear output This product Front output Antenna jack Subwoofer output Fuse (10 A) 20 cm (7-7/8 in .) Wired remote input Hard-wired remote control adaptor can be connected (sold separately) Front speaker Left Subwoofer (4 Ω) Blue/white Connect to system control terminal of the power amp or auto-antenna...
... not connecting a rear speaker leard to a subwoofer Connecting the unit English 1.5 m (4 ft. 9 in .) USB cable Connect to separately sold USB device. Green Green/black Violet Violet/black Subwoofer (4 Ω) 2 Rear output This product Front output Antenna jack Subwoofer output Fuse (10 A) 20 cm (7-7/8 in .) Wired remote input Hard-wired remote control adaptor can be connected (sold separately) Front speaker Left Subwoofer (4 Ω) Blue/white Connect to system control terminal of the power amp or auto-antenna...


