
Owner's Manual
Page 3
... conversation, quiet office 60 Air conditioner at 20 feet, sewing machine 70 Vacuum cleaner, hair dryer, noisy restaurant 80 Average city traffic, garbage disposals, alarm clock at a safe level. THE FOLLOWING NOISES CAN BE DANGEROUS UNDER CONSTANT EXPOSURE 90 Subway, motorcycle, truck traffic, lawn mower 100 Garbage truck, chain saw, pneumatic...
... conversation, quiet office 60 Air conditioner at 20 feet, sewing machine 70 Vacuum cleaner, hair dryer, noisy restaurant 80 Average city traffic, garbage disposals, alarm clock at a safe level. THE FOLLOWING NOISES CAN BE DANGEROUS UNDER CONSTANT EXPOSURE 90 Subway, motorcycle, truck traffic, lawn mower 100 Garbage truck, chain saw, pneumatic...
Owner's Manual
Page 4
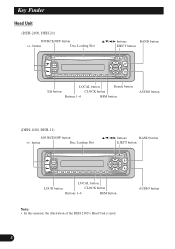
button Disc Loading Slot 5/∞/2/3 buttons BAND button EJECT button LOCAL button Detach button EQ button CLOCK button Buttons 1-6 BSM button AUDIO button (DEH-1100, DEH-11) SOURCE/OFF button +/- button Disc Loading Slot 5/∞/2/3 buttons BAND button EJECT button LOCAL button LOUD button CLOCK button Buttons 1-6 BSM button Note: • In this manual, the illustration of the DEH-2100's Head Unit is used. 3 AUDIO button AKeTyitFlein(dEenrglish) Head Unit (DEH-2100, DEH-21) SOURCE/OFF button +/-
button Disc Loading Slot 5/∞/2/3 buttons BAND button EJECT button LOCAL button Detach button EQ button CLOCK button Buttons 1-6 BSM button AUDIO button (DEH-1100, DEH-11) SOURCE/OFF button +/- button Disc Loading Slot 5/∞/2/3 buttons BAND button EJECT button LOCAL button LOUD button CLOCK button Buttons 1-6 BSM button Note: • In this manual, the illustration of the DEH-2100's Head Unit is used. 3 AUDIO button AKeTyitFlein(dEenrglish) Head Unit (DEH-2100, DEH-21) SOURCE/OFF button +/-

Owner's Manual
Page 16
AOtThietrleF(uEnncgtliiosnhs) Setting the Time This is the mode for setting the time on the unit's clock display. (Refer to "Minute", the seconds start counting from 00. 5. Hold for details concerning the clock display.) 1. As soon as desired time with the 2/3 buttons. 4. Enter the Time setting mode. Set as you switch to page 16 for 2 seconds 3. Cancel the Time setting mode. Select "Hour" or "Minute" with the 5/∞ buttons. Switch the source OFF. 2. Note: • Holding down the AUDIO button for 2 seconds also cancels the Time setting mode. 15
AOtThietrleF(uEnncgtliiosnhs) Setting the Time This is the mode for setting the time on the unit's clock display. (Refer to "Minute", the seconds start counting from 00. 5. Hold for details concerning the clock display.) 1. As soon as desired time with the 2/3 buttons. 4. Enter the Time setting mode. Set as you switch to page 16 for 2 seconds 3. Cancel the Time setting mode. Select "Hour" or "Minute" with the 5/∞ buttons. Switch the source OFF. 2. Note: • Holding down the AUDIO button for 2 seconds also cancels the Time setting mode. 15

Owner's Manual
Page 17
The time display disappears temporarily when you perform another operation, but the time indication returns to the display after 25 seconds. Pressing the CLOCK button switches the Time display ON/OFF. 16 FRANÇAIS ITALIANO NEDERLANDS ENGLISH ESPAÑOL DEUTSCH A Title (English) Displaying the Time • To turn the time display ON. Note: • When the sources are OFF, the Time appears on the display.
The time display disappears temporarily when you perform another operation, but the time indication returns to the display after 25 seconds. Pressing the CLOCK button switches the Time display ON/OFF. 16 FRANÇAIS ITALIANO NEDERLANDS ENGLISH ESPAÑOL DEUTSCH A Title (English) Displaying the Time • To turn the time display ON. Note: • When the sources are OFF, the Time appears on the display.


