
Owner's Manual
Page 2
... - Disc Loading Slot - Loudness Adjustment (LOUD) Detaching and Replacing the Front Panel 14 Theft Protection 14 - Manual and Seek Tuning - Track Search and Fast Forward/Reverse - Best Stations Memory (BSM) Using the Built-in CD Player's Error Message 17 Specifications 18 1 Random Play - Balance Adjustment (FADER) - Replacing the Front Panel Other Functions 15 Setting the Time 15 Displaying the Time 16 CD Player and Care 17 Precaution 17 Built-in CD Player 10 - Eject Tuner Operation 9 - Treble Adjustment (TRE) - Preset Tuning Basic Operation...
... - Disc Loading Slot - Loudness Adjustment (LOUD) Detaching and Replacing the Front Panel 14 Theft Protection 14 - Manual and Seek Tuning - Track Search and Fast Forward/Reverse - Best Stations Memory (BSM) Using the Built-in CD Player's Error Message 17 Specifications 18 1 Random Play - Balance Adjustment (FADER) - Replacing the Front Panel Other Functions 15 Setting the Time 15 Displaying the Time 16 CD Player and Care 17 Precaution 17 Built-in CD Player 10 - Eject Tuner Operation 9 - Treble Adjustment (TRE) - Preset Tuning Basic Operation...

Owner's Manual
Page 3
... actually be deceiving. Taking a minute to do this by playing it 's time to your hearing. Over time your sensitive hearing. Once you listening for your protection. Now it at a safe level BEFORE your hearing adapts. We Want You Listening For A Lifetime Used wisely, your new sound equipment will help to higher volumes of the Deafness Research Foundation. 2 ITALIANO NEDERLANDS This...
... actually be deceiving. Taking a minute to do this by playing it 's time to your hearing. Over time your sensitive hearing. Once you listening for your protection. Now it at a safe level BEFORE your hearing adapts. We Want You Listening For A Lifetime Used wisely, your new sound equipment will help to higher volumes of the Deafness Research Foundation. 2 ITALIANO NEDERLANDS This...
Owner's Manual
Page 4
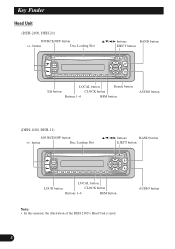
button Disc Loading Slot 5/∞/2/3 buttons BAND button EJECT button LOCAL button LOUD button CLOCK button Buttons 1-6 BSM button Note: • In this manual, the illustration of the DEH-2100's Head Unit is used. 3 AUDIO button AKeTyitFlein(dEenrglish) Head Unit (DEH-2100, DEH-21) SOURCE/OFF button +/- button Disc Loading Slot 5/∞/2/3 buttons BAND button EJECT button LOCAL button Detach button EQ button CLOCK button Buttons 1-6 BSM button AUDIO button (DEH-1100, DEH-11) SOURCE/OFF button +/-
button Disc Loading Slot 5/∞/2/3 buttons BAND button EJECT button LOCAL button LOUD button CLOCK button Buttons 1-6 BSM button Note: • In this manual, the illustration of the DEH-2100's Head Unit is used. 3 AUDIO button AKeTyitFlein(dEenrglish) Head Unit (DEH-2100, DEH-21) SOURCE/OFF button +/- button Disc Loading Slot 5/∞/2/3 buttons BAND button EJECT button LOCAL button Detach button EQ button CLOCK button Buttons 1-6 BSM button AUDIO button (DEH-1100, DEH-11) SOURCE/OFF button +/-
Owner's Manual
Page 5
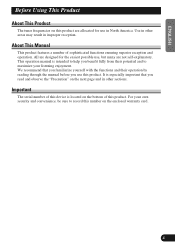
.... This operation manual is especially important that you familiarize yourself with the functions and their potential and to help you read and observe the "Precaution" on the next page and in other areas may result in North America. All are designed for the easiest possible use, but many are allocated for use this device is located on the...
.... This operation manual is especially important that you familiarize yourself with the functions and their potential and to help you read and observe the "Precaution" on the next page and in other areas may result in North America. All are designed for the easiest possible use, but many are allocated for use this device is located on the...
Owner's Manual
Page 6
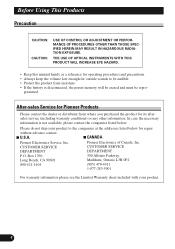
...manual handy as a reference for operating procedures and precautions. • Always keep the volume low enough for outside sounds to the companies at the addresses listed below for its aftersales service (including warranty conditions) or any other information. ABeTfoitrle U(EsningglisThh)is disconnected, the preset memory will be erased and must be audible. • Protect... After-sales Service for Pioneer Products Please contact the dealer or distributor from moisture. • If the battery is Products Precaution CAUTION: CAUTION: USE OF CONTROL OR ADJUSTMENT OR PERFORMANCE ...
...manual handy as a reference for operating procedures and precautions. • Always keep the volume low enough for outside sounds to the companies at the addresses listed below for its aftersales service (including warranty conditions) or any other information. ABeTfoitrle U(EsningglisThh)is disconnected, the preset memory will be erased and must be audible. • Protect... After-sales Service for Pioneer Products Please contact the dealer or distributor from moisture. • If the battery is Products Precaution CAUTION: CAUTION: USE OF CONTROL OR ADJUSTMENT OR PERFORMANCE ...
Owner's Manual
Page 7
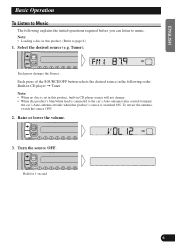
...; Loading a disc in CD player source will not change. • When this product's blue/white lead is switched ON. Each press changes the Source ... Each press of the SOURCE/OFF button selects the desired source in the following explains the initial operations required before you can listen to page 8.) 1. To retract the antenna, switch the source OFF. 2. Turn the source OFF. Tuner). Select the desired source (e.g. Raise or lower the volume. 3. Hold...
...; Loading a disc in CD player source will not change. • When this product's blue/white lead is switched ON. Each press changes the Source ... Each press of the SOURCE/OFF button selects the desired source in the following explains the initial operations required before you can listen to page 8.) 1. To retract the antenna, switch the source OFF. 2. Turn the source OFF. Tuner). Select the desired source (e.g. Raise or lower the volume. 3. Hold...
Owner's Manual
Page 8
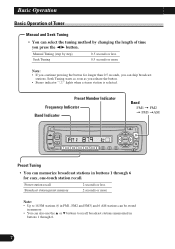
... 6. 7 Preset Number Indicator Frequency Indicator Band Indicator Band FM1 = FM2 = FM3 =AM Preset Tuning • You can memorize broadcast stations in buttons 1 through 6 for longer than 0.5 seconds, you can skip broadcast stations. ABaTsitcleO(pEenrgaltisohn) Basic Operation of time you press the 2/3 button. Preset station recall Broadcast station preset memory 2 seconds or less 2 seconds or more Note: • If you release the button. • Stereo indicator "" lights when a stereo station is selected...
... 6. 7 Preset Number Indicator Frequency Indicator Band Indicator Band FM1 = FM2 = FM3 =AM Preset Tuning • You can memorize broadcast stations in buttons 1 through 6 for longer than 0.5 seconds, you can skip broadcast stations. ABaTsitcleO(pEenrgaltisohn) Basic Operation of time you press the 2/3 button. Preset station recall Broadcast station preset memory 2 seconds or less 2 seconds or more Note: • If you release the button. • Stereo indicator "" lights when a stereo station is selected...

Owner's Manual
Page 9
..., make sure the recorded side is inserted with the disc remaining in CD Player's Error Message" on the display. ESPAÑOL DEUTSCH FRANÇAIS ITALIANO NEDERLANDS Track Number Indicator Play Time Indicator Track Search and Fast Forward/Reverse • You can be turned ON/OFF with the recorded side up, it . • If a disc is down. Do not use...
..., make sure the recorded side is inserted with the disc remaining in CD Player's Error Message" on the display. ESPAÑOL DEUTSCH FRANÇAIS ITALIANO NEDERLANDS Track Number Indicator Play Time Indicator Track Search and Fast Forward/Reverse • You can be turned ON/OFF with the recorded side up, it . • If a disc is down. Do not use...

Owner's Manual
Page 10
Best Stations Memory (BSM) The BSM function stores stations in order of their signal strength. "LOC" • To cancel the process, press the BSM button before memorization is complete. 9 The stations with the LOCAL button. Tuner Operation Local Seek Tuning This function selects only stations with especially strong signals. • Switch the Local ON/OFF with the strongest signals will be stored under buttons 1-6 and in memory automatically. • Press the BSM button for 2 seconds to switch BSM ON.
Best Stations Memory (BSM) The BSM function stores stations in order of their signal strength. "LOC" • To cancel the process, press the BSM button before memorization is complete. 9 The stations with the LOCAL button. Tuner Operation Local Seek Tuning This function selects only stations with especially strong signals. • Switch the Local ON/OFF with the strongest signals will be stored under buttons 1-6 and in memory automatically. • Press the BSM button for 2 seconds to switch BSM ON.

Owner's Manual
Page 11
... the tracks on a disc have been scanned. Note: • Scan Play is automatically canceled. Pause Pause pauses the currently playing track. • Switch the Pause ON/OFF with the button 3. ENGLISH ESPAÑOL DEUTSCH AUsTinitgleth(EenBgulislth-)in CD Player Repeat Play Repeat Play plays the same track repeatedly. • Switch Repeat Play ON/OFF with the button 3. 2. Switch Scan Play ON with the...
... the tracks on a disc have been scanned. Note: • Scan Play is automatically canceled. Pause Pause pauses the currently playing track. • Switch the Pause ON/OFF with the button 3. ENGLISH ESPAÑOL DEUTSCH AUsTinitgleth(EenBgulislth-)in CD Player Repeat Play Repeat Play plays the same track repeatedly. • Switch Repeat Play ON/OFF with the button 3. 2. Switch Scan Play ON with the...

Owner's Manual
Page 12
... Audio Menu. Select the desired mode in the following order: EQ1 = EQ2 = EQ3 = OFF Entering the Audio Menu With this Menu, you do not perform an operation within about 30 seconds, the Audio Menu is automatically canceled. 1. Note: • After entering the Audio Menu, if you can switch between Equalizer curves. • Press the EQ button to select the desired Equalizer curve. AuTdiitoleA(dEjnugstlmishen) t Selecting the Equalizer Curve (DEH-2100 and DEH...
... Audio Menu. Select the desired mode in the following order: EQ1 = EQ2 = EQ3 = OFF Entering the Audio Menu With this Menu, you do not perform an operation within about 30 seconds, the Audio Menu is automatically canceled. 1. Note: • After entering the Audio Menu, if you can switch between Equalizer curves. • Press the EQ button to select the desired Equalizer curve. AuTdiitoleA(dEjnugstlmishen) t Selecting the Equalizer Curve (DEH-2100 and DEH...
Owner's Manual
Page 13
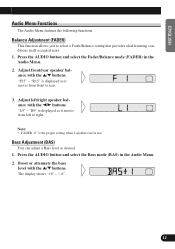
...) This function allows you to rear. 3. Boost or attenuate the bass level with the 2/3 buttons. "F15" - "R15" is the proper setting when 2 speakers are in all occupied seats. 1. The display shows "+6" - Adjust front/rear speaker balance with the 5/∞ buttons. Bass Adjustment (BAS) You can adjust a Bass level as it moves from front to select a Fader/Balance setting that provides ideal listening conditions in use. Press the AUDIO button and select the Bass mode (BAS) in the Audio Menu. 2.
...) This function allows you to rear. 3. Boost or attenuate the bass level with the 2/3 buttons. "F15" - "R15" is the proper setting when 2 speakers are in all occupied seats. 1. The display shows "+6" - Adjust front/rear speaker balance with the 5/∞ buttons. Bass Adjustment (BAS) You can adjust a Bass level as it moves from front to select a Fader/Balance setting that provides ideal listening conditions in use. Press the AUDIO button and select the Bass mode (BAS) in the Audio Menu. 2.
Owner's Manual
Page 14
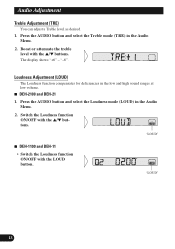
... the Audio Menu. 2. "LOUD" 7 DEH-1100 and DEH-11 • Switch the Loudness function ON/OFF with the 5/∞ buttons. Press the AUDIO button and select the Treble mode (TRE) in the low and high sound ranges at low volume. 7 DEH-2100 and DEH-21 1. The display shows "+6" - "LOUD" 13 Boost or attenuate the treble level with the 5/∞ buttons. Press the AUDIO button and select the Loudness mode (LOUD) in the Audio Menu. 2. Audio Adjustment Treble Adjustment (TRE) You can adjust a Treble level...
... the Audio Menu. 2. "LOUD" 7 DEH-1100 and DEH-11 • Switch the Loudness function ON/OFF with the 5/∞ buttons. Press the AUDIO button and select the Treble mode (TRE) in the low and high sound ranges at low volume. 7 DEH-2100 and DEH-21 1. The display shows "+6" - "LOUD" 13 Boost or attenuate the treble level with the 5/∞ buttons. Press the AUDIO button and select the Loudness mode (LOUD) in the Audio Menu. 2. Audio Adjustment Treble Adjustment (TRE) You can adjust a Treble level...
Owner's Manual
Page 15
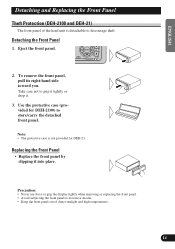
... the display tightly when removing or replacing the front panel. • Avoid subjecting the front panel to grip it tightly or drop it into place. Replacing the Front Panel • Replace the front panel by clipping it . 3. Take care not to excessive shocks. • Keep the front panel out of the head unit is not provided for DEH-2100) to discourage theft. Use the protective case...
... the display tightly when removing or replacing the front panel. • Avoid subjecting the front panel to grip it tightly or drop it into place. Replacing the Front Panel • Replace the front panel by clipping it . 3. Take care not to excessive shocks. • Keep the front panel out of the head unit is not provided for DEH-2100) to discourage theft. Use the protective case...

Owner's Manual
Page 16
Set as you switch to page 16 for 2 seconds also cancels the Time setting mode. 15 Cancel the Time setting mode. Enter the Time setting mode. Select "Hour" or "Minute" with the 5/∞ buttons. Note: • Holding down the AUDIO button for details concerning the clock display.) 1. AOtThietrleF(uEnncgtliiosnhs) Setting the Time This is the mode for setting the time on the unit's clock display. (Refer to "Minute", the seconds start counting from 00. 5. Hold for 2 seconds 3. Switch the source OFF. 2. As soon as desired time with the 2/3 buttons. 4.
Set as you switch to page 16 for 2 seconds also cancels the Time setting mode. 15 Cancel the Time setting mode. Enter the Time setting mode. Select "Hour" or "Minute" with the 5/∞ buttons. Note: • Holding down the AUDIO button for details concerning the clock display.) 1. AOtThietrleF(uEnncgtliiosnhs) Setting the Time This is the mode for setting the time on the unit's clock display. (Refer to "Minute", the seconds start counting from 00. 5. Hold for 2 seconds 3. Switch the source OFF. 2. As soon as desired time with the 2/3 buttons. 4.

Owner's Manual
Page 17
Pressing the CLOCK button switches the Time display ON/OFF. 16 FRANÇAIS ITALIANO NEDERLANDS Note: • When the sources are OFF, the Time appears on the display. ENGLISH ESPAÑOL DEUTSCH A Title (English) Displaying the Time • To turn the time display ON. The time display disappears temporarily when you perform another operation, but the time indication returns to the display after 25 seconds.
Pressing the CLOCK button switches the Time display ON/OFF. 16 FRANÇAIS ITALIANO NEDERLANDS Note: • When the sources are OFF, the Time appears on the display. ENGLISH ESPAÑOL DEUTSCH A Title (English) Displaying the Time • To turn the time display ON. The time display disappears temporarily when you perform another operation, but the time indication returns to the display after 25 seconds.
Owner's Manual
Page 18
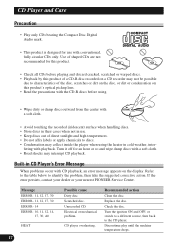
.... Replace the disc. If the error persists, contact your dealer or your nearest PIONEER Service Center. Scratched disc. Use of direct sunlight and high temperatures. • Do not affix labels or apply chemicals to discs. • Condensation may interrupt CD playback. Recommended action Clean the disc. Check the disc. Refer to the table below to the CD player. CD player overheating. Discontinue play until...
.... Replace the disc. If the error persists, contact your dealer or your nearest PIONEER Service Center. Scratched disc. Use of direct sunlight and high temperatures. • Do not affix labels or apply chemicals to discs. • Condensation may interrupt CD playback. Recommended action Clean the disc. Check the disc. Refer to the table below to the CD player. CD player overheating. Discontinue play until...
Owner's Manual
Page 19
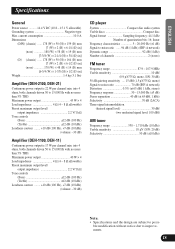
... more than 5% THD. Maximum power output 40 W × 4 Load impedance 4 Ω (4 - 8 Ω allowable) Preout maximum output level/ output impedance 2.2 V/1 kΩ Tone controls (Bass 12 dB (100 Hz) (Treble 12 dB (10 kHz) Loudness contour ........ +10 dB (100 Hz), +7 dB (10 kHz) (volume: -30 dB) CD player System Compact disc audio system Usable discs Compact disc Signal format Sampling frequency: 44.1 kHz Number of channels 2 (stereo) FM tuner Frequency range 87.9 - 107.9 MHz...
... more than 5% THD. Maximum power output 40 W × 4 Load impedance 4 Ω (4 - 8 Ω allowable) Preout maximum output level/ output impedance 2.2 V/1 kΩ Tone controls (Bass 12 dB (100 Hz) (Treble 12 dB (10 kHz) Loudness contour ........ +10 dB (100 Hz), +7 dB (10 kHz) (volume: -30 dB) CD player System Compact disc audio system Usable discs Compact disc Signal format Sampling frequency: 44.1 kHz Number of channels 2 (stereo) FM tuner Frequency range 87.9 - 107.9 MHz...

Owner's Manual
Page 56
...-90 Published by Pioneer Corporation. Copyright © 1999 by Pioneer Corporation. Tous droits de reproduction et de traduction réservés. Publication de Pioneer Corporation. Printed in Imprimé UC P.O. PIONEER CORPORATION 4-1, MEGURO 1-CHOME, MEGURO-KU, TOKYO 153-8654, JAPAN PIONEER ELECTRONICS (USA) INC. All rights reserved. Box 1760, Long Beach, California 90801, U.S.A. Del Valle, Mexico...
...-90 Published by Pioneer Corporation. Copyright © 1999 by Pioneer Corporation. Tous droits de reproduction et de traduction réservés. Publication de Pioneer Corporation. Printed in Imprimé UC P.O. PIONEER CORPORATION 4-1, MEGURO 1-CHOME, MEGURO-KU, TOKYO 153-8654, JAPAN PIONEER ELECTRONICS (USA) INC. All rights reserved. Box 1760, Long Beach, California 90801, U.S.A. Del Valle, Mexico...


