Owner's Manual
Page 6
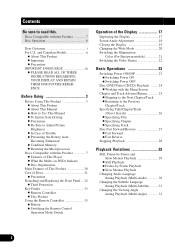
...INSTRUCTIONS REGARDING YOUR DISPLAY AND RETAIN THEM FOR FUTURE REFERENCE Before Using 3 Before Using This Product 3 - Precaution - Switching the Remote Control Operation Mode Switch Operation of Trouble - Working with this Product 7 - Discs Compatible with the Menu Screen Chapter and ...Track Advance/Return 25 - and Canadian Models ii - Important - About This Manual - This Product Using the Remote Controller 15 - Fast Forward - Frame-by -Frame and Slow Motion Playback 29 - Precaution IMPORTANT SAFEGUARDS iii - What the Marks on...
...INSTRUCTIONS REGARDING YOUR DISPLAY AND RETAIN THEM FOR FUTURE REFERENCE Before Using 3 Before Using This Product 3 - Precaution - Switching the Remote Control Operation Mode Switch Operation of Trouble - Working with this Product 7 - Discs Compatible with the Menu Screen Chapter and ...Track Advance/Return 25 - and Canadian Models ii - Important - About This Manual - This Product Using the Remote Controller 15 - Fast Forward - Frame-by -Frame and Slow Motion Playback 29 - Precaution IMPORTANT SAFEGUARDS iii - What the Marks on...

Owner's Manual
Page 7
... Menu - Adjusting the Color - Adjusting the Hue - Searching for Digital Output (DIGITAL OUTPUT 52 Setting Digital and Analog Audio Output (OUTPUT SELECTION 53 Setting Remote Control Code Type (REMOTE CODE SELECT 54 Setting the Display 55 Operating the Setting Menu 55 - About the Liquid Crystal Display (LCD) Screen - Searching for a Desired Scene...
... Menu - Adjusting the Color - Adjusting the Hue - Searching for Digital Output (DIGITAL OUTPUT 52 Setting Digital and Analog Audio Output (OUTPUT SELECTION 53 Setting Remote Control Code Type (REMOTE CODE SELECT 54 Setting the Display 55 Operating the Setting Menu 55 - About the Liquid Crystal Display (LCD) Screen - Searching for a Desired Scene...

Owner's Manual
Page 18
...u RGB !9 i MENU V.SEL @0 o REAR @1 !0 WIDE @2 OPEN/CLOSE ANGLE @3 1 2 3 C @4 CLEAR !1 4 5 6 10 7 8 9 0 q Remote control code selection switch (For details, see page 54.) w TOP MENU button e MENU button r AUDIO button t SUBTITLE button y ANGLE button u REVERSE (1) button i PLAY/PAUSE ...(4) button !0 OPEN/CLOSE (0) button !1 Number buttons !2 RETURN button !3 POWER button !4 DISPLAY button !5 Joystick !6 STEP (e)/(E) buttons !7 Remote control operation mode switch (For details, see page 16.) !8 FORWARD (¡) button !9 RGB button @0 STOP (7) button @1 NEXT (¢...
...u RGB !9 i MENU V.SEL @0 o REAR @1 !0 WIDE @2 OPEN/CLOSE ANGLE @3 1 2 3 C @4 CLEAR !1 4 5 6 10 7 8 9 0 q Remote control code selection switch (For details, see page 54.) w TOP MENU button e MENU button r AUDIO button t SUBTITLE button y ANGLE button u REVERSE (1) button i PLAY/PAUSE ...(4) button !0 OPEN/CLOSE (0) button !1 Number buttons !2 RETURN button !3 POWER button !4 DISPLAY button !5 Joystick !6 STEP (e)/(E) buttons !7 Remote control operation mode switch (For details, see page 16.) !8 FORWARD (¡) button !9 RGB button @0 STOP (7) button @1 NEXT (¢...

Owner's Manual
Page 20
...unit. • Do not handle the battery with metallic tools. • Do not store the lithium battery with metallic materials. • When disposing of the remote controller and insert the battery with the (+) and (-) poles pointing in the proper direction. Precaution: • Do not store the... in high temperatures or direct sunlight. • The controller may not function properly in direct sunlight. • Do not let the remote controller fall onto the floor, where it may become jammed under the brake or accelerator pedal. Replacing the Lithium Battery: • Use only lithium battery ...
...unit. • Do not handle the battery with metallic tools. • Do not store the lithium battery with metallic materials. • When disposing of the remote controller and insert the battery with the (+) and (-) poles pointing in the proper direction. Precaution: • Do not store the... in high temperatures or direct sunlight. • The controller may not function properly in direct sunlight. • Do not let the remote controller fall onto the floor, where it may become jammed under the brake or accelerator pedal. Replacing the Lithium Battery: • Use only lithium battery ...
Owner's Manual
Page 21
... button ANGLE button Model ABCDEF 7 Model A:AVD-W8000* D:AVX-P7000CD B:AVX-7000 E:AVX-P7300DVD * Only when the front mode is selected. Before Using Switching the Remote Control Operation Mode Switch When using this product, set the remote control operation mode switch to the following chart before operating. C:AVX-7300 F:GEX-P7000TV 16 To operate the TV or...
... button ANGLE button Model ABCDEF 7 Model A:AVD-W8000* D:AVX-P7000CD B:AVX-7000 E:AVX-P7300DVD * Only when the front mode is selected. Before Using Switching the Remote Control Operation Mode Switch When using this product, set the remote control operation mode switch to the following chart before operating. C:AVX-7300 F:GEX-P7000TV 16 To operate the TV or...
Owner's Manual
Page 38
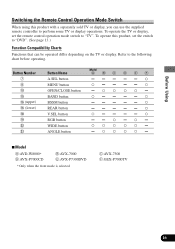
... MENU AUDIO TOP MENU RTN POWER S.TITLE ANGLE DISP BSSM/ BAND DVD TV ch call RGB MENU V.SEL REAR OPEN/CLOSE 1 ANGLE 2 3 4 5 6 7 8 9 WIDE C CLEAR 10 0 REMOTE CONTROLLER 1 Press the DISPLAY button. These include starting playback from a specified title, chapter or time, setting the range of disc operations. Operating with Information Displays...
... MENU AUDIO TOP MENU RTN POWER S.TITLE ANGLE DISP BSSM/ BAND DVD TV ch call RGB MENU V.SEL REAR OPEN/CLOSE 1 ANGLE 2 3 4 5 6 7 8 9 WIDE C CLEAR 10 0 REMOTE CONTROLLER 1 Press the DISPLAY button. These include starting playback from a specified title, chapter or time, setting the range of disc operations. Operating with Information Displays...

Owner's Manual
Page 46
... AUDIO TOP MENU RTN POWER S.TITLE ANGLE DISP BSSM/ BAND DVD TV ch call RGB MENU V.SEL REAR OPEN/CLOSE 1 ANGLE 23 4 5 6 WIDE C CLEAR 10 7 8 9 0 REMOTE CONTROLLER 1 Press the STOP (7) button. 2 Press the MENU button when the disc is displayed. Changing Initial Settings Changing Initial Settings Calling up the SET UP...
... AUDIO TOP MENU RTN POWER S.TITLE ANGLE DISP BSSM/ BAND DVD TV ch call RGB MENU V.SEL REAR OPEN/CLOSE 1 ANGLE 23 4 5 6 WIDE C CLEAR 10 7 8 9 0 REMOTE CONTROLLER 1 Press the STOP (7) button. 2 Press the MENU button when the disc is displayed. Changing Initial Settings Changing Initial Settings Calling up the SET UP...

Owner's Manual
Page 59
Precaution: • When changing the code type, set the remote code of the supplied remote controller to select the "REMOTE CODE SELECT" . The currently set . There are two remote codes, CODE TYPE A and CODE TYPE B. When using this product with a Pioneer DVD player, set the switch on the left side of this product only. Code type...
Precaution: • When changing the code type, set the remote code of the supplied remote controller to select the "REMOTE CODE SELECT" . The currently set . There are two remote codes, CODE TYPE A and CODE TYPE B. When using this product with a Pioneer DVD player, set the switch on the left side of this product only. Code type...

Owner's Manual
Page 60
Setting the Display Setting the Display Operating the Setting Menu Entering the Display Setting Menu Perform display and picture setting with remote controller. Note: • After entering the Display Setting Menu, if you do not perfome an operation within about 30 seconds, the Display Setting Menu is ...
Setting the Display Setting the Display Operating the Setting Menu Entering the Display Setting Menu Perform display and picture setting with remote controller. Note: • After entering the Display Setting Menu, if you do not perfome an operation within about 30 seconds, the Display Setting Menu is ...

Owner's Manual
Page 65
Precaution • You cannot switch the head unit's source with remote control for DVD player. • When you have switched power to this unit ON by pressing the POWER button, power to this unit remains ON ... this unit. Depending on the connection method, the picture on the rear display may disappear. 60 Others For details, refer to a head unit other than a Pioneer Multi-Channel AV Master Unit (e.g. AVM-P9000R), performing the following steps switches power ON.
Precaution • You cannot switch the head unit's source with remote control for DVD player. • When you have switched power to this unit ON by pressing the POWER button, power to this unit remains ON ... this unit. Depending on the connection method, the picture on the rear display may disappear. 60 Others For details, refer to a head unit other than a Pioneer Multi-Channel AV Master Unit (e.g. AVM-P9000R), performing the following steps switches power ON.

Owner's Manual
Page 68
...Operation with a new one of the same capacity. The unit does not operate correctly even when the appropriate remote control buttons are caus- rectly connected. The remote control operation mode is dirty. The disc is incorrect. There is no sound. Switch to pages 13 ... output Switch the output setting to operate incorrectly. Fix the problem causing the blown fuse, and replace the old fuse with the remote control isn't possible. Battery power is not possible. Noise and other factors are pressed. Playback is low. Connections are correct....
...Operation with a new one of the same capacity. The unit does not operate correctly even when the appropriate remote control buttons are caus- rectly connected. The remote control operation mode is dirty. The disc is incorrect. There is no sound. Switch to pages 13 ... output Switch the output setting to operate incorrectly. Fix the problem causing the blown fuse, and replace the old fuse with the remote control isn't possible. Battery power is not possible. Noise and other factors are pressed. Playback is low. Connections are correct....

Other Manual
Page 4
.... 13 Installing the Voice Guidance Speaker Precaution: • Do not install on each side. High temperatures may be subjected to both the back of the remote control signal. Installation 2. Stick the supplied velcro tapes to direct sunlight.
.... 13 Installing the Voice Guidance Speaker Precaution: • Do not install on each side. High temperatures may be subjected to both the back of the remote control signal. Installation 2. Stick the supplied velcro tapes to direct sunlight.


