Owner's Manual
Page 6
... Display 17 Deploying the Display 17 Screen Angle Adjustment 18 Closing the Display 19 Changing the Wide Mode 20 Switching the Illumination Color (For European models 21 Switching the Video Source 22 Basic Operations 23 Switching Power ON/OFF 23 - Remote Controller - Battery - Frame-by -Frame and Slow Motion Playback 29 - Important - About This Product - Precaution - Precaution Detaching and Replacing the Front Panel ....12 - Switching Power OFF Disc (DVD/Video CD/CD) Playback ........ 24 - Fast Reverse...
... Display 17 Deploying the Display 17 Screen Angle Adjustment 18 Closing the Display 19 Changing the Wide Mode 20 Switching the Illumination Color (For European models 21 Switching the Video Source 22 Basic Operations 23 Switching Power ON/OFF 23 - Remote Controller - Battery - Frame-by -Frame and Slow Motion Playback 29 - Important - About This Product - Precaution - Precaution Detaching and Replacing the Front Panel ....12 - Switching Power OFF Disc (DVD/Video CD/CD) Playback ........ 24 - Fast Reverse...

Owner's Manual
Page 7
... - Setting the Automatic Open Mode - Adjusting the Color - About the Liquid Crystal Display (LCD) Screen - Keeping the Display in Good Condition - Selecting Repeat Range - Searching for Digital Output (DIGITAL OUTPUT 52 Setting Digital and Analog Audio Output (OUTPUT SELECTION 53 Setting Remote Control Code Type (REMOTE CODE SELECT 54 Setting the Display 55 Operating the Setting Menu 55 - Selecting Repeat Range - Setting Scan Play Changing Initial Settings 41 Calling up Information Displays 33 Operating with the Head Unit 59 - Setting the Code Number and Level - Changing the...
... - Setting the Automatic Open Mode - Adjusting the Color - About the Liquid Crystal Display (LCD) Screen - Keeping the Display in Good Condition - Selecting Repeat Range - Searching for Digital Output (DIGITAL OUTPUT 52 Setting Digital and Analog Audio Output (OUTPUT SELECTION 53 Setting Remote Control Code Type (REMOTE CODE SELECT 54 Setting the Display 55 Operating the Setting Menu 55 - Selecting Repeat Range - Setting Scan Play Changing Initial Settings 41 Calling up Information Displays 33 Operating with the Head Unit 59 - Setting the Code Number and Level - Changing the...

Owner's Manual
Page 12
... to use certain functions. • Playback of some DVD-Video discs, you purchased the application software.) • Playback of CD-TEXT discs is possible, but display of titles and other information is not possible. • CD-Extra discs can be played back as music CDs. 7 Disc types and logos Diameter/Playable sides Playback time DVD VIDEO DVD VIDEO 12 cm (5 in.)/single-sided 12 cm (5 in the Video format (Video mode...
... to use certain functions. • Playback of some DVD-Video discs, you purchased the application software.) • Playback of CD-TEXT discs is possible, but display of titles and other information is not possible. • CD-Extra discs can be played back as music CDs. 7 Disc types and logos Diameter/Playable sides Playback time DVD VIDEO DVD VIDEO 12 cm (5 in.)/single-sided 12 cm (5 in the Video format (Video mode...

Owner's Manual
Page 15
You can play back DVDs, Video CDs (PBC compatibility) and CDs. When using this product with a Pioneer Multi-Channel AV Master Unit such as the AVM-P9000R or AVM-P9000) You can enjoy different kinds of repeat play back Video CDs featuring PBC (Playback Control). Before Using Main Features of This Product You can switch between multiple audio systems recorded on a DVD as desired. This product...
You can play back DVDs, Video CDs (PBC compatibility) and CDs. When using this product with a Pioneer Multi-Channel AV Master Unit such as the AVM-P9000R or AVM-P9000) You can enjoy different kinds of repeat play back Video CDs featuring PBC (Playback Control). Before Using Main Features of This Product You can switch between multiple audio systems recorded on a DVD as desired. This product...

Owner's Manual
Page 27
... "AVM" video select setting in the display setting menu, video is locked to RGB. (See page 56.) 7 Switching to AV and VTR You can switch between video from a component connected to this produt's RGB input. • Switch to RGB. Operation of the Display Switching the Video Source 7 Switching to RGB You can watch videos from a component connected to this product's video input (VTR) and video from the AV-BUS component selected with the Head Unit's source select...
... "AVM" video select setting in the display setting menu, video is locked to RGB. (See page 56.) 7 Switching to AV and VTR You can switch between video from a component connected to this produt's RGB input. • Switch to RGB. Operation of the Display Switching the Video Source 7 Switching to RGB You can watch videos from a component connected to this product's video input (VTR) and video from the AV-BUS component selected with the Head Unit's source select...

Owner's Manual
Page 28
... the Head Unit. Basic Operations Basic Operations Switching Power ON/OFF Switching Power ON Press the SOURCE button on the rear display may be sure not to forget to switch power to the Head Unit switches OFF. Precautions • When you can watch the DVD picture from where you eject a source disc (CD or MD) selected with the POWER button, you can switch power to the head unit switches OFF. Depending on the connection method, the picture on the...
... the Head Unit. Basic Operations Basic Operations Switching Power ON/OFF Switching Power ON Press the SOURCE button on the rear display may be sure not to forget to switch power to the Head Unit switches OFF. Precautions • When you can watch the DVD picture from where you eject a source disc (CD or MD) selected with the POWER button, you can switch power to the head unit switches OFF. Depending on the connection method, the picture on the...
Owner's Manual
Page 38
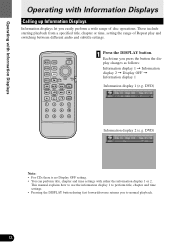
...time settings. • Pressing the DISPLAY button during fast forward/reverse returns you press the button the display changes as follows: Information display 1 = Information display 2 = Display OFF = Information display 1 Information display 1 (e.g. MENU AUDIO TOP MENU RTN POWER S.TITLE ANGLE DISP BSSM/ BAND DVD TV ch call RGB MENU V.SEL REAR OPEN/CLOSE 1 ANGLE 2 3 4 5 6 7 8 9 WIDE C CLEAR 10 0 REMOTE CONTROLLER 1 Press the DISPLAY button. DVD) Information display 2 (e.g. This manual explains how to use the information display 1 to normal playback. 33 Operating...
...time settings. • Pressing the DISPLAY button during fast forward/reverse returns you press the button the display changes as follows: Information display 1 = Information display 2 = Display OFF = Information display 1 Information display 1 (e.g. MENU AUDIO TOP MENU RTN POWER S.TITLE ANGLE DISP BSSM/ BAND DVD TV ch call RGB MENU V.SEL REAR OPEN/CLOSE 1 ANGLE 2 3 4 5 6 7 8 9 WIDE C CLEAR 10 0 REMOTE CONTROLLER 1 Press the DISPLAY button. DVD) Information display 2 (e.g. This manual explains how to use the information display 1 to normal playback. 33 Operating...

Owner's Manual
Page 46
... the PREVIOUS (w2) button. 41 The SET UP MENU is displayed. The second SET UP MENU is displayed. 3 Press the NEXT (¢) button. MENU AUDIO TOP MENU RTN POWER S.TITLE ANGLE DISP BSSM/ BAND DVD TV ch call RGB MENU V.SEL REAR OPEN/CLOSE 1 ANGLE 23 4 5 6 WIDE C CLEAR 10 7 8 9 0 REMOTE CONTROLLER 1 Press the STOP (7) button. 2 Press the MENU button when the disc is stopped. Note: • To switch to change Audio, Subtitle, Parental Lock and other DVD settings.
... the PREVIOUS (w2) button. 41 The SET UP MENU is displayed. The second SET UP MENU is displayed. 3 Press the NEXT (¢) button. MENU AUDIO TOP MENU RTN POWER S.TITLE ANGLE DISP BSSM/ BAND DVD TV ch call RGB MENU V.SEL REAR OPEN/CLOSE 1 ANGLE 23 4 5 6 WIDE C CLEAR 10 7 8 9 0 REMOTE CONTROLLER 1 Press the STOP (7) button. 2 Press the MENU button when the disc is stopped. Note: • To switch to change Audio, Subtitle, Parental Lock and other DVD settings.

Owner's Manual
Page 48
... the joystick to select the "SUBTITLE LANG.". Each time you click the joystick the selected setting switches ON/OFF. 7 Assist Subtitles Assist subtitles offer explanations for the aurally impaired. However, they are only displayed if they are recorded on the DVD, subtitles are displayed in blue. 2 Click the joystick. Changing Initial Settings Setting the Subtitle (SUBTITLE LANG.) You can also...
... the joystick to select the "SUBTITLE LANG.". Each time you click the joystick the selected setting switches ON/OFF. 7 Assist Subtitles Assist subtitles offer explanations for the aurally impaired. However, they are only displayed if they are recorded on the DVD, subtitles are displayed in blue. 2 Click the joystick. Changing Initial Settings Setting the Subtitle (SUBTITLE LANG.) You can also...
Owner's Manual
Page 57
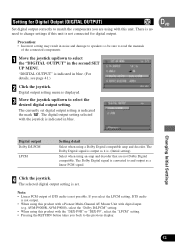
... speakers so be sure to read the manuals of DTS audio is indicated in blue. (For details, see page 41.) 2 Click the joystick. The Dolby Digital signal is converted to select the "DIGITAL OUTPUT" in blue. There is no need to change settings if this unit is displayed. 3 Move the joystick up /down to the previous display. 52 Digital output setting menu is not connected for Digital Output...
... speakers so be sure to read the manuals of DTS audio is indicated in blue. (For details, see page 41.) 2 Click the joystick. The Dolby Digital signal is converted to select the "DIGITAL OUTPUT" in blue. There is no need to change settings if this unit is displayed. 3 Move the joystick up /down to the previous display. 52 Digital output setting menu is not connected for Digital Output...
Owner's Manual
Page 58
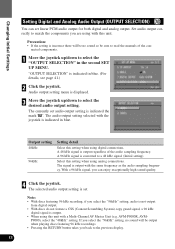
... RETURN button takes you can set . Audio output setting menu is output regardless of the con- A 96 kHz signal is indicated in blue. "OUTPUT SELECTION" is converted to read the manuals of the audio sampling frequency. Changing Initial Settings Setting Digital and Analog Audio Output (OUTPUT SELECTION) You can enjoy exceptionally high sound quality. 4 Click the joystick. The audio output setting selected with the joystick is output with this setting when using digital connections. The signal is...
... RETURN button takes you can set . Audio output setting menu is output regardless of the con- A 96 kHz signal is indicated in blue. "OUTPUT SELECTION" is converted to read the manuals of the audio sampling frequency. Changing Initial Settings Setting Digital and Analog Audio Output (OUTPUT SELECTION) You can enjoy exceptionally high sound quality. 4 Click the joystick. The audio output setting selected with the joystick is output with this setting when using digital connections. The signal is...
Owner's Manual
Page 61
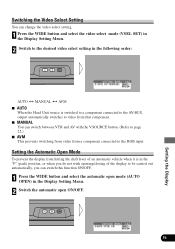
Switching the Video Select Setting You can change the video select setting. 1 Press the WIDE button and select the video select mode (VSEL SET) in the Display Setting Menu. 2 Switch to the desired video select setting in the following order: AUTO Ô MANUAL Ô AVM 7 AUTO When the Head Unit source is switched to a component connected to the AV-BUS, output automatically switches to video from that component. 7 MANUAL You can switch between VTR and AV with the V.SOURCE button. (Refer...
Switching the Video Select Setting You can change the video select setting. 1 Press the WIDE button and select the video select mode (VSEL SET) in the Display Setting Menu. 2 Switch to the desired video select setting in the following order: AUTO Ô MANUAL Ô AVM 7 AUTO When the Head Unit source is switched to a component connected to the AV-BUS, output automatically switches to video from that component. 7 MANUAL You can switch between VTR and AV with the V.SOURCE button. (Refer...

Owner's Manual
Page 62
... lights are recorded separately for the AV, VTR and RGB video. Note: • The density of the display black can be adjusted within the range of "-24" to the AV-BUS input are also recorded separately. Setting the Display Adjusting the Bright You can adjust the color of the picture. 1 Press the WIDE button and select the Color mode (COLOR) in the Display Setting Menu. 2 Adjust the Bright. ment values of the picture...
... lights are recorded separately for the AV, VTR and RGB video. Note: • The density of the display black can be adjusted within the range of "-24" to the AV-BUS input are also recorded separately. Setting the Display Adjusting the Bright You can adjust the color of the picture. 1 Press the WIDE button and select the Color mode (COLOR) in the Display Setting Menu. 2 Adjust the Bright. ment values of the picture...

Owner's Manual
Page 63
... (blue). ment values of the LCD screen will be adjusted automatically to the brightness you set to match the ambient brightness. The adjusted value is memorized when the setting screen disappears. 1 Press the WIDE button and select the Dimmer mode (DIMMER) in the Display Setting Menu. 2 Adjust the Hue. Note: • The display changes within a range from "-24" to "+24" as the distinction of the picture. 1 Press the WIDE button...
... (blue). ment values of the LCD screen will be adjusted automatically to the brightness you set to match the ambient brightness. The adjusted value is memorized when the setting screen disappears. 1 Press the WIDE button and select the Dimmer mode (DIMMER) in the Display Setting Menu. 2 Adjust the Hue. Note: • The display changes within a range from "-24" to "+24" as the distinction of the picture. 1 Press the WIDE button...

Owner's Manual
Page 65
Switching Power ON When connected to the head unit's Owner's Manual. Do not forget to switch power to this unit OFF. • When you eject a source disc (CD or MD) selected with remote control for DVD player. • When you have switched power to this unit ON by pressing the POWER button, power to this unit. Depending on the connection method, the picture on the rear display may disappear. 60 Others AVM-P9000R), performing the following steps switches power ON...
Switching Power ON When connected to the head unit's Owner's Manual. Do not forget to switch power to this unit OFF. • When you eject a source disc (CD or MD) selected with remote control for DVD player. • When you have switched power to this unit ON by pressing the POWER button, power to this unit. Depending on the connection method, the picture on the rear display may disappear. 60 Others AVM-P9000R), performing the following steps switches power ON...
Owner's Manual
Page 70
... angles. Switching the viewing angle The DVD playing does not fea- Switch Parental Lock OFF or change the level. (See page 47.) Parental Lock cannot be ture multiple language record- switched. You can only switch between multiple angles when watching scenes recorded from this unit. (See page 8.) A Parental Lock message is Parental Lock is malfunctioning. 65 You are not recorded on the disc. Switch using the disc menu. The DVD playing does...
... angles. Switching the viewing angle The DVD playing does not fea- Switch Parental Lock OFF or change the level. (See page 47.) Parental Lock cannot be ture multiple language record- switched. You can only switch between multiple angles when watching scenes recorded from this unit. (See page 8.) A Parental Lock message is Parental Lock is malfunctioning. 65 You are not recorded on the disc. Switch using the disc menu. The DVD playing does...

Owner's Manual
Page 71
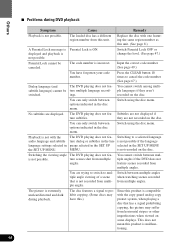
... Cause The PBC (Playback Control) The Video CD playing does not menu display cannot be feature PBC. Repeat play and Track/Time PBC is switched OFF. The Multi-Channel AV Master Unit is not compatible with Video CDs not featuring PBC. Others 66 Switch the output setting to 48 kHz. (See page 53.) Indications are not the Multi- 7 Problems during Multi-Channel AV Master Unit connection Symptom There's no sound.
... Cause The PBC (Playback Control) The Video CD playing does not menu display cannot be feature PBC. Repeat play and Track/Time PBC is switched OFF. The Multi-Channel AV Master Unit is not compatible with Video CDs not featuring PBC. Others 66 Switch the output setting to 48 kHz. (See page 53.) Indications are not the Multi- 7 Problems during Multi-Channel AV Master Unit connection Symptom There's no sound.

Owner's Manual
Page 74
... entertainment, you must connect this unit's optical digital output jacks to the optical digital input jacks of a book. Some DVDs feature scenes shot from one camera at a time are numbered in the same way as desired. 69 Wide-screen displays have an aspect ratio of a DTS compatible amp or decoder. Compared to music CDs, which is the signal recording system used in turn divided into chapters...
... entertainment, you must connect this unit's optical digital output jacks to the optical digital input jacks of a book. Some DVDs feature scenes shot from one camera at a time are numbered in the same way as desired. 69 Wide-screen displays have an aspect ratio of a DTS compatible amp or decoder. Compared to music CDs, which is the signal recording system used in turn divided into chapters...
Other Manual
Page 1
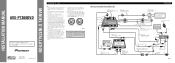
... with cable clamps or adhesive tape. INSTALLATION MANUAL OF OF AVX-P7300DVD This product conforms to the owner's manual for details on the navigation unit. Le code de couleur des câbles utilisé pour ce produit est conforme à CEMA. Do not route wiring in the electrical system, be used . GEX-P7000TV) (sold separately) Yellow/black To Yellow/black lead (GUIDE ON) on connecting the power amp...
... with cable clamps or adhesive tape. INSTALLATION MANUAL OF OF AVX-P7300DVD This product conforms to the owner's manual for details on the navigation unit. Le code de couleur des câbles utilisé pour ce produit est conforme à CEMA. Do not route wiring in the electrical system, be used . GEX-P7000TV) (sold separately) Yellow/black To Yellow/black lead (GUIDE ON) on connecting the power amp...
Other Manual
Page 2
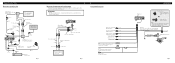
.... Power supply side Ground side Parking brake switch Fig. 5 Black (ground) To vehicle (metal) body. Clamp firmly with power regardless of ignition switch position. Note: • The position of a display to enable passengers in a location that enables the Driver to watch the DVD or Video CD while Driving. WARNING • NEVER install the display in the rear seats to watch the DVD or Video CD. AVIC-9DVD) (sold separately) To audio outputs RCA cables (sold...
.... Power supply side Ground side Parking brake switch Fig. 5 Black (ground) To vehicle (metal) body. Clamp firmly with power regardless of ignition switch position. Note: • The position of a display to enable passengers in a location that enables the Driver to watch the DVD or Video CD while Driving. WARNING • NEVER install the display in the rear seats to watch the DVD or Video CD. AVIC-9DVD) (sold separately) To audio outputs RCA cables (sold...


