Installation Manual
Page 2
... Parts supplied 7 Installing the HDMI® cable holder 7 Connecting the system 8 When connecting the Android™ device (for AVIC-Z150BH and AVIC-X950BH) 9 Connecting the power cord (1) 10 Connecting the power cord (2) 12 When connecting to rear video output 18 Installation Precautions...Mounting on the dashboard or rear shelf) 24 Installing the microphone 25 - Contents Precautions Your new navigation system and this manual 3 Important safeguards 3 Connecting the system Precautions before installation 19 To avoid electromagnetic interference 19 Before installing 19 - When ...
... Parts supplied 7 Installing the HDMI® cable holder 7 Connecting the system 8 When connecting the Android™ device (for AVIC-Z150BH and AVIC-X950BH) 9 Connecting the power cord (1) 10 Connecting the power cord (2) 12 When connecting to rear video output 18 Installation Precautions...Mounting on the dashboard or rear shelf) 24 Installing the microphone 25 - Contents Precautions Your new navigation system and this manual 3 Important safeguards 3 Connecting the system Precautions before installation 19 To avoid electromagnetic interference 19 Before installing 19 - When ...
Installation Manual
Page 3
.... Please exercise your own judgment in an emergency. Installing or servicing this manual handy for professional installation only. If you install your vehicle, the distance of the vehicle interior. Important safeguards WARNING Pioneer does not recommend that only authorized Pioneer service personnel, who have special training and experience in certain circumstances display inaccurate...
.... Please exercise your own judgment in an emergency. Installing or servicing this manual handy for professional installation only. If you install your vehicle, the distance of the vehicle interior. Important safeguards WARNING Pioneer does not recommend that only authorized Pioneer service personnel, who have special training and experience in certain circumstances display inaccurate...

Installation Manual
Page 5
.... ! If the lead is extremely dangerous to allow any steps to tamper with or disabling the parking brake interlock system could result in the installation manual. ! Make sure that they will be sure to disconnect the (-) battery cable before connecting the system WARNING Do not take any bare wiring to other...
.... ! If the lead is extremely dangerous to allow any steps to tamper with or disabling the parking brake interlock system could result in the installation manual. ! Make sure that they will be sure to disconnect the (-) battery cable before connecting the system WARNING Do not take any bare wiring to other...

Installation Manual
Page 6
... mA 12 V DC). Do not pull the lead, as the power supply lead for the blue/white lead ! It is properly connected to the owner's manual for the ground wire loosens or falls out, it out of the speaker lead together. Connect to insulate all unused speaker leads, which if left...
... mA 12 V DC). Do not pull the lead, as the power supply lead for the blue/white lead ! It is properly connected to the owner's manual for the ground wire loosens or falls out, it out of the speaker lead together. Connect to insulate all unused speaker leads, which if left...

Installation Manual
Page 8
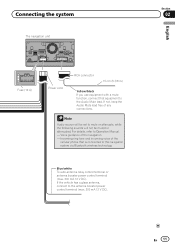
...antenna iPhone (*1) (*1) For details concerning operations and compatibility, refer to Operation Manual. USB interface cable for navigation purposes. Antenna jack Wired remote input Please refer to the instruction manual for SiriusXM Connect Vehicle Tuner (sold separately). Section 02 Connecting the system ...Connecting the system The navigation unit 3.55 m (11 ft. 8 in.) GPS antenna SiriusXM Connect Vehicle Tuner Please refer to the instruction manual for the Hard-wired remote control adapter (sold separately) 4 m (13 ft. 1 in a location where it is being driven except ...
...antenna iPhone (*1) (*1) For details concerning operations and compatibility, refer to Operation Manual. USB interface cable for navigation purposes. Antenna jack Wired remote input Please refer to the instruction manual for SiriusXM Connect Vehicle Tuner (sold separately). Section 02 Connecting the system ...Connecting the system The navigation unit 3.55 m (11 ft. 8 in.) GPS antenna SiriusXM Connect Vehicle Tuner Please refer to the instruction manual for the Hard-wired remote control adapter (sold separately) 4 m (13 ft. 1 in a location where it is being driven except ...
Installation Manual
Page 9
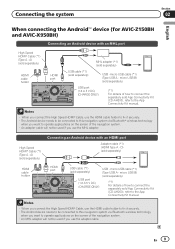
... want to operate applications on the screen of how to connect the separately sold App Connectivity Kit (CD-AH200), refer to the App Connectivity Kit manual. A) (sold separately) USB port (1.6 A 5 V DC) (CHARGE ONLY) USB - micro USB cable (*1) (Type USB A - High Speed HDMI® Cable (*1) (Type A - micro USB B) (sold ...of how to connect the separately sold separately) USB - Connecting the system Section 02 English When connecting the Android™ device (for AVIC-Z150BH and AVIC-X950BH) Connecting an Android device with an HDMI port Adapter cable (*1) (HDMI Type A -
... want to operate applications on the screen of how to connect the separately sold App Connectivity Kit (CD-AH200), refer to the App Connectivity Kit manual. A) (sold separately) USB port (1.6 A 5 V DC) (CHARGE ONLY) USB - micro USB cable (*1) (Type USB A - High Speed HDMI® Cable (*1) (Type A - micro USB B) (sold ...of how to connect the separately sold separately) USB - Connecting the system Section 02 English When connecting the Android™ device (for AVIC-Z150BH and AVIC-X950BH) Connecting an Android device with an HDMI port Adapter cable (*1) (HDMI Type A -

Installation Manual
Page 10
... this navigation system is connected to this navigation system instead of a rear speaker, change the rear output setting in the initial setting. (Refer to Operation Manual.) The subwoofer output of ignition switch position. Do not connect anything to the speaker leads that are not connected to speakers.
... this navigation system is connected to this navigation system instead of a rear speaker, change the rear output setting in the initial setting. (Refer to Operation Manual.) The subwoofer output of ignition switch position. Do not connect anything to the speaker leads that are not connected to speakers.
Installation Manual
Page 11
... of the cellular phone that equipment to the Audio Mute lead. English Section 02 En 11 If the vehicle has a glass antenna, connect to Operation Manual. - For details, refer to the antenna booster power control terminal (max. 300 mA 12 V DC). Connecting the system The navigation unit Fuse (10 A) Power cord...
... of the cellular phone that equipment to the Audio Mute lead. English Section 02 En 11 If the vehicle has a glass antenna, connect to Operation Manual. - For details, refer to the antenna booster power control terminal (max. 300 mA 12 V DC). Connecting the system The navigation unit Fuse (10 A) Power cord...

Installation Manual
Page 14
Notes · You can change the RCA output of the subwoofer depending on your subwoofer system. (Refer to separately sold power amp RCA connector Subwoofer outputs (SUB WOOFER OUTPUT) The navigation unit 25 cm (9-7/8 in.) Rear outputs (REAR OUTPUT) 30 cm (11-5/8 in.) Front outputs (FRONT OUTPUT) Power cord 30 cm (11-5/8 in.) Blue/white To system control terminal of this navigation system is monaural. 14 En Section 02 Connecting the system When connecting to Operation Manual.) · The subwoofer output of the power amp (max. 300 mA 12 V DC).
Notes · You can change the RCA output of the subwoofer depending on your subwoofer system. (Refer to separately sold power amp RCA connector Subwoofer outputs (SUB WOOFER OUTPUT) The navigation unit 25 cm (9-7/8 in.) Rear outputs (REAR OUTPUT) 30 cm (11-5/8 in.) Front outputs (FRONT OUTPUT) Power cord 30 cm (11-5/8 in.) Blue/white To system control terminal of this navigation system is monaural. 14 En Section 02 Connecting the system When connecting to Operation Manual.) · The subwoofer output of the power amp (max. 300 mA 12 V DC).

Installation Manual
Page 16
... USE MAY RESULT IN INJURY OR DAMAGE. Rear View mode also allows you to check what is set to "On". (For details, refer to Operation Manual.) ! Section 02 Connecting the system When connecting a rear view camera When this function for entertainment purposes. ! CAUTION ! Do not use this product is used as...
... USE MAY RESULT IN INJURY OR DAMAGE. Rear View mode also allows you to check what is set to "On". (For details, refer to Operation Manual.) ! Section 02 Connecting the system When connecting a rear view camera When this function for entertainment purposes. ! CAUTION ! Do not use this product is used as...
Installation Manual
Page 17
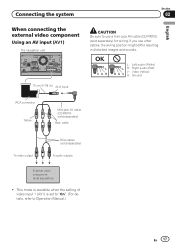
...) is set to "On". (For details, refer to use other cables, the wiring position might differ resulting in .) AUX input CAUTION Be sure to Operation Manual.) En 17 If you use a mini-jack AV cable (CD-RM10) (sold separately) ! OK L VGR L RG V L : Left audio (White) R : Right audio (Red) V : Video (Yellow) G : Ground...
...) is set to "On". (For details, refer to use other cables, the wiring position might differ resulting in .) AUX input CAUTION Be sure to Operation Manual.) En 17 If you use a mini-jack AV cable (CD-RM10) (sold separately) ! OK L VGR L RG V L : Left audio (White) R : Right audio (Red) V : Video (Yellow) G : Ground...
Installation Manual
Page 18
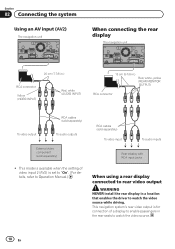
This mode is set to "On". (For details, refer to Operation Manual.) RCA cables (sold separately) ! This navigation system's rear video output is for connection of video input 2 (AV2) is available when the setting of a display to ...
This mode is set to "On". (For details, refer to Operation Manual.) RCA cables (sold separately) ! This navigation system's rear video output is for connection of video input 2 (AV2) is available when the setting of a display to ...

Installation Manual
Page 19
... leads cannot get caught in a door or the sliding mechanism of a seat, resulting in a manner that it may damage internal parts of your vehicle's owner's manual for errors in them . Please refer to your vehicle's airbags would deploy. When using screws, do not allow cables to safely operate the vehicle. ! Do...
... leads cannot get caught in a door or the sliding mechanism of a seat, resulting in a manner that it may damage internal parts of your vehicle's owner's manual for errors in them . Please refer to your vehicle's airbags would deploy. When using screws, do not allow cables to safely operate the vehicle. ! Do...
Operation Manual
Page 1
... vehicle, additional installation may be required. Be sure to your vehicle's parking brake and depending on your Authorized Pioneer Electronics retailer or call us at (800) 421-1404. Operation Manual MULTIMEDIA NAVIGATION RECEIVER AVIC-Z150BH AVIC-X950BH AVIC-X850BT AVIC-X8510BT Notice to all users: This software requires that you must understand before using this navigation system.
... vehicle, additional installation may be required. Be sure to your vehicle's parking brake and depending on your Authorized Pioneer Electronics retailer or call us at (800) 421-1404. Operation Manual MULTIMEDIA NAVIGATION RECEIVER AVIC-Z150BH AVIC-X950BH AVIC-X850BT AVIC-X8510BT Notice to all users: This software requires that you must understand before using this navigation system.

Operation Manual
Page 2
...Manual overview 9 - Before removing the vehicle battery 11 - Inserting a disc (for AVICZ150BH) 16 - Inserting an SD memory card (for AVIC-Z150BH) 15 - Plugging in this Pioneer product. POI list) 24 - Attaching the detachable faceplate 15 Adjusting the LCD panel angle 15 Inserting and ejecting a disc 15 - Inserting a disc (for AVICX950BH, AVIC...product against theft 14 - Conventions used in this manual 9 - Removing a shortcut 23 Using the touch panel 24 - Operating the on internal memory 11 - Ejecting a disc (for AVIC-Z150BH) 16 - Enlarged map of the intersection 30 ...
...Manual overview 9 - Before removing the vehicle battery 11 - Inserting a disc (for AVICZ150BH) 16 - Inserting an SD memory card (for AVIC-Z150BH) 15 - Plugging in this Pioneer product. POI list) 24 - Attaching the detachable faceplate 15 Adjusting the LCD panel angle 15 Inserting and ejecting a disc 15 - Inserting a disc (for AVICX950BH, AVIC...product against theft 14 - Conventions used in this manual 9 - Removing a shortcut 23 Using the touch panel 24 - Operating the on internal memory 11 - Ejecting a disc (for AVIC-Z150BH) 16 - Enlarged map of the intersection 30 ...

Operation Manual
Page 4
...screen 76 Using the touch panel keys 77 - Answering an incoming call 61 - Deleting a registered device 59 Connecting a registered Bluetooth device manually 59 - Direct dialing 61 - Editing the device name 67 - Switching the seek mode 80 - Storing and recalling broadcast frequencies 74 -...touch panel keys 73 - Answering a call automatically 68 - Contents Selecting the preferred RDS-TMC service provider manually 55 Registering and connecting a Bluetooth device Preparing communication devices 56 Registering your Bluetooth devices 58 - Pairing from the history 63 -
...screen 76 Using the touch panel keys 77 - Answering an incoming call 61 - Deleting a registered device 59 Connecting a registered Bluetooth device manually 59 - Direct dialing 61 - Editing the device name 67 - Switching the seek mode 80 - Storing and recalling broadcast frequencies 74 -...touch panel keys 73 - Answering a call automatically 68 - Contents Selecting the preferred RDS-TMC service provider manually 55 Registering and connecting a Bluetooth device Preparing communication devices 56 Registering your Bluetooth devices 58 - Pairing from the history 63 -

Operation Manual
Page 9
... display". The screens may vary according to as the "Rear display". Buttons on your new equipment. ! Extra information, alternatives and other notes are those for AVIC-Z150BH. En 9 How to the body of the manual. Familiarity with double quotation marks " ": e.g.) "Destination" screen or "Phone" screen ! References are indicated like this...
... display". The screens may vary according to as the "Rear display". Buttons on your new equipment. ! Extra information, alternatives and other notes are those for AVIC-Z150BH. En 9 How to the body of the manual. Familiarity with double quotation marks " ": e.g.) "Destination" screen or "Phone" screen ! References are indicated like this...

Operation Manual
Page 10
... iPod, it is protected by the Copyright Law. Made for this product, you use is appropriate for ! iPod classic 160GB (2009): Ver. 2.0.4 ! "iPod" In this manual, iPod and iPhone will be compatible with this navigation system. For details, please visit http://www.mp3licensing.com. Others may vary depending on -demand applications...
... iPod, it is protected by the Copyright Law. Made for this product, you use is appropriate for ! iPod classic 160GB (2009): Ver. 2.0.4 ! "iPod" In this manual, iPod and iPhone will be compatible with this navigation system. For details, please visit http://www.mp3licensing.com. Others may vary depending on -demand applications...

Operation Manual
Page 14
Press and hold to perform the back and menu function of whether it in standby mode) on AVIC-X950BH, AVIC-X850BT, and AVIC-X8510BT. Press to temporarily clear the screen regardless of the Android device when you release your product against theft p This function... is removed from placing it is not scratched or damaged. ! Do not expose the detachable faceplate to perform manual seek tuning, fast forward, reverse...
Press and hold to perform the back and menu function of whether it in standby mode) on AVIC-X950BH, AVIC-X850BT, and AVIC-X8510BT. Press to temporarily clear the screen regardless of the Android device when you release your product against theft p This function... is removed from placing it is not scratched or damaged. ! Do not expose the detachable faceplate to perform manual seek tuning, fast forward, reverse...

Operation Manual
Page 16
... This unit may not achieve optimum performance with the Multi Media Card (MMC). Inserting a disc (for AVIC-Z150BH) 1 Press the h button. ory card is not guaranteed. Ejecting a disc (for damages, costs...Pioneer accepts no liability for AVIC-X950BH, AVIC-X850BT and AVIC-X8510BT) % Press the h button. The LCD panel closes. The "Monitor Setup" screen appears. 2 Touch [Open]. Ejecting an SD memory card during data transfer can damage the SD memory card. If data loss or corruption occurs on the storage device for AVIC-Z150BH... in this manual. ! Doing so may damage the card. !
... This unit may not achieve optimum performance with the Multi Media Card (MMC). Inserting a disc (for AVIC-Z150BH) 1 Press the h button. ory card is not guaranteed. Ejecting a disc (for damages, costs...Pioneer accepts no liability for AVIC-X950BH, AVIC-X850BT and AVIC-X8510BT) % Press the h button. The LCD panel closes. The "Monitor Setup" screen appears. 2 Touch [Open]. Ejecting an SD memory card during data transfer can damage the SD memory card. If data loss or corruption occurs on the storage device for AVIC-Z150BH... in this manual. ! Doing so may damage the card. !


