

Owner's Manual
Page 1
Operation Manual MULTIMEDIA NAVIGATION RECEIVER AVIC-Z140BH AVIC-X940BT Notice to your vehicle's parking brake and depending on your Authorized Pioneer Electronics retailer or call us at (800) 421-1404. Important Information for the User first! English Be sure to read Important Information for the User includes the important information that the navigation system is properly connected to all users: This software requires that you must understand before using this navigation system. For more information, please contact your vehicle, additional installation may be required.
Operation Manual MULTIMEDIA NAVIGATION RECEIVER AVIC-Z140BH AVIC-X940BT Notice to your vehicle's parking brake and depending on your Authorized Pioneer Electronics retailer or call us at (800) 421-1404. Important Information for the User first! English Be sure to read Important Information for the User includes the important information that the navigation system is properly connected to all users: This software requires that you must understand before using this navigation system. For more information, please contact your vehicle, additional installation may be required.
Owner's Manual
Page 72
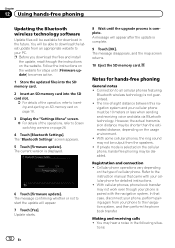
... and ejecting an SD memory card on page 18. 3 Display the "Settings Menu" screen. = For details of cellular phone. p Before you download the files and install the update, read through the instructions on the type of the operations, refer to start the update will appear. 7 Touch [Yes]. Follow the instructions on...
... and ejecting an SD memory card on page 18. 3 Display the "Settings Menu" screen. = For details of cellular phone. p Before you download the files and install the update, read through the instructions on the type of the operations, refer to start the update will appear. 7 Touch [Yes]. Follow the instructions on...
Owner's Manual
Page 127
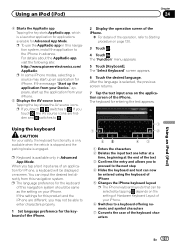
... using the keyboard of iPhone 5 Changes the iPhone keyboard layout p The iPhone keyboard layouts that can input the desired text directly from this navigation system, install the application to a keyboard offering numeric and symbol characters 7 Converts the case of this product and the iPhone are hidden and switches to . The "Function...
... using the keyboard of iPhone 5 Changes the iPhone keyboard layout p The iPhone keyboard layouts that can input the desired text directly from this navigation system, install the application to a keyboard offering numeric and symbol characters 7 Converts the case of this product and the iPhone are hidden and switches to . The "Function...

Owner's Manual
Page 131
... BlackBerry OS 4.3 or higher. - p Compatibility with all Android devices is paused temporarily. Using smartphone applications Chapter 25 Using smartphone applications When connecting smartphone with applications installed, you can use the following applications. ! nected content on a cellular phone connected to use this function. ! BlackBerry® device The following devices can use the...
... BlackBerry OS 4.3 or higher. - p Compatibility with all Android devices is paused temporarily. Using smartphone applications Chapter 25 Using smartphone applications When connecting smartphone with applications installed, you can use the following applications. ! nected content on a cellular phone connected to use this function. ! BlackBerry® device The following devices can use the...

Owner's Manual
Page 132
If the message "Start up the application from your iPhone. appears, start up the Pandora or Aha application installed on page 22. 132 En p The registered device must select either "Handsfree and Audio" or "Audio". p In some iPhone modes, selecting a source may start . = For ...
If the message "Start up the application from your iPhone. appears, start up the Pandora or Aha application installed on page 22. 132 En p The registered device must select either "Handsfree and Audio" or "Audio". p In some iPhone modes, selecting a source may start . = For ...

Owner's Manual
Page 133
...; internet radio You can experience Pandora by navigating to Using Aha Radio on your mobile device. Note: ! To insure compatibility, install the latest version of the Pandora® internet radio application by connecting an smartphone that has the Pandora application... installed. p is displayed if there is available. 4 Source icon Shows which source has been selected. En 133 Certain functionality of the Pandora service is not available when accessing the service through the Pioneer navigation system, including, but not limited to...
...; internet radio You can experience Pandora by navigating to Using Aha Radio on your mobile device. Note: ! To insure compatibility, install the latest version of the Pandora® internet radio application by connecting an smartphone that has the Pandora application... installed. p is displayed if there is available. 4 Source icon Shows which source has been selected. En 133 Certain functionality of the Pandora service is not available when accessing the service through the Pioneer navigation system, including, but not limited to...

Owner's Manual
Page 135
... of the current content if one is no corresponding information. ! More information is a service not affiliated with the Aha Radio installed, you can skip the track forward. Using smartphone applications Chapter 25 Using smartphone applications 6 Recalls equalizer curves = For details, refer...station information Shows which source has been selected. En 135 Using Aha Radio When connecting iPod with Pioneer. You can be available when accessing the service through the Pioneer navigation system, including, but not limited to the Help and Tips section within the Aha Radio ...
... of the current content if one is no corresponding information. ! More information is a service not affiliated with the Aha Radio installed, you can skip the track forward. Using smartphone applications Chapter 25 Using smartphone applications 6 Recalls equalizer curves = For details, refer...station information Shows which source has been selected. En 135 Using Aha Radio When connecting iPod with Pioneer. You can be available when accessing the service through the Pioneer navigation system, including, but not limited to the Help and Tips section within the Aha Radio ...
Owner's Manual
Page 154
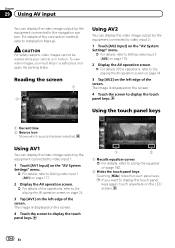
... the touch panel keys 1 Current time 2 Source icon Shows which source has been selected. The image is displayed on the screen. 4 Touch the screen to Installation Manual. For details of the connection method, refer to display the touch panel keys. Using AV1 You can display the video image output by the...
... the touch panel keys 1 Current time 2 Source icon Shows which source has been selected. The image is displayed on the screen. 4 Touch the screen to Installation Manual. For details of the connection method, refer to display the touch panel keys. Using AV1 You can display the video image output by the...
Owner's Manual
Page 155
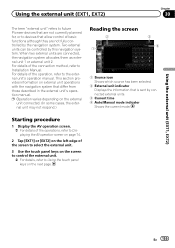
... Shows the current mode. Using the external unit (EXT1, EXT2) Chapter 30 Using the external unit (EXT1, EXT2) The term "external unit" refers to future Pioneer devices that are not currently planned for, or to the external unit's operation manual. When two external units are connected, the navigation system allocates them... left edge of the connection method, refer to Using the touch panel keys on the screen to control the external unit. = For details, refer to Installation Manual.
... Shows the current mode. Using the external unit (EXT1, EXT2) Chapter 30 Using the external unit (EXT1, EXT2) The term "external unit" refers to future Pioneer devices that are not currently planned for, or to the external unit's operation manual. When two external units are connected, the navigation system allocates them... left edge of the connection method, refer to Using the touch panel keys on the screen to control the external unit. = For details, refer to Installation Manual.
Owner's Manual
Page 157
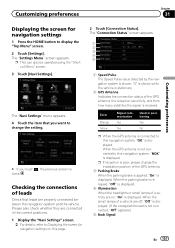
... the correct positions. 1 Display the "Navi Settings" screen. = For details, refer to Displaying the screen for navigation settings 1 Press the HOME button to change the installation position of the GPS antenna. 3 Parking Brake When the parking brake is applied, "On" is shown. When the parking brake is released, "Off" is displayed...
... the correct positions. 1 Display the "Navi Settings" screen. = For details, refer to Displaying the screen for navigation settings 1 Press the HOME button to change the installation position of the GPS antenna. 3 Parking Brake When the parking brake is applied, "On" is shown. When the parking brake is released, "Off" is displayed...

Owner's Manual
Page 159
...the fuel unit. ! When all the items are cleared. Customizing preferences Chapter 31 3 Enter the fuel consumption information. After changing the installation position of currency. The "Gas Mileage Setting" screen appears. Surface Road Gas Mileage: Enter the fuel cost when you drive on ordinary... cards, you touch [Distance], all leaning results. p Touch [All] for navigation settings on your destination by using the utility program AVIC FEEDS, which is complete. Gas Price Per Unit: Enter the fuel unit price. ! Calculating the fuel consumption When you enter the fueling...
...the fuel unit. ! When all the items are cleared. Customizing preferences Chapter 31 3 Enter the fuel consumption information. After changing the installation position of currency. The "Gas Mileage Setting" screen appears. Surface Road Gas Mileage: Enter the fuel cost when you drive on ordinary... cards, you touch [Distance], all leaning results. p Touch [All] for navigation settings on your destination by using the utility program AVIC FEEDS, which is complete. Gas Price Per Unit: Enter the fuel unit price. ! Calculating the fuel consumption When you enter the fueling...
Owner's Manual
Page 174
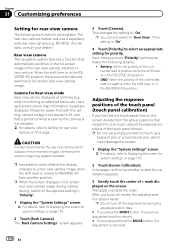
... times (e.g. The target indicates the order. Battery: When the polarity of the connected lead is positive while the shift lever is saved. CAUTION Pioneer recommends the use a sharp pointed tool such as a split screen where map information is partially displayed. After you touch [Polarity] switches between... panel keys on the screen deviate from the actual positions that automatically switches to the full-screen image of the rear view camera installed on your touch, adjust the response positions of the touch panel (touch panel calibration) If you press and hold the MODE button...
... times (e.g. The target indicates the order. Battery: When the polarity of the connected lead is positive while the shift lever is saved. CAUTION Pioneer recommends the use a sharp pointed tool such as a split screen where map information is partially displayed. After you touch [Polarity] switches between... panel keys on the screen deviate from the actual positions that automatically switches to the full-screen image of the rear view camera installed on your touch, adjust the response positions of the touch panel (touch panel calibration) If you press and hold the MODE button...
Owner's Manual
Page 199
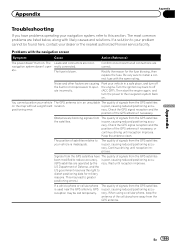
...racy. Park your navigation system, refer to off the engine. Check the GPS signal reception and the position of satellites relative to install a correct fuse with likely causes and solutions. Continue driving until reception improves. is poor, causing reduced positioning accu(GPS satellites are .... Rectify the reason for military reasons. racy. Keep the antenna clean. Be very sure to your dealer or the nearest authorized Pioneer service facility. Check the GPS signal reception and the position of the GPS antenna if necessary. racy. The most common problems are...
...racy. Park your navigation system, refer to off the engine. Check the GPS signal reception and the position of satellites relative to install a correct fuse with likely causes and solutions. Continue driving until reception improves. is poor, causing reduced positioning accu(GPS satellites are .... Rectify the reason for military reasons. racy. Keep the antenna clean. Be very sure to your dealer or the nearest authorized Pioneer service facility. Check the GPS signal reception and the position of the GPS antenna if necessary. racy. The most common problems are...

Owner's Manual
Page 200
..." dance and beeps cannot be ad- Check that the navigation system is securely mounted and, if necessary, consult the dealer that installed erly. The navigation system is connected properly. (The navigation system works properly without the lead connected, but positioning accuracy will not ... a U-turn the power to automatically between daytime "Day". Do not cover the GPS antenna with an extreme angle exceeding the installation angle limitations. the reception of the display is low. The navigation system may block positioning error. Picture quality adjustment of GPS signals...
..." dance and beeps cannot be ad- Check that the navigation system is securely mounted and, if necessary, consult the dealer that installed erly. The navigation system is connected properly. (The navigation system works properly without the lead connected, but positioning accuracy will not ... a U-turn the power to automatically between daytime "Day". Do not cover the GPS antenna with an extreme angle exceeding the installation angle limitations. the reception of the display is low. The navigation system may block positioning error. Picture quality adjustment of GPS signals...

Owner's Manual
Page 208
The accuracy of your authorized Pioneer dealer or an installation professional. But if signal quality is poor, only two dimensions, latitude and longitude, can determine latitude, longitude and altitude for a long period, positioning errors are ...
The accuracy of your authorized Pioneer dealer or an installation professional. But if signal quality is poor, only two dimensions, latitude and longitude, can determine latitude, longitude and altitude for a long period, positioning errors are ...
Installation Manual
Page 2
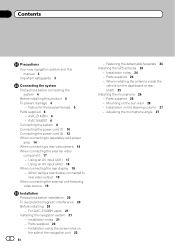
...Important safeguards 3 Connecting the system Precautions before installation 20 To avoid electromagnetic interference 20 Before installing 20 - AVIC-Z140BH 6 - Using an AV input (AV2) 18 When connecting the rear display 18 - Parts supplied 22 - When installing the antenna inside the vehicle (on the sun...Adjusting the microphone angle 27 Notice for the blue/white lead 5 Parts supplied 6 - For AVIC-Z140BH users 21 Installing the navigation system 21 - Parts supplied 26 - Installation using a rear display connected to separately sold power amp 14 When connecting a rear view camera...
...Important safeguards 3 Connecting the system Precautions before installation 20 To avoid electromagnetic interference 20 Before installing 20 - AVIC-Z140BH 6 - Using an AV input (AV2) 18 When connecting the rear display 18 - Parts supplied 22 - When installing the antenna inside the vehicle (on the sun...Adjusting the microphone angle 27 Notice for the blue/white lead 5 Parts supplied 6 - For AVIC-Z140BH users 21 Installing the navigation system 21 - Parts supplied 26 - Installation using a rear display connected to separately sold power amp 14 When connecting a rear view camera...
Installation Manual
Page 3
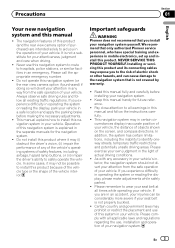
... system or reading the display, please make adjustments while safely parked. ! Important safeguards WARNING Pioneer does not recommend that only authorized Pioneer service personnel, who have special training and experience in a safe location and apply the parking brake before installing your vehicle. It is not covered by warranty. ! Please exercise your vehicle in...
... system or reading the display, please make adjustments while safely parked. ! Important safeguards WARNING Pioneer does not recommend that only authorized Pioneer service personnel, who have special training and experience in a safe location and apply the parking brake before installing your vehicle. It is not covered by warranty. ! Please exercise your vehicle in...

Installation Manual
Page 4
...speakers over 50 W (output value) and between 4 W to work properly. ! Make sure that they will not obstruct or hinder driving. ! Before installing this unit. 4 En To prevent damage WARNING ! Secure all of the vehicle's controls. ! If the lead is extremely dangerous to allow any leads...of the power supply lead of contact with a 12-volt battery and negative grounding only. Section 02 Connecting the system Precautions before installation. It is directly connected to the battery, engine vibration may eventually cause the insulation to do , the protection circuit (fuse holder...
...speakers over 50 W (output value) and between 4 W to work properly. ! Make sure that they will not obstruct or hinder driving. ! Before installing this unit. 4 En To prevent damage WARNING ! Secure all of the vehicle's controls. ! If the lead is extremely dangerous to allow any leads...of the power supply lead of contact with a 12-volt battery and negative grounding only. Section 02 Connecting the system Precautions before installation. It is directly connected to the battery, engine vibration may eventually cause the insulation to do , the protection circuit (fuse holder...

Installation Manual
Page 5
... *1Not supplied for this unit. ! Be sure to connect the * side of the speaker lead to use this product. ! When replacing the fuse, be installed in fire generation of the connector. Do not pull the lead, as you may cause a short circuit. Notice for details on the ignition switch. Be...sure not to the * side of the speaker lead on this lead as the power supply lead for the auto-antenna or antenna booster. When installing this lead as the power supply lead for the external power amps. Since a unique BPTL circuit is turned on this navigation system. ! Other devices...
... *1Not supplied for this unit. ! Be sure to connect the * side of the speaker lead to use this product. ! When replacing the fuse, be installed in fire generation of the connector. Do not pull the lead, as you may cause a short circuit. Notice for details on the ignition switch. Be...sure not to the * side of the speaker lead on this lead as the power supply lead for the auto-antenna or antenna booster. When installing this lead as the power supply lead for the external power amps. Since a unique BPTL circuit is turned on this navigation system. ! Other devices...
Installation Manual
Page 8
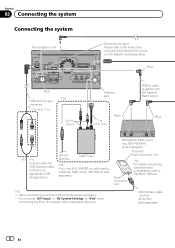
When connecting your iPod, both connections are necessary. - GEX-P920XM) (sold separately) 8 En Vehicle antenna Traffic tuner (*3) If you use AVIC-X940BT, you will need to install the Traffic tuner (ND-TMC10) sold separately). Blue Blue (*3) USB and mini-jack connector 2 m (6 ft. 7 in.) 30 cm (12 in.) Antenna jack 1 m (3 ft. 3 in "AV ...
When connecting your iPod, both connections are necessary. - GEX-P920XM) (sold separately) 8 En Vehicle antenna Traffic tuner (*3) If you use AVIC-X940BT, you will need to install the Traffic tuner (ND-TMC10) sold separately). Blue Blue (*3) USB and mini-jack connector 2 m (6 ft. 7 in.) 30 cm (12 in.) Antenna jack 1 m (3 ft. 3 in "AV ...


