Owner's Manual
Page 7
...175 - Adjusting the equalizer curve automatically (Auto EQ) 177 - Using subwoofer output 180 - Adjusting source levels 180 - How to the splash screen stored in the SD memory card 165 - Customizing the regional settings 163 - Changing to use the voice operation 183 Available basic voice ... the 3D landmarks 158 Displaying maneuvers 159 Displaying the fuel consumption information 159 Displaying POI on the map 159 - Changing the preinstalled splash screen 165 - Switching the muting/attenuation timing 172 - Using balance adjustment 175 - Using the high pass filter 180 - Setting the ...
...175 - Adjusting the equalizer curve automatically (Auto EQ) 177 - Using subwoofer output 180 - Adjusting source levels 180 - How to the splash screen stored in the SD memory card 165 - Customizing the regional settings 163 - Changing to use the voice operation 183 Available basic voice ... the 3D landmarks 158 Displaying maneuvers 159 Displaying the fuel consumption information 159 Displaying POI on the map 159 - Changing the preinstalled splash screen 165 - Switching the muting/attenuation timing 172 - Using balance adjustment 175 - Using the high pass filter 180 - Setting the ...

Owner's Manual
Page 20
... 1 Start the engine to boot up the system. The navigation system is required for connection. After a short pause, the splash screen comes on the screen. USB and mini-jack connector USB interface cable for iPod Disconnecting your iPod % Pull out the USB interface cable for iPod ... off the vehicle engine to terminate the system. p For details about iPod compatibility with your finger only and gently touch the screen. 2 Turn off . After a short pause, the splash screen comes on our website. p Connection via a USB hub is not possible. 1 Check that no data is connected. 2 Connect...
... 1 Start the engine to boot up the system. The navigation system is required for connection. After a short pause, the splash screen comes on the screen. USB and mini-jack connector USB interface cable for iPod Disconnecting your iPod % Pull out the USB interface cable for iPod ... off the vehicle engine to terminate the system. p For details about iPod compatibility with your finger only and gently touch the screen. 2 Turn off . After a short pause, the splash screen comes on our website. p Connection via a USB hub is not possible. 1 Check that no data is connected. 2 Connect...

Owner's Manual
Page 21
... system reboots. Read the disclaimer carefully, checking its details, and then touch [OK] if you agree to boot up the system. After a short pause, the splash screen comes on the previous conditions. p The screen shown will differ depending on for a few seconds. The map screen appears. Regular startup % Start the engine to the conditions.
... system reboots. Read the disclaimer carefully, checking its details, and then touch [OK] if you agree to boot up the system. After a short pause, the splash screen comes on the previous conditions. p The screen shown will differ depending on for a few seconds. The map screen appears. Regular startup % Start the engine to the conditions.

Owner's Manual
Page 165
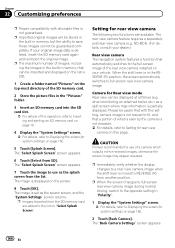
...setting is changed . ! You can operate the following formats; ! On this screen, you touch the key next to "VR Beep", the setting is changed . ! On (default): Voice recognition beep is available for AVIC-Z130BT only. 4 To finish the setting, touch [OK]. p This function is... enabled. ! Allowable horizontal and vertical size are needed only when the cellular phone featuring Bluetooth technology is connected. When set their volume. The "Select Splash Screen" screen appears. 3 Touch the...
...setting is changed . ! You can operate the following formats; ! On this screen, you touch the key next to "VR Beep", the setting is changed . ! On (default): Voice recognition beep is available for AVIC-Z130BT only. 4 To finish the setting, touch [OK]. p This function is... enabled. ! Allowable horizontal and vertical size are needed only when the cellular phone featuring Bluetooth technology is connected. When set their volume. The "Select Splash Screen" screen appears. 3 Touch the...
Owner's Manual
Page 166
...for rear view camera on the list is set as the splash screen, and the "System Settings" screen returns. The "Select Splash Screen" screen appears. 6 Touch [Select from another position. p Images imported from the list. The "Select Splash Screen" screen appears. 7 Touch the image to save these images cannot...The image is in "Polarity". 1 Display the "System Settings" screen. = For details, refer to the list on your vehicle. Please be guaranteed completely. CAUTION Pioneer recommends the use as a split screen where map information is moved to a rear view camera image when ...
...for rear view camera on the list is set as the splash screen, and the "System Settings" screen returns. The "Select Splash Screen" screen appears. 6 Touch [Select from another position. p Images imported from the list. The "Select Splash Screen" screen appears. 7 Touch the image to save these images cannot...The image is in "Polarity". 1 Display the "System Settings" screen. = For details, refer to the list on your vehicle. Please be guaranteed completely. CAUTION Pioneer recommends the use as a split screen where map information is moved to a rear view camera image when ...
Owner's Manual
Page 190
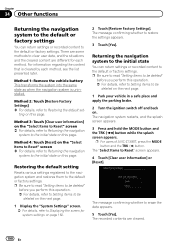
... En ting on the next page. 1 Display the "System Settings" screen. = For details, refer to Displaying the screen for each method, see the list presented later. The navigation system restarts, and the splash screen appears. 3 Press and hold the MODE button and the TRK (m) button... while the splash screen appears. The "Select Items to the default or factory settings. Restoring the default setting Resets various settings registered to the navigation system and restores them to Reset" screen appears. 4 Touch [Clear user information] or [Reset]. p For users of AVIC-Z130BT, press the ...
... En ting on the next page. 1 Display the "System Settings" screen. = For details, refer to Displaying the screen for each method, see the list presented later. The navigation system restarts, and the splash screen appears. 3 Press and hold the MODE button and the TRK (m) button... while the splash screen appears. The "Select Items to the default or factory settings. Restoring the default setting Resets various settings registered to the navigation system and restores them to Reset" screen appears. 4 Touch [Clear user information] or [Reset]. p For users of AVIC-Z130BT, press the ...

Owner's Manual
Page 198
...is impossible. Messages for some rea- Set a destination closer to destination cannot be calculated. Route to the starting point. Consult the Pioneer Local dealer if this message persists. Route calculation not possi- Route calculation not possi- a mountain) and hicle to identify the ..., a route calculation file. without a ferry and the route calculation is damaged or an attempt was made to specifications as the splash screen. There are in Change the destination. ble: destination is too close . Reset the destination after you may occur. ! vided around...
...is impossible. Messages for some rea- Set a destination closer to destination cannot be calculated. Route to the starting point. Consult the Pioneer Local dealer if this message persists. Route calculation not possi- Route calculation not possi- a mountain) and hicle to identify the ..., a route calculation file. without a ferry and the route calculation is damaged or an attempt was made to specifications as the splash screen. There are in Change the destination. ble: destination is too close . Reset the destination after you may occur. ! vided around...
Owner's Manual
Page 222
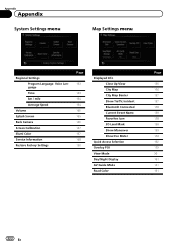
Appendix Appendix System Settings menu Map Settings menu Regional Settings Program Language, Voice Language Time km / mile Average Speed Volume Splash Screen Back Camera Screen Calibration Illumi Color Service Information Restore Factory Settings Page 163 163 164 164 165 165 166 167 167 168 190 Displayed Info Close Up View ...
Appendix Appendix System Settings menu Map Settings menu Regional Settings Program Language, Voice Language Time km / mile Average Speed Volume Splash Screen Back Camera Screen Calibration Illumi Color Service Information Restore Factory Settings Page 163 163 164 164 165 165 166 167 167 168 190 Displayed Info Close Up View ...


