
Installation Manual
Page 6
... installation. A signal is especially important to control the antenna of the connector. ! Change the source from radio (AM or FM) to black, etc. ! Check the battery voltage of the 4 ohms to 8 ohms specifications to [Radio], the vehicle's antenna can be stowed or turned off by following the instructions below. - Connecting speakers with...
... installation. A signal is especially important to control the antenna of the connector. ! Change the source from radio (AM or FM) to black, etc. ! Check the battery voltage of the 4 ohms to 8 ohms specifications to [Radio], the vehicle's antenna can be stowed or turned off by following the instructions below. - Connecting speakers with...
Installation Manual
Page 9
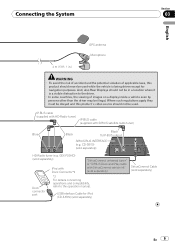
...) En 9 GEX-P20HD) (sold separately) iPod with Dock Connector*2 "SiriusConnect universal tuner" or "SIRIUS Dock and Play radio with SIRIUS satellite radio tuner) Blue Black Black To IP-BUS output SIRIUS BUS INTERFACE (e.g. Where such regulations apply they must be obeyed and this... product should not be used . USB Interface Cable for navigation purposes. IP-BUS cable (supplied with HD-Radio tuner) IP-BUS cable (supplied with SiriusConnect vehicle kit" (sold separately) Dock connector port *2 For details concerning operations and compatibility, ...
...) En 9 GEX-P20HD) (sold separately) iPod with Dock Connector*2 "SiriusConnect universal tuner" or "SIRIUS Dock and Play radio with SIRIUS satellite radio tuner) Blue Black Black To IP-BUS output SIRIUS BUS INTERFACE (e.g. Where such regulations apply they must be obeyed and this... product should not be used . USB Interface Cable for navigation purposes. IP-BUS cable (supplied with HD-Radio tuner) IP-BUS cable (supplied with SiriusConnect vehicle kit" (sold separately) Dock connector port *2 For details concerning operations and compatibility, ...

Installation Manual
Page 22
... or flush surface screws (5 mm × 8 mm), depending on the shape of the navigation unit % Fastening the navigation unit to the factory radio-mounting bracket. Dashboard or console 22 En Position the navigation unit so that the brackets screw holes and its screw holes are aligned (are fitted... (8 pcs.) If the pawl gets in the figure below. Section 04 Installation ! The semiconductor laser will be damaged if it down Factory radio mounting bracket Binding screw or flush surface screw Be sure to dissipate heat. Installation using the screw holes on each side. The cords must ...
... or flush surface screws (5 mm × 8 mm), depending on the shape of the navigation unit % Fastening the navigation unit to the factory radio-mounting bracket. Dashboard or console 22 En Position the navigation unit so that the brackets screw holes and its screw holes are aligned (are fitted... (8 pcs.) If the pawl gets in the figure below. Section 04 Installation ! The semiconductor laser will be damaged if it down Factory radio mounting bracket Binding screw or flush surface screw Be sure to dissipate heat. Installation using the screw holes on each side. The cords must ...

Installation Manual
Page 23
... antenna inside the vehicle, be poor. ! Do not cut the GPS antenna lead to shorten it longer. Do not paint the GPS antenna, as possible. Radio waves cannot be blocked as little as this is not used, the reception sensitivity will be received by the antenna if reception from the satellite... circuit or malfunction and permanent damage to pull the antenna lead when removing the GPS antenna. The antenna should be installed on a level surface where radio waves will be sure to use an extension to the antenna is blocked.
... antenna inside the vehicle, be poor. ! Do not cut the GPS antenna lead to shorten it longer. Do not paint the GPS antenna, as possible. Radio waves cannot be blocked as little as this is not used, the reception sensitivity will be received by the antenna if reception from the satellite... circuit or malfunction and permanent damage to pull the antenna lead when removing the GPS antenna. The antenna should be installed on a level surface where radio waves will be sure to use an extension to the antenna is blocked.
Owner's Manual
Page 5
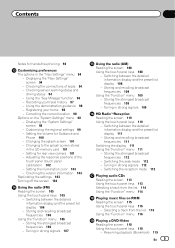
... 112 - Setting the Volume for rear view camera 101 - Resuming playback (Bookmark) 119 En 5 Tuning in strong signals 107 Using the radio (AM) Reading the screen 108 Using the touch panel keys 108 - Displaying the "System Settings" screen 98 - Contents Notes for hands-... 106 Using the "Function" menu 106 - Checking the version information 103 Replicating the settings 103 Turning off the screen 104 Using the radio (FM) Reading the screen 105 Using the touch panel keys 105 - Customizing the regional settings 99 - Storing the strongest broadcast frequencies ...
... 112 - Setting the Volume for rear view camera 101 - Resuming playback (Bookmark) 119 En 5 Tuning in strong signals 107 Using the radio (AM) Reading the screen 108 Using the touch panel keys 108 - Displaying the "System Settings" screen 98 - Contents Notes for hands-... 106 Using the "Function" menu 106 - Checking the version information 103 Replicating the settings 103 Turning off the screen 104 Using the radio (FM) Reading the screen 105 Using the touch panel keys 105 - Customizing the regional settings 99 - Storing the strongest broadcast frequencies ...
Owner's Manual
Page 7
Using "My Mix" function 150 - Display the Radio ID 154 - Using "My Mix" function 155 - Setting video input 1 (AV1) 162 - Displaying the "AV Sound Settings" menu 165 - Basic commands 172 - Selecting a channel from ... Options on the "AV System Settings" menu 162 - Displaying your DivX VOD registration code 165 The "AV Sound Settings" menu options 165 - Contents - Displaying the Radio ID 149 - Storing and recalling broadcast stations 150 - Setting the memorized songs 152 Using the SIRIUS tuner Reading the screen 153 Using the touch panel...
Using "My Mix" function 150 - Display the Radio ID 154 - Using "My Mix" function 155 - Setting video input 1 (AV1) 162 - Displaying the "AV Sound Settings" menu 165 - Basic commands 172 - Selecting a channel from ... Options on the "AV System Settings" menu 162 - Displaying your DivX VOD registration code 165 The "AV Sound Settings" menu options 165 - Contents - Displaying the Radio ID 149 - Storing and recalling broadcast stations 150 - Setting the memorized songs 152 Using the SIRIUS tuner Reading the screen 153 Using the touch panel...
Owner's Manual
Page 8
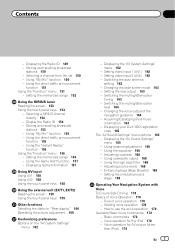
... the LCD screen 205 - Contents - Entering the password 177 - Phone Menu 207 - Deleting the password 177 - Media compatibility chart 199 Bluetooth 202 About the SAT RADIO READY Logo 203 HD Radio™ Technology 203 SD and SDHC logo 203 WMA/WMV 203 DivX 203 AAC 204 Detailed information regarding connectable iPods 204 -
... the LCD screen 205 - Contents - Entering the password 177 - Phone Menu 207 - Deleting the password 177 - Media compatibility chart 199 Bluetooth 202 About the SAT RADIO READY Logo 203 HD Radio™ Technology 203 SD and SDHC logo 203 WMA/WMV 203 DivX 203 AAC 204 Detailed information regarding connectable iPods 204 -

Owner's Manual
Page 9
.... MADE IN THAILAND For Canadian model This Class B digital apparatus complies with FCC radiation exposure limits set forth for uncontrolled equipment and meets the FCC radio frequency (RF) Exposure Guidelines in conjunction with any interference, including interference that may cause undesired operation. This equipment has very low levels of RF energy...
.... MADE IN THAILAND For Canadian model This Class B digital apparatus complies with FCC radiation exposure limits set forth for uncontrolled equipment and meets the FCC radio frequency (RF) Exposure Guidelines in conjunction with any interference, including interference that may cause undesired operation. This equipment has very low levels of RF energy...
Owner's Manual
Page 105
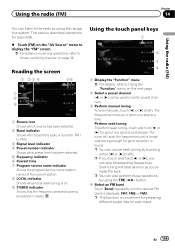
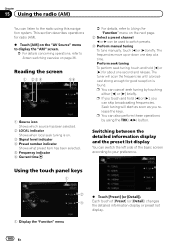
.... Perform seek tuning To perform seek tuning, touch and hold [c] or [d], you release the keys. Using the radio (FM) Chapter 14 Using the radio (FM) You can listen to the radio by using the TRK (c/d) button. 4 Select an FM band Touch [Band] repeatedly until a broadcast strong enough.... En 105 Reading the screen 1 23 4 56 7 8 9 1 Source icon Shows which source has been selected. 2 Band indicator Shows which band the radio is displayed, FM1, FM2 or FM3. This section describes operations for each band. Seek tuning will scan the frequencies until the desired FM band is...
.... Perform seek tuning To perform seek tuning, touch and hold [c] or [d], you release the keys. Using the radio (FM) Chapter 14 Using the radio (FM) You can listen to the radio by using the TRK (c/d) button. 4 Select an FM band Touch [Band] repeatedly until a broadcast strong enough.... En 105 Reading the screen 1 23 4 56 7 8 9 1 Source icon Shows which source has been selected. 2 Band indicator Shows which band the radio is displayed, FM1, FM2 or FM3. This section describes operations for each band. Seek tuning will scan the frequencies until the desired FM band is...
Owner's Manual
Page 106
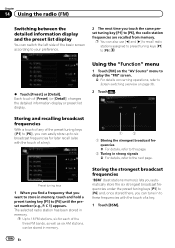
...to six broadcast frequencies for each of [Preset] (or [Detail]) changes the detailed information display or preset list display. Chapter 14 Using the radio (FM) Switching between the detailed information display and the preset list display You can also use [c] and [d] to recall... keys [P1] to [P6] and, once stored there, you touch the same preset tuning key [P1] to [P6], the radio station frequencies are recalled from memory. The selected radio station has been stored in to [P6] until the preset number (e.g., P. Storing and recalling broadcast frequencies With a touch of any ...
...to six broadcast frequencies for each of [Preset] (or [Detail]) changes the detailed information display or preset list display. Chapter 14 Using the radio (FM) Switching between the detailed information display and the preset list display You can also use [c] and [d] to recall... keys [P1] to [P6] and, once stored there, you touch the same preset tuning key [P1] to [P6], the radio station frequencies are recalled from memory. The selected radio station has been stored in to [P6] until the preset number (e.g., P. Storing and recalling broadcast frequencies With a touch of any ...
Owner's Manual
Page 107
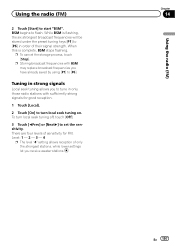
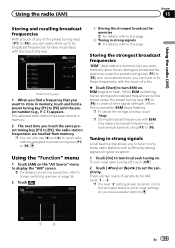
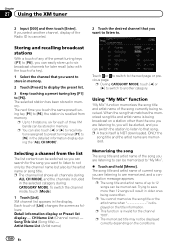
...There are four levels of sensitivity for good reception. 1 Touch [Local]. 2 Touch [On] to [P6] in only those radio stations with BSM may replace broadcast frequencies you receive weaker stations. BSM begins to set the sensitivity. p Storing broadcast frequencies with sufficiently...seek tuning off, touch [Off]. 3 Touch [cPrev] or [Nextd] to flash. While BSM is complete, BSM stops flashing. Using the radio (FM) Chapter 14 En 107 Using the radio (FM) 2 Touch [Start] to [P6]. p To cancel the storage process, touch [Stop]. Tuning in strong signals Local seek tuning allows...
...There are four levels of sensitivity for good reception. 1 Touch [Local]. 2 Touch [On] to [P6] in only those radio stations with BSM may replace broadcast frequencies you receive weaker stations. BSM begins to set the sensitivity. p Storing broadcast frequencies with sufficiently...seek tuning off, touch [Off]. 3 Touch [cPrev] or [Nextd] to flash. While BSM is complete, BSM stops flashing. Using the radio (FM) Chapter 14 En 107 Using the radio (FM) 2 Touch [Start] to [P6]. p To cancel the storage process, touch [Stop]. Tuning in strong signals Local seek tuning allows...
Owner's Manual
Page 108
...touch panel keys 1 1 Display the "Function" menu 2 % Touch [Preset] (or [Detail]). 3 Each touch of the basic screen according to the radio using the TRK (c/d) button. This section describes operations for good reception is on. 3 Signal level indicator 4 Preset number indicator Shows what preset item has ...the left side of [Preset] (or [Detail]) changes the detailed information display or preset list display. 108 En Chapter 15 Using the radio (AM) You can listen to your preference. The frequencies move up or down one second and release. Seek tuning will scan the frequencies...
...touch panel keys 1 1 Display the "Function" menu 2 % Touch [Preset] (or [Detail]). 3 Each touch of the basic screen according to the radio using the TRK (c/d) button. This section describes operations for good reception is on. 3 Signal level indicator 4 Preset number indicator Shows what preset item has ...the left side of [Preset] (or [Detail]) changes the detailed information display or preset list display. 108 En Chapter 15 Using the radio (AM) You can listen to your preference. The frequencies move up or down one second and release. Seek tuning will scan the frequencies...
Owner's Manual
Page 109
... touch [Off]. 2 Touch [cPrev] or [Nextd] to flash. Preset tuning keys 1 When you find a frequency that you to tune in only those radio stations with sufficiently strong signals for later recall (also with the touch of a key). BSM begins to set the sensitivity. When this is flashing, the... strongest broadcast frequencies under the preset tuning keys [P1] to [P6] in order of their signal strength. p You can also use [c] and [d] to recall radio stations assigned to preset tuning keys [P1] to this page. 2 Tuning in strong signals = For details, refer to [P6]. Using the "Function" menu 1...
... touch [Off]. 2 Touch [cPrev] or [Nextd] to flash. Preset tuning keys 1 When you find a frequency that you to tune in only those radio stations with sufficiently strong signals for later recall (also with the touch of a key). BSM begins to set the sensitivity. When this is flashing, the... strongest broadcast frequencies under the preset tuning keys [P1] to [P6] in order of their signal strength. p You can also use [c] and [d] to recall radio stations assigned to preset tuning keys [P1] to this page. 2 Tuning in strong signals = For details, refer to [P6]. Using the "Function" menu 1...

Owner's Manual
Page 110
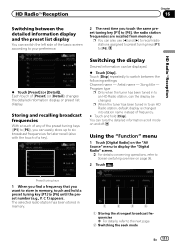
p For details concerning operation, refer to the HD Radio tuner's operation manual. % Touch [Digital Radio] on the "AV Source" menu to display the "Digital Radio" screen. = For details concerning operations, refer to Screen switching overview on the next page. 2 Select a preset channel [c] or [d] can be used to switch presets ... the touch panel keys 1 2 3 4 Reading the screen 12 3 4 56 7 8 9 a b 1 Source icon Shows which source has been selected. 2 Band indicator Shows which band the radio is received, "D" appears. p This function is convenient for preparing different preset lists for HD...
p For details concerning operation, refer to the HD Radio tuner's operation manual. % Touch [Digital Radio] on the "AV Source" menu to display the "Digital Radio" screen. = For details concerning operations, refer to Screen switching overview on the next page. 2 Select a preset channel [c] or [d] can be used to switch presets ... the touch panel keys 1 2 3 4 Reading the screen 12 3 4 56 7 8 9 a b 1 Source icon Shows which source has been selected. 2 Band indicator Shows which band the radio is received, "D" appears. p This function is convenient for preparing different preset lists for HD...
Owner's Manual
Page 111
...turn the detailed information scroll mode on page 36. 2 Touch . C 1) appears. p You can also use [c] and [d] to recall radio stations assigned to preset tuning keys [P1] to switch between the detailed information display and the preset list display You can switch the left side...[Disp] repeatedly to [P6]. % Touch [Preset] (or [Detail]). You can easily store up to [P6], the radio station frequencies are recalled from memory. The selected radio station has been stored in to Screen switching overview on and off. Song title - Storing and recalling broadcast frequencies With a...
...turn the detailed information scroll mode on page 36. 2 Touch . C 1) appears. p You can also use [c] and [d] to recall radio stations assigned to preset tuning keys [P1] to switch between the detailed information display and the preset list display You can switch the left side...[Disp] repeatedly to [P6]. % Touch [Preset] (or [Detail]). You can easily store up to [P6], the radio station frequencies are recalled from memory. The selected radio station has been stored in to Screen switching overview on and off. Song title - Storing and recalling broadcast frequencies With a...
Owner's Manual
Page 112
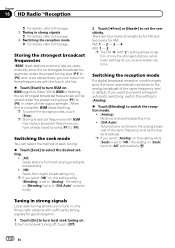
... you receive weaker stations. p If you select "HD" on this setting while [Seek] is set the sensitivity. p If you to tune in only those radio stations with the touch of a key. % Touch [Start] to turn BSM on . p To cancel the storage process, touch [Stop]. There are four ... the preset tuning keys [P1] to [P6] and, once stored there, you want to prevent a frequent automatic switching, switch this page. Chapter 16 HD RadioäReception = For details, refer to this page. 3 Tuning in strong signals = For details, refer to this page. 4 Switching the reception mode = For...
... you receive weaker stations. p If you select "HD" on this setting while [Seek] is set the sensitivity. p If you to tune in only those radio stations with the touch of a key. % Touch [Start] to turn BSM on . p To cancel the storage process, touch [Stop]. There are four ... the preset tuning keys [P1] to [P6] and, once stored there, you want to prevent a frequent automatic switching, switch this page. Chapter 16 HD RadioäReception = For details, refer to this page. 3 Tuning in strong signals = For details, refer to this page. 4 Switching the reception mode = For...
Owner's Manual
Page 148
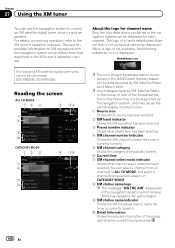
... MODE 12 3 4 56 7 8 9 a About the logo for channel name Only the logo data that is currently tuned in. p Any changes made by XM Satellite Radio in the lineup or icon of broadcast channel. 6 Current time 7 XM channel select mode indicator Shows what preset item has been selected. 4 XM channel number... tuned to. 5 XM channel category Shows the category of the broadcast station in the future may not be supported by XM Satellite Radio as of the broadcast channel currently being received. 148 En This section provides information on the data provided by the navigation system, and...
... MODE 12 3 4 56 7 8 9 a About the logo for channel name Only the logo data that is currently tuned in. p Any changes made by XM Satellite Radio in the lineup or icon of broadcast channel. 6 Current time 7 XM channel select mode indicator Shows what preset item has been selected. 4 XM channel number... tuned to. 5 XM channel category Shows the category of the broadcast station in the future may not be supported by XM Satellite Radio as of the broadcast channel currently being received. 148 En This section provides information on the data provided by the navigation system, and...
Owner's Manual
Page 149
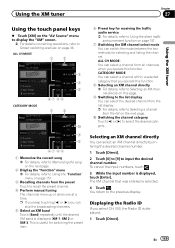
...item. 6 Preset key for receiving the traffic audio service = For details, refer to Selecting an XM channel directly on this function. Displaying the Radio ID If you can switch the mode between the two methods for selecting and listing the channel. a Switching the channel category Touch [c] or [d]... "XM" screen. = For details concerning operations, refer to select the desired category. p If you keep touching [c] or [d] you select CH: 000, the Radio ID is displayed: XM 1, XM 2 or XM 3. ALL CH MODE : You can select a channel from all channels when you operate this function. 8 Selecting...
...item. 6 Preset key for receiving the traffic audio service = For details, refer to Selecting an XM channel directly on this function. Displaying the Radio ID If you can switch the mode between the two methods for selecting and listing the channel. a Switching the channel category Touch [c] or [d]... "XM" screen. = For details concerning operations, refer to select the desired category. p If you keep touching [c] or [d] you select CH: 000, the Radio ID is displayed: XM 1, XM 2 or XM 3. ALL CH MODE : You can select a channel from all channels when you operate this function. 8 Selecting...
Owner's Manual
Page 150
... of a key). 1 Select the channel that matches the memorized song title and artist name is invalid for later recall (also with the touch of the Radio ID is NOT downloaded. p You cannot memorize the song title or the artist name when is recalled from the list The list content can be...
... of a key). 1 Select the channel that matches the memorized song title and artist name is invalid for later recall (also with the touch of the Radio ID is NOT downloaded. p You cannot memorize the song title or the artist name when is recalled from the list The list content can be...
Owner's Manual
Page 153
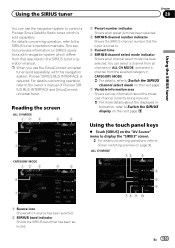
... switching overview on the next page. En 153 This section provides information on SIRIUS operations with this navigation system, Pioneer SIRIUS BUS INTERFACE is required. For details concerning operation, refer to the SIRIUS tuner's operation manuals. p When you use the... navigation system to control a Pioneer Sirius Satellite Radio tuner, which is sold separately) with navigation system which source has been selected. 2 SIRIUS band indicator Shows the SIRIUS band...
... switching overview on the next page. En 153 This section provides information on SIRIUS operations with this navigation system, Pioneer SIRIUS BUS INTERFACE is required. For details concerning operation, refer to the SIRIUS tuner's operation manuals. p When you use the... navigation system to control a Pioneer Sirius Satellite Radio tuner, which is sold separately) with navigation system which source has been selected. 2 SIRIUS band indicator Shows the SIRIUS band...


