Owner's Manual
Page 2
... map screen 31 - Important The screens shown in this Pioneer product. Data subject to see 32 Inserting a disc (for AVICZ140BH) 19 - Ejecting an SD memory card (for AVIC-Z140BH) 17 - Inserting an SD memory card (for AVIC-X940BT) 18 - Removing a shortcut 28 Operating list screens (e.g.... Changing the scale of the intersection 30 - Scrolling the map to the position you want to erasure 12 Basic operation Checking part names and functions 14...
... map screen 31 - Important The screens shown in this Pioneer product. Data subject to see 32 Inserting a disc (for AVICZ140BH) 19 - Ejecting an SD memory card (for AVIC-Z140BH) 17 - Inserting an SD memory card (for AVIC-X940BT) 18 - Removing a shortcut 28 Operating list screens (e.g.... Changing the scale of the intersection 30 - Scrolling the map to the position you want to erasure 12 Basic operation Checking part names and functions 14...

Owner's Manual
Page 14
Chapter 02 Basic operation Checking part names and functions This chapter gives information about the names of the parts and the main features using the buttons. AVIC-Z140BH (with the LCD panel closed) 1 2 34 5 67 AVIC-Z140BH (with the LCD panel open) 8 9 14 En
Chapter 02 Basic operation Checking part names and functions This chapter gives information about the names of the parts and the main features using the buttons. AVIC-Z140BH (with the LCD panel closed) 1 2 34 5 67 AVIC-Z140BH (with the LCD panel open) 8 9 14 En

Owner's Manual
Page 17
... to adjust the angle. p The adjusted angle of the LCD panel will be memorized and the LCD panel will automatically return to that angle for AVIC-Z140BH) WARNING ! Inserting and ejecting a disc Inserting a disc (for safety. ! WARNING Keep hands and fingers clear of an accident. Do not ...operate this navigation system. ! Basic operation Chapter 02 Basic operation 2 Push the lower part of the unit when opening , closing , or adjusting the LCD panel. If LCD panel is opening or closing, the LCD panel may result in ...
... to adjust the angle. p The adjusted angle of the LCD panel will be memorized and the LCD panel will automatically return to that angle for AVIC-Z140BH) WARNING ! Inserting and ejecting a disc Inserting a disc (for safety. ! WARNING Keep hands and fingers clear of an accident. Do not ...operate this navigation system. ! Basic operation Chapter 02 Basic operation 2 Push the lower part of the unit when opening , closing , or adjusting the LCD panel. If LCD panel is opening or closing, the LCD panel may result in ...
Owner's Manual
Page 96
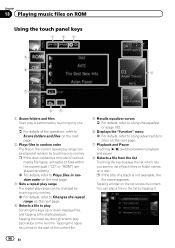
... list Touching the key displays the list which lets you see the list of various media file types, all tracks or files within the current part ("CD" or "ROM") are played randomly. = For details, refer to the next file. You can be played at random by touching only one key. = For...
... list Touching the key displays the list which lets you see the list of various media file types, all tracks or files within the current part ("CD" or "ROM") are played randomly. = For details, refer to the next file. You can be played at random by touching only one key. = For...

Owner's Manual
Page 172
... the vehicle When calculating the expected time of the AV source is adjusted by the VOL (+/-) button or Multi-control. = For details, refer to Checking part names and functions on page 170. 2 Touch [Volume]. Each time you touch the key next to Displaying the screen for system settings on page 14...
... the vehicle When calculating the expected time of the AV source is adjusted by the VOL (+/-) button or Multi-control. = For details, refer to Checking part names and functions on page 170. 2 Touch [Volume]. Each time you touch the key next to Displaying the screen for system settings on page 14...
Installation Manual
Page 2
...Before installing 20 - When using the screw holes on the steering column 27 - Parts supplied 24 - Parts supplied 26 - Mounting on the dashboard or rear shelf) 25 Installing the microphone 26 - AVIC-X940BT 6 Connecting the system 8 Connecting the power cord (1) 10 Connecting the power ...19 Installation Precautions before connecting the system 4 Before installing this product 4 To prevent damage 4 - For AVIC-Z140BH users 21 Installing the navigation system 21 - Parts supplied 22 - Fastening the detachable faceplate 23 Installing the GPS antenna 24 - Installation notes 24 - When...
...Before installing 20 - When using the screw holes on the steering column 27 - Parts supplied 24 - Parts supplied 26 - Mounting on the dashboard or rear shelf) 25 Installing the microphone 26 - AVIC-X940BT 6 Connecting the system 8 Connecting the power cord (1) 10 Connecting the power ...19 Installation Precautions before connecting the system 4 Before installing this product 4 To prevent damage 4 - For AVIC-Z140BH users 21 Installing the navigation system 21 - Parts supplied 22 - Fastening the detachable faceplate 23 Installing the GPS antenna 24 - Installation notes 24 - When...

Installation Manual
Page 4
... and between 4 W to do , the protection circuit (fuse holder, fuse resistor or filter, etc.) may result in any of the vehicle's moving parts, especially the steering wheel, shift lever, parking brake, sliding seat tracks, doors, or any of the navigation system and tapping into the engine compartment....you do so may fail to the vehicle battery. Make sure that they will not obstruct or hinder driving. ! Use this unit with metal parts, short-circuiting can occur, resulting in a short circuit or malfunction. ! It is directly connected to the product. ! Do not cut the...
... and between 4 W to do , the protection circuit (fuse holder, fuse resistor or filter, etc.) may result in any of the vehicle's moving parts, especially the steering wheel, shift lever, parking brake, sliding seat tracks, doors, or any of the navigation system and tapping into the engine compartment....you do so may fail to the vehicle battery. Make sure that they will not obstruct or hinder driving. ! Use this unit with metal parts, short-circuiting can occur, resulting in a short circuit or malfunction. ! It is directly connected to the product. ! Do not cut the...

Installation Manual
Page 5
...of the car's body. To avoid short-circuiting, cover the disconnected lead with different screws. When the ignition switch is especially important to metal parts of the speaker lead together. En 5 When installing this navigation system. ! The ground wire of the power amp and the one of ... may cause a short circuit. The black cable is employed, do not remove the caps attached to only use this product. ! Other devices Metal parts of car's body (Another electronic device in a vehicle without ACC (accessory) position on connecting the power amp and other units, then make sure ...
...of the car's body. To avoid short-circuiting, cover the disconnected lead with different screws. When the ignition switch is especially important to metal parts of the speaker lead together. En 5 When installing this navigation system. ! The ground wire of the power amp and the one of ... may cause a short circuit. The black cable is employed, do not remove the caps attached to only use this product. ! Other devices Metal parts of car's body (Another electronic device in a vehicle without ACC (accessory) position on connecting the power amp and other units, then make sure ...
Installation Manual
Page 6
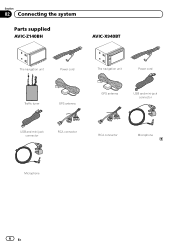
Section 02 Connecting the system Parts supplied AVIC-Z140BH AVIC-X940BT The navigation unit Power cord The navigation unit Power cord Traffic tuner GPS antenna GPS antenna USB and mini-jack connector USB and mini-jack connector RCA connector RCA connector Microphone Microphone 6 En
Section 02 Connecting the system Parts supplied AVIC-Z140BH AVIC-X940BT The navigation unit Power cord The navigation unit Power cord Traffic tuner GPS antenna GPS antenna USB and mini-jack connector USB and mini-jack connector RCA connector RCA connector Microphone Microphone 6 En

Installation Manual
Page 20
...! Vibration may damage wires or insulation, leading to the deployment area of the vehicle. ! Do not install this product, use the supplied parts in the vehicle's location display. Never install the navigation system in front of or next to the place in the dashboard, door, or ... and the product may (i) obstruct the driver's vision, (ii) impair the performance of this product, its lead In addition, you have the parts' compatibility checked by the driver or passenger if the vehicle stops quickly. ! Make sure there is extremely dangerous to allow them . Section 03...
...! Vibration may damage wires or insulation, leading to the deployment area of the vehicle. ! Do not install this product, use the supplied parts in the vehicle's location display. Never install the navigation system in front of or next to the place in the dashboard, door, or ... and the product may (i) obstruct the driver's vision, (ii) impair the performance of this product, its lead In addition, you have the parts' compatibility checked by the driver or passenger if the vehicle stops quickly. ! Make sure there is extremely dangerous to allow them . Section 03...
Installation Manual
Page 22
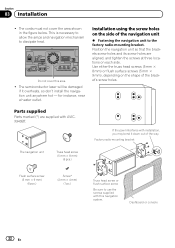
... below. Installation using the screw holes on the side of the navigation unit % Fastening the navigation unit to dissipate heat. Dashboard or console 22 En Parts supplied Parts marked (*) are aligned, and tighten the screws at three locations on the shape of the way. Factory radio-mounting bracket The navigation unit Truss...
... below. Installation using the screw holes on the side of the navigation unit % Fastening the navigation unit to dissipate heat. Dashboard or console 22 En Parts supplied Parts marked (*) are aligned, and tighten the screws at three locations on the shape of the way. Factory radio-mounting bracket The navigation unit Truss...
Installation Manual
Page 24
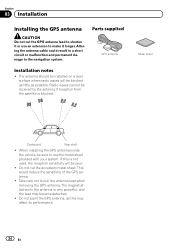
... metal sheet. The antenna should be installed on a level surface where radio waves will be sure to the navigation system. If this may become detached. ! Parts supplied GPS antenna Installation notes ! Altering the antenna cable could result in a short circuit or malfunction and permanent damage to use an extension to make...
... metal sheet. The antenna should be installed on a level surface where radio waves will be sure to the navigation system. If this may become detached. ! Parts supplied GPS antenna Installation notes ! Altering the antenna cable could result in a short circuit or malfunction and permanent damage to use an extension to make...

Installation Manual
Page 26
Microphone clip Microphone Clamps Use separately sold clamps to the sun visor. Make sure to connect the microphone to pick up position. Microphone clip Parts supplied Microphone Microphone clip Double-sided tape Mounting on the sun visor when it easiest to the navigation system after the system is in the ...
Microphone clip Microphone Clamps Use separately sold clamps to the sun visor. Make sure to connect the microphone to pick up position. Microphone clip Parts supplied Microphone Microphone clip Double-sided tape Mounting on the sun visor when it easiest to the navigation system after the system is in the ...


