Owner's Manual
Page 1
... you must understand before using this navigation system. Important Information for the User first! For more information, please contact your vehicle, additional installation may be required. Operation Manual FLASH MEMORY MULTIMEDIA AV NAVIGATION RECEIVER AVIC-Z120BT AVIC-X920BT Notice to your vehicle's parking brake and depending on your Authorized Pioneer Electronics retailer or call us at...
... you must understand before using this navigation system. Important Information for the User first! For more information, please contact your vehicle, additional installation may be required. Operation Manual FLASH MEMORY MULTIMEDIA AV NAVIGATION RECEIVER AVIC-Z120BT AVIC-X920BT Notice to your vehicle's parking brake and depending on your Authorized Pioneer Electronics retailer or call us at...
Owner's Manual
Page 2
...differ from startup to termination 19 On first-time startup 19 Regular startup 20 How to use the map How to use the navigation menu screens Screen switching overview 22 What you can do on -screen keyboard 24 How to read through these operating instructions so you ...read the map screen 25 - Inserting an SD memory card (for AVIC-Z120BT) 14 - Selecting the shortcut 23 - Contents Thank you for AVIC-Z120BT) 15 - Data subject to use this Pioneer product. Z120BT) 15 - Connecting your route 33 Searching for AVIC-X920BT) 15 - POI list) 24 Operating the on each menu 23 ...
...differ from startup to termination 19 On first-time startup 19 Regular startup 20 How to use the map How to use the navigation menu screens Screen switching overview 22 What you can do on -screen keyboard 24 How to read through these operating instructions so you ...read the map screen 25 - Inserting an SD memory card (for AVIC-Z120BT) 14 - Selecting the shortcut 23 - Contents Thank you for AVIC-Z120BT) 15 - Data subject to use this Pioneer product. Z120BT) 15 - Connecting your route 33 Searching for AVIC-X920BT) 15 - POI list) 24 Operating the on each menu 23 ...
Owner's Manual
Page 7
...Starting voice operation 178 - Setting video input 1 (AV1) 168 - Acquiring/Cataloging iPod music information 170 - Adjusting loudness 174 - Flow of navigation interruption screen 160 Selecting the "Quick Access" menu 160 Displaying the "System Settings" screen 161 - Adjusting the response positions of Voice Operation 178... timing 170 - Setting the simulated sound stage 175 Replicating the settings 176 Turning off the screen 177 Operating Your Navigation System with Voice To Ensure Safe Driving 178 Basics of the touch panel (touch panel calibration) 165 - Changing the wide ...
...Starting voice operation 178 - Setting video input 1 (AV1) 168 - Acquiring/Cataloging iPod music information 170 - Adjusting loudness 174 - Flow of navigation interruption screen 160 Selecting the "Quick Access" menu 160 Displaying the "System Settings" screen 161 - Adjusting the response positions of Voice Operation 178... timing 170 - Setting the simulated sound stage 175 Replicating the settings 176 Turning off the screen 177 Operating Your Navigation System with Voice To Ensure Safe Driving 178 Basics of the touch panel (touch panel calibration) 165 - Changing the wide ...
Owner's Manual
Page 8
... 214 Using the LCD screen correctly 214 - Basic commands 181 - Voice commands related to the default or factory settings 186 - Forgotten password 185 Returning the navigation system to hands-free phoning 183 Tips for audio functions 197 Positioning technology 199 - Setting items to be deleted 187 - Route search specifications 203 Handling...
... 214 Using the LCD screen correctly 214 - Basic commands 181 - Voice commands related to the default or factory settings 186 - Forgotten password 185 Returning the navigation system to hands-free phoning 183 Tips for audio functions 197 Positioning technology 199 - Setting items to be deleted 187 - Route search specifications 203 Handling...
Owner's Manual
Page 9
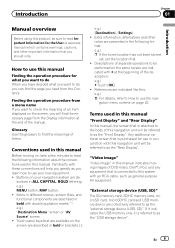
... in this manual "Front Display" and "Rear Display" In this manual, the screen that is attached to the body of this navigation unit will help you greatly as the "USB storage device". Glossary Use the glossary to find the meanings of terms. Conventions used ...lettering: e.g.) MENU button, MAP button. ! Descriptions of separate operations to be performed on the screen are de- References are presented in bold with this navigation unit will find the page you need from the Display information at the beginning of the description: e.g.) # Touch [OK]. ! Finding the operation procedure...
... in this manual "Front Display" and "Rear Display" In this manual, the screen that is attached to the body of this navigation unit will help you greatly as the "USB storage device". Glossary Use the glossary to find the meanings of terms. Conventions used ...lettering: e.g.) MENU button, MAP button. ! Descriptions of separate operations to be performed on the screen are de- References are presented in bold with this navigation unit will find the page you need from the Display information at the beginning of the description: e.g.) # Touch [OK]. ! Finding the operation procedure...

Owner's Manual
Page 10
...iPhone 3G: Ver. 3.1.2 ! iPhone 3GS: Ver. 3.1.2 p In this navigation system, refer to the information on the author's rights as protected by Macrovision Corporation. Map coverage For details about iPod compatibility with a Pioneer USB interface cable for the iPod. Others may constitute an infringement on our... website. 10 En iPod fifth generation: Ver. 1.3 ! p For details about the map coverage of this navigation system, refer to use and ...
...iPhone 3G: Ver. 3.1.2 ! iPhone 3GS: Ver. 3.1.2 p In this navigation system, refer to the information on the author's rights as protected by Macrovision Corporation. Map coverage For details about iPod compatibility with a Pioneer USB interface cable for the iPod. Others may constitute an infringement on our... website. 10 En iPod fifth generation: Ver. 1.3 ! p For details about the map coverage of this navigation system, refer to use and ...
Owner's Manual
Page 11
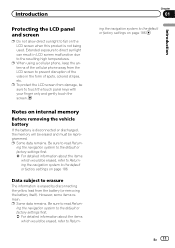
... screen to prevent disruption of the video in LCD screen malfunction due to the default or factory settings on page 186. ing the navigation system to the default or factory settings first. = For detailed information about the items which would be erased, refer to Returning the...settings on page 186. p When using a cellular phone, keep the antenna of the cellular phone away from damage, be reprogrammed. Chapter 01 ing the navigation system to the resulting high temperatures. En 11 Introduction However, some items remain. Be sure to Return- p Some data remains. ing the...
... screen to prevent disruption of the video in LCD screen malfunction due to the default or factory settings on page 186. ing the navigation system to the default or factory settings first. = For detailed information about the items which would be erased, refer to Returning the...settings on page 186. p When using a cellular phone, keep the antenna of the cellular phone away from damage, be reprogrammed. Chapter 01 ing the navigation system to the resulting high temperatures. En 11 Introduction However, some items remain. Be sure to Return- p Some data remains. ing the...
Owner's Manual
Page 13
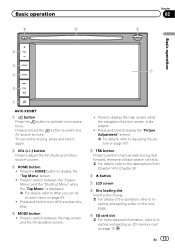
... screen display. 4 MODE button ! Press to display the map screen while the navigation function screen is displayed. = For details, refer to What you can do on each menu on page 23. ! En 13 Basic operation 6 8 Chapter 02 9 Basic operation 2 3 7 4 5 1 AVIC-X920BT 1 button Press the button to adjust the AV (Audio and Video) source...
... screen display. 4 MODE button ! Press to display the map screen while the navigation function screen is displayed. = For details, refer to What you can do on each menu on page 23. ! En 13 Basic operation 6 8 Chapter 02 9 Basic operation 2 3 7 4 5 1 AVIC-X920BT 1 button Press the button to adjust the AV (Audio and Video) source...
Owner's Manual
Page 14
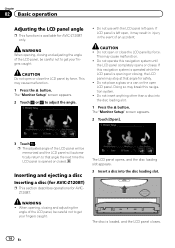
... careful not to get your fingers caught. Inserting and ejecting a disc Inserting a disc (for AVIC-Z120BT) p This section describes operations for safety. ! The disc is available for AVIC-Z120BT only. Chapter 02 Basic operation Adjusting the LCD panel angle p This function is loaded, and... malfunction. 1 Press the h button. The "Monitor Setup" screen appears. 2 Touch [Open]. 3 Touch . CAUTION ! This may break this navigation system until the LCD panel completely opens or closes. p The adjusted angle of the LCD panel, be memorized and the LCD panel will be careful...
... careful not to get your fingers caught. Inserting and ejecting a disc Inserting a disc (for AVIC-Z120BT) p This section describes operations for safety. ! The disc is available for AVIC-Z120BT only. Chapter 02 Basic operation Adjusting the LCD panel angle p This function is loaded, and... malfunction. 1 Press the h button. The "Monitor Setup" screen appears. 2 Touch [Open]. 3 Touch . CAUTION ! This may break this navigation system until the LCD panel completely opens or closes. p The adjusted angle of the LCD panel, be memorized and the LCD panel will be careful...
Owner's Manual
Page 16
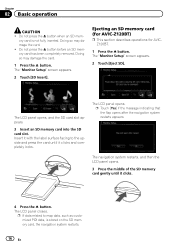
...damage the card. ! p Touch [Yes] if the message indicating that the flap opens after the navigation system restarts appears. Do not press the h button when an SD mem- Ejecting an SD memory card (for AVIC-Z120BT) p This section describes operations for AVICZ120BT. 1 Press the h button. The LCD panel opens..., and the SD card slot appears. 3 Insert an SD memory card into the SD card slot. The LCD panel opens. The navigation system restarts, and then the LCD...
...damage the card. ! p Touch [Yes] if the message indicating that the flap opens after the navigation system restarts appears. Do not press the h button when an SD mem- Ejecting an SD memory card (for AVIC-Z120BT) p This section describes operations for AVICZ120BT. 1 Press the h button. The LCD panel opens..., and the SD card slot appears. 3 Insert an SD memory card into the SD card slot. The LCD panel opens. The navigation system restarts, and then the LCD...
Owner's Manual
Page 17
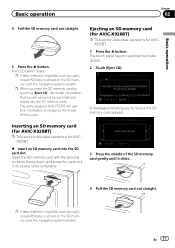
...the navigation system restarts. The utility program AVIC FEEDS will use . p If data related to remove the SD memory card appears. En 17 The touch panel keys for AVICX920BT. % Insert an SD memory card into the SD memory card. Inserting an SD memory card (for AVIC-X920BT) ...p This section describes operations for ejecting the media appear. 2 Touch [Eject SD]. Ejecting an SD memory card (for AVIC-X920BT) p This section describes operations for AVICX920BT. 1 Press the h button. A message ...
...the navigation system restarts. The utility program AVIC FEEDS will use . p If data related to remove the SD memory card appears. En 17 The touch panel keys for AVICX920BT. % Insert an SD memory card into the SD memory card. Inserting an SD memory card (for AVIC-X920BT) ...p This section describes operations for ejecting the media appear. 2 Touch [Eject SD]. Ejecting an SD memory card (for AVIC-X920BT) p This section describes operations for AVICX920BT. 1 Press the h button. A message ...
Owner's Manual
Page 18
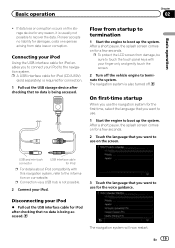
..., is stored on the storage device for damages, costs or expenses arising from this navigation system while data is being transferred. 18 En Connecting and disconnecting an iPod CAUTION ! Pioneer accepts no data is being accessed. This navigation system may not achieve optimum performance with all USB storage devices is not guaranteed. Plugging...
..., is stored on the storage device for damages, costs or expenses arising from this navigation system while data is being transferred. 18 En Connecting and disconnecting an iPod CAUTION ! Pioneer accepts no data is being accessed. This navigation system may not achieve optimum performance with all USB storage devices is not guaranteed. Plugging...
Owner's Manual
Page 19
En 19 Pioneer accepts no data is being accessed. Connecting your finger only and gently touch the screen. 2 Turn off . After a short pause, the splash screen comes on for a few seconds. Disconnecting your iPod to use on our website. The navigation system is required for damages, ...interface cable for iPod p For details about iPod compatibility with your iPod Using the USB interface cable for iPod enables you want to the navigation system. p A USB interface cable for iPod (CD-IU50V) (sold separately) is also turned off the vehicle engine to terminate the system...
En 19 Pioneer accepts no data is being accessed. Connecting your finger only and gently touch the screen. 2 Turn off . After a short pause, the splash screen comes on for a few seconds. Disconnecting your iPod to use on our website. The navigation system is required for damages, ...interface cable for iPod p For details about iPod compatibility with your iPod Using the USB interface cable for iPod enables you want to the navigation system. p A USB interface cable for iPod (CD-IU50V) (sold separately) is also turned off the vehicle engine to terminate the system...
Owner's Manual
Page 20
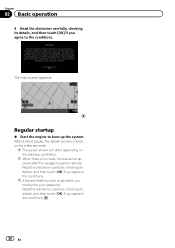
..., and then touch [OK] if you agree to boot up the system. p If the anti-theft function is no route, the disclaimer appears after the navigation system reboots. p When there is activated, you must enter your password. Chapter 02 Basic operation 4 Read the disclaimer carefully, checking its details, and then touch...
..., and then touch [OK] if you agree to boot up the system. p If the anti-theft function is no route, the disclaimer appears after the navigation system reboots. p When there is activated, you must enter your password. Chapter 02 Basic operation 4 Read the disclaimer carefully, checking its details, and then touch...
Owner's Manual
Page 22
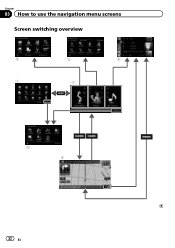
Chapter 03 How to use the navigation menu screens Screen switching overview 2 3 4 1 1 5 6 22 En
Chapter 03 How to use the navigation menu screens Screen switching overview 2 3 4 1 1 5 6 22 En

Owner's Manual
Page 23
.... Selecting the shortcut p Up to 15 menu items can access the screen to customize settings. 6 Map screen Press the MODE button to display the navigation map screen. Shortcut Menu p In this manual, Classic Menu will appear. En 23 Classic Menu Shortcut Menu Registering your favorite menu items in shortcuts.... Top Menu Press the HOME button to display the "Top Menu" screen. How to use the navigation menu screens How to use the navigation menu screens Chapter 03 What you use the navigation system for your set route from this menu. The selected item is the starting menu to next ...
.... Selecting the shortcut p Up to 15 menu items can access the screen to customize settings. 6 Map screen Press the MODE button to display the navigation map screen. Shortcut Menu p In this manual, Classic Menu will appear. En 23 Classic Menu Shortcut Menu Registering your favorite menu items in shortcuts.... Top Menu Press the HOME button to display the "Top Menu" screen. How to use the navigation menu screens How to use the navigation menu screens Chapter 03 What you use the navigation system for your set route from this menu. The selected item is the starting menu to next ...
Owner's Manual
Page 24
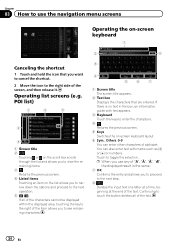
... can enter other characters of the screen, and then release it. If there is the same. 7 OK Confirms the entry and allows you use the navigation menu screens Operating the on-screen keyboard 1 2 8 Canceling the shortcut 1 Touch and hold the icon that you to see remaining characters. 3 4 5 6 7 1 Screen title The screen...
... can enter other characters of the screen, and then release it. If there is the same. 7 OK Confirms the entry and allows you use the navigation menu screens Operating the on-screen keyboard 1 2 8 Canceling the shortcut 1 Touch and hold the icon that you to see remaining characters. 3 4 5 6 7 1 Screen title The screen...
Owner's Manual
Page 25
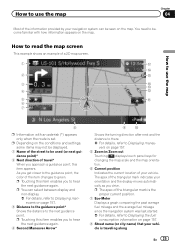
...Next direction of travel* When you to hear the next guidance again. vers on the map. The apex of the triangular mark indicates your navigation system can select between display and non-display. = For details, refer to Displaying maneuvers on the map. p Touching this item enables you ...mark is the proper current position. 7 Eco-Meter Displays a graph comparing the past average fuel mileage and the average fuel mileage since the navigation system was last started. = For details, refer to Displaying the fuel consumption information on the conditions and settings, some items may not be...
...Next direction of travel* When you to hear the next guidance again. vers on the map. The apex of the triangular mark indicates your navigation system can select between display and non-display. = For details, refer to Displaying maneuvers on the map. p Touching this item enables you ...mark is the proper current position. 7 Eco-Meter Displays a graph comparing the past average fuel mileage and the average fuel mileage since the navigation system was last started. = For details, refer to Displaying the fuel consumption information on the conditions and settings, some items may not be...
Owner's Manual
Page 26
... View" in another color. p If you to briefly view the current status on the AV source. e Direction line* The direction towards your iPod to this navigation system, the artwork for the AV information bar Touching this tab opens the AV information bar and enables you connect your destination (next waypoint, or...
... View" in another color. p If you to briefly view the current status on the AV source. e Direction line* The direction towards your iPod to this navigation system, the artwork for the AV information bar Touching this tab opens the AV information bar and enables you connect your destination (next waypoint, or...
Owner's Manual
Page 27
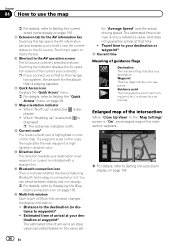
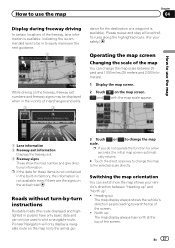
... for a few seconds, the initial map screen automatically returns. # Touch the direct scale key to change the map to the selected scale directly. Pioneer Navigation will only display a navigable route on the map (only the arrival gui- 3 Touch or to change the map scale between "Heading up" and "North up". ! En...be in to easily maneuver the next guidance. 1 While driving on the freeway, freeway exit numbers and freeway signs may be used to plot a navigable route. p If you do not operate the function for these items is not contained in the built-in memory, the information is not available ...
... for a few seconds, the initial map screen automatically returns. # Touch the direct scale key to change the map to the selected scale directly. Pioneer Navigation will only display a navigable route on the map (only the arrival gui- 3 Touch or to change the map scale between "Heading up" and "North up". ! En...be in to easily maneuver the next guidance. 1 While driving on the freeway, freeway exit numbers and freeway signs may be used to plot a navigable route. p If you do not operate the function for these items is not contained in the built-in memory, the information is not available ...


