Owner's Manual
Page 1
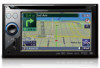
English Operation Manual FLASH MEMORY MULTIMEDIA AV NAVIGATION RECEIVER AVIC-X910BT AVIC-X710BT Notice to all users: This software requires that the navigation system is properly connected to your vehicle's parking brake and depending on your Authorized Pioneer Electronics retailer or call us at (800) 421-1404. For more information, please contact your vehicle, additional installation may be required.
English Operation Manual FLASH MEMORY MULTIMEDIA AV NAVIGATION RECEIVER AVIC-X910BT AVIC-X710BT Notice to all users: This software requires that the navigation system is properly connected to your vehicle's parking brake and depending on your Authorized Pioneer Electronics retailer or call us at (800) 421-1404. For more information, please contact your vehicle, additional installation may be required.
Owner's Manual
Page 2
... memory 26 - Contents Thank you for Canada 12 - PIONEER AVIC-X910BT, AVIC-X710BT for buying this Pioneer product. Speed limit indication 22 Additional Safety Information 22 - Failure to erasure 26 - Visit Our Web site 24 Manual overview 24 - Definitions of terminology 24 2 En Notice ... Inserting a disc 29 - How to use the navigation menu screens 34 - PIONEER AVIC-X910BT, AVIC-X710BT for future reference. How to operate your iPod 31 - Before removing the vehicle battery 26 - Data subject to operate 23 - Inserting an SD memory card 30 - Please read the map screen...
... memory 26 - Contents Thank you for Canada 12 - PIONEER AVIC-X910BT, AVIC-X710BT for buying this Pioneer product. Speed limit indication 22 Additional Safety Information 22 - Failure to erasure 26 - Visit Our Web site 24 Manual overview 24 - Definitions of terminology 24 2 En Notice ... Inserting a disc 29 - How to use the navigation menu screens 34 - PIONEER AVIC-X910BT, AVIC-X710BT for future reference. How to operate your iPod 31 - Before removing the vehicle battery 26 - Data subject to operate 23 - Inserting an SD memory card 30 - Please read the map screen...
Owner's Manual
Page 20
...Chapter 01 Introduction Copyright Notices for internal inspection, adjustments or repairs. ! If you to consult your dealer or the nearest authorized Pioneer Service Station. Do not disassemble or modify this product shall not be dangerous and could expose you notice smoke, a strange noise ... system, park your vehicle to the terms of this condition because doing so may be construed as there are located in the operator's manual included in this product to the product, smoke, and overheating could result. The product is an authorized distributor of copyright protection ...
...Chapter 01 Introduction Copyright Notices for internal inspection, adjustments or repairs. ! If you to consult your dealer or the nearest authorized Pioneer Service Station. Do not disassemble or modify this product shall not be dangerous and could expose you notice smoke, a strange noise ... system, park your vehicle to the terms of this condition because doing so may be construed as there are located in the operator's manual included in this product to the product, smoke, and overheating could result. The product is an authorized distributor of copyright protection ...
Owner's Manual
Page 21
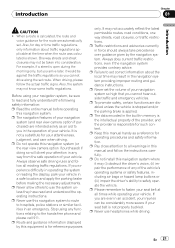
...understand the following safety information: p Read the entire manual before making the necessary adjustments. When driving, please follow the instructions carefully. It is shown. p Never allow others to read and understood the operating instructions. It may not know some traffic regulations. ...reference purposes only. p Route and guidance information displayed by the navigation system. p Keep this manual handy as an aid to you experience difficulty in operating the system or reading the display, park your attention in the navigation system providing improper routing ...
...understand the following safety information: p Read the entire manual before making the necessary adjustments. When driving, please follow the instructions carefully. It is shown. p Never allow others to read and understood the operating instructions. It may not know some traffic regulations. ...reference purposes only. p Route and guidance information displayed by the navigation system. p Keep this manual handy as an aid to you experience difficulty in operating the system or reading the display, park your attention in the navigation system providing improper routing ...
Owner's Manual
Page 123
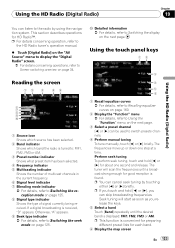
... the keys. 5 Select a band Touch [Band] repeatedly until a broadcast strong enough for about one step at a time. p For details concerning operation, refer to the HD Radio tuner's operation manual. % Touch [Digital Radio] on the "AV Source" menu to display the "Digital Radio" screen. = For details concerning... operations, refer to Switching the display on page 34. The tuner will start as soon as you touch and hold [c] or [d] ...
... the keys. 5 Select a band Touch [Band] repeatedly until a broadcast strong enough for about one step at a time. p For details concerning operation, refer to the HD Radio tuner's operation manual. % Touch [Digital Radio] on the "AV Source" menu to display the "Digital Radio" screen. = For details concerning... operations, refer to Switching the display on page 34. The tuner will start as soon as you touch and hold [c] or [d] ...
Owner's Manual
Page 129
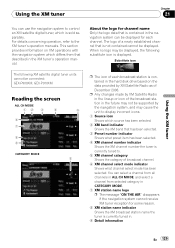
For details concerning operation, refer to . 5 XM channel category Shows the category of each channel. The following substitute icon is ... displayed. p Any changes made by XM Satellite Radio as of a newly established channel that described in the XM tuner's operation manual. Using the XM tuner Chapter 21 Using the XM tuner You can use the navigation system to control an XM satellite digital...the lineup or icon of the broadcast station in the hard disk drive based on XM operations with the navigation system which is currently tuned to the XM tuner's operation manuals.
For details concerning operation, refer to . 5 XM channel category Shows the category of each channel. The following substitute icon is ... displayed. p Any changes made by XM Satellite Radio as of a newly established channel that described in the XM tuner's operation manual. Using the XM tuner Chapter 21 Using the XM tuner You can use the navigation system to control an XM satellite digital...the lineup or icon of the broadcast station in the hard disk drive based on XM operations with the navigation system which is currently tuned to the XM tuner's operation manuals.
Owner's Manual
Page 134
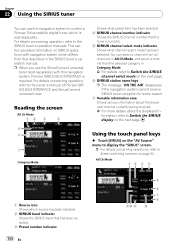
... Shows the SIRIUS band that the tuner is sold separately. p When you use the navigation system to control a Pioneer Sirius satellite digital tuner, which differs from the selected category in the SIRIUS tuner's operation manual. You can use the SiriusConnect universal tuner (sold separately) with navigation system which is tuned to Switch the...
... Shows the SIRIUS band that the tuner is sold separately. p When you use the navigation system to control a Pioneer Sirius satellite digital tuner, which differs from the selected category in the SIRIUS tuner's operation manual. You can use the SiriusConnect universal tuner (sold separately) with navigation system which is tuned to Switch the...

Owner's Manual
Page 141
... the navigation system that differ from those described in the external unit's operation manual. p Operation varies depending on page 160. 3 Send an [a], [b], [c], or [d] command Touch to operate the external unit. p Operation varies depending on the external unit connected. (In some cases, the external unit may not respond... system. Using the external unit (EXT1, EXT2) Chapter 24 The term "external unit" refers to future Pioneer devices that are not currently planned for Auto and Manual operations vary depending on the external unit connected. 5 Display the map screen 6 Send a 1 key to 6...
... the navigation system that differ from those described in the external unit's operation manual. p Operation varies depending on page 160. 3 Send an [a], [b], [c], or [d] command Touch to operate the external unit. p Operation varies depending on the external unit connected. (In some cases, the external unit may not respond... system. Using the external unit (EXT1, EXT2) Chapter 24 The term "external unit" refers to future Pioneer devices that are not currently planned for Auto and Manual operations vary depending on the external unit connected. 5 Display the map screen 6 Send a 1 key to 6...
Owner's Manual
Page 185
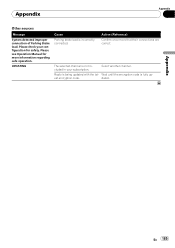
... Cause Parking brake lead is fully up- Select another channel. Appendix Appendix Other sources Message System detected improper connection of Parking Brake lead. Please see Operation Manual for safety. Wait until the encryption code is incorrectly connected. est encryption code. The selected channel is being updated with the lat- Appendix En 185...
... Cause Parking brake lead is fully up- Select another channel. Appendix Appendix Other sources Message System detected improper connection of Parking Brake lead. Please see Operation Manual for safety. Wait until the encryption code is incorrectly connected. est encryption code. The selected channel is being updated with the lat- Appendix En 185...

Installation Manual
Page 6
... pull the connector itself. It is for vehicles with output and/or impedance values other units, then make connections accordingly. ! Refer to "Operation Manual".) ! Connecting speakers with a 12-volt battery and negative grounding. The timing varies depending on the setting. (For more detailed information on changing... [Ant CTRL] mode, refer to the owner's manual for the blue lead ! Turn off - This product is especially important to [Power], the vehicle's antenna can be stowed or...
... pull the connector itself. It is for vehicles with output and/or impedance values other units, then make connections accordingly. ! Refer to "Operation Manual".) ! Connecting speakers with a 12-volt battery and negative grounding. The timing varies depending on the setting. (For more detailed information on changing... [Ant CTRL] mode, refer to the owner's manual for the blue lead ! Turn off - This product is especially important to [Power], the vehicle's antenna can be stowed or...

Installation Manual
Page 8
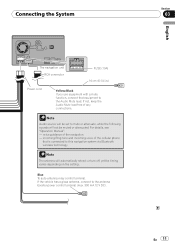
... (sold separately). It is necessary to set [AV1 Input] in .) Antenna jack Vehicle antenna WIRED REMOTE INPUT Please see the Instruction Manual for iPod or an appropriate USB storage device. *1 8 En IP-BUS cable (supplied with hide-away XM tuner) Yellow (VIDEO ... in.) RCA connector 2 m (6 ft. 7 in.) Blue 20 cm (7-7/8 in [AV Settings] to [iPod] when connecting the iPod. (For details, refer to "Operation Manual".) USB connector Connect either the interface cable for the Wired Remote Control Adapters (sold separately) *1 - When connecting your iPod, both connections are necessary. -
... (sold separately). It is necessary to set [AV1 Input] in .) Antenna jack Vehicle antenna WIRED REMOTE INPUT Please see the Instruction Manual for iPod or an appropriate USB storage device. *1 8 En IP-BUS cable (supplied with hide-away XM tuner) Yellow (VIDEO ... in.) RCA connector 2 m (6 ft. 7 in.) Blue 20 cm (7-7/8 in [AV Settings] to [iPod] when connecting the iPod. (For details, refer to "Operation Manual".) USB connector Connect either the interface cable for the Wired Remote Control Adapters (sold separately) *1 - When connecting your iPod, both connections are necessary. -

Installation Manual
Page 9
...tuner and SIRIUS satellite radio tuner will not receive their coverage area. GEX-P20HD) (sold separately) Dock connector port *2 For details concerning operations and compatibility, refer to the driver. · In some countries or states, the viewing of their service when you drive outside of ...potential violation of applicable laws, this product´s video source should not be used while the vehicle is a visible distraction to the operation manual. Where such regulations apply they must be obeyed and this product should not be in a location where it is being driven except...
...tuner and SIRIUS satellite radio tuner will not receive their coverage area. GEX-P20HD) (sold separately) Dock connector port *2 For details concerning operations and compatibility, refer to the driver. · In some countries or states, the viewing of their service when you drive outside of ...potential violation of applicable laws, this product´s video source should not be used while the vehicle is a visible distraction to the operation manual. Where such regulations apply they must be obeyed and this product should not be in a location where it is being driven except...
Installation Manual
Page 10
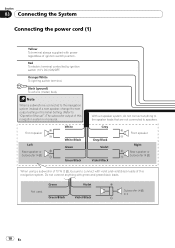
...; Subwoofer (4 Ω) White White/Black Green Green/Black With a 2 speaker system, do not connect anything to the speaker leads that are not connected to "Operation Manual".) The subwoofer output of 70 W (2 Ω), be sure to connect with green and green/black leads. Section 03 Connecting the System Connecting the power cord...
...; Subwoofer (4 Ω) White White/Black Green Green/Black With a 2 speaker system, do not connect anything to the speaker leads that are not connected to "Operation Manual".) The subwoofer output of 70 W (2 Ω), be sure to connect with green and green/black leads. Section 03 Connecting the System Connecting the power cord...
Installation Manual
Page 11
... sounds will automatically retract or turn off, yet the timing varies depending on the setting. Blue To auto-antenna relay control terminal. For details, see "Operation Manual". - incoming Ring tone and incoming voice of any connections. If the vehicle has a glass antenna, connect to the Audio Mute lead. Connecting the System Section...
... sounds will automatically retract or turn off, yet the timing varies depending on the setting. Blue To auto-antenna relay control terminal. For details, see "Operation Manual". - incoming Ring tone and incoming voice of any connections. If the vehicle has a glass antenna, connect to the Audio Mute lead. Connecting the System Section...
Installation Manual
Page 14
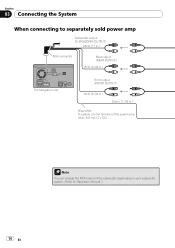
Note You can change the RCA output of the power amp (max. 300 mA 12 V DC). Section 03 Connecting the System When connecting to separately sold power amp Subwoofer output (SUBWOOFER OUTPUT) 28cm (11 in.) RCA connector Rear output (REAR OUTPUT) 15cm (5-7/8 in.) The navigation unit Front output (FRONT OUTPUT) 15cm (5-7/8 in.) 30cm (11-7/8 in.) Blue/white To system control terminal of the subwoofer depending on your subwoofer system. (Refer to "Operation Manual".) 14 En
Note You can change the RCA output of the power amp (max. 300 mA 12 V DC). Section 03 Connecting the System When connecting to separately sold power amp Subwoofer output (SUBWOOFER OUTPUT) 28cm (11 in.) RCA connector Rear output (REAR OUTPUT) 15cm (5-7/8 in.) The navigation unit Front output (FRONT OUTPUT) 15cm (5-7/8 in.) 30cm (11-7/8 in.) Blue/white To system control terminal of the subwoofer depending on your subwoofer system. (Refer to "Operation Manual".) 14 En

Installation Manual
Page 16
..., refer to REVERSE (R). It is moved to Connecting the power cord (2) on trailers, or backing into a tight parking spot. RearView mode also allows you to "Operation Manual".) ! OTHER USE MAY RESULT IN INJURY OR DAMAGE. Rear view camera (e.g. The screen image may differ slightly according to whether full screen images are displayed...
..., refer to REVERSE (R). It is moved to Connecting the power cord (2) on trailers, or backing into a tight parking spot. RearView mode also allows you to "Operation Manual".) ! OTHER USE MAY RESULT IN INJURY OR DAMAGE. Rear view camera (e.g. The screen image may differ slightly according to whether full screen images are displayed...

Installation Manual
Page 17
... rear display This connection is necessary to set [AV1 Input] in [AV Settings] to [Video] when connecting the external video component. (For details, refer to "Operation Manual".) En 17 It is unnecessary for connection of a display to enable passengers in a location that enables the driver to watch the video source while driving...
... rear display This connection is necessary to set [AV1 Input] in [AV Settings] to [Video] when connecting the external video component. (For details, refer to "Operation Manual".) En 17 It is unnecessary for connection of a display to enable passengers in a location that enables the driver to watch the video source while driving...

Installation Manual
Page 18
... use other cables, there is necessary to set [AV2 Input] in [AV Settings] to [Video] when connecting the external video component. (For details, refer to "Operation Manual".) 18 En It is a case where wiring position differs, images and sounds may be disturbed. If you use a CD-RM10 (sold separately) !
... use other cables, there is necessary to set [AV2 Input] in [AV Settings] to [Video] when connecting the external video component. (For details, refer to "Operation Manual".) 18 En It is a case where wiring position differs, images and sounds may be disturbed. If you use a CD-RM10 (sold separately) !

Installation Manual
Page 19
Connecting the System When connecting the external unit featuring video source The navigation unit Blue RCA connector 20 cm (7-7/8 in [AV Settings] to [EXT] when connecting the external unit. (For details, refer to set [AV1 Input] in .) Yellow (VIDEO INPUT) IP-BUS cable (sold separately) Black RCA cable (sold separately) To IP-BUS output To video output Pioneer external unit (sold separately) ! It is necessary to "Operation Manual".) English Section 03 En 19
Connecting the System When connecting the external unit featuring video source The navigation unit Blue RCA connector 20 cm (7-7/8 in [AV Settings] to [EXT] when connecting the external unit. (For details, refer to set [AV1 Input] in .) Yellow (VIDEO INPUT) IP-BUS cable (sold separately) Black RCA cable (sold separately) To IP-BUS output To video output Pioneer external unit (sold separately) ! It is necessary to "Operation Manual".) English Section 03 En 19

Installation Manual
Page 28
... to the negative (-) terminal of a pen. 4 Make the following settings: = For details concerning operations, refer to check at a safe place that the vehicle is installed correctly. Section 05 After Installation After Installing this navigation system, be sure to "Operation Manual". 1 Set the language. 2 Drive an unobstructed road until the GPS starts receiving the...
... to the negative (-) terminal of a pen. 4 Make the following settings: = For details concerning operations, refer to check at a safe place that the vehicle is installed correctly. Section 05 After Installation After Installing this navigation system, be sure to "Operation Manual". 1 Set the language. 2 Drive an unobstructed road until the GPS starts receiving the...


