
Operation Manual
Page 2
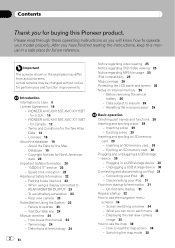
... How to REAR MONITOR OUTPUT 23 - Inserting a disc 29 - Rear view camera 23 Notes Before Using the System 23 - Introduction Information to use the navigation menu screens 34 - PIONEER AVIC-X9115BT, AVIC-X7115BT - Copyright Notices for the Map Database 19 - Speed limit indication 22 Additional Safety...and ejecting a disc 29 - Displaying the rear view camera image 35 How to erasure 26 - After you have finished reading the instructions, keep this manual 24 - Licenses 16 About the database 19 - PIONEER AVIC-X9115BT, AVIC-X7115BT - "GOOG-411" service 22 - for future reference...
... How to REAR MONITOR OUTPUT 23 - Inserting a disc 29 - Rear view camera 23 Notes Before Using the System 23 - Introduction Information to use the navigation menu screens 34 - PIONEER AVIC-X9115BT, AVIC-X7115BT - Copyright Notices for the Map Database 19 - Speed limit indication 22 Additional Safety...and ejecting a disc 29 - Displaying the rear view camera image 35 How to erasure 26 - After you have finished reading the instructions, keep this manual 24 - Licenses 16 About the database 19 - PIONEER AVIC-X9115BT, AVIC-X7115BT - "GOOG-411" service 22 - for future reference...

Operation Manual
Page 7
... settings 151 - Setting your home position 155 Options on the "AV System Settings" menu 164 - Displaying the "System Settings" menu 155 - Setting the rear view camera 157 - Checking the version information 159 - Adjusting source levels 163 - Enhancing bass (Bass Booster) 164 Options on the "System Settings" menu 155 - Displaying the "AV...
... settings 151 - Setting your home position 155 Options on the "AV System Settings" menu 164 - Displaying the "System Settings" menu 155 - Setting the rear view camera 157 - Checking the version information 159 - Adjusting source levels 163 - Enhancing bass (Bass Booster) 164 Options on the "System Settings" menu 155 - Displaying the "AV...

Operation Manual
Page 21
p Do not operate this navigation system (or the rear view camera option if purchased) if doing so will divert your vehicle. p Never use this manual handy as an aid to hospitals, police stations or similar facilities ... closures, or traffic restrictions. p The navigation features of your vehicle in operating the system or reading the display, park your navigation system (and rear view camera option if purchased) are automatically set the volume of the vehicle's operating systems or safety features, including air bags or hazard lamp buttons or (iii...
p Do not operate this navigation system (or the rear view camera option if purchased) if doing so will divert your vehicle. p Never use this manual handy as an aid to hospitals, police stations or similar facilities ... closures, or traffic restrictions. p The navigation features of your vehicle in operating the system or reading the display, park your navigation system (and rear view camera option if purchased) are automatically set the volume of the vehicle's operating systems or safety features, including air bags or hazard lamp buttons or (iii...

Operation Manual
Page 23
... Box 1760 Long Beach, CA 90801-1760 800-421-1404 ! SCREEN IMAGE MAY APPEAR REVERSED. ! For safety reasons, the rear view camera func- Failure to operate Should the navigation system fail to operate properly, contact your own security and convenience, be sure to watch video images...Number:) The serial number of this function for connection of Canada, Inc. After-sales service for Pioneer products Please contact the dealer or distributor from which you are able to AVIC- In case the necessary information is not available, please contact the companies listed below for aftersales ...
... Box 1760 Long Beach, CA 90801-1760 800-421-1404 ! SCREEN IMAGE MAY APPEAR REVERSED. ! For safety reasons, the rear view camera func- Failure to operate Should the navigation system fail to operate properly, contact your own security and convenience, be sure to watch video images...Number:) The serial number of this function for connection of Canada, Inc. After-sales service for Pioneer products Please contact the dealer or distributor from which you are able to AVIC- In case the necessary information is not available, please contact the companies listed below for aftersales ...

Operation Manual
Page 31
Pioneer accepts no data is being transferred. ! p A USB interface cable for iPod (CD-IU230V) (sold separately) is required for connection. 1 Pull out the USB storage device ... navigation system is usually not possible to terminate the system. To prevent data loss and damage to termination CAUTION For safety reasons, the rear view camera function is being accessed. Connecting your iPod Using the USB interface cable for iPod enables you want to use . 1 Start the engine to the information...
Pioneer accepts no data is being transferred. ! p A USB interface cable for iPod (CD-IU230V) (sold separately) is required for connection. 1 Pull out the USB storage device ... navigation system is usually not possible to terminate the system. To prevent data loss and damage to termination CAUTION For safety reasons, the rear view camera function is being accessed. Connecting your iPod Using the USB interface cable for iPod enables you want to use . 1 Start the engine to the information...

Operation Manual
Page 32
... disclaimer screen will now restart. 4 Touch [Destination] to Switching the auto antenna setting on the setting. Regular startup CAUTION For safety reasons, the rear view camera function is activated, you enter the navigation screen first, the disclaimer screen will differ depending on for the voice guidance. Read the disclaimer carefully, checking...
... disclaimer screen will now restart. 4 Touch [Destination] to Switching the auto antenna setting on the setting. Regular startup CAUTION For safety reasons, the rear view camera function is activated, you enter the navigation screen first, the disclaimer screen will differ depending on for the voice guidance. Read the disclaimer carefully, checking...
Operation Manual
Page 35
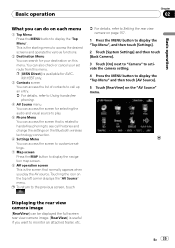
... 1 Press the MENU button to display the "Top Menu", and then touch [Settings]. 2 Touch [System Settings] and then touch [Back Camera]. 3 Touch [On] next to "Camera" to activate the camera setting. 4 Press the MENU button to display the "Top Menu" and then touch [AV Source]. 5 Touch [RearView] on the top ...Press the MENU button to display the "Top Menu". Basic operation Chapter 02 Basic operation What you can be displayed the full-screen rear view camera image. [RearView] is useful if you play . 5 Phone Menu You can access the screen that normally appears when you want to monitor ...
... 1 Press the MENU button to display the "Top Menu", and then touch [Settings]. 2 Touch [System Settings] and then touch [Back Camera]. 3 Touch [On] next to "Camera" to activate the camera setting. 4 Press the MENU button to display the "Top Menu" and then touch [AV Source]. 5 Touch [RearView] on the top ...Press the MENU button to display the "Top Menu". Basic operation Chapter 02 Basic operation What you can be displayed the full-screen rear view camera image. [RearView] is useful if you play . 5 Phone Menu You can access the screen that normally appears when you want to monitor ...
Operation Manual
Page 157
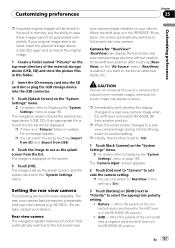
... REVERSE (R) from the list. p If there is in the REVERSE (R) position ! CAUTION Pioneer recommends the use as the splash screen, and the system returns to select the appropriate polarity setting. ! p Immediately verify whether the display changes to a rear view camera image when the shift lever is displayed on page 155. p You can...
... REVERSE (R) from the list. p If there is in the REVERSE (R) position ! CAUTION Pioneer recommends the use as the splash screen, and the system returns to select the appropriate polarity setting. ! p Immediately verify whether the display changes to a rear view camera image when the shift lever is displayed on page 155. p You can...

Operation Manual
Page 165
... the normal picture. MUTE - Off - Video - Changing the wide screen mode % Touch [Wide Mode] on the previous page. p The navigation map and the rear view camera picture is turned on the "AV System Settings" menu. = For details, refer to the navigation system. Muting En 165 Power - AV1 and AV2 ! p Regardless of...
... the normal picture. MUTE - Off - Video - Changing the wide screen mode % Touch [Wide Mode] on the previous page. p The navigation map and the rear view camera picture is turned on the "AV System Settings" menu. = For details, refer to the navigation system. Muting En 165 Power - AV1 and AV2 ! p Regardless of...

Operation Manual
Page 180
...the parking brake. Clean the disc. Insert a normal, round disc. back. tion message and the video can- is incorrect. cable for [Back Camera]. (Page 157) There is no sound on fast reverse or forward. secured. The USB storage device has been Park your vehicle in the AV ...are produced. Connect the cables correctly. disc playback. 180 En The disc is not con- nected or applied. with the label upward. view camera. Turn the ignition key back to Page 194.) The screen is cracked or otherwise da- sible. The files on . The disc format cannot ...
...the parking brake. Clean the disc. Insert a normal, round disc. back. tion message and the video can- is incorrect. cable for [Back Camera]. (Page 157) There is no sound on fast reverse or forward. secured. The USB storage device has been Park your vehicle in the AV ...are produced. Connect the cables correctly. disc playback. 180 En The disc is not con- nected or applied. with the label upward. view camera. Turn the ignition key back to Page 194.) The screen is cracked or otherwise da- sible. The files on . The disc format cannot ...
Operation Manual
Page 207
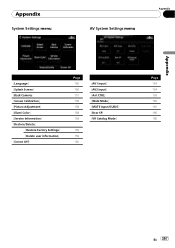
Appendix System Settings menu AV System Settings menu Appendix Appendix [Language] [Splash Screen] [Back Camera] [Screen Calibration] [Picture Adjustment] [Illumi Color] [Service Information] [Restore/Delete] [Restore Factory Settings] [Delete user information] [Screen Off] Page 156 156 157 158 158 158 159 159 159 160 [AV1 Input] [AV2 Input] [Ant CTRL] [Wide Mode] [MUTE Input/GUIDE] [Rear SP] [VR Catalog Mode] Page 164 164 165 165 165 166 166 En 207
Appendix System Settings menu AV System Settings menu Appendix Appendix [Language] [Splash Screen] [Back Camera] [Screen Calibration] [Picture Adjustment] [Illumi Color] [Service Information] [Restore/Delete] [Restore Factory Settings] [Delete user information] [Screen Off] Page 156 156 157 158 158 158 159 159 159 160 [AV1 Input] [AV2 Input] [Ant CTRL] [Wide Mode] [MUTE Input/GUIDE] [Rear SP] [VR Catalog Mode] Page 164 164 165 165 165 166 166 En 207

Operation Manual
Page 211
... can have up to 8 languages can have up to 31 characters (including the separation mark "." Each folder contains less than 2 sessions in one camera at a time are regulations for the following two levels: Level 1: The file name is in up to simultaneously shoot scenes, only images from one... disc. MP3 MP3 is short for the format logic of DVD/CD-ROM folders and files. Multi-angle With regular TV programs, although multiple cameras are used to 8 characters, half-byte English capital letters, half-byte numerals and the "_" sign, with ID3 Tag editing functions. For example, dialog...
... can have up to 8 languages can have up to 31 characters (including the separation mark "." Each folder contains less than 2 sessions in one camera at a time are regulations for the following two levels: Level 1: The file name is in up to simultaneously shoot scenes, only images from one... disc. MP3 MP3 is short for the format logic of DVD/CD-ROM folders and files. Multi-angle With regular TV programs, although multiple cameras are used to 8 characters, half-byte English capital letters, half-byte numerals and the "_" sign, with ID3 Tag editing functions. For example, dialog...


