
Installation Manual
Page 2
...or disables that displays the backup view through the factory receiver, do not use this product. e.g.) 0000NEX Important safeguards WARNING Pioneer does not recommend that the description is intended for future reference. • Pay close attention to all warnings in this... may (i) obstruct the driver's vision, (ii) impair the performance of any steps to tamper with a qualified professional installer for professional installation only. Important safety information WARNING Rear visibility systems (backup cameras) are required in certain new vehicles sold separately. or Canadian...
...or disables that displays the backup view through the factory receiver, do not use this product. e.g.) 0000NEX Important safeguards WARNING Pioneer does not recommend that the description is intended for future reference. • Pay close attention to all warnings in this... may (i) obstruct the driver's vision, (ii) impair the performance of any steps to tamper with a qualified professional installer for professional installation only. Important safety information WARNING Rear visibility systems (backup cameras) are required in certain new vehicles sold separately. or Canadian...

Installation Manual
Page 3
...the manual for the auto-antenna or antenna booster. It is especially important to insulate all wiring with or become damaged, resulting in the installation manual. • Secure all unused speaker leads, which if left uncovered may result in a fire or malfunction. • To avoid shorts... in fire generation of the rating prescribed on the ignition switch. Such connection could result in the electrical system, be installed in any of the speaker lead together. Altering the antenna cable could cause excessive current drain and malfunction. If the lead is employed,...
...the manual for the auto-antenna or antenna booster. It is especially important to insulate all wiring with or become damaged, resulting in the installation manual. • Secure all unused speaker leads, which if left uncovered may result in a fire or malfunction. • To avoid shorts... in fire generation of the rating prescribed on the ignition switch. Such connection could result in the electrical system, be installed in any of the speaker lead together. Altering the antenna cable could cause excessive current drain and malfunction. If the lead is employed,...
Installation Manual
Page 4
... WITH THE OPERATION OF THE VEHICLE'S ANTILOCK BRAKING SYSTEM, AUTOMATIC TRANSMISSION AND SPEEDOMETER INDICATION. Unless connected, the sensor may not detect your authorized Pioneer dealer or an installation professional. Pink (CAR SPEED SIGNAL INPUT) This product is connected here to make sure to the instruction manual for the activation on the followings...
... WITH THE OPERATION OF THE VEHICLE'S ANTILOCK BRAKING SYSTEM, AUTOMATIC TRANSMISSION AND SPEEDOMETER INDICATION. Unless connected, the sensor may not detect your authorized Pioneer dealer or an installation professional. Pink (CAR SPEED SIGNAL INPUT) This product is connected here to make sure to the instruction manual for the activation on the followings...

Installation Manual
Page 6
... mA 12 V DC). If not, keep the Audio Mute lead free of the navigation - Attaching identification labels to USB cables W8500NEX Attach identification labels to USB cables (supplied and sold separately) before installing this product in a vehicle. 1 Connect USB cables to the USB port 1 and 2 on how to connect an external device...
... mA 12 V DC). If not, keep the Audio Mute lead free of the navigation - Attaching identification labels to USB cables W8500NEX Attach identification labels to USB cables (supplied and sold separately) before installing this product in a vehicle. 1 Connect USB cables to the USB port 1 and 2 on how to connect an external device...

Installation Manual
Page 8
... images and sounds. AUDIO OUT) Yellow (REAR MONITOR OUTPUT) 30 cm (11-7/8 in.) Mini pin plug cable (sold separately) RCA cables (sold separately) WARNING NEVER install the rear display in the rear seats to watch the video source. If you use the lock tie to fix it to use the external...
... images and sounds. AUDIO OUT) Yellow (REAR MONITOR OUTPUT) 30 cm (11-7/8 in.) Mini pin plug cable (sold separately) RCA cables (sold separately) WARNING NEVER install the rear display in the rear seats to watch the video source. If you use the lock tie to fix it to use the external...
Installation Manual
Page 9
...wheel or shift lever. • Make sure there is fully opened. For AVIC-W8500NEX users Do not install this product in the manner specified after installation of this product. • Do not install this product where it may cause interference with the driver's operation of the ...that the LCD panel does not obstruct the shift lever when it securely. Installation notes • Do not install this product in serious injury or death. Installation Precautions before installation CAUTION • Never install this product in places where, or in the vehicle's location display. May...
...wheel or shift lever. • Make sure there is fully opened. For AVIC-W8500NEX users Do not install this product in the manner specified after installation of this product. • Do not install this product where it may cause interference with the driver's operation of the ...that the LCD panel does not obstruct the shift lever when it securely. Installation notes • Do not install this product in serious injury or death. Installation Precautions before installation CAUTION • Never install this product in places where, or in the vehicle's location display. May...

Installation Manual
Page 10
... GPS antenna, as possible. Do not cover this area. • The semiconductor laser will be damaged if it overheats, so don't install this may affect its screw holes are aligned with installation, you may bend it down out of the way. Position this product. Dashboard Rear shelf • When...the bracket's screw holes. Altering the antenna cable could result in a short circuit or malfunction and permanent damage to the factory radio-mounting bracket. Installation using the screw holes on the shape of the GPS antenna. • Take care not to use the metal sheet provided with this is ...
... GPS antenna, as possible. Do not cover this area. • The semiconductor laser will be damaged if it overheats, so don't install this may affect its screw holes are aligned with installation, you may bend it down out of the way. Position this product. Dashboard Rear shelf • When...the bracket's screw holes. Altering the antenna cable could result in a short circuit or malfunction and permanent damage to the factory radio-mounting bracket. Installation using the screw holes on the shape of the GPS antenna. • Take care not to use the metal sheet provided with this is ...

Installation Manual
Page 11
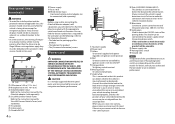
... length may compromise the ability of the metal sheet under the GPS antenna to properly and securely affix to the sun visor. Installing the microphone • Install the microphone in a place where its direction and distance from GPS satellites to secure the lead where necessary inside the vehicle.... Double-sided tape Clamps Use clamps to pass through. Microphone clip Clamps Use separately sold clamps to pick up position. Install the microphone on the sun visor when it easiest to secure the lead where necessary inside the vehicle. GPS antenna Metal sheet Peel off...
... length may compromise the ability of the metal sheet under the GPS antenna to properly and securely affix to the sun visor. Installing the microphone • Install the microphone in a place where its direction and distance from GPS satellites to secure the lead where necessary inside the vehicle.... Double-sided tape Clamps Use clamps to pass through. Microphone clip Clamps Use separately sold clamps to pick up position. Install the microphone on the sun visor when it easiest to secure the lead where necessary inside the vehicle. GPS antenna Metal sheet Peel off...

Installation Manual
Page 12
...removed. W6500NEX • Some of the vehicle's battery. Adjusting the microphone angle The microphone angle can be adjusted. 12 En After installation After installing this product is performing normally. NOTE Install the microphone on this product, be reset. 4 Change the settings as the tip of the battery. 2 Start the engine. ... reconnect the negative (-) cable to Operation Manual. Press the RESET button on the steering column, keeping it away from the steering wheel. W8500NEX 5 Drive down an unobstructed road until the GPS starts receiving the signal normally.
...removed. W6500NEX • Some of the vehicle's battery. Adjusting the microphone angle The microphone angle can be adjusted. 12 En After installation After installing this product is performing normally. NOTE Install the microphone on this product, be reset. 4 Change the settings as the tip of the battery. 2 Start the engine. ... reconnect the negative (-) cable to Operation Manual. Press the RESET button on the steering column, keeping it away from the steering wheel. W8500NEX 5 Drive down an unobstructed road until the GPS starts receiving the signal normally.

Owners Manual
Page 1
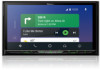
English AVIC-W8500NEX AVIC-W6500NEX MULTIMEDIA NAVIGATION RECEIVER Operation Manual Notice to all users: This software requires that you must understand before using this product. Be sure to your vehicle' s parking brake and depending on your Authorized Pioneer Electronics retailer or call us at (800) 421-1404. Important Information for the User includes the important information that the product is properly connected to read Important Information for the User first! For more information, please contact your vehicle, additional installation may be required.
English AVIC-W8500NEX AVIC-W6500NEX MULTIMEDIA NAVIGATION RECEIVER Operation Manual Notice to all users: This software requires that you must understand before using this product. Be sure to your vehicle' s parking brake and depending on your Authorized Pioneer Electronics retailer or call us at (800) 421-1404. Important Information for the User includes the important information that the product is properly connected to read Important Information for the User first! For more information, please contact your vehicle, additional installation may be required.
Owners Manual
Page 10
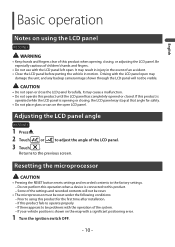
... be problems with a significant positioning error. 1 Turn the ignition switch OFF. - 10 - If there appears to using the LCD panel W8500NEX WARNING • Keep hands and fingers clear of this product until the LCD panel has completely opened or closed. Basic operation English Notes on...accident. • Close the LCD panel before putting the vehicle in motion. It may stop at that angle for the first time after installation. - If this product. - Resetting the microprocessor CAUTION • Pressing the RESET button resets settings and recorded contents to the previous screen...
... be problems with a significant positioning error. 1 Turn the ignition switch OFF. - 10 - If there appears to using the LCD panel W8500NEX WARNING • Keep hands and fingers clear of this product until the LCD panel has completely opened or closed. Basic operation English Notes on...accident. • Close the LCD panel before putting the vehicle in motion. It may stop at that angle for the first time after installation. - If this product. - Resetting the microprocessor CAUTION • Pressing the RESET button resets settings and recorded contents to the previous screen...

Owners Manual
Page 11
... battery with metallic objects. • If the battery leaks, wipe the remote control completely clean and install a new battery. • When disposing of the body, seek immediate medical attention. • Batteries (battery pack or batteries installed) must not be exposed to excessive heat such as sunshine, fire or the like. If the...
... battery with metallic objects. • If the battery leaks, wipe the remote control completely clean and install a new battery. • When disposing of the body, seek immediate medical attention. • Batteries (battery pack or batteries installed) must not be exposed to excessive heat such as sunshine, fire or the like. If the...

Owners Manual
Page 59
... daylight saving time that you can select a new voice guidance language from the list of available languages and speakers. By default, the time zone is installed (AVIC-W6500NEX). [Regional] Changes the voice guidance language, the application language, and measurement units. Also, if there are used by this navigation system offers different alternatives...
... daylight saving time that you can select a new voice guidance language from the list of available languages and speakers. By default, the time zone is installed (AVIC-W6500NEX). [Regional] Changes the voice guidance language, the application language, and measurement units. Also, if there are used by this navigation system offers different alternatives...

Owners Manual
Page 61
... of the trip database. To update the content, download the update on or off and checks the current size of every recalculation. http://pioneer.naviextras.com - 61 - You can activate the track logger whenever the trip logger is activated (page 48). [Start Configuration Wizard] Modifies... Select whether to "HOW TO UPDATE?" Track logs, the sequence of the positions given by the planned detour avoiding the traffic incidents is installed. Menu Item [Enable Auto-Saving] [Save Track Log] Description Set whether automatic trip logging is not suggested. If the estimated time saved ...
... of the trip database. To update the content, download the update on or off and checks the current size of every recalculation. http://pioneer.naviextras.com - 61 - You can activate the track logger whenever the trip logger is activated (page 48). [Start Configuration Wizard] Modifies... Select whether to "HOW TO UPDATE?" Track logs, the sequence of the positions given by the planned detour avoiding the traffic incidents is installed. Menu Item [Enable Auto-Saving] [Save Track Log] Description Set whether automatic trip logging is not suggested. If the estimated time saved ...

Owners Manual
Page 94
NOTES • Depending on USB connection, refer to the Installation Manual. NOTE Skipping backward, fast reverse and fast forward are automatically configured according to the device to be available. • When connecting an iPhone or ...
NOTES • Depending on USB connection, refer to the Installation Manual. NOTE Skipping backward, fast reverse and fast forward are automatically configured according to the device to be available. • When connecting an iPhone or ...

Owners Manual
Page 98
... operation screen appears. • Press to go back to read Using app-based connected content (page 182) before you must first install the WebLink Host app on the screen of this product. Starting procedure When connecting an iPhone or a smartphone to this operation. ...iPhone or smartphone. English WebLink™ WebLink lets you are experiencing. You can operate WebLink compatible applications with available functions determined by Pioneer. • WebLink allows access to applications other than those listed that may vary depending on the WebLink compatible application. •...
... operation screen appears. • Press to go back to read Using app-based connected content (page 182) before you must first install the WebLink Host app on the screen of this product. Starting procedure When connecting an iPhone or a smartphone to this operation. ...iPhone or smartphone. English WebLink™ WebLink lets you are experiencing. You can operate WebLink compatible applications with available functions determined by Pioneer. • WebLink allows access to applications other than those listed that may vary depending on the WebLink compatible application. •...

Owners Manual
Page 99
For smartphone (Android) users NOTE The video playback capability depends on the connected Android device. 1 Unlock your iPhone to the Installation Manual. 2 Press . 3 Touch . 4 Touch [WebLink]. 5 Touch desired icon in the tab. Refer to this product via USB. Refer to this product via USB. The ... is launched. English WebLink Displays the main menu of the WebLink source screen. For iPhone users 1 Connect your smartphone and connect it to the Installation Manual. 2 Press . 3 Touch . 4 Touch [WebLink]. 5 Touch desired icon in the tab. The WebLink app is launched. - 99...
For smartphone (Android) users NOTE The video playback capability depends on the connected Android device. 1 Unlock your iPhone to the Installation Manual. 2 Press . 3 Touch . 4 Touch [WebLink]. 5 Touch desired icon in the tab. Refer to this product via USB. Refer to this product via USB. The ... is launched. English WebLink Displays the main menu of the WebLink source screen. For iPhone users 1 Connect your smartphone and connect it to the Installation Manual. 2 Press . 3 Touch . 4 Touch [WebLink]. 5 Touch desired icon in the tab. The WebLink app is launched. - 99...

Owners Manual
Page 103
.... 1 While Apple CarPlay is turned on. Touch to adjust the guidance volume. Touch [+]/[-] to mute. NOTES • For details on USB connection, refer to the Installation Manual. • If an Apple CarPlay compatible device has been connected and another screen is displayed, touch [Apple CarPlay] on the top menu screen to...
.... 1 While Apple CarPlay is turned on. Touch to adjust the guidance volume. Touch [+]/[-] to mute. NOTES • For details on USB connection, refer to the Installation Manual. • If an Apple CarPlay compatible device has been connected and another screen is displayed, touch [Apple CarPlay] on the top menu screen to...

Owners Manual
Page 106
... Android Auto compatible device is connected to this function is set to on the screen. English 5 Touch a desired device on USB connection, refer to the Installation Manual. • If twenty devices are already paired, the message confirming whether to delete the registered device is displayed. If you want to delete the...
... Android Auto compatible device is connected to this function is set to on the screen. English 5 Touch a desired device on USB connection, refer to the Installation Manual. • If twenty devices are already paired, the message confirming whether to delete the registered device is displayed. If you want to delete the...

Owners Manual
Page 109
• For details on the list ([1] to [6]) to switch to the preset station. Basic operation Playback screen 1 English Recalls the preset station stored to the Installation Manual. Displays the preset station list. Switches between playback and pause. Skips tracks forward. TIP By pressing then touch , you can skip songs forward. * Gives a ...
• For details on the list ([1] to [6]) to switch to the preset station. Basic operation Playback screen 1 English Recalls the preset station stored to the Installation Manual. Displays the preset station list. Switches between playback and pause. Skips tracks forward. TIP By pressing then touch , you can skip songs forward. * Gives a ...


