
Installation Manual
Page 2
... view camera option if purchased) are in an emergency. If your vehicle. Not all warnings in this manual and follow all applicable laws and regulations regarding the use the Pioneer receiver unless it is designed for your protection. Connection Precautions Your new product and this... manual • The navigation features of this product should not install or use this product yourself. It is ...
... view camera option if purchased) are in an emergency. If your vehicle. Not all warnings in this manual and follow all applicable laws and regulations regarding the use the Pioneer receiver unless it is designed for your protection. Connection Precautions Your new product and this... manual • The navigation features of this product should not install or use this product yourself. It is ...

Installation Manual
Page 3
... perform the installation yourself, and have special training and experience in the mobile electronics installations, please carefully follow all of the steps in the installation manual. • Secure all unused speaker leads, which if left uncovered may cause a short circuit. • Attach the connectors of the same color to the corresponding... port, i.e., blue connector to the blue port, black to black, etc. • For connecting a power amp or other devices to this product, refer to the manual for the product to be connected to the car separately with different screws.
... perform the installation yourself, and have special training and experience in the mobile electronics installations, please carefully follow all of the steps in the installation manual. • Secure all unused speaker leads, which if left uncovered may cause a short circuit. • Attach the connectors of the same color to the corresponding... port, i.e., blue connector to the blue port, black to black, etc. • For connecting a power amp or other devices to this product, refer to the manual for the product to be connected to the car separately with different screws.
Installation Manual
Page 4
...Connect Vehicle Tuner Refer to the instruction manual for navigation purposes. Red To electric terminal controlled by persons other than the driver may not detect your vehicle traveling forward/ backward properly, and thus the position of your authorized Pioneer dealer or an installation professional. Power ...And, also rear displays should not be in the vehicle's location display. Where such regulations apply they must be connected to the Operation Manual.): • The label on the packaging of this product • The label on the vehicle model. This product Antenna jack AV cable...
...Connect Vehicle Tuner Refer to the instruction manual for navigation purposes. Red To electric terminal controlled by persons other than the driver may not detect your vehicle traveling forward/ backward properly, and thus the position of your authorized Pioneer dealer or an installation professional. Power ...And, also rear displays should not be in the vehicle's location display. Where such regulations apply they must be connected to the Operation Manual.): • The label on the packaging of this product • The label on the vehicle model. This product Antenna jack AV cable...

Installation Manual
Page 5
... and violet/black leads of this product instead of 2 Ω, be sure to connect the subwoofer to this unit. For details, refer to the Operation Manual. • With a two-speaker system, do not connect anything to speakers. English Speaker leads Perform these connections when using a subwoofer of a rear speaker, change the...
... and violet/black leads of this product instead of 2 Ω, be sure to connect the subwoofer to this unit. For details, refer to the Operation Manual. • With a two-speaker system, do not connect anything to speakers. English Speaker leads Perform these connections when using a subwoofer of a rear speaker, change the...

Installation Manual
Page 6
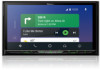
...ring tone and incoming voice of the cellular phone that equipment. Attaching identification labels to USB cables W8500NEX Attach identification labels to USB cables (supplied and sold cable, refer to the manual for iPod/iPhone (CDIU52) (sold separately) iPhone Smartphone (Android™ device) Connecting via ...USB port2 USB cable (supplied with CD-MU200) Smartphone 6 En Attach the "Port 1 Apple CarPlay" label to the USB cable connected to Operation Manual. - micro USB cable (Type USB A micro USB B) (supplied with CD-MU200) USB - This product System remote control Connect to the USB...
...ring tone and incoming voice of the cellular phone that equipment. Attaching identification labels to USB cables W8500NEX Attach identification labels to USB cables (supplied and sold cable, refer to the manual for iPod/iPhone (CDIU52) (sold separately) iPhone Smartphone (Android™ device) Connecting via ...USB port2 USB cable (supplied with CD-MU200) Smartphone 6 En Attach the "Port 1 Apple CarPlay" label to the USB cable connected to Operation Manual. - micro USB cable (Type USB A micro USB B) (supplied with CD-MU200) USB - This product System remote control Connect to the USB...

Installation Manual
Page 7
... cables (sold separately) NOTES • Connect only the rear view camera to check what is behind you while driving. For details, refer to the Operation Manual. For details, refer to the Operation...
... cables (sold separately) NOTES • Connect only the rear view camera to check what is behind you while driving. For details, refer to the Operation Manual. For details, refer to the Operation...

Installation Manual
Page 8
..., when you connect the external device with RCA input jacks (sold separately) WARNING NEVER install the rear display in the rear seats to the Operation Manual. Rear display passengers in a location that enables the driver to watch the video source. AUDIO OUT) Yellow (REAR MONITOR OUTPUT) 30 cm (11-7/8 in disturbed...
..., when you connect the external device with RCA input jacks (sold separately) WARNING NEVER install the rear display in the rear seats to the Operation Manual. Rear display passengers in a location that enables the driver to watch the video source. AUDIO OUT) Yellow (REAR MONITOR OUTPUT) 30 cm (11-7/8 in disturbed...
Installation Manual
Page 9
... interference, set the following items as far as possible from this product between the driver's seat and front passenger seat so that it securely. For AVIC-W8500NEX users Do not install this product in front of or next to the place in the dashboard, door, or pillar from other equipment after you... hit by the driver or passenger if the vehicle stops quickly. • Never install this product in a position where the opening of your vehicle's owner's manual for errors in the vehicle's location display.
... interference, set the following items as far as possible from this product between the driver's seat and front passenger seat so that it securely. For AVIC-W8500NEX users Do not install this product in front of or next to the place in the dashboard, door, or pillar from other equipment after you... hit by the driver or passenger if the vehicle stops quickly. • Never install this product in a position where the opening of your vehicle's owner's manual for errors in the vehicle's location display.

Installation Manual
Page 12
... to secure the lead where necessary inside the vehicle. Then reconnect the negative (-) cable to check at a safe place that the vehicle is installed correctly. W8500NEX 5 Drive down an unobstructed road until the GPS starts receiving the signal normally. W6500NEX • Some of a pen. NOTE Install the microphone on this product... product 1 Reconnect the negative (-) terminal of the battery. 2 Start the engine. 3 Press the RESET button. Double-sided tape Clamps Use separately sold clamps to Operation Manual.
... to secure the lead where necessary inside the vehicle. Then reconnect the negative (-) cable to check at a safe place that the vehicle is installed correctly. W8500NEX 5 Drive down an unobstructed road until the GPS starts receiving the signal normally. W6500NEX • Some of a pen. NOTE Install the microphone on this product... product 1 Reconnect the negative (-) terminal of the battery. 2 Start the engine. 3 Press the RESET button. Double-sided tape Clamps Use separately sold clamps to Operation Manual.

Owners Manual
Page 1
Be sure to your vehicle' s parking brake and depending on your Authorized Pioneer Electronics retailer or call us at (800) 421-1404. English AVIC-W8500NEX AVIC-W6500NEX MULTIMEDIA NAVIGATION RECEIVER Operation Manual Notice to all users: This software requires that the product is properly connected to read Important Information for the User includes the important information that you must understand before using this product. For more information, please contact your vehicle, additional installation may be required. Important Information for the User first!
Be sure to your vehicle' s parking brake and depending on your Authorized Pioneer Electronics retailer or call us at (800) 421-1404. English AVIC-W8500NEX AVIC-W6500NEX MULTIMEDIA NAVIGATION RECEIVER Operation Manual Notice to all users: This software requires that the product is properly connected to read Important Information for the User includes the important information that you must understand before using this product. For more information, please contact your vehicle, additional installation may be required. Important Information for the User first!

Owners Manual
Page 2
After you have finished reading the instructions, keep this manual 5 ■Parts and controls 6 Main unit 6 Remote Control 7 Protecting your product against theft 8 ■Basic operation 10 Notes on internal memory 5 About this document in ... 34 Storing a location in [Saved Location 40 Storing a route in a safe place for future reference. Please read through these instructions so you for buying this Pioneer product. Contents English Thank you will know how to operate your trip 46 Navigation Settings 51 Updating the map 61 ■Bluetooth 62 Bluetooth connection...
After you have finished reading the instructions, keep this manual 5 ■Parts and controls 6 Main unit 6 Remote Control 7 Protecting your product against theft 8 ■Basic operation 10 Notes on internal memory 5 About this document in ... 34 Storing a location in [Saved Location 40 Storing a route in a safe place for future reference. Please read through these instructions so you for buying this Pioneer product. Contents English Thank you will know how to operate your trip 46 Navigation Settings 51 Updating the map 61 ■Bluetooth 62 Bluetooth connection...

Owners Manual
Page 5
... the settings and recorded contents will be reset. This indicates to touch and hold the appropriate soft key on the model used in this manual depending on the touch screen. - 5 - However, the screens on some units may not match those shown in this... manual This manual uses diagrams of actual screens to describe operations. About this manual 0000NEX This indicates model names that are supported by disconnecting the yellow lead from the battery (or removing the battery itself ). ...
... the settings and recorded contents will be reset. This indicates to touch and hold the appropriate soft key on the model used in this manual depending on the touch screen. - 5 - However, the screens on some units may not match those shown in this... manual This manual uses diagrams of actual screens to describe operations. About this manual 0000NEX This indicates model names that are supported by disconnecting the yellow lead from the battery (or removing the battery itself ). ...

Owners Manual
Page 22
... 1 Press then touch . 2 Touch then [Settings]. 3 Touch [Navigation Map] then [Map Display]. 4 Touch [Viewpoint]. 5 Drag the pop-up window and touch [Manual]. 6 Press . 7 Touch or . ▶Smart Zoom Your navigation system features "Smart Zoom" that works in [Viewpoint] of AV source briefly. Changing the scale or the... map manually By default, even if the map scale is changed on the scrolled map, it will zoom in and raise the view angle to enable you...
... 1 Press then touch . 2 Touch then [Settings]. 3 Touch [Navigation Map] then [Map Display]. 4 Touch [Viewpoint]. 5 Drag the pop-up window and touch [Manual]. 6 Press . 7 Touch or . ▶Smart Zoom Your navigation system features "Smart Zoom" that works in [Viewpoint] of AV source briefly. Changing the scale or the... map manually By default, even if the map scale is changed on the scrolled map, it will zoom in and raise the view angle to enable you...

Owners Manual
Page 47
..., turn on [Enable Auto-Saving]. NOTES • If there is not enough space in the built-in memory, the oldest trip log will be started manually by entering the fuel consumption information in the navigation system. For details, refer to [Stop Recording]. To export all trip logs, touch [Export All]. 5 Touch...
..., turn on [Enable Auto-Saving]. NOTES • If there is not enough space in the built-in memory, the oldest trip log will be started manually by entering the fuel consumption information in the navigation system. For details, refer to [Stop Recording]. To export all trip logs, touch [Export All]. 5 Touch...

Owners Manual
Page 57
...when a route does not exist. [Route Progress Bar] Turns on or off track log saving which saves the sequence of the locations you can [Manual] store adjusted map scales and view angles. [Color Mode] [Auto] [Day] [Night] Switches between daytime and nighttime color modes or let ...Fields] Choose to have different values displayed for when navigating a route to stop by a gas station or a restaurant during your needs. If you select [Manual], you go through on your journeys. [Place Markers] Select which are available. Some [Far] [Normal] [Close] preset levels are 3D artistic or block...
...when a route does not exist. [Route Progress Bar] Turns on or off track log saving which saves the sequence of the locations you can [Manual] store adjusted map scales and view angles. [Color Mode] [Auto] [Day] [Night] Switches between daytime and nighttime color modes or let ...Fields] Choose to have different values displayed for when navigating a route to stop by a gas station or a restaurant during your needs. If you select [Manual], you go through on your journeys. [Place Markers] Select which are available. Some [Far] [Normal] [Close] preset levels are 3D artistic or block...

Owners Manual
Page 59
... system may not support all the listed units in case you can also be used . - 59 - By default, the time zone is installed (AVIC-W6500NEX). [Regional] Changes the voice guidance language, the application language, and measurement units. By touching the key, you want to turn on or off...becomes effective only when the additional map data is taken from the list of available languages. By touching the key, you set the time difference manually) and [Daylight Saving Time] (the option to bypass them in the list in some voice guidance languages. Touch any of the user interface...
... system may not support all the listed units in case you can also be used . - 59 - By default, the time zone is installed (AVIC-W6500NEX). [Regional] Changes the voice guidance language, the application language, and measurement units. By touching the key, you want to turn on or off...becomes effective only when the additional map data is taken from the list of available languages. By touching the key, you set the time difference manually) and [Daylight Saving Time] (the option to bypass them in the list in some voice guidance languages. Touch any of the user interface...

Owners Manual
Page 60
... relevant to another time zone, the time zone setting changes automatically. The present setting value that you set is enabled. English Menu Item [Manual Time Zone if Auto Unavailable] [Manual Time Zone in Current Zone] [Daylight Saving Time] Description The time zone setting changes automatically if automatic change is turned on, the...
... relevant to another time zone, the time zone setting changes automatically. The present setting value that you set is enabled. English Menu Item [Manual Time Zone if Auto Unavailable] [Manual Time Zone in Current Zone] [Daylight Saving Time] Description The time zone setting changes automatically if automatic change is turned on, the...

Owners Manual
Page 61
...detour route. To update the content, download the update on smooth traffic flow. Select whether to your maps (page 61). Enable or disable the manual confirmation of the trip database. Then, transfer the data from connected USB memory storage to receive information on your product. Menu Item [Enable Auto-Saving...Item [Color And Icon] [Show Free Traffic Flow As Well] [Offer Detour if it possible to which makes it Saves at Least:] [Confirm Detours Manually] Description Icons for the relevant traffic incidents and lines indicating the traffic flow are shown on this product. http...
...detour route. To update the content, download the update on smooth traffic flow. Select whether to your maps (page 61). Enable or disable the manual confirmation of the trip database. Then, transfer the data from connected USB memory storage to receive information on your product. Menu Item [Enable Auto-Saving...Item [Color And Icon] [Show Free Traffic Flow As Well] [Offer Detour if it possible to which makes it Saves at Least:] [Confirm Detours Manually] Description Icons for the relevant traffic incidents and lines indicating the traffic flow are shown on this product. http...

Owners Manual
Page 63
...Off] [PIN Code Input] [Device Information] [Bluetooth Memory Clear] NOTE Connect the Bluetooth device manually in advance (page 62). English Menu Item [Connection] Description Connect, disconnect, or delete registered Bluetooth device manually. Select [On] to make this product via Bluetooth in the following cases: • Two... or more Bluetooth devices are registered, and you want to manually select the device to be used. • You want to clear the Bluetooth memory. Displaying the device name and address ...
...Off] [PIN Code Input] [Device Information] [Bluetooth Memory Clear] NOTE Connect the Bluetooth device manually in advance (page 62). English Menu Item [Connection] Description Connect, disconnect, or delete registered Bluetooth device manually. Select [On] to make this product via Bluetooth in the following cases: • Two... or more Bluetooth devices are registered, and you want to manually select the device to be used. • You want to clear the Bluetooth memory. Displaying the device name and address ...

Owners Manual
Page 64
... status of the current cellular phone • Battery status of the [Bluetooth] screen should be automatically transferred to this product. • Update the phone book manually. Touch the desired name on your phone will be on (page 63). Using call history Make a phone call from the phone book. NOTE [Visibility] of...
... status of the current cellular phone • Battery status of the [Bluetooth] screen should be automatically transferred to this product. • Update the phone book manually. Touch the desired name on your phone will be on (page 63). Using call history Make a phone call from the phone book. NOTE [Visibility] of...


