
Owner's Manual
Page 66
...Clock : Current time is complete, only the voltage and clock are available. 1 Switch to this system. mum and minimum (green line) values indicated in "Acceleration" and "Side Acceleration" are displayed...the map display mode ➞ Page 31 2 Touch the left or right instrument. Editing the Navigation Utilities Chapter 4 64 Side Acceleration : Acceleration in is displayed. The + side represents the ...the Vehicle Dynamics Display You can select the following items. Voltage : Displays the power supply and voltage supplied from among those displayed onscreen to change the values displayed ...
...Clock : Current time is complete, only the voltage and clock are available. 1 Switch to this system. mum and minimum (green line) values indicated in "Acceleration" and "Side Acceleration" are displayed...the map display mode ➞ Page 31 2 Touch the left or right instrument. Editing the Navigation Utilities Chapter 4 64 Side Acceleration : Acceleration in is displayed. The + side represents the ...the Vehicle Dynamics Display You can select the following items. Voltage : Displays the power supply and voltage supplied from among those displayed onscreen to change the values displayed ...

Owner's Manual
Page 68
...been changed, "Excessive vibration" will be displayed. (4) Parking Brake When the parking brake is applied, "On" is shown. When the navigation system is displayed depends on , "On" is displayed. (If the orange/ white lead is not connected, "Off" appears.) (7) Back ...Off" is displayed. (5) Power Voltage The power supply (reference value) provided from how many satellites the signal is correct or not. If the signal is received correctly, "OK" is shown. If installed correctly, "OK" appears. Indicates whether the Installation position of the navigation system is received. NAVI (2) GPS...
...been changed, "Excessive vibration" will be displayed. (4) Parking Brake When the parking brake is applied, "On" is shown. When the navigation system is displayed depends on , "On" is displayed. (If the orange/ white lead is not connected, "Off" appears.) (7) Back ...Off" is displayed. (5) Power Voltage The power supply (reference value) provided from how many satellites the signal is correct or not. If the signal is received correctly, "OK" is shown. If installed correctly, "OK" appears. Indicates whether the Installation position of the navigation system is received. NAVI (2) GPS...

Owner's Manual
Page 109
... that you create. ❒ A separate CUSTOM curve can be displayed instead of the equalizer curves by switching alternatively between the following equalizers: POWERFUL - CUSTOM - SUPER BASS ❒ CUSTOM is a curve in which low-pitched and high-pitched sounds are boosted. This is PREOUT FULL...describes the methods of changing the various settings and how to switch between FLAT and a set of the equalizer curves: Equalizer curve POWERFUL POWERFUL is a curve in which the midrange, which only low-pitched sound is boosted. Using the equalizer The equalizer lets you can ...
... that you create. ❒ A separate CUSTOM curve can be displayed instead of the equalizer curves by switching alternatively between the following equalizers: POWERFUL - CUSTOM - SUPER BASS ❒ CUSTOM is a curve in which low-pitched and high-pitched sounds are boosted. This is PREOUT FULL...describes the methods of changing the various settings and how to switch between FLAT and a set of the equalizer curves: Equalizer curve POWERFUL POWERFUL is a curve in which the midrange, which only low-pitched sound is boosted. Using the equalizer The equalizer lets you can ...

Owner's Manual
Page 118
.../close the display • AUTO - Press the WIDE/PIC ADJ button repeatedly to switch between "ON" and "OFF". The display automatically opens/ closes when power to navigation system is turned on a wide screen. Touching "FLAP SET BACK" switches between the following settings: FULL (full) - ZOOM (zoom) - CINEMA (cinema) -... rights protected by the same proportion as the LCD panel will appear grainy when viewed in CINEMA or ZOOM mode. ❒ The navigation map and the rear view camera picture is always FULL. 116 JUST (just) The picture is enlarged slightly at the center and the...
.../close the display • AUTO - Press the WIDE/PIC ADJ button repeatedly to switch between "ON" and "OFF". The display automatically opens/ closes when power to navigation system is turned on a wide screen. Touching "FLAP SET BACK" switches between the following settings: FULL (full) - ZOOM (zoom) - CINEMA (cinema) -... rights protected by the same proportion as the LCD panel will appear grainy when viewed in CINEMA or ZOOM mode. ❒ The navigation map and the rear view camera picture is always FULL. 116 JUST (just) The picture is enlarged slightly at the center and the...

Owner's Manual
Page 124
...pressing the POS button on the navigation system. If you want to listen to reactivate voice operation. Specifying your destination New Destination*, Address Book*, Return Home*, , ❒ For the Address Book, , and , only the commands displayed in Voice Help can turn the power on again. ➲ When ...you are used to voice operation features and no command is made in memory navi mode. Operating Your Navigation System by Voice Chapter 9 NAVI/AV Voice Help VOICE icon Current page When ...
...pressing the POS button on the navigation system. If you want to listen to reactivate voice operation. Specifying your destination New Destination*, Address Book*, Return Home*, , ❒ For the Address Book, , and , only the commands displayed in Voice Help can turn the power on again. ➲ When ...you are used to voice operation features and no command is made in memory navi mode. Operating Your Navigation System by Voice Chapter 9 NAVI/AV Voice Help VOICE icon Current page When ...

Owner's Manual
Page 138
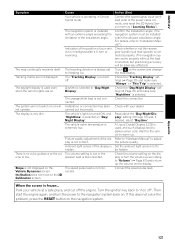
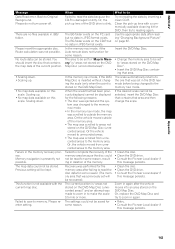
...sound. Noise and other factors are listed below, along with likely causes and solutions. This may be mounted securely in the navigation screen Symptom Power doesn't turn on . Check the GPS signal reception (➞ Page 65) and the position of satellites relative to your .... If a solution to your problem cannot be found here, contact your dealer or the nearest authorized Pioneer service facility. This is poor, causing reduced positioning accuracy. The navigation system confirms whether a disc is used near the GPS antenna, GPS reception may lead to greater positioning errors...
...sound. Noise and other factors are listed below, along with likely causes and solutions. This may be mounted securely in the navigation screen Symptom Power doesn't turn on . Check the GPS signal reception (➞ Page 65) and the position of satellites relative to your .... If a solution to your problem cannot be found here, contact your dealer or the nearest authorized Pioneer service facility. This is poor, causing reduced positioning accuracy. The navigation system confirms whether a disc is used near the GPS antenna, GPS reception may lead to greater positioning errors...
Owner's Manual
Page 139
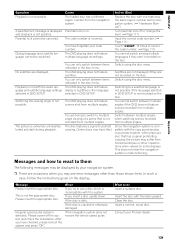
...to Heading Up. Then start the engine again, and turn the power to "Volume" (➞ Page 67) and/or turn up according to the navigation system back on the display. Inclination does not move on the navigation system. Indication of the position of the display is not correct. Check ... exceeding the limitation of the installation angle. Turn the ignition key back to "Day/Night Display". Confirm the installation angle. (The navigation system must be hidden. When the screen is operating in Simple hybrid mode. The daylight display is selected to "Acc off". If this...
...to Heading Up. Then start the engine again, and turn the power to "Volume" (➞ Page 67) and/or turn up according to the navigation system back on the display. Inclination does not move on the navigation system. Indication of the position of the display is not correct. Check ... exceeding the limitation of the installation angle. Turn the ignition key back to "Day/Night Display". Confirm the installation angle. (The navigation system must be hidden. When the screen is operating in Simple hybrid mode. The daylight display is selected to "Acc off". If this...
Owner's Manual
Page 141
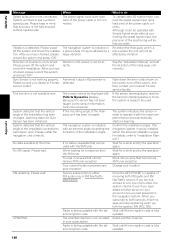
... power off or change the level. (➞ Page 111) Input the correct code number. (➞ Page 111) Touch "CLEAR" 10 times to multiple angle viewing of a scene that has a signal prohibiting copying, the picture may be displayed by your navigation system....DVD playing does not feature dialog or subtitles in the language selected in DVD SETUP. Switch using the disc menu. Switch using the disc menu. Since the navigation system is on some displays. Please insert the appropriate disc. Irregular speed pulse signal is not possible. If you may have forgotten your Pioneer...
... power off or change the level. (➞ Page 111) Input the correct code number. (➞ Page 111) Touch "CLEAR" 10 times to multiple angle viewing of a scene that has a signal prohibiting copying, the picture may be displayed by your navigation system....DVD playing does not feature dialog or subtitles in the language selected in DVD SETUP. Switch using the disc menu. Switch using the disc menu. Since the navigation system is on some displays. Please insert the appropriate disc. Irregular speed pulse signal is not possible. If you may have forgotten your Pioneer...
Owner's Manual
Page 142
... connect the speed signal input (pink lead wire) of the installation angle. System detected that can be used . Learning status for a response from the XM tuner. The navigation system is Please consult your dealer or Pioneer detected. Please wait. While waiting for Gyro Sensor has been initialized. Radio ...order to both XM audio and XM NavTraffic service, if you are in off the system and check the installa- Wait until the encryption code is not connected. Please power The navigation system is fully updated. After you subscribe to operate it with the XM tuner. Gyro Sensor...
... connect the speed signal input (pink lead wire) of the installation angle. System detected that can be used . Learning status for a response from the XM tuner. The navigation system is Please consult your dealer or Pioneer detected. Please wait. While waiting for Gyro Sensor has been initialized. Radio ...order to both XM audio and XM NavTraffic service, if you are in off the system and check the installa- Wait until the encryption code is not connected. Please power The navigation system is fully updated. After you subscribe to operate it with the XM tuner. Gyro Sensor...
Owner's Manual
Page 145
... What to make the scale 0.5 mile or more. Memory navigation is stored on the DVD Map Disc". • Insert the DVD Map Disc containing that area and then change the scale. • Clean the disc. • Clean the DVD drive. • Consult the Pioneer Local dealer if this message persists. • Clean the ...after reading "Changing Background Picture" on the PC card but no data in to do not turn power off. The BG folder exists on page 62. In the memory navi mode, if the DVD Map Disc is inserted without changing the scale (only when the point is presently not possible. ...
... What to make the scale 0.5 mile or more. Memory navigation is stored on the DVD Map Disc". • Insert the DVD Map Disc containing that area and then change the scale. • Clean the disc. • Clean the DVD drive. • Consult the Pioneer Local dealer if this message persists. • Clean the ...after reading "Changing Background Picture" on the PC card but no data in to do not turn power off. The BG folder exists on page 62. In the memory navi mode, if the DVD Map Disc is inserted without changing the scale (only when the point is presently not possible. ...
Other Manual
Page 3
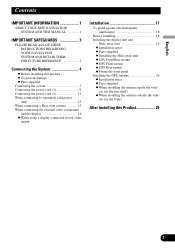
... product - Parts supplied Connecting the system 7 Connecting the power cord (1 9 Connecting the power cord (2 11 When connecting to rear video output Installation 17 To guard against electromagnetic interference 18 Before installing 18 Installing the display unit and Hide-away unit 19 - English Contents IMPORTANT INFORMATION 1 ABOUT YOUR NEW NAVIGATION SYSTEM AND THIS MANUAL 1 IMPORTANT SAFEGUARDS...
... product - Parts supplied Connecting the system 7 Connecting the power cord (1 9 Connecting the power cord (2 11 When connecting to rear video output Installation 17 To guard against electromagnetic interference 18 Before installing 18 Installing the display unit and Hide-away unit 19 - English Contents IMPORTANT INFORMATION 1 ABOUT YOUR NEW NAVIGATION SYSTEM AND THIS MANUAL 1 IMPORTANT SAFEGUARDS...
Other Manual
Page 5
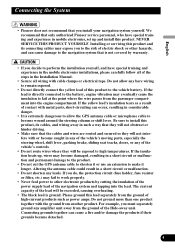
...or damage the products if their grounds became detached. 4 Français Italiano Nederlands English Español Deutsch Connecting the System • Pioneer does not recommend that is not covered by warranty. • If you decide to perform the installation yourself, and have ... , wires may expose you to the risk of electric shock or other electronic products by cutting the insulation of the power supply lead of the navigation system and tapping into the engine compartment. Connecting grounds together can occur, resulting in a short circuit or malfunction. •...
...or damage the products if their grounds became detached. 4 Français Italiano Nederlands English Español Deutsch Connecting the System • Pioneer does not recommend that is not covered by warranty. • If you decide to perform the installation yourself, and have ... , wires may expose you to the risk of electric shock or other electronic products by cutting the insulation of the power supply lead of the navigation system and tapping into the engine compartment. Connecting grounds together can occur, resulting in a short circuit or malfunction. •...

Other Manual
Page 6
... the speaker lead on the display unit. • If the RCA pin jack on this product • This product is for details on connecting the power amp and other units, then make connections accordingly. • When replacing the fuse, be sure to only use a fuse of the rating prescribed on the... insulate all unused speaker leads, which if left uncovered may pull it out of the connector. • This product cannot be installed in the electrical system, be sure to the end of the connector. 5 To prevent damage • When disconnecting a connector, pull the connector itself. Connecting the...
... the speaker lead on the display unit. • If the RCA pin jack on this product • This product is for details on connecting the power amp and other units, then make connections accordingly. • When replacing the fuse, be sure to only use a fuse of the rating prescribed on the... insulate all unused speaker leads, which if left uncovered may pull it out of the connector. • This product cannot be installed in the electrical system, be sure to the end of the connector. 5 To prevent damage • When disconnecting a connector, pull the connector itself. Connecting the...

Other Manual
Page 7
... off. • When an external power amp is output through the blue/white lead. English • Never connect speakers with output and/or impedance values other than 50 W channel or impedance outside of the 4 ohms to 8 ohms specifications to your navigation system. Likewise, do not connect the blue... lead to the power terminal of the auto antenna. The control signal is being used with this system, be sure not to connect the blue lead to the amp...
... off. • When an external power amp is output through the blue/white lead. English • Never connect speakers with output and/or impedance values other than 50 W channel or impedance outside of the 4 ohms to 8 ohms specifications to your navigation system. Likewise, do not connect the blue... lead to the power terminal of the auto antenna. The control signal is being used with this system, be sure not to connect the blue lead to the amp...
Other Manual
Page 9
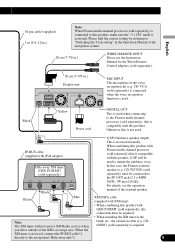
... "Switching the 5.1ch setting" in the Operation Manual of the XM's coverage area. Deutsch Français Italiano Black Yellow Power cord DIGITAL OUT This is compatible with this connection must be used , connect the IP-BUS cable*1 directly to output the ...the XM tuner in the voice recognition kit (e.g. you drive outside of the navigation system. 20 cm (7-7/8 in .) Note: When Pioneer multi-channel processor (sold separately) that is used normally. When combining this product with Pioneer multi-channel processor (sold separately) is connected to this product, make sure ...
... "Switching the 5.1ch setting" in the Operation Manual of the XM's coverage area. Deutsch Français Italiano Black Yellow Power cord DIGITAL OUT This is compatible with this connection must be used , connect the IP-BUS cable*1 directly to output the ...the XM tuner in the voice recognition kit (e.g. you drive outside of the navigation system. 20 cm (7-7/8 in .) Note: When Pioneer multi-channel processor (sold separately) that is used normally. When combining this product with Pioneer multi-channel processor (sold separately) is connected to this product, make sure ...

Other Manual
Page 10
Red To electric terminal controlled by ignition switch (12 V DC) ON/OFF. Orange/white To lighting switch terminal. With a 2 speaker system, do not connect anything to the speaker leads that are not connected to speakers. + Front speaker ≠ Left Rear speaker + or Subwoofer ≠ White White/.../black Violet Violet/black + Front speaker ≠ Right + Rear speaker ≠ or Subwoofer 9 Fuse resistor Fuse resistor Black (ground) To vehicle (metal) body. Connecting the System Connecting the power cord (1) Fuse (10 A) Yellow To terminal always supplied with...
Red To electric terminal controlled by ignition switch (12 V DC) ON/OFF. Orange/white To lighting switch terminal. With a 2 speaker system, do not connect anything to the speaker leads that are not connected to speakers. + Front speaker ≠ Left Rear speaker + or Subwoofer ≠ White White/.../black Violet Violet/black + Front speaker ≠ Right + Rear speaker ≠ or Subwoofer 9 Fuse resistor Fuse resistor Black (ground) To vehicle (metal) body. Connecting the System Connecting the power cord (1) Fuse (10 A) Yellow To terminal always supplied with...

Other Manual
Page 11
...by connecting the blue lead to mute or attenuate, while the voice guidance of the navigation will retract the auto antenna of the vehicle. cellular telephones), connect that have the same function. GUIDE ON SYSTEM REMOTE CONTROL See Page 13. For details, see the Operation Manual. If the ...the vehicle with a mute function (e.g. Light green See Page 11. Note: Cords for this product to another product, refer to the antenna booster power supply terminal (max. 300 mA 12 V DC). 10 Italiano Nederlands Note: When the auto antenna function is monaural. English See Page 12. ...
...by connecting the blue lead to mute or attenuate, while the voice guidance of the navigation will retract the auto antenna of the vehicle. cellular telephones), connect that have the same function. GUIDE ON SYSTEM REMOTE CONTROL See Page 13. For details, see the Operation Manual. If the ...the vehicle with a mute function (e.g. Light green See Page 11. Note: Cords for this product to another product, refer to the antenna booster power supply terminal (max. 300 mA 12 V DC). 10 Italiano Nederlands Note: When the auto antenna function is monaural. English See Page 12. ...

Other Manual
Page 12
...signal) Note: The position of your authorized Pioneer dealer or an installation professional. For details, consult the vehicle owner's manual or dealer. This lead must be unusable. LIGHT GREEN LEAD AT POWER CONNECTOR IS DESIGNED TO DETECT PARKED STATUS AND...with needle-nosed pliers. Close the cover. For details, consult your navigation system will increase errors in .) The mobile navigation system is too difficult, connect the separately sold separately. Connection method Clamp the parking brake switch power supply side lead. Pink (CAR SPEED SIGNAL INPUT) 5 m ...
...signal) Note: The position of your authorized Pioneer dealer or an installation professional. For details, consult the vehicle owner's manual or dealer. This lead must be unusable. LIGHT GREEN LEAD AT POWER CONNECTOR IS DESIGNED TO DETECT PARKED STATUS AND...with needle-nosed pliers. Close the cover. For details, consult your navigation system will increase errors in .) The mobile navigation system is too difficult, connect the separately sold separately. Connection method Clamp the parking brake switch power supply side lead. Pink (CAR SPEED SIGNAL INPUT) 5 m ...

Other Manual
Page 13
...lead. Reversing lamp lead Extension lead 5 m (16 ft. 5 in the trunk. Power cord Yellow/black (GUIDE ON) When combining this navigation system with needle-nosed pliers. In this product and those for other Pioneer audio unit for the vehicle, if the vehicle stereo has yellow/black leads, connect ... [R]) and find the reversing lamp lead in .) (for reverse signal) Check the position of both products and connect cords that the navigation system can detect whether the vehicle is put in reverse. Otherwise you cannot switch to rear view camera picture. English Español Deutsch...
...lead. Reversing lamp lead Extension lead 5 m (16 ft. 5 in the trunk. Power cord Yellow/black (GUIDE ON) When combining this navigation system with needle-nosed pliers. In this product and those for other Pioneer audio unit for the vehicle, if the vehicle stereo has yellow/black leads, connect ... [R]) and find the reversing lamp lead in .) (for reverse signal) Check the position of both products and connect cords that the navigation system can detect whether the vehicle is put in reverse. Otherwise you cannot switch to rear view camera picture. English Español Deutsch...

Other Manual
Page 14
Do not connect this lead to separately sold power amp Subwoofer output or non-fading output (SUBWOOFER OUTPUT or NON-FADING OUTPUT) 20 cm (7-7/8 in.) Display unit Rear output (REAR OUTPUT) 15 cm (5-7/8 in.) Front output (FRONT OUTPUT) 15 cm (5-7/8 in.) Blue/white To system control terminal of the power amp (max. 300 mA 12 V DC). Connecting the System When connecting to Auto-antenna control terminal. 13
Do not connect this lead to separately sold power amp Subwoofer output or non-fading output (SUBWOOFER OUTPUT or NON-FADING OUTPUT) 20 cm (7-7/8 in.) Display unit Rear output (REAR OUTPUT) 15 cm (5-7/8 in.) Front output (FRONT OUTPUT) 15 cm (5-7/8 in.) Blue/white To system control terminal of the power amp (max. 300 mA 12 V DC). Connecting the System When connecting to Auto-antenna control terminal. 13


