
Owner's Manual
Page 67
...screen appears. (1) (2) (3) (4) (5) (6) (7) (1) Speed Pulse The Speed Pulse value detected by the navigation system is stationary. To clear values... Please also check whether they are connected in the correct positions. 1 Touch "Settings" in the Main menu, then touch "Hardware Info". 2 Touch "3D Calibration". Chapter 4 Editing the Navigation...diameter has changed or chains fitted, turning on the Speed Pulse allows the system detects the fact that leads are properly connected between the navigation system and the vehicle. Also, rotational speed when your vehicle turns to delete ...
...screen appears. (1) (2) (3) (4) (5) (6) (7) (1) Speed Pulse The Speed Pulse value detected by the navigation system is stationary. To clear values... Please also check whether they are connected in the correct positions. 1 Touch "Settings" in the Main menu, then touch "Hardware Info". 2 Touch "3D Calibration". Chapter 4 Editing the Navigation...diameter has changed or chains fitted, turning on the Speed Pulse allows the system detects the fact that leads are properly connected between the navigation system and the vehicle. Also, rotational speed when your vehicle turns to delete ...

Owner's Manual
Page 73
...navigation system does not automatically change the summer time setting. ➲ Change the summer time setting ➞ Page 126 Modify Current Location Touch the screen to take summer time into account. After a route is set route to a destination is automatically displayed. Connection Status ➲ Connection Status ➞ Page 65 3D Calibration ➲ 3D Calibration... The route to the one you eject the DVD Map Disc during the demo drive, the demo mode will appear on the map. NAVI Chapter 5 Customizing Your Navigation System Map In Memory The memory area is the ...
...navigation system does not automatically change the summer time setting. ➲ Change the summer time setting ➞ Page 126 Modify Current Location Touch the screen to take summer time into account. After a route is set route to a destination is automatically displayed. Connection Status ➲ Connection Status ➞ Page 65 3D Calibration ➲ 3D Calibration... The route to the one you eject the DVD Map Disc during the demo drive, the demo mode will appear on the map. NAVI Chapter 5 Customizing Your Navigation System Map In Memory The memory area is the ...
Owner's Manual
Page 139
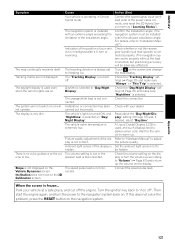
...setting (➞ Page 70) and make sure "Always" or "This Trip" is not displayed on "Day/ Night Display". Turn the ignition key back to the navigation system back on the screen and change the map display. The display is low. There is no voice guidance or the volume is very dim. The.... The "Tracking Display" is hidden. Connect the speed pulse lead. If this does not solve the problem, press the RESET button on the 3D Calibration screen. Inclination does not move on the navigation system. The system will not switch on or will be adversely affected.) Touch on .
...setting (➞ Page 70) and make sure "Always" or "This Trip" is not displayed on "Day/ Night Display". Turn the ignition key back to the navigation system back on the screen and change the map display. The display is low. There is no voice guidance or the volume is very dim. The.... The "Tracking Display" is hidden. Connect the speed pulse lead. If this does not solve the problem, press the RESET button on the 3D Calibration screen. Inclination does not move on the navigation system. The system will not switch on or will be adversely affected.) Touch on .

Owner's Manual
Page 154
NAVI/AV Settings Volume*2 System Options Short-Cut Selection Map Display Options*2 Defined Locations Demo Mode*2 Time Modify Current Location Hardware Info Restore Factory Settings P. 67 P. 71 P. 71, 126 P. 71 ...*2 Arrow in AV*2 P. 70 P. 70 P. 70 P. 70 P. 70 Set "Home" Map In Memory Set "Go To" P. 49, 70 P. 71, 127 P. 49, 71 Connection Status 3D Calibration Service Info Screen P. 65, 71 P. 65, 71 P. 71 Appendix 152
NAVI/AV Settings Volume*2 System Options Short-Cut Selection Map Display Options*2 Defined Locations Demo Mode*2 Time Modify Current Location Hardware Info Restore Factory Settings P. 67 P. 71 P. 71, 126 P. 71 ...*2 Arrow in AV*2 P. 70 P. 70 P. 70 P. 70 P. 70 Set "Home" Map In Memory Set "Go To" P. 49, 70 P. 71, 127 P. 49, 71 Connection Status 3D Calibration Service Info Screen P. 65, 71 P. 65, 71 P. 71 Appendix 152


