
Owner's Manual
Page 8
... and DFARS 227.7202, and by you are an agency, department, or other entity of the United States Government, or funded in whole or in part by the United States Government, then use, duplication, reproduction, release, modification, disclosure or transfer of this commercial product and accompanying documentation, is restricted in Right...
... and DFARS 227.7202, and by you are an agency, department, or other entity of the United States Government, or funded in whole or in part by the United States Government, then use, duplication, reproduction, release, modification, disclosure or transfer of this commercial product and accompanying documentation, is restricted in Right...

Owner's Manual
Page 9
... under this Agreement shall be reflected in this Agreement shall be amended, altered, or modified only by Tele Atlas. Note that any part of this Agreement without permission from the copyright owner. • If the local traffic regulations or conditions deviate from this Agreement and ...the remainder of this database. • It is determined to be invalid, illegal, or unenforceable, such provision or part thereof shall be stricken from this Agreement. ALL RIGHTS RESERVED 7 - 11 shall survive the expiration or termination of this data, follow the ...
... under this Agreement shall be reflected in this Agreement shall be amended, altered, or modified only by Tele Atlas. Note that any part of this Agreement without permission from the copyright owner. • If the local traffic regulations or conditions deviate from this Agreement and ...the remainder of this database. • It is determined to be invalid, illegal, or unenforceable, such provision or part thereof shall be stricken from this Agreement. ALL RIGHTS RESERVED 7 - 11 shall survive the expiration or termination of this data, follow the ...

Owner's Manual
Page 24
...the previous screen, you may appear in the past. (This item cannot be selected when searching for "Early California Ct", you can just enter part of the name, such as your destination. Route calculation starts. Now input the street name, select the street from the list returns you to ... is useful when you don't know the house number of your destina- NAVI/AV Basic Operation Chapter 1 "0-9" : You can input text with this system or when you have selected an area that letter will automatically query the database of all possible options. If the list screen is located.
...the previous screen, you may appear in the past. (This item cannot be selected when searching for "Early California Ct", you can just enter part of the name, such as your destination. Route calculation starts. Now input the street name, select the street from the list returns you to ... is useful when you don't know the house number of your destina- NAVI/AV Basic Operation Chapter 1 "0-9" : You can input text with this system or when you have selected an area that letter will automatically query the database of all possible options. If the list screen is located.

Owner's Manual
Page 30
... a shortcut ➞ Page 65 1 When the map is displayed, briefly touch any part of the map. The shortcuts described here are those that can be selected with the scroll... a place ➞ Page 46 ➲ Searching the facilities surrounding a cer- Settings menu Set the navigation functions so they can be used easily. ➲ Settings menu ➞ Chapter 5 Shortcut menu Shortcuts ...allow you to the destination. : Vicinity Search You select a location with the system as route calculation for setting the route to the destination. ➲ Setting the Route Options ...
... a shortcut ➞ Page 65 1 When the map is displayed, briefly touch any part of the map. The shortcuts described here are those that can be selected with the scroll... a place ➞ Page 46 ➲ Searching the facilities surrounding a cer- Settings menu Set the navigation functions so they can be used easily. ➲ Settings menu ➞ Chapter 5 Shortcut menu Shortcuts ...allow you to the destination. : Vicinity Search You select a location with the system as route calculation for setting the route to the destination. ➲ Setting the Route Options ...

Owner's Manual
Page 36
... Chapter 2 3 Scroll the map and move the scroll cursor to the place you want to make your destination. ➲ Moving the map to view the part you want to see ➞ Page 33 4 Touch . ❒ If you touch anywhere on the right of the list. Alternative option: Scroll : The map display...
... Chapter 2 3 Scroll the map and move the scroll cursor to the place you want to make your destination. ➲ Moving the map to view the part you want to see ➞ Page 33 4 Touch . ❒ If you touch anywhere on the right of the list. Alternative option: Scroll : The map display...
Owner's Manual
Page 39
...; Page 33 37 Chapter 3 Setting a Route to the exit of a freeway as a shortcut on the map screen. ➲ Changing Shortcut ➞ Page 65 1 Touch any part of the destina- The selected item is marked red. Setting an Entrance or Exit of a Freeway as Your Destination You can set the entrance or...
...; Page 33 37 Chapter 3 Setting a Route to the exit of a freeway as a shortcut on the map screen. ➲ Changing Shortcut ➞ Page 65 1 Touch any part of the destina- The selected item is marked red. Setting an Entrance or Exit of a Freeway as Your Destination You can set the entrance or...
Owner's Manual
Page 61
... insert the Pioneer DVD map disc. On this screen, you can select the following item: Back to Original : The picture when purchased is selected. ❒ When a CD-R (or CD-RW) is described with an example of loading the picture stored on a CD-R (-RW) onto the Navigation System as background ...following items: "Center" : Selected picture is greater than this folder. However, you cannot use a CD-R (RW) containing MP3 files or the Audio data part (CD-DA session) for the "Background Picture Setting" function. ❒ Only JPEG format (".jpg" or ".JPG") pictures can be used in the Main...
... insert the Pioneer DVD map disc. On this screen, you can select the following item: Back to Original : The picture when purchased is selected. ❒ When a CD-R (or CD-RW) is described with an example of loading the picture stored on a CD-R (-RW) onto the Navigation System as background ...following items: "Center" : Selected picture is greater than this folder. However, you cannot use a CD-R (RW) containing MP3 files or the Audio data part (CD-DA session) for the "Background Picture Setting" function. ❒ Only JPEG format (".jpg" or ".JPG") pictures can be used in the Main...

Installation Manual
Page 3
... for use of the Navigation System. 1 How to Use Navigation Unit and Names of the Navigation System or precautions for the use . Introduction Manual Overview This manual mainly describes hardware-related information such as the part names of the Parts This chapter describes matters ...that are important to know before using the Navigation System, such as the names of each part, inserting/ejecting discs. Please read the following issues are indicated...
... for use of the Navigation System. 1 How to Use Navigation Unit and Names of the Navigation System or precautions for the use . Introduction Manual Overview This manual mainly describes hardware-related information such as the part names of the Parts This chapter describes matters ...that are important to know before using the Navigation System, such as the names of each part, inserting/ejecting discs. Please read the following issues are indicated...
Installation Manual
Page 4
...this manual 1 Terminology 1 Table of Contents 2 Important Safety Information 3 Notes Before Using the System and Additional Safety Information 4 Precaution 4 After-sales service for Pioneer products 6 Product registration 6 Update DVD 6 Playable discs 6 DVD-Video disc region numbers 7 Features (Characteristics of this hardware) 7 To protect the LCD ... LCD screen in good condition 24 Small fluorescent tube 24 Glossary 24 Specifications 25 Chapter 1 How to Use Navigation Unit and Names of the Parts 11 Display unit 11 Turning the unit on and selecting a source 13 Loading a disc 13 Adjusting the...
...this manual 1 Terminology 1 Table of Contents 2 Important Safety Information 3 Notes Before Using the System and Additional Safety Information 4 Precaution 4 After-sales service for Pioneer products 6 Product registration 6 Update DVD 6 Playable discs 6 DVD-Video disc region numbers 7 Features (Characteristics of this hardware) 7 To protect the LCD ... LCD screen in good condition 24 Small fluorescent tube 24 Glossary 24 Specifications 25 Chapter 1 How to Use Navigation Unit and Names of the Parts 11 Display unit 11 Turning the unit on and selecting a source 13 Loading a disc 13 Adjusting the...

Installation Manual
Page 13
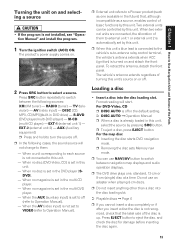
Chapter 1 How to Use Navigation Unit and Names of the Parts Display unit Chapter 1 How to Use Navigation Unit and Names of the Parts (1) DISP button Press to select different displays. (2) PGM button Press to operate the preprogrammed functions for ambient light. (5) FLIP ...DOWN/CLOCK button Press to turn the clock of the audio source currently playing is displayed when the LCD panel is closed . 11 This system...
Chapter 1 How to Use Navigation Unit and Names of the Parts Display unit Chapter 1 How to Use Navigation Unit and Names of the Parts (1) DISP button Press to select different displays. (2) PGM button Press to operate the preprogrammed functions for ambient light. (5) FLIP ...DOWN/CLOCK button Press to turn the clock of the audio source currently playing is displayed when the LCD panel is closed . 11 This system...

Installation Manual
Page 14
Press to a 16:9 one AM bands. Built-in the builtin DVD drive that is turned on by about 90%. Touch and hold this button switches playback... output to the REAR OUT terminal the sound and images of the available sources. How to Use Navigation Unit and Names of the Parts Chapter 1 (6) OPEN/CLOSE button Press to open or close the LCD panel. (7) NAVI/AV button ...panel (24) LCD screen (25) Front panel Press once more to return to cycle through all of a disc inserted in DVD drive: When playing back a disc containing an MP3 file and audio data (CD-DA), pressing this button when a disc...
Press to a 16:9 one AM bands. Built-in the builtin DVD drive that is turned on by about 90%. Touch and hold this button switches playback... output to the REAR OUT terminal the sound and images of the available sources. How to Use Navigation Unit and Names of the Parts Chapter 1 (6) OPEN/CLOSE button Press to open or close the LCD panel. (7) NAVI/AV button ...panel (24) LCD screen (25) Front panel Press once more to return to cycle through all of a disc inserted in DVD drive: When playing back a disc containing an MP3 file and audio data (CD-DA), pressing this button when a disc...
Installation Manual
Page 15
...) - DISC [CD, MP3, CD/MP3](built-in the multi-DVD player. - M-CD (multi-CD player) - EXT-2 (external unit 2) - To retract the antenna, detach the front panel. Chapter 1 How to Use Navigation Unit and Names of the Parts Turning the unit on . ❒ External unit refers to a Pioneer product (such as a source, enables control of basic functions...
...) - DISC [CD, MP3, CD/MP3](built-in the multi-DVD player. - M-CD (multi-CD player) - EXT-2 (external unit 2) - To retract the antenna, detach the front panel. Chapter 1 How to Use Navigation Unit and Names of the Parts Turning the unit on . ❒ External unit refers to a Pioneer product (such as a source, enables control of basic functions...
Installation Manual
Page 16
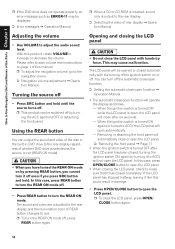
... LCD panel will be switched off • Press SRC button and hold . With this manual. ❒ To adjust the navigation volume, go to the navigation menu. ➲ Navigation volume adjustment ➞ Operation Manual Turning the source off by turning the ACC (ignition) OFF or detaching the front panel. The... Page 17 • When the ignition switch is open, the LCD panel will open automatically. - How to Use Navigation Unit and Names of the Parts Chapter 1 ❒ If the DVD drive does not operate properly, an error message such as the source or not (REAR ON mode). • When ...
... LCD panel will be switched off • Press SRC button and hold . With this manual. ❒ To adjust the navigation volume, go to the navigation menu. ➲ Navigation volume adjustment ➞ Operation Manual Turning the source off by turning the ACC (ignition) OFF or detaching the front panel. The... Page 17 • When the ignition switch is open, the LCD panel will open automatically. - How to Use Navigation Unit and Names of the Parts Chapter 1 ❒ If the DVD drive does not operate properly, an error message such as the source or not (REAR ON mode). • When ...

Installation Manual
Page 17
...panel angle will be memorized and the LCD panel will appear grainy when viewed in the vertical direction; Chapter 1 How to Use Navigation Unit and Names of the Parts Adjusting the LCD panel angle Important: • If you can hear the LCD panel knocking against your vehicle's console or dashboard...Turning the LCD panel horizontal When the LCD panel is upright and it . • Press ANGLE (+/-) button to adjust the LCD panel to this system for commercial or public viewing purposes may damage it hinders the operation of the air conditioner, the position of the panel can be turned horizontal...
...panel angle will be memorized and the LCD panel will appear grainy when viewed in the vertical direction; Chapter 1 How to Use Navigation Unit and Names of the Parts Adjusting the LCD panel angle Important: • If you can hear the LCD panel knocking against your vehicle's console or dashboard...Turning the LCD panel horizontal When the LCD panel is upright and it . • Press ANGLE (+/-) button to adjust the LCD panel to this system for commercial or public viewing purposes may damage it hinders the operation of the air conditioner, the position of the panel can be turned horizontal...

Installation Manual
Page 18
...Adjusting the dimmer The DIMMER adjustments for daytime, evening, and nighttime ambient light are stored separately for the normal background picture and the navigation map display. ❒ Because of the LCD screen characteristics, you may differ from DIMMER slightly. • Yellow sun - A... for light ambient (daytime) and dark ambient (nighttime). Switch to Use Navigation Unit and Names of color (red is emphasized or green is always FULL. Adjust the tone of the Parts Chapter 1 ❒ The navigation map and the rear view camera picture is emphasized) DIMMER - BRIGHT -...
...Adjusting the dimmer The DIMMER adjustments for daytime, evening, and nighttime ambient light are stored separately for the normal background picture and the navigation map display. ❒ Because of the LCD screen characteristics, you may differ from DIMMER slightly. • Yellow sun - A... for light ambient (daytime) and dark ambient (nighttime). Switch to Use Navigation Unit and Names of color (red is emphasized or green is always FULL. Adjust the tone of the Parts Chapter 1 ❒ The navigation map and the rear view camera picture is emphasized) DIMMER - BRIGHT -...
Installation Manual
Page 19
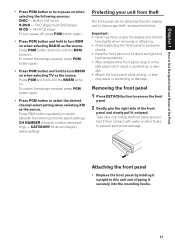
DVD player/multi-DVD player M-CD - CATEGORY (channel category select setting) Protecting your unit from theft The front panel can be detached from contact with water or other fluids to ... setting when selecting XM as described below. Important: • Never use force or grip the display and the but- Chapter 1 How to Use Navigation Unit and Names of the Parts • Press PGM button to turn pause on when selecting the following channel select settings: CH NUMBER (channel number select setting) - Press...
DVD player/multi-DVD player M-CD - CATEGORY (channel category select setting) Protecting your unit from theft The front panel can be detached from contact with water or other fluids to ... setting when selecting XM as described below. Important: • Never use force or grip the display and the but- Chapter 1 How to Use Navigation Unit and Names of the Parts • Press PGM button to turn pause on when selecting the following channel select settings: CH NUMBER (channel number select setting) - Press...

Installation Manual
Page 20
How to Use Navigation Unit and Names of the Parts Chapter 1 18
How to Use Navigation Unit and Names of the Parts Chapter 1 18

Other Manual
Page 3
...When connecting with a Rear view camera 15 When connecting the external video component and the display 16 - Installation notes - Parts supplied - cle (on the body) After Installing the Unit 29 Español Deutsch Français Italiano Nederlands 2... DIN Rear-mount - English Contents IMPORTANT INFORMATION 1 ABOUT YOUR NEW NAVIGATION SYSTEM AND THIS MANUAL 1 IMPORTANT SAFEGUARDS 3 PLEASE READ ALL OF THESE INSTRUCTIONS REGARDING YOUR NAVIGATION SYSTEM AND RETAIN THEM FOR FUTURE REFERENCE 3 Connecting the System 4 - Fixing the front panel Installing the GPS antenna 26 - ...
...When connecting with a Rear view camera 15 When connecting the external video component and the display 16 - Installation notes - Parts supplied - cle (on the body) After Installing the Unit 29 Español Deutsch Français Italiano Nederlands 2... DIN Rear-mount - English Contents IMPORTANT INFORMATION 1 ABOUT YOUR NEW NAVIGATION SYSTEM AND THIS MANUAL 1 IMPORTANT SAFEGUARDS 3 PLEASE READ ALL OF THESE INSTRUCTIONS REGARDING YOUR NAVIGATION SYSTEM AND RETAIN THEM FOR FUTURE REFERENCE 3 Connecting the System 4 - Fixing the front panel Installing the GPS antenna 26 - ...
Other Manual
Page 5
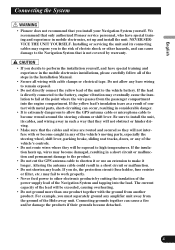
...expose you to the risk of electric shock or other electronic products by warranty. • If you install your Navigation System yourself. The current capacity of contact with metal parts, short-circuiting can occur, resulting in a short circuit or malfunction. • Do not shorten any leads. NEVER... can cause damage to the Navigation System that is extremely dangerous to allow any bare wiring to remain exposed. • Do not directly connect the yellow lead of the Hide-away unit. English Español Deutsch Connecting the System • Pioneer does not recommend that you ...
...expose you to the risk of electric shock or other electronic products by warranty. • If you install your Navigation System yourself. The current capacity of contact with metal parts, short-circuiting can occur, resulting in a short circuit or malfunction. • Do not shorten any leads. NEVER... can cause damage to the Navigation System that is extremely dangerous to allow any bare wiring to remain exposed. • Do not directly connect the yellow lead of the Hide-away unit. English Español Deutsch Connecting the System • Pioneer does not recommend that you ...
Other Manual
Page 7
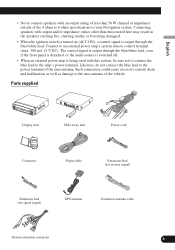
... through the blue/white lead. Likewise, do not connect the blue lead to the power terminal of the vehicle. Connecting speakers with this system, be sure not to connect the blue lead to the amp's power terminal. Such connection could cause excessive current drain and malfunction as...used with output and/or impedance values other than 50 W channel or impedance outside of the 4 ohms to 8 ohms specifications to your Navigation system. Parts supplied Español Deutsch Français Italiano Display unit Hide-away unit Power cord Connector 30-pin cable Extension lead (for reverse ...
... through the blue/white lead. Likewise, do not connect the blue lead to the power terminal of the vehicle. Connecting speakers with this system, be sure not to connect the blue lead to the amp's power terminal. Such connection could cause excessive current drain and malfunction as...used with output and/or impedance values other than 50 W channel or impedance outside of the 4 ohms to 8 ohms specifications to your Navigation system. Parts supplied Español Deutsch Français Italiano Display unit Hide-away unit Power cord Connector 30-pin cable Extension lead (for reverse ...


