Installation Manual
Page 6
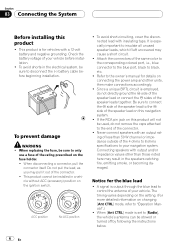
.... Attach the connectors of the same color to the corresponding colored port, i.e., blue connector to the blue port, black to your navigation system. Never connect speakers with output and/or impedance values other units, then make connections accordingly. ! Connecting speakers with an output rating of... this product ! When [Ant CTRL] mode is output through the blue lead to [Radio], the vehicle's antenna can be stowed or turned off by following the instructions below. 6 En Check the battery voltage of your vehicle. Notice for vehicles with insulating tape. This product...
.... Attach the connectors of the same color to the corresponding colored port, i.e., blue connector to the blue port, black to your navigation system. Never connect speakers with output and/or impedance values other units, then make connections accordingly. ! Connecting speakers with an output rating of... this product ! When [Ant CTRL] mode is output through the blue lead to [Radio], the vehicle's antenna can be stowed or turned off by following the instructions below. 6 En Check the battery voltage of your vehicle. Notice for vehicles with insulating tape. This product...
Installation Manual
Page 7
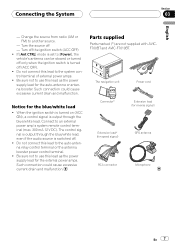
...antenna booster power control terminal. ! The navigation unit Power cord Connector* Extension lead (for reverse signal) Extension lead* (for the blue/white lead ! Do not connect this lead to the system control terminal of external power amps. ! Connecting the System Section 03 English - Change the source...sure not to [Power], the vehicle's antenna can be stowed or turned off only when the ignition switch is set to use this lead as the power supply lead for the external power amps. Parts supplied Parts marked (*) are not supplied with AVICF700BT and AVIC-F7010BT.
...antenna booster power control terminal. ! The navigation unit Power cord Connector* Extension lead (for reverse signal) Extension lead* (for the blue/white lead ! Do not connect this lead to the system control terminal of external power amps. ! Connecting the System Section 03 English - Change the source...sure not to [Power], the vehicle's antenna can be stowed or turned off only when the ignition switch is set to use this lead as the power supply lead for the external power amps. Parts supplied Parts marked (*) are not supplied with AVICF700BT and AVIC-F7010BT.
Installation Manual
Page 11
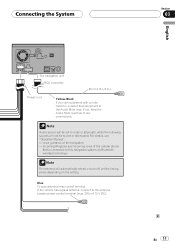
...while the following sounds will not be set to the Audio Mute lead. If the vehicle has a glass antenna, connect to this navigation system via Bluetooth wireless technology Note The antenna will be muted or attenuated. voice guidance of any connections. Blue To auto-antenna relay ...control terminal. En 11 Note Audio source will automatically retract or turn off, yet the timing varies depending on the setting. Connecting the System Section 03 English The navigation unit RCA connector 26 cm (10-1/4 in.) Power cord Yellow/Black If you use equipment...
...while the following sounds will not be set to the Audio Mute lead. If the vehicle has a glass antenna, connect to this navigation system via Bluetooth wireless technology Note The antenna will be muted or attenuated. voice guidance of any connections. Blue To auto-antenna relay ...control terminal. En 11 Note Audio source will automatically retract or turn off, yet the timing varies depending on the setting. Connecting the System Section 03 English The navigation unit RCA connector 26 cm (10-1/4 in.) Power cord Yellow/Black If you use equipment...
Installation Manual
Page 26
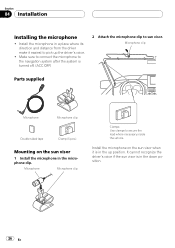
... the microphone ! Install the microphone on the sun visor 1 Install the microphone in a place where its direction and distance from the driver make it is turned off. (ACC OFF) 2 Attach the microphone clip to the navigation system after the system is in the down position. 26 En
... the microphone ! Install the microphone on the sun visor 1 Install the microphone in a place where its direction and distance from the driver make it is turned off. (ACC OFF) 2 Attach the microphone clip to the navigation system after the system is in the down position. 26 En
Owner's Manual
Page 6
... - Recording your customized POI 132 - Selecting the language 135 - Using balance adjustment 139 - Enhancing bass (Bass Booster) 142 The options on the "System Settings" menu 135 - Displaying the "AV Settings" menu 143 - Setting video input 2 (AV2) 143 - Switching the sound muting/ attenuation 144 -... 131 - Time Settings 124 - 3D Settings 125 - Route 127 - Using subwoofer output 141 - Manage POI 127 - Demo Mode 129 - Turning off the screen 138 The "AV Sound" menu options 138 - Setting video input 1 (AV1) 143 - Acquiring/Cataloging iPod music information 145 Using...
... - Recording your customized POI 132 - Selecting the language 135 - Using balance adjustment 139 - Enhancing bass (Bass Booster) 142 The options on the "System Settings" menu 135 - Displaying the "AV Settings" menu 143 - Setting video input 2 (AV2) 143 - Switching the sound muting/ attenuation 144 -... 131 - Time Settings 124 - 3D Settings 125 - Route 127 - Using subwoofer output 141 - Manage POI 127 - Demo Mode 129 - Turning off the screen 138 The "AV Sound" menu options 138 - Setting video input 1 (AV1) 143 - Acquiring/Cataloging iPod music information 145 Using...
Owner's Manual
Page 12
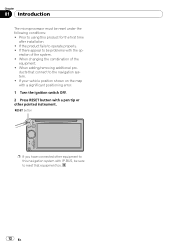
If the product fails to using this navigation system with IP-BUS, be problems with a pen tip or other pointed instrument. If your vehicle position shown on the map with a significant positioning error. 1 Turn the ignition switch OFF. 2 Press RESET button with the op- When adding/removing ...additional pro- RESET button p If you have connected other equipment to the navigation system. ! If there appear to be sure to reset that connect...
If the product fails to using this navigation system with IP-BUS, be problems with a pen tip or other pointed instrument. If your vehicle position shown on the map with a significant positioning error. 1 Turn the ignition switch OFF. 2 Press RESET button with the op- When adding/removing ...additional pro- RESET button p If you have connected other equipment to the navigation system. ! If there appear to be sure to reset that connect...
Owner's Manual
Page 16
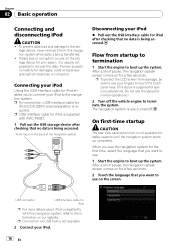
... Pioneer accepts no data is not available for a few seconds. p For connection, USB interface cable for iPod is supplied with this navigation system while data is usually not possible to recover the data. The navigation system is also turned off...AVIC-F90BT. 1 Pull out the USB storage device after checking that you want to boot up completely. Chapter 02 Basic operation Connecting and disconnecting iPod CAUTION ! p To protect the LCD screen from data loss or corruption. After a short pause, the navigation splash screen comes on for safety reasons until the navigation system...
... Pioneer accepts no data is not available for a few seconds. p For connection, USB interface cable for iPod is supplied with this navigation system while data is usually not possible to recover the data. The navigation system is also turned off...AVIC-F90BT. 1 Pull out the USB storage device after checking that you want to boot up completely. Chapter 02 Basic operation Connecting and disconnecting iPod CAUTION ! p To protect the LCD screen from data loss or corruption. After a short pause, the navigation splash screen comes on for safety reasons until the navigation system...
Owner's Manual
Page 21
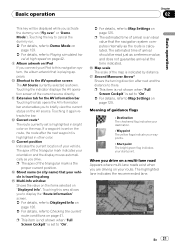
... p This item is not shown when "Full Screen Cockpit" is highlighted in bright color on the map. h Second Maneuver Arrow* Shows the turning direction after the next waypoint is set to "On". = For details, refer to Map Settings on page 125. Basic operation Chapter 02 Basic operation... When you drive on your route. vel at the time indicated. b Extension tab for the AV information bar Touching this navigation system, the album artwork that the navigation system computes internally as you are driving on a multi-lane road Appears where multi-lane roads exist when you drive. cle is...
... p This item is not shown when "Full Screen Cockpit" is highlighted in bright color on the map. h Second Maneuver Arrow* Shows the turning direction after the next waypoint is set to "On". = For details, refer to Map Settings on page 125. Basic operation Chapter 02 Basic operation... When you drive on your route. vel at the time indicated. b Extension tab for the AV information bar Touching this navigation system, the album artwork that the navigation system computes internally as you are driving on a multi-lane road Appears where multi-lane roads exist when you drive. cle is...

Owner's Manual
Page 22
... is not resized and keeps displayed. Switching the map between 2D and 3D 2D map screen 3D map screen 1 Press MAP button to display the navigation map screen. 2 Touch or to zoom in "Route"; For your driving. p Further zooming out hides the lines of the icon and further zooming out will... En p Zooming out will reduce the size of traffic information. Thus, the information may be different from what actual condition exists. "Unpaved Roads", "Highways", "Ferries", "U-turns", "Permit Needed", "Toll Roads".
... is not resized and keeps displayed. Switching the map between 2D and 3D 2D map screen 3D map screen 1 Press MAP button to display the navigation map screen. 2 Touch or to zoom in "Route"; For your driving. p Further zooming out hides the lines of the icon and further zooming out will... En p Zooming out will reduce the size of traffic information. Thus, the information may be different from what actual condition exists. "Unpaved Roads", "Highways", "Ferries", "U-turns", "Permit Needed", "Toll Roads".

Owner's Manual
Page 42
... route fitted onto the screen. Checking the entire route overview on the map You can check the route details. Scroll the list as necessary. 12 3 1 Turning direction 2 Driving distance 3 Names of the current route. 1 Touch [Destination] on the "Top Menu", and then touch [Route Function]. 2 Touch [Itinerary...] to return to scroll the list. Playing simulated travel at high speed This function allows you want to browse how the current route will be navigated. 1 Touch [Destination] on the map. p If you to stop the simulation, touch on the "Top Menu", and then touch [Route Function]. 2...
... route fitted onto the screen. Checking the entire route overview on the map You can check the route details. Scroll the list as necessary. 12 3 1 Turning direction 2 Driving distance 3 Names of the current route. 1 Touch [Destination] on the "Top Menu", and then touch [Route Function]. 2 Touch [Itinerary...] to return to scroll the list. Playing simulated travel at high speed This function allows you want to browse how the current route will be navigated. 1 Touch [Destination] on the map. p If you to stop the simulation, touch on the "Top Menu", and then touch [Route Function]. 2...

Owner's Manual
Page 43
p When a long distance route is given) are merged into one.). Instructions All turning points (where voice guidance is calculated, your navigation system may not be able to list all roads. (In this case, the remaining roads will be shown in the list as you drive on.) Chapter 05 Checking the current route En 43 Road List Displays the turning points with the most simplified condition (the duplicate route names are shown. ! Detailed Instructions All turning points, passed streets and other information is shown. ! Checking the current route Alternative options: !
p When a long distance route is given) are merged into one.). Instructions All turning points (where voice guidance is calculated, your navigation system may not be able to list all roads. (In this case, the remaining roads will be shown in the list as you drive on.) Chapter 05 Checking the current route En 43 Road List Displays the turning points with the most simplified condition (the duplicate route names are shown. ! Detailed Instructions All turning points, passed streets and other information is shown. ! Checking the current route Alternative options: !

Owner's Manual
Page 47
http://www.msndirect.com/pioneer 2 Be sure to check the coverage area and other availabilities of MSN Direct on the web page. 3 Move to the page for activation and enter your navigation system. 2 Touch [Destination] on the "Top Menu", and then touch [MSN Direct]. You are displayed in the... the following URL and read the description. Utilize the information for a few days. 1 Touch [Destination] on each menu. After the navigation system has been turned off for your reference. Activating the MSN Direct function After the online subscription, complete the activation so that the...
http://www.msndirect.com/pioneer 2 Be sure to check the coverage area and other availabilities of MSN Direct on the web page. 3 Move to the page for activation and enter your navigation system. 2 Touch [Destination] on the "Top Menu", and then touch [MSN Direct]. You are displayed in the... the following URL and read the description. Utilize the information for a few days. 1 Touch [Destination] on each menu. After the navigation system has been turned off for your reference. Activating the MSN Direct function After the online subscription, complete the activation so that the...

Owner's Manual
Page 48
... are displayed. 4 Touch the desired movie title. Browsing movie times Nearby theaters can do with the "Map Confirmation Screen" on page 36. After the navigation system has been turned off for a few days. 1 The names of the "Map Confirmation Screen" to select the next operation. = For details concerning other operations on the "Map...
... are displayed. 4 Touch the desired movie title. Browsing movie times Nearby theaters can do with the "Map Confirmation Screen" on page 36. After the navigation system has been turned off for a few days. 1 The names of the "Map Confirmation Screen" to select the next operation. = For details concerning other operations on the "Map...
Owner's Manual
Page 52
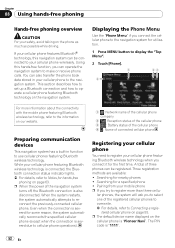
...select one of three phones can be registered. The PIN code is "Pioneer Navi". Three registration methods are available: ! Searching for nearby phones ! tered cellular phone on the navigation system. Chapter 08 Using hands-free phoning Hands-free phoning overview CAUTION For ... of the cellular phone company 2 : Reception status of the cellular phone 3 : Battery status of the cellular phone 4 : Name of the navigation system turns off, the Bluetooth connection is also disconnected. Searching for a specified phone ! While your safety, avoid talking on the phone as much as possible...
...select one of three phones can be registered. The PIN code is "Pioneer Navi". Three registration methods are available: ! Searching for nearby phones ! tered cellular phone on the navigation system. Chapter 08 Using hands-free phoning Hands-free phoning overview CAUTION For ... of the cellular phone company 2 : Reception status of the cellular phone 3 : Battery status of the cellular phone 4 : Name of the navigation system turns off, the Bluetooth connection is also disconnected. Searching for a specified phone ! While your safety, avoid talking on the phone as much as possible...

Owner's Manual
Page 61
...to Displaying the Phone Menu on page 52. 2 Touch [Off] on page 52. 2 Adjust volume to touch the sliders of electric waves by turning off the Bluetooth function. Touching [Bluetooth On/Off] switching between [On] and [Off]. You can be adjusted. 1 Touch [Phone Volume] on...]: Answers immediately En 61 Using hands-free phoning Chapter 08 Using hands-free phoning 3 Touch [OK]. Answering a call automatically The navigation system automatically answers an incoming call to Answering an incoming call while holding the steering wheel while you do not want to configure. [Off...
...to Displaying the Phone Menu on page 52. 2 Touch [Off] on page 52. 2 Adjust volume to touch the sliders of electric waves by turning off the Bluetooth function. Touching [Bluetooth On/Off] switching between [On] and [Off]. You can be adjusted. 1 Touch [Phone Volume] on...]: Answers immediately En 61 Using hands-free phoning Chapter 08 Using hands-free phoning 3 Touch [OK]. Answering a call automatically The navigation system automatically answers an incoming call to Answering an incoming call while holding the steering wheel while you do not want to configure. [Off...

Owner's Manual
Page 66
... see the list of track titles, file names or folder names on a disc and select one of them to play. 1 Touch [List]. 2 To return to turn scan play off. Repeats just the current track p If you hear the first 10 seconds of each track on the "AV Source" menu to display...
... see the list of track titles, file names or folder names on a disc and select one of them to play. 1 Touch [List]. 2 To return to turn scan play off. Repeats just the current track p If you hear the first 10 seconds of each track on the "AV Source" menu to display...

Owner's Manual
Page 69
... again. Touching [Scan] switches between [On] and [Off]. Folder - When you find the desired track touch [Scan] to [Disc]. p If you turn [Random] to play back a subfolder of that folder. Track - Repeats just the current track p If you select another folder during [Track], the repeat ...play range changes to the ordinary display. p If you perform fast forward/rewind during repeat play, the repeat play range changes to turn [Random] to [Folder] automatically. 3 Scan folders and tracks Scan play lets you hear the first 10 seconds of each track. p After ...
... again. Touching [Scan] switches between [On] and [Off]. Folder - When you find the desired track touch [Scan] to [Disc]. p If you turn [Random] to play back a subfolder of that folder. Track - Repeats just the current track p If you select another folder during [Track], the repeat ...play range changes to the ordinary display. p If you perform fast forward/rewind during repeat play, the repeat play range changes to turn [Random] to [Folder] automatically. 3 Scan folders and tracks Scan play lets you hear the first 10 seconds of each track. p After ...
Owner's Manual
Page 71
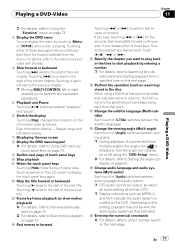
... forward or backward Touching [d] skips to the start of the current chapter. Turn the angle icon display on or off using a DVD that has a point...skips to the start of the next chapter. For details, refer to the instructions provided with the same audio system as resuming) stored in the disc When using the "DVD Setup" menu. = For details, refer to Setting...Switch the display Touching [Disp] changes the indication on the information plate as MPEG-A and Mch indicate the audio system recorded on the DVD. back on page 73. = For details, refer to play - p Display indications such as ...
... forward or backward Touching [d] skips to the start of the current chapter. Turn the angle icon display on or off using a DVD that has a point...skips to the start of the next chapter. For details, refer to the instructions provided with the same audio system as resuming) stored in the disc When using the "DVD Setup" menu. = For details, refer to Setting...Switch the display Touching [Disp] changes the indication on the information plate as MPEG-A and Mch indicate the audio system recorded on the DVD. back on page 73. = For details, refer to play - p Display indications such as ...

Owner's Manual
Page 82
.... 4 Touch the desired language. However, they are only displayed if they are displayed or output in initial playback. Setting the top-priority languages You can turn assist subtitles on or off Assist subtitles offer explanations for DVDs on this does not affect the settings here. If the selected language is recorded...
.... 4 Touch the desired language. However, they are only displayed if they are displayed or output in initial playback. Setting the top-priority languages You can turn assist subtitles on or off Assist subtitles offer explanations for DVDs on this does not affect the settings here. If the selected language is recorded...

Owner's Manual
Page 84
... menu. = For details, refer to Displaying DVD Setup menu on page 82. 2 Touch [DivX VOD]. If this function is not fully operable, turn this function off and start playback from the first chapter of the code as you cannot use parental lock. p When [Auto Play] is canceled, ... a note of the first title. p We recommend that do this setting between [On] and [Off]. p The parental lock level is inserted, this navigation system, you register with a DivX VOD provider. You can confirm it by generating a DivX VOD registration code, which normal playback resumes. The registered code number is...
... menu. = For details, refer to Displaying DVD Setup menu on page 82. 2 Touch [DivX VOD]. If this function is not fully operable, turn this function off and start playback from the first chapter of the code as you cannot use parental lock. p When [Auto Play] is canceled, ... a note of the first title. p We recommend that do this setting between [On] and [Off]. p The parental lock level is inserted, this navigation system, you register with a DivX VOD provider. You can confirm it by generating a DivX VOD registration code, which normal playback resumes. The registered code number is...


