Installation Manual
Page 2
Notice for the blue/white lead 7 Parts supplied 7 Connecting the system 8 Connecting the power cord (1) 10 Connecting the power cord (2) 12 When connecting to rear video output 17 When connecting the external video component 17 - When using the screw holes on the side of the navigation unit 22 Installing the GPS antenna 23 - Installation using a rear display connected to separately sold power amp 14 When connecting a rear view camera 16 When connecting the rear display 17 - When installing the antenna outside the vehicle (on the steering column 27 - Installation on the body...
Notice for the blue/white lead 7 Parts supplied 7 Connecting the system 8 Connecting the power cord (1) 10 Connecting the power cord (2) 12 When connecting to rear video output 17 When connecting the external video component 17 - When using the screw holes on the side of the navigation unit 22 Installing the GPS antenna 23 - Installation using a rear display connected to separately sold power amp 14 When connecting a rear view camera 16 When connecting the rear display 17 - When installing the antenna outside the vehicle (on the steering column 27 - Installation on the body...
Installation Manual
Page 5
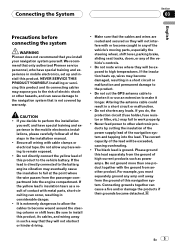
... lever, parking brake, sliding seat tracks, doors, or any amp unit away from the ground of high-current products such as a result of the lead will be exposed to the risk of the vehicle's controls. ! If the yellow lead's insulation tears as power amps. Be sure to the product. ! Do not cut the GPS antenna cable to shorten it or use an...
... lever, parking brake, sliding seat tracks, doors, or any amp unit away from the ground of high-current products such as a result of the lead will be exposed to the risk of the vehicle's controls. ! If the yellow lead's insulation tears as power amps. Be sure to the product. ! Do not cut the GPS antenna cable to shorten it or use an...
Installation Manual
Page 6
... System Before installing this navigation system. ! If the RCA pin jack on connecting the power amp and other than 50 W channel or impedance outside of your vehicle before beginning installation. A signal is for details on this product will not be used, do not directly ground the * side of the speaker lead or connect the * sides of the connector. ! This product is output through the blue lead to control the antenna...
... System Before installing this navigation system. ! If the RCA pin jack on connecting the power amp and other than 50 W channel or impedance outside of your vehicle before beginning installation. A signal is for details on this product will not be used, do not directly ground the * side of the speaker lead or connect the * sides of the connector. ! This product is output through the blue lead to control the antenna...
Installation Manual
Page 12
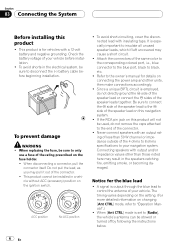
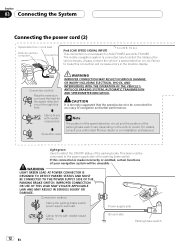
... parking brake. Light green Used to detect the distance the vehicle travels. WARNING LIGHT GREEN LEAD AT POWER CONNECTOR IS DESIGNED TO DETECT PARKED STATUS AND MUST BE CONNECTED TO THE POWER SUPPLY SIDE OF THE PARKING BRAKE SWITCH. Section 03 Connecting the System Connecting the power cord (2) Speed detection circuit lead Vehicle injection computer Connector Pink (CAR SPEED SIGNAL INPUT) 3 m (9 ft. 10 in the location display. For details, consult your navigation system will be connected to make...
... parking brake. Light green Used to detect the distance the vehicle travels. WARNING LIGHT GREEN LEAD AT POWER CONNECTOR IS DESIGNED TO DETECT PARKED STATUS AND MUST BE CONNECTED TO THE POWER SUPPLY SIDE OF THE PARKING BRAKE SWITCH. Section 03 Connecting the System Connecting the power cord (2) Speed detection circuit lead Vehicle injection computer Connector Pink (CAR SPEED SIGNAL INPUT) 3 m (9 ft. 10 in the location display. For details, consult your navigation system will be connected to make...

Installation Manual
Page 16
... Camera] in .) The navigation unit Extension lead (for reverse signal) Fuse resistor For more distant than in .) Power cord CAUTION ! Rear view camera (e.g. The screen image may appear closer or more details about the wiring, refer to Connecting the power cord (2) on trailers, or backing into a tight parking spot. WARNING USE INPUT ONLY FOR REVERSE OR MIRROR IMAGE REAR VIEW CAMERA. ND-BC2) (sold separately) To video output RCA cable Violet/white Brown (REAR VIEW CAMERA IN) 20 cm RCA connector (7-7/8 in reality. ! The rear view camera function is to use this function...
... Camera] in .) The navigation unit Extension lead (for reverse signal) Fuse resistor For more distant than in .) Power cord CAUTION ! Rear view camera (e.g. The screen image may appear closer or more details about the wiring, refer to Connecting the power cord (2) on trailers, or backing into a tight parking spot. WARNING USE INPUT ONLY FOR REVERSE OR MIRROR IMAGE REAR VIEW CAMERA. ND-BC2) (sold separately) To video output RCA cable Violet/white Brown (REAR VIEW CAMERA IN) 20 cm RCA connector (7-7/8 in reality. ! The rear view camera function is to use this function...
Owner's Manual
Page 6
...rear view camera 136 - Turning off the screen 138 The "AV Sound" menu options 138 - Adjusting loudness 141 - Changing the wide screen mode 144 - Manage Track Logs 127 - Changing the splash screen 135 - Adjusting the response positions of the touch panels (touch panel calibration) 136 - Adjusting the screen brightness 137 - Displaying the "AV Sound" menu 138 - Adjusting source levels 142 - Switching the auto antenna setting 143 - Displayed Info 126 - Set Home 129 - Sound settings 130 - Creating new categories 131 - Using subwoofer output 141 - Acquiring/Cataloging iPod...
...rear view camera 136 - Turning off the screen 138 The "AV Sound" menu options 138 - Adjusting loudness 141 - Changing the wide screen mode 144 - Manage Track Logs 127 - Changing the splash screen 135 - Adjusting the response positions of the touch panels (touch panel calibration) 136 - Adjusting the screen brightness 137 - Displaying the "AV Sound" menu 138 - Adjusting source levels 142 - Switching the auto antenna setting 143 - Displayed Info 126 - Set Home 129 - Sound settings 130 - Creating new categories 131 - Using subwoofer output 141 - Acquiring/Cataloging iPod...
Owner's Manual
Page 7
... regarding connectable iPods 180 Using the LCD screen correctly 180 - Liquid crystal display (LCD) screen 181 - Settings Menu 183 - Voice operation for playing a disc 170 Playable discs 171 - About DVD-Video and CD 171 - LED (light-emitting diode) backlight 181 Display information 182 - DVD Setup 186 Glossary 187 Specifications 190 En 7 Positioning by "Dead Reckoning" 165 - Ambient conditions for AV source (other than iPod) 150 - Forgotten passwords 153 Returning the navigation system to cause noticeable positioning errors...
... regarding connectable iPods 180 Using the LCD screen correctly 180 - Liquid crystal display (LCD) screen 181 - Settings Menu 183 - Voice operation for playing a disc 170 Playable discs 171 - About DVD-Video and CD 171 - LED (light-emitting diode) backlight 181 Display information 182 - DVD Setup 186 Glossary 187 Specifications 190 En 7 Positioning by "Dead Reckoning" 165 - Ambient conditions for AV source (other than iPod) 150 - Forgotten passwords 153 Returning the navigation system to cause noticeable positioning errors...

Owner's Manual
Page 10
... countries. Auto file name listing The track name will be automatically listed when this navigation system may not be connected wirelessly. - Ver. 1.1.3 ! iPod classic; Ver. 1.1.1 ! and other rights owners. When using Bluetooth wireless technology, this function is available. Rear display entertainment Video sources can be compati- Reverse engineering or disassembly is a trademark of the functions on the external storage device (USB, SD). iPod nano third generation; iPod touch; The cellular phone used must be...
... countries. Auto file name listing The track name will be automatically listed when this navigation system may not be connected wirelessly. - Ver. 1.1.3 ! iPod classic; Ver. 1.1.1 ! and other rights owners. When using Bluetooth wireless technology, this function is available. Rear display entertainment Video sources can be compati- Reverse engineering or disassembly is a trademark of the functions on the external storage device (USB, SD). iPod nano third generation; iPod touch; The cellular phone used must be...
Owner's Manual
Page 11
... the antenna of the cellular phone away from the battery (or removing the battery itself). En 11 Rear view camera ready You can result in the form of the LCD screen is output from damage, be deleted, refer to Returning the navigation system to the information on page 154. p Some data remains. Resetting the microprocessor CAUTION Pressing RESET button clears the settings for the AV source without clearing all the navigation function...
... the antenna of the cellular phone away from the battery (or removing the battery itself). En 11 Rear view camera ready You can result in the form of the LCD screen is output from damage, be deleted, refer to Returning the navigation system to the information on page 154. p Some data remains. Resetting the microprocessor CAUTION Pressing RESET button clears the settings for the AV source without clearing all the navigation function...
Owner's Manual
Page 16
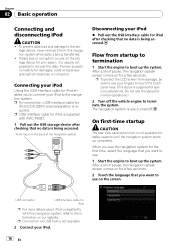
... to recover the data. rage device, never remove it is being accessed. Connecting your iPod to boot up completely. p For connection, USB interface cable for any reason, it from startup to termination 1 Start the engine to the navigation system. p USB interface cable for safety reasons until the navigation system boots up the system. To AV input on for normal operations.) 2 Turn off . On first-time startup CAUTION The rear view camera function is not...
... to recover the data. rage device, never remove it is being accessed. Connecting your iPod to boot up completely. p For connection, USB interface cable for any reason, it from startup to termination 1 Start the engine to the navigation system. p USB interface cable for safety reasons until the navigation system boots up the system. To AV input on for normal operations.) 2 Turn off . On first-time startup CAUTION The rear view camera function is not...

Owner's Manual
Page 19
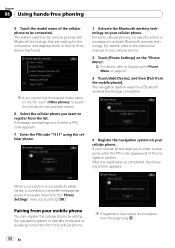
... previous screen, touch . 2 Touch [System Settings] and then touch [Back Camera]. 3 Touch [On] next to "Camera" to activate the camera setting. 4 Press MENU button to display the "Top Menu" and then touch [AV Source]. 5 Touch [RearView] on the Bluetooth wireless technology connection. 6 Settings Menu You can access the screen to customize settings. 7 Map screen Press MAP button to display the navigation map screen. 8 AV operation screen When you play the AV source, this screen appears regularly. Displaying the rear camera image [RearView] can be displayed the full-screen rear camera image...
... previous screen, touch . 2 Touch [System Settings] and then touch [Back Camera]. 3 Touch [On] next to "Camera" to activate the camera setting. 4 Press MENU button to display the "Top Menu" and then touch [AV Source]. 5 Touch [RearView] on the Bluetooth wireless technology connection. 6 Settings Menu You can access the screen to customize settings. 7 Map screen Press MAP button to display the navigation map screen. 8 AV operation screen When you play the AV source, this screen appears regularly. Displaying the rear camera image [RearView] can be displayed the full-screen rear camera image...
Owner's Manual
Page 54
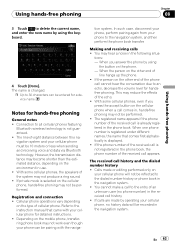
... the "Phone Settings" menu by setting the navigation system to Displaying the Phone Menu on page 52. 3 Touch [Add Device], and then [Pair from the cellular phone. When a connection is successfully established, a connection complete message appears, the screen returns to enter a password, enter the PIN code (password) of the navigation system. A message promptings you want to activate Bluetooth wireless technology. After the registration is necessary to register from the beginning. 54 En Chapter 08 Using hands-free phoning 5 Touch the model name...
... the "Phone Settings" menu by setting the navigation system to Displaying the Phone Menu on page 52. 3 Touch [Add Device], and then [Pair from the cellular phone. When a connection is successfully established, a connection complete message appears, the screen returns to enter a password, enter the PIN code (password) of the navigation system. A message promptings you want to activate Bluetooth wireless technology. After the registration is necessary to register from the beginning. 54 En Chapter 08 Using hands-free phoning 5 Touch the model name...
Owner's Manual
Page 63
... phone number of the echo. ! Calls made by operating your phone can be 10 meters or less when sending and receiving voice and data via Bluetooth technology. You cannot make a call to the entry of cellular phone. If private mode is not registered in the navigation system. The received call cannot hear the conversation due to an echo, decrease the volume level for detailed instructions...
... phone number of the echo. ! Calls made by operating your phone can be 10 meters or less when sending and receiving voice and data via Bluetooth technology. You cannot make a call to the entry of cellular phone. If private mode is not registered in the navigation system. The received call cannot hear the conversation due to an echo, decrease the volume level for detailed instructions...
Owner's Manual
Page 64
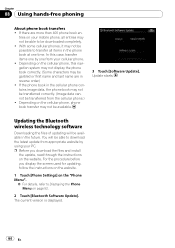
... possible to Displaying the Phone Menu on the cellular phone, phone book transfer may not be transferred correctly. (Image data cannot be transferred from the cellular phone.) ! Depending on page 52. 2 Touch [Bluetooth Software Update]. p Before you display the screen used for updating, follow the instructions on the website. 1 Touch [Phone Settings] on the website. For the procedure before you download the files and install the update, read through the instructions on the "Phone Menu". = For details...
... possible to Displaying the Phone Menu on the cellular phone, phone book transfer may not be transferred correctly. (Image data cannot be transferred from the cellular phone.) ! Depending on page 52. 2 Touch [Bluetooth Software Update]. p Before you display the screen used for updating, follow the instructions on the website. 1 Touch [Phone Settings] on the website. For the procedure before you download the files and install the update, read through the instructions on the "Phone Menu". = For details...
Owner's Manual
Page 83
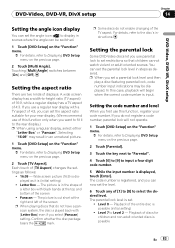
... your rear display. (We recommend use of discs for your code number. Panscan - In this function only when you first use parental lock to set a parental lock level and then play a disc featuring parental lock, code number input indications may result in an unnatural picture. 1 Touch [DVD Setup] on the "Function" menu. = For details, refer to fit it is played back with black bands at the right and left of the screen p When playing discs that children cannot watch...
... your rear display. (We recommend use of discs for your code number. Panscan - In this function only when you first use parental lock to set a parental lock level and then play a disc featuring parental lock, code number input indications may result in an unnatural picture. 1 Touch [DVD Setup] on the "Function" menu. = For details, refer to fit it is played back with black bands at the right and left of the screen p When playing discs that children cannot watch...
Owner's Manual
Page 124
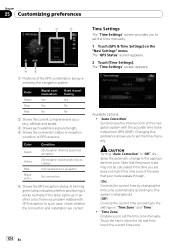
... or reception condition of GPS antenna. The "GPS Status" screen appears. 2 Touch [Time Settings]. "Auto Correction" Synchronizes the internal clock of the area that your route passes through. [On]: Corrects the current time by the navigation system Color Green Gray Red Signal communication Yes Yes No Used in another color, there is works normally. Chapter 25 Customizing preferences 1 2 3 45 1 Positions of the GPS constellation being received by changing the time zone automatically according to...
... or reception condition of GPS antenna. The "GPS Status" screen appears. 2 Touch [Time Settings]. "Auto Correction" Synchronizes the internal clock of the area that your route passes through. [On]: Corrects the current time by the navigation system Color Green Gray Red Signal communication Yes Yes No Used in another color, there is works normally. Chapter 25 Customizing preferences 1 2 3 45 1 Positions of the GPS constellation being received by changing the time zone automatically according to...
Owner's Manual
Page 136
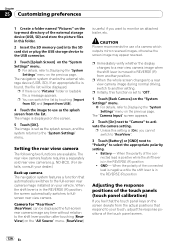
... the REVERSE (R) position, the screen automatically switches to fullscreen rear view camera. Chapter 25 Customizing preferences 1 Create a folder named "Pictures" on the top-most directory of the external storage device (USB, SD) and store the picture files in this folder. 2 Insert the SD memory card into the SD card slot or plug the USB storage device to the USB connector. 3 Touch [Splash Screen] on the "System Settings" menu. = For details, refer to Displaying the "System Settings" menu on...
... the REVERSE (R) position, the screen automatically switches to fullscreen rear view camera. Chapter 25 Customizing preferences 1 Create a folder named "Pictures" on the top-most directory of the external storage device (USB, SD) and store the picture files in this folder. 2 Insert the SD memory card into the SD card slot or plug the USB storage device to the USB connector. 3 Touch [Splash Screen] on the "System Settings" menu. = For details, refer to Displaying the "System Settings" menu on...
Owner's Manual
Page 156
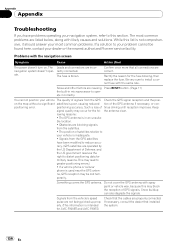
... covers the GPS antenna. The most common problems. If a solution to your problem cannot be lost tem- rectly connected. ate. The fuse is poor, causing reduced tion of Defense, and the US government reserves the right to distort positioning data for the fuse blowing, then replace the fuse. Such a loss of GPS signals. on . positioning error. ble location. • Obstacles are causing Press RESET button. (Page...
... covers the GPS antenna. The most common problems. If a solution to your problem cannot be lost tem- rectly connected. ate. The fuse is poor, causing reduced tion of Defense, and the US government reserves the right to distort positioning data for the fuse blowing, then replace the fuse. Such a loss of GPS signals. on . positioning error. ble location. • Obstacles are causing Press RESET button. (Page...
Owner's Manual
Page 157
... mode] setting and make sure [Automatic] is too bright. No sounds of AV source are used. The attenuator or mute is on the backlight. (Page 138) The source disc being listened to "Installation Manual".) Indication of the position of the LCD panel is turned off . Turn the attenuator or mute off . Connect the parking brake cord, and apply nected. ejected. For details, refer to in Before ejecting the disc, switch the source. Check the connection. the parking brake. Connect...
... mode] setting and make sure [Automatic] is too bright. No sounds of AV source are used. The attenuator or mute is on the backlight. (Page 138) The source disc being listened to "Installation Manual".) Indication of the position of the LCD panel is turned off . Turn the attenuator or mute off . Connect the parking brake cord, and apply nected. ejected. For details, refer to in Before ejecting the disc, switch the source. Check the connection. the parking brake. Connect...

Owner's Manual
Page 163
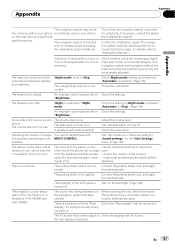
Replace disc. Impossible to operate iPod with a compatible version. The USB connector or USB cable is not supported. consumes more than 500 mA (maxi- Connected iPod is Confirm that the USB connector or USB nection. iPod connection failed. any data. storage device are skipped. The USB interface cable for iPod or short-circuited. Please check instruction manual. Updating VR dictionary. iPod function is restricted because the navigation system is displayed.) (Page 145) En 163 Appendix Appendix Appendix Reading error (ERROR-10, 11, 12...
Replace disc. Impossible to operate iPod with a compatible version. The USB connector or USB cable is not supported. consumes more than 500 mA (maxi- Connected iPod is Confirm that the USB connector or USB nection. iPod connection failed. any data. storage device are skipped. The USB interface cable for iPod or short-circuited. Please check instruction manual. Updating VR dictionary. iPod function is restricted because the navigation system is displayed.) (Page 145) En 163 Appendix Appendix Appendix Reading error (ERROR-10, 11, 12...


