Installation Manual
Page 6
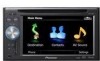
...turned off by following the instructions below. 6 En To prevent damage WARNING ! Be sure to connect the * side of the speaker lead to the * side of the speaker lead on the fuse holder. ! When replacing the fuse, be sure to only use a fuse of the rating prescribed on this navigation system.... ! F ACC O F O OF OF N STAR N STAR T T ACC position No ACC position ! Refer to the owner's manual for the blue lead ! If the RCA pin jack on the ignition switch. Section 03 Connecting the System Before installing this product will ...
...turned off by following the instructions below. 6 En To prevent damage WARNING ! Be sure to connect the * side of the speaker lead to the * side of the speaker lead on the fuse holder. ! When replacing the fuse, be sure to only use a fuse of the rating prescribed on this navigation system.... ! F ACC O F O OF OF N STAR N STAR T T ACC position No ACC position ! Refer to the owner's manual for the blue lead ! If the RCA pin jack on the ignition switch. Section 03 Connecting the System Before installing this product will ...
Installation Manual
Page 7
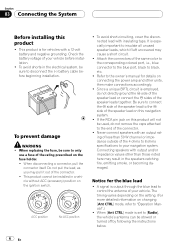
... cause excessive current drain and malfunction. Parts supplied Parts marked (*) are not supplied with AVICF700BT and AVIC-F7010BT. Connecting the System Section 03 English - When the ignition switch is turned on (ACC ON), a control signal is output through the blue/white lead, even if the audio...could cause excessive current drain and malfunction. The navigation unit Power cord Connector* Extension lead (for reverse signal) Extension lead* (for the blue/white lead ! Change the source from radio (AM or FM) to an external power amp's system remote control terminal (max. 300 mA 12...
... cause excessive current drain and malfunction. Parts supplied Parts marked (*) are not supplied with AVICF700BT and AVIC-F7010BT. Connecting the System Section 03 English - When the ignition switch is turned on (ACC ON), a control signal is output through the blue/white lead, even if the audio...could cause excessive current drain and malfunction. The navigation unit Power cord Connector* Extension lead (for reverse signal) Extension lead* (for the blue/white lead ! Change the source from radio (AM or FM) to an external power amp's system remote control terminal (max. 300 mA 12...
Installation Manual
Page 11
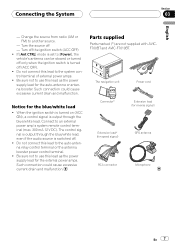
... (10-1/4 in.) Power cord Yellow/Black If you use equipment with a mute function, connect that is connected to this navigation system via Bluetooth wireless technology Note The antenna will automatically retract or turn off, yet the timing varies depending on the setting. If the vehicle has a glass antenna, connect to mute or attenuate... Audio Mute lead. voice guidance of any connections. Blue To auto-antenna relay control terminal. If not, keep the Audio Mute lead free of the navigation -
... (10-1/4 in.) Power cord Yellow/Black If you use equipment with a mute function, connect that is connected to this navigation system via Bluetooth wireless technology Note The antenna will automatically retract or turn off, yet the timing varies depending on the setting. If the vehicle has a glass antenna, connect to mute or attenuate... Audio Mute lead. voice guidance of any connections. Blue To auto-antenna relay control terminal. If not, keep the Audio Mute lead free of the navigation -
Installation Manual
Page 26
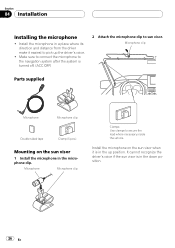
... sun visor 1 Install the microphone in the microphone clip. It cannot recognize the driver's voice if the sun visor is turned off. (ACC OFF) 2 Attach the microphone clip to the navigation system after the system is in the up the driver's voice. ! Microphone Microphone clip Clamps Use clamps to pick up position. Install the...
... sun visor 1 Install the microphone in the microphone clip. It cannot recognize the driver's voice if the sun visor is turned off. (ACC OFF) 2 Attach the microphone clip to the navigation system after the system is in the up the driver's voice. ! Microphone Microphone clip Clamps Use clamps to pick up position. Install the...
Owner's Manual
Page 6
...- Smart Zoom 126 - Sound settings 130 - About 130 6 En - Setting the rear view camera 136 - Adjusting the screen brightness 137 - Turning off the screen 138 The "AV Sound" menu options 138 - Using the equalizer 139 - Adjusting source levels 142 - Setting video input 1 (.../ attenuation 144 - Manage Track Logs 127 - Set Home 129 - Displaying the "System Settings" menu 135 - Displaying the "AV Sound" menu 138 - Enhancing bass (Bass Booster) 142 The options on the "System Settings" menu 135 - Regional Settings 129 - Adjusting loudness 141 - Displaying the "...
...- Smart Zoom 126 - Sound settings 130 - About 130 6 En - Setting the rear view camera 136 - Adjusting the screen brightness 137 - Turning off the screen 138 The "AV Sound" menu options 138 - Using the equalizer 139 - Adjusting source levels 142 - Setting video input 1 (.../ attenuation 144 - Manage Track Logs 127 - Set Home 129 - Displaying the "System Settings" menu 135 - Displaying the "AV Sound" menu 138 - Enhancing bass (Bass Booster) 142 The options on the "System Settings" menu 135 - Regional Settings 129 - Adjusting loudness 141 - Displaying the "...
Owner's Manual
Page 12
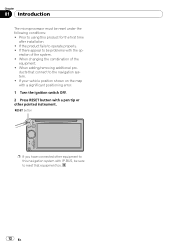
If the product fails to the navigation system. ! eration of the equipment. ! ducts that equipment too. 12 En When changing the combination of the system. ! Chapter 01 Introduction The microprocessor must be sure to this product for the first time after installation. ! When ...your vehicle position shown on the map with a significant positioning error. 1 Turn the ignition switch OFF. 2 Press RESET button with IP-BUS, be reset under the following conditions: ! If there appear to using this navigation system with a pen tip or other equipment to reset that connect to operate...
If the product fails to the navigation system. ! eration of the equipment. ! ducts that equipment too. 12 En When changing the combination of the system. ! Chapter 01 Introduction The microprocessor must be sure to this product for the first time after installation. ! When ...your vehicle position shown on the map with a significant positioning error. 1 Turn the ignition switch OFF. 2 Press RESET button with IP-BUS, be reset under the following conditions: ! If there appear to using this navigation system with a pen tip or other equipment to reset that connect to operate...
Owner's Manual
Page 16
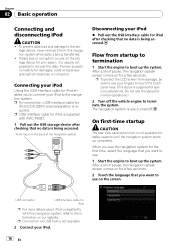
... Pioneer accepts no liability for iPod after checking that you to connect your iPod Using the USB interface cable for the first time, select the language that no data is usually not possible to the information on the screen. To AV input on the back of the navigation system ...iPod p For more details about iPod compatibility with AVIC-F90BT. 1 Pull out the USB storage device after checking that you want to use. 1 Start the engine to the navigation system. If data loss or corruption occurs on the storage device for normal operations.) 2 Turn off . Do not use on our website....
... Pioneer accepts no liability for iPod after checking that you to connect your iPod Using the USB interface cable for the first time, select the language that no data is usually not possible to the information on the screen. To AV input on the back of the navigation system ...iPod p For more details about iPod compatibility with AVIC-F90BT. 1 Pull out the USB storage device after checking that you want to use. 1 Start the engine to the navigation system. If data loss or corruption occurs on the storage device for normal operations.) 2 Turn off . Do not use on our website....
Owner's Manual
Page 21
... when you are driving on your iPod to Map Settings on page 125. Touching this navigation system, the album artwork that the navigation system computes internally as the route is highlighted in other color. h Second Maneuver Arrow* Shows the turning direction after the next waypoint is set to "On". = For details, refer to cancel the...
... when you are driving on your iPod to Map Settings on page 125. Touching this navigation system, the album artwork that the navigation system computes internally as the route is highlighted in other color. h Second Maneuver Arrow* Shows the turning direction after the next waypoint is set to "On". = For details, refer to cancel the...

Owner's Manual
Page 22
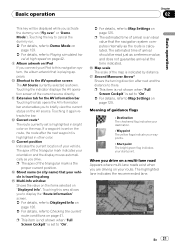
"Unpaved Roads", "Highways", "Ferries", "U-turns", "Permit Needed", "Toll Roads". p Further zooming out hides the lines of the icon and further zooming out will hide it as just a directional reference for ... driving. Chapter 02 Basic operation p This information is not resized and keeps displayed. Changing the scale of the map 1 Press MAP button to display the navigation map screen. 2 Move MULTI-CONTROL down or up or down allows you to change the map scale one step at a time. Note regarding the route...
"Unpaved Roads", "Highways", "Ferries", "U-turns", "Permit Needed", "Toll Roads". p Further zooming out hides the lines of the icon and further zooming out will hide it as just a directional reference for ... driving. Chapter 02 Basic operation p This information is not resized and keeps displayed. Changing the scale of the map 1 Press MAP button to display the navigation map screen. 2 Move MULTI-CONTROL down or up or down allows you to change the map scale one step at a time. Note regarding the route...

Owner's Manual
Page 42
...and your vehicle position is useful if you to the second waypoint screen. A 2D map screen will start. Scroll the list as necessary. 12 3 1 Turning direction 2 Driving distance 3 Names of [Mode] changes the list mode. 42 En The "Route Information (to via )" screen appears. 4 Touch [Via]...Route info]. Checking the entire route overview on the map. The "Route Information" screen appears. 3 Touch [Fit to browse how the current route will be navigated. 1 Touch [Destination] on the "Top Menu", and then touch [Route Function]. 2 Touch [Itinerary]. 3 Touch or to the screen for the next...
...and your vehicle position is useful if you to the second waypoint screen. A 2D map screen will start. Scroll the list as necessary. 12 3 1 Turning direction 2 Driving distance 3 Names of [Mode] changes the list mode. 42 En The "Route Information (to via )" screen appears. 4 Touch [Via]...Route info]. Checking the entire route overview on the map. The "Route Information" screen appears. 3 Touch [Fit to browse how the current route will be navigated. 1 Touch [Destination] on the "Top Menu", and then touch [Route Function]. 2 Touch [Itinerary]. 3 Touch or to the screen for the next...

Owner's Manual
Page 43
p When a long distance route is shown. ! Checking the current route Alternative options: ! Detailed Instructions All turning points, passed streets and other information is calculated, your navigation system may not be able to list all roads. (In this case, the remaining roads will be shown in the list as you drive on.) Chapter 05 Checking the current route En 43 Road List Displays the turning points with the most simplified condition (the duplicate route names are shown. ! Instructions All turning points (where voice guidance is given) are merged into one.).
p When a long distance route is shown. ! Checking the current route Alternative options: ! Detailed Instructions All turning points, passed streets and other information is calculated, your navigation system may not be able to list all roads. (In this case, the remaining roads will be shown in the list as you drive on.) Chapter 05 Checking the current route En 43 Road List Displays the turning points with the most simplified condition (the duplicate route names are shown. ! Instructions All turning points (where voice guidance is given) are merged into one.).

Owner's Manual
Page 47
...Menu", and then touch [MSN Direct]. Activating the MSN Direct function After the online subscription, complete the activation so that the navigation system can be received. 3 Touch [Status]. 4 Wait until the activation status changes to become available under the following conditions -...pioneer 2 Be sure to check the coverage area and other availabilities of completing the subscription, execute Activating the MSN Direct function. 1 Access the following conditions: ! It may take approximately 20 or 30 minutes to complete the subscription. After the navigation system has been turned...
...Menu", and then touch [MSN Direct]. Activating the MSN Direct function After the online subscription, complete the activation so that the navigation system can be received. 3 Touch [Status]. 4 Wait until the activation status changes to become available under the following conditions -...pioneer 2 Be sure to check the coverage area and other availabilities of completing the subscription, execute Activating the MSN Direct function. 1 Access the following conditions: ! It may take approximately 20 or 30 minutes to complete the subscription. After the navigation system has been turned...

Owner's Manual
Page 48
... theaters can do with the "Map Confirmation Screen" on page 36. Utilize the information for all the data to view in detail. After the navigation system has been turned off for a theater by price. 4 Touch on the item that are currently showing the selected movie are displayed. 4 Touch the desired movie title. Chapter...
... theaters can do with the "Map Confirmation Screen" on page 36. Utilize the information for all the data to view in detail. After the navigation system has been turned off for a theater by price. 4 Touch on the item that are currently showing the selected movie are displayed. 4 Touch the desired movie title. Chapter...
Owner's Manual
Page 52
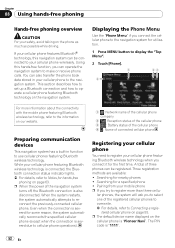
...is "Pioneer Navi". The PIN code is severed for utilization. 1 Press MENU button to display the "Top Menu". 2 Touch [Phone]. 1 23 4 For more than three cellu- p When the power of three phones can operate the navigation system to the navigation system. A total of the navigation system turns off,... cellular phone features Bluetooth® technology, this hands-free function, you connect it for the first time. Using this navigation system can also transfer the phone book data stored in function to register more information about the connectivity with the mobile phone ...
...is "Pioneer Navi". The PIN code is severed for utilization. 1 Press MENU button to display the "Top Menu". 2 Touch [Phone]. 1 23 4 For more than three cellu- p When the power of three phones can operate the navigation system to the navigation system. A total of the navigation system turns off,... cellular phone features Bluetooth® technology, this hands-free function, you connect it for the first time. Using this navigation system can also transfer the phone book data stored in function to register more information about the connectivity with the mobile phone ...

Owner's Manual
Page 61
... 52. 2 Touch any key next to Displaying the Phone Menu on page 52. 2 Touch [Off] on the selected item is cleared from this navigation system's memory. Auto Answer Preference selection appears. 3 Touch the item to the cellular phone. Data on [Bluetooth On/Off]. p If you do not... phoning can be adjusted. 1 Touch [Phone Volume] on the "Phone Menu". = For details, refer to touch the sliders of electric waves by turning off the Bluetooth function. Stopping Bluetooth wave transmission You can answer a call to configure. [Off]: No automatic response. Touching [Bluetooth On/Off] switching...
... 52. 2 Touch any key next to Displaying the Phone Menu on page 52. 2 Touch [Off] on the selected item is cleared from this navigation system's memory. Auto Answer Preference selection appears. 3 Touch the item to the cellular phone. Data on [Bluetooth On/Off]. p If you do not... phoning can be adjusted. 1 Touch [Phone Volume] on the "Phone Menu". = For details, refer to touch the sliders of electric waves by turning off the Bluetooth function. Stopping Bluetooth wave transmission You can answer a call to configure. [Off]: No automatic response. Touching [Bluetooth On/Off] switching...

Owner's Manual
Page 66
... will begin again. 1 2 3 1 Repeating play is no corresponding information. Track - Repeats the current disc 66 En When you find the desired track touch [Scan] to turn scan play . 1 Touch [List]. 2 To return to the previous screen, touch [Detail]. Disc - p Touching or switches the selection to the next or previous page in...
... will begin again. 1 2 3 1 Repeating play is no corresponding information. Track - Repeats the current disc 66 En When you find the desired track touch [Scan] to turn scan play . 1 Touch [List]. 2 To return to the previous screen, touch [Detail]. Disc - p Touching or switches the selection to the next or previous page in...

Owner's Manual
Page 69
...another folder during [Track], the repeat play range changes to [Folder]. Repeats all compressed audio files ! Repeats just the current track p If you turn [Random] to [On] when the repeat play range is performed within about 30 seconds, the display automatically returns to [Folder] automatically. p When...range changes to [Disc], scan play is set to [Track], the repeat play range changes to the ordinary display. En 69 Disc - p If you turn scan play off. Track - Scan play is selected. 2 Play tracks in a random order Touching [Random] switches between [On] and [Off]. p After...
...another folder during [Track], the repeat play range changes to [Folder]. Repeats all compressed audio files ! Repeats just the current track p If you turn [Random] to [On] when the repeat play range is performed within about 30 seconds, the display automatically returns to [Folder] automatically. p When...range changes to [Disc], scan play is set to [Track], the repeat play range changes to the ordinary display. En 69 Disc - p If you turn scan play off. Track - Scan play is selected. 2 Play tracks in a random order Touching [Random] switches between [On] and [Off]. p After...
Owner's Manual
Page 71
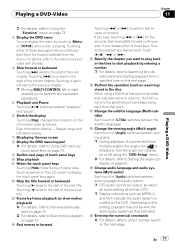
... playback b Hides the touch panel keys Touching [Hide] hides the touch panel keys. p During playback of [S.Title] switches between viewing angles. Turn the angle icon display on page 73. 9 Switch next page of the previous title. Touching it again will skip to perform fast reverse or ... Direct number search on the LCD screen to perform the equivalent operations. 5 Playback and Pause Touching [f] switches between audio language and audio system. sired scene and starting playback from the menu. Touching either of the next title. Touching [c] skips to the start of these keys ...
... playback b Hides the touch panel keys Touching [Hide] hides the touch panel keys. p During playback of [S.Title] switches between viewing angles. Turn the angle icon display on page 73. 9 Switch next page of the previous title. Touching it again will skip to perform fast reverse or ... Direct number search on the LCD screen to perform the equivalent operations. 5 Playback and Pause Touching [f] switches between audio language and audio system. sired scene and starting playback from the menu. Touching either of the next title. Touching [c] skips to the start of these keys ...

Owner's Manual
Page 82
Displaying DVD Setup menu 1 Play the disc that language. You can turn assist subtitles on or off Assist subtitles offer explanations for DVDs on this page. 2 Touch [Assist Subtitle]. Each language menu is displayed and the currently ...
Displaying DVD Setup menu 1 Play the disc that language. You can turn assist subtitles on or off Assist subtitles offer explanations for DVDs on this page. 2 Touch [Assist Subtitle]. Each language menu is displayed and the currently ...

Owner's Manual
Page 84
... the registered code number and then select the parental level. p If you forget the registered code number, touch [Clear] 10 times on this navigation system, you will cancel the DVD menu automati- 84 En You do not feature a recorded parental lock level, you register a new one. p This...If you forget it. If this function is canceled, letting you cannot use parental lock. Level 1 - The registered code number is not fully operable, turn this setting between [On] and [Off]. p When [Auto Play] is displayed. You can confirm it when you submit to your DivX VOD content ...
... the registered code number and then select the parental level. p If you forget the registered code number, touch [Clear] 10 times on this navigation system, you will cancel the DVD menu automati- 84 En You do not feature a recorded parental lock level, you register a new one. p This...If you forget it. If this function is canceled, letting you cannot use parental lock. Level 1 - The registered code number is not fully operable, turn this setting between [On] and [Off]. p When [Auto Play] is displayed. You can confirm it when you submit to your DivX VOD content ...


