
Owner's Manual
Page 11
...Using the AV Source (Built-in CD Drive and Radio) Basic Operation 69 Activating the touch panel keys 69 Selecting a source 69 How to display each menu 71 Operating the Built-in CD Drive 72 Touch key operation 73 Operation using the FUNCTION menu 74 Radio 76 Listening to the radio 76... Advanced radio operation 76 Storing and recalling broadcast frequencies 77 Storing the strongest broadcast frequencies 77 Tuning in strong signals 77 Chapter 7 Using the AV Source (Pioneer AV Equipment) Multi...
...Using the AV Source (Built-in CD Drive and Radio) Basic Operation 69 Activating the touch panel keys 69 Selecting a source 69 How to display each menu 71 Operating the Built-in CD Drive 72 Touch key operation 73 Operation using the FUNCTION menu 74 Radio 76 Listening to the radio 76... Advanced radio operation 76 Storing and recalling broadcast frequencies 77 Storing the strongest broadcast frequencies 77 Tuning in strong signals 77 Chapter 7 Using the AV Source (Pioneer AV Equipment) Multi...

Owner's Manual
Page 16
...from all of the available data. ❒ The information content depends on the trailers, or while backing up. About XM NavTraffic Service and Pioneer Navigation ❒ XM NavTraffic subscription is required and is contained in the future may cause the unit not to XM Satellite Radio ➞ ... station is available only in this database as of October 2005. XM NavTraffic data also may not be unavailable if obstructed (e.g., by using touch panel key. Auto Reroute Function If you remain on the data provided by the navigation system, and may not be displayed when a CD TEXT...
...from all of the available data. ❒ The information content depends on the trailers, or while backing up. About XM NavTraffic Service and Pioneer Navigation ❒ XM NavTraffic subscription is required and is contained in the future may cause the unit not to XM Satellite Radio ➞ ... station is available only in this database as of October 2005. XM NavTraffic data also may not be unavailable if obstructed (e.g., by using touch panel key. Auto Reroute Function If you remain on the data provided by the navigation system, and may not be displayed when a CD TEXT...

Owner's Manual
Page 21
...the "Hardware Manual". • DVD-ROM loading slot • MAP button • DEST button • OPEN/CLOSE button 1 Start the engine. sage and touch "OK". If the route is reached, the set the disc correctly, your finger. The map of the destination is already set , the message asking to... insert the disc appears. After you to route guidance mode. The LCD panel fully opens, and the DVD-ROM loading slot appears. 3 Insert the Pioneer DVD Map Disc to the navigation map screen. Then, a message screen is displayed. ❒ If the disc is...
...the "Hardware Manual". • DVD-ROM loading slot • MAP button • DEST button • OPEN/CLOSE button 1 Start the engine. sage and touch "OK". If the route is reached, the set the disc correctly, your finger. The map of the destination is already set , the message asking to... insert the disc appears. After you to route guidance mode. The LCD panel fully opens, and the DVD-ROM loading slot appears. 3 Insert the Pioneer DVD Map Disc to the navigation map screen. Then, a message screen is displayed. ❒ If the disc is...
Owner's Manual
Page 26
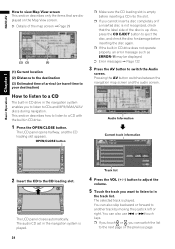
... the CD to a CD with the built-in the track list. The LCD panel closes automatically. This section describes how to listen to the CD loading slot. You can also use or touch keys. ❒ If you touch or , you cannot insert a disc completely or if a inserted disc is not ... the disc again. ❒ If the built-in the navigation system is played. 24 Track list 4 Press the VOL (+/-) button to adjust the volume. 5 Touch the track you to listen to CDs and MP3/WMA/WAV discs during navigation. Pressing the AV button switches between the navigation map screen and...
... the CD to a CD with the built-in the track list. The LCD panel closes automatically. This section describes how to listen to the CD loading slot. You can also use or touch keys. ❒ If you touch or , you cannot insert a disc completely or if a inserted disc is not ... the disc again. ❒ If the built-in the navigation system is played. 24 Track list 4 Press the VOL (+/-) button to adjust the volume. 5 Touch the track you to listen to CDs and MP3/WMA/WAV discs during navigation. Pressing the AV button switches between the navigation map screen and...

Owner's Manual
Page 27
...touch the screen, the touch panel keys are displayed, touching the screen displays the touch keys. 6 To fast forward or rewind, keep touching or . For details on the status of a specific button or functionality is indicated by their color. Depending on the audio source functions, please see Chapters 6, 7 and 8. 25 Pausing playback 1 Touch... ❒ If you can also perform fast rewind/fast forward by touching "PAUSE". NAVI/AV Chapter 1 Basic Operation ❒ When no touch keys are displayed again. Distance to the guidance point Current direction of...
...touch the screen, the touch panel keys are displayed, touching the screen displays the touch keys. 6 To fast forward or rewind, keep touching or . For details on the status of a specific button or functionality is indicated by their color. Depending on the audio source functions, please see Chapters 6, 7 and 8. 25 Pausing playback 1 Touch... ❒ If you can also perform fast rewind/fast forward by touching "PAUSE". NAVI/AV Chapter 1 Basic Operation ❒ When no touch keys are displayed again. Distance to the guidance point Current direction of...

Owner's Manual
Page 62
... following items. Voltage : Displays the power supply and voltage supplied from among those displayed onscreen to change the panel to the selected pattern. ❒ If you want to display a screen for selecting the panel pattern. Touch one second (how far it has turned in is traveling in a second). Acceleration : Acceleration in the Main...
... following items. Voltage : Displays the power supply and voltage supplied from among those displayed onscreen to change the panel to the selected pattern. ❒ If you want to display a screen for selecting the panel pattern. Touch one second (how far it has turned in is traveling in a second). Acceleration : Acceleration in the Main...

Owner's Manual
Page 64
Select the orientation of the LCD panel from the left from the center. Facing Right : Select this when the angle is 5° or more to the navigation system is shown. NAVI (5) Power ... Left : Select this when the angle is 5° or more to the left , center, and right. 1 Touch "Settings" in the Main menu, then touch "System Options". 2 Touch "Installation Angle Setup". 3 Check the direction the LCD panel faces, and touch the corresponding item. Facing Center : Select this when the angle is less than 5° to the...
Select the orientation of the LCD panel from the left from the center. Facing Right : Select this when the angle is 5° or more to the navigation system is shown. NAVI (5) Power ... Left : Select this when the angle is 5° or more to the left , center, and right. 1 Touch "Settings" in the Main menu, then touch "System Options". 2 Touch "Installation Angle Setup". 3 Check the direction the LCD panel faces, and touch the corresponding item. Facing Center : Select this when the angle is less than 5° to the...

Owner's Manual
Page 71
...switch Audio oper- Basic Operation ➲ For information on most basic operations, refer to "How to listen to a CD" ➞ Page 24 Activating the touch panel keys 1 Press the AV button to the navigation system. - "EXT-1" (external unit 1) - "CD" [CD, MP3/WMA/ WAV](built-in the multi...-CD player. 69 When no magazine is set in CD Drive and Radio) (1) (1) Touch panel keys ❒ Touch "HIDE" to turn the source off. ❒ In the following sources: "XM" (XM tuner) - Basic Operation Chapter 6 Using the AV Source (Built...
...switch Audio oper- Basic Operation ➲ For information on most basic operations, refer to "How to listen to a CD" ➞ Page 24 Activating the touch panel keys 1 Press the AV button to the navigation system. - "EXT-1" (external unit 1) - "CD" [CD, MP3/WMA/ WAV](built-in the multi...-CD player. 69 When no magazine is set in CD Drive and Radio) (1) (1) Touch panel keys ❒ Touch "HIDE" to turn the source off. ❒ In the following sources: "XM" (XM tuner) - Basic Operation Chapter 6 Using the AV Source (Built...

Owner's Manual
Page 79
... same preset tuning key P1 - The number you automatically store the six strongest broadcast frequencies under preset tuning keys P1 - When the touch panel keys are four levels of sensitivity for FM and two levels for AM: FM: 1 - 2 - 3 - 4 AM: 1 - 2 The FM "4" (AM "2") setting allows reception of... (e.g., P.ch: 1) stops flashing. The selected radio station frequency has been stored in memory. 2 The next time you want to store in memory keep touching a preset tuning key P1 - BSM begins to flash. P6 in order of the preset tuning keys P1 (PRESET 1) - While BSM is recalled from ...
... same preset tuning key P1 - The number you automatically store the six strongest broadcast frequencies under preset tuning keys P1 - When the touch panel keys are four levels of sensitivity for FM and two levels for AM: FM: 1 - 2 - 3 - 4 AM: 1 - 2 The FM "4" (AM "2") setting allows reception of... (e.g., P.ch: 1) stops flashing. The selected radio station frequency has been stored in memory. 2 The next time you want to store in memory keep touching a preset tuning key P1 - BSM begins to flash. P6 in order of the preset tuning keys P1 (PRESET 1) - While BSM is recalled from ...
Owner's Manual
Page 89
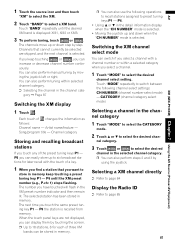
... in the XM preset number indicator and then remain lit. P6 you can easily store up and down step by mov- When the touch panel keys are skipped, and the next channel is recalled from memory. Channel category Storing and recalling broadcast stations If you have... number (e.g., P.ch: 1) stops flashing. The number you touch any of changes the information as follows: Channel name - 1 Touch the source icon and then touch "XM" to select the XM. 2 Touch "BAND" to page 85 87 XM (GEX-P910XM) Chapter 7 Using the AV Source (Pioneer AV Equipment) AV The selected station has been stored...
... in the XM preset number indicator and then remain lit. P6 you can easily store up and down step by mov- When the touch panel keys are skipped, and the next channel is recalled from memory. Channel category Storing and recalling broadcast stations If you have... number (e.g., P.ch: 1) stops flashing. The number you touch any of changes the information as follows: Channel name - 1 Touch the source icon and then touch "XM" to select the XM. 2 Touch "BAND" to page 85 87 XM (GEX-P910XM) Chapter 7 Using the AV Source (Pioneer AV Equipment) AV The selected station has been stored...
Owner's Manual
Page 90
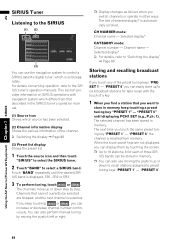
...the channel is displayed, SR1, SR2 or SR3. 3 To perform tuning, touch or . Selected display* CATEGORY mode: Channel number - The next time you can increase or decrease channel number contin- When the touch panel keys are skipped, and the next channel is automatically scrolled. For details concerning...manuals. "PRESET 6". 88 If you keep touching a preset tuning key "PRESET 1" - You can also perform manual tuning by moving the joystick up to six broadcast stations for each of three SIR- AV Using the AV Source (Pioneer AV Equipment) Chapter 7 SIRIUS SIRIUS Tuner ...
...the channel is displayed, SR1, SR2 or SR3. 3 To perform tuning, touch or . Selected display* CATEGORY mode: Channel number - The next time you can increase or decrease channel number contin- When the touch panel keys are skipped, and the next channel is automatically scrolled. For details concerning...manuals. "PRESET 6". 88 If you keep touching a preset tuning key "PRESET 1" - You can also perform manual tuning by moving the joystick up to six broadcast stations for each of three SIR- AV Using the AV Source (Pioneer AV Equipment) Chapter 7 SIRIUS SIRIUS Tuner ...
Owner's Manual
Page 92
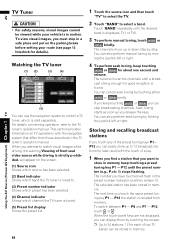
... enough for about one second and release. Storing and recalling broadcast stations If you touch any of two TV bands can use the navigation system to the TV tuner's operation manual. Using the AV Source (Pioneer AV Equipment) Chapter 7 TV AV TV Tuner • For safety reasons, visual...which preset has been selected. (4) Channel indicator Shows which is found. If you keep touching a preset tuning key P1 - P6 and P7 - When the touch panel keys are not displayed, you can display them by touching either or briefly. P12 you can easily store up or down step by holding the...
... enough for about one second and release. Storing and recalling broadcast stations If you touch any of two TV bands can use the navigation system to the TV tuner's operation manual. Using the AV Source (Pioneer AV Equipment) Chapter 7 TV AV TV Tuner • For safety reasons, visual...which preset has been selected. (4) Channel indicator Shows which is found. If you keep touching a preset tuning key P1 - P6 and P7 - When the touch panel keys are not displayed, you can display them by touching either or briefly. P12 you can easily store up or down step by holding the...

Owner's Manual
Page 96
...which source has been selected. (2) External unit indicator Displays any connected external units. 1 Touch the source icon and then touch "EXT-1" or "EXT-2" to select the external unit. 2 Touch any touch panel key to operate the external unit. ➲ Advanced external unit operation ➞ Page ... external unit may not respond.) ❒ When you touch and hold the key. 1 Touch "FUNCTION 1" - iPod® is required. "FUNCTION 4" in the future) that differ from those described in the U.S. AV Using the AV Source (Pioneer AV Equipment) Chapter 7 EXT External Unit Operating the ...
...which source has been selected. (2) External unit indicator Displays any connected external units. 1 Touch the source icon and then touch "EXT-1" or "EXT-2" to select the external unit. 2 Touch any touch panel key to operate the external unit. ➲ Advanced external unit operation ➞ Page ... external unit may not respond.) ❒ When you touch and hold the key. 1 Touch "FUNCTION 1" - iPod® is required. "FUNCTION 4" in the future) that differ from those described in the U.S. AV Using the AV Source (Pioneer AV Equipment) Chapter 7 EXT External Unit Operating the ...

Owner's Manual
Page 99
.../BAL" in the AUDIO menu. When the rear output setting is PREOUT FULL, NON FADING will be displayed instead of the LCD panel. FR:00 is displayed as the front/rear speaker balance moves from left / right speaker balance towards the front or the rear. troller ➞ Page... 100 97 troller ➞ Page 100 3 Touch or to display the AUDIO menu ➞ Page 71 Only when the subwoofer controller setting is REAR SP SUB W, BALANCE will be displayed...
.../BAL" in the AUDIO menu. When the rear output setting is PREOUT FULL, NON FADING will be displayed instead of the LCD panel. FR:00 is displayed as the front/rear speaker balance moves from left / right speaker balance towards the front or the rear. troller ➞ Page... 100 97 troller ➞ Page 100 3 Touch or to display the AUDIO menu ➞ Page 71 Only when the subwoofer controller setting is REAR SP SUB W, BALANCE will be displayed...

Owner's Manual
Page 107
...dark ambient (nighttime). dark ambient light (night- The further the level indicator moves to the right, the brighter the screen. 3 Touch "ESC" to hide the touch panel keys. ❒ Because of BRIGHTNESS and CONTRAST, respectively, as the level is turned on and turned off the voice guidance. 1...; You can turn on . AV Other Functions Chapter 8 Customizing the Audio Source Setting ❒ When the "DIMMER" is set to "ILLUMI". 2 Touch or to adjust the brightness. bright ambient light (day- The backlight turns off, and the screen turns off. ❒ Press the...
...dark ambient (nighttime). dark ambient light (night- The further the level indicator moves to the right, the brighter the screen. 3 Touch "ESC" to hide the touch panel keys. ❒ Because of BRIGHTNESS and CONTRAST, respectively, as the level is turned on and turned off the voice guidance. 1...; You can turn on . AV Other Functions Chapter 8 Customizing the Audio Source Setting ❒ When the "DIMMER" is set to "ILLUMI". 2 Touch or to adjust the brightness. bright ambient light (day- The backlight turns off, and the screen turns off. ❒ Press the...
Owner's Manual
Page 119
...CD format cannot be returned to the previous display.) There is no picture on the rear display while the PICTURE ADJUSTMENT is displayed and the touch panel keys cannot use. The parking brake cord is cracked or otherwise damaged. The setting for the rear view camera is activated. Check the file...the appropriate slot. Rear View is inserted upside down. Action (See) Eject the disc and insert the disc to "Handing and care of the LCD panel is not firmly secured. Park your vehicle in [R] when the rear view camera was not connected. Insert a normal, round disc. Press the AV ...
...CD format cannot be returned to the previous display.) There is no picture on the rear display while the PICTURE ADJUSTMENT is displayed and the touch panel keys cannot use. The parking brake cord is cracked or otherwise damaged. The setting for the rear view camera is activated. Check the file...the appropriate slot. Rear View is inserted upside down. Action (See) Eject the disc and insert the disc to "Handing and care of the LCD panel is not firmly secured. Park your vehicle in [R] when the rear view camera was not connected. Insert a normal, round disc. Press the AV ...

Hardware Manual
Page 8
...in CD drive. mation is possible to play all discs bearing the marks shown above. nies at the following site: Touch panel key operation It is not available, please contact the com- Receive updates on other networks or in navigation system You .... CUSTOMER CUSTOMER SUPPORT DIVISION SATISFACTION P.O. Use only discs approved by using touch panel keys. 1. Upgrade DVD Map Disc Upgrade DVD Map Discs are compatible with your local Pioneer dealer. Register your local Pioneer dealer for this hardware) Product registration Visit us at the addresses listed below...
...in CD drive. mation is possible to play all discs bearing the marks shown above. nies at the following site: Touch panel key operation It is not available, please contact the com- Receive updates on other networks or in navigation system You .... CUSTOMER CUSTOMER SUPPORT DIVISION SATISFACTION P.O. Use only discs approved by using touch panel keys. 1. Upgrade DVD Map Disc Upgrade DVD Map Discs are compatible with your local Pioneer dealer. Register your local Pioneer dealer for this hardware) Product registration Visit us at the addresses listed below...

Hardware Manual
Page 10
...viewing. For details, see section "About the Data being used to adjust the brightness of spots, colored stripes, etc. ❒ Never touch the screen with the viewing angle to adjust for the first time after installation. • If the product fails to operate properly. &#...tip or other pointed instrument. To Protect the LCD Screen ❒ Do not allow direct sunlight to suit your finger when operating the Touch Panel functions. ment. • When adding/removing additional products that connect to its construction, the view angle of NAVTEQ North America, LLC.-2005...
...viewing. For details, see section "About the Data being used to adjust the brightness of spots, colored stripes, etc. ❒ Never touch the screen with the viewing angle to adjust for the first time after installation. • If the product fails to operate properly. &#...tip or other pointed instrument. To Protect the LCD Screen ❒ Do not allow direct sunlight to suit your finger when operating the Touch Panel functions. ment. • When adding/removing additional products that connect to its construction, the view angle of NAVTEQ North America, LLC.-2005...
Hardware Manual
Page 19
...camera images. (When "NAVI" is incompatible with the same rate. You cannot adjust them with a video. The disc is displayed and the touch panel keys cannot use. The disc is blown. The fuse is dirty. This system confirms whether a disc is not applied. Select SOURCE in REAR...doesn't turn on . The source without a video is not possible. The disc is turned off . Adjusting the volume of the LCD panel is inserted upside down according to "Volume" in microprocessor to ACC), the motor sounds. Appendix Appendix Troubleshooting ➲ About troubleshooting other than Rear ...
...camera images. (When "NAVI" is incompatible with the same rate. You cannot adjust them with a video. The disc is displayed and the touch panel keys cannot use. The disc is blown. The fuse is dirty. This system confirms whether a disc is not applied. Select SOURCE in REAR...doesn't turn on . The source without a video is not possible. The disc is turned off . Adjusting the volume of the LCD panel is inserted upside down according to "Volume" in microprocessor to ACC), the motor sounds. Appendix Appendix Troubleshooting ➲ About troubleshooting other than Rear ...
Hardware Manual
Page 23
...the LCD screen with anything besides your dealer or the nearest authorized PIONEER Service Station. Consider it to the LCD panel may cause an electric shock. When not using this navigation system, avoid exposing it . • Never touch the LCD screen with much as this may scratch it to .... Also, do not affect actual operation may result in possible damage to place anything on the LCD panel when it off the power immediately and consult your finger when operating the Touch Panel functions. The LCD screen can be normal wear and tear. This is cooled down by the cooler,...
...the LCD screen with anything besides your dealer or the nearest authorized PIONEER Service Station. Consider it to the LCD panel may cause an electric shock. When not using this navigation system, avoid exposing it . • Never touch the LCD screen with much as this may scratch it to .... Also, do not affect actual operation may result in possible damage to place anything on the LCD panel when it off the power immediately and consult your finger when operating the Touch Panel functions. The LCD screen can be normal wear and tear. This is cooled down by the cooler,...


