
Owner's Manual
Page 1
Operation Manual DOUBLE-DIN DVD NAVIGATION SYSTEM AVIC-D2 Notice to your Authorized Pioneer Electronics retailer or call us at (800) 421-1404. For more information, please contact your vehicle's parking brake. If not properly connected and depending on your vehicle, additional installation may be properly connected to all users: This software requires that the navigation system be required.
Operation Manual DOUBLE-DIN DVD NAVIGATION SYSTEM AVIC-D2 Notice to your Authorized Pioneer Electronics retailer or call us at (800) 421-1404. For more information, please contact your vehicle's parking brake. If not properly connected and depending on your vehicle, additional installation may be properly connected to all users: This software requires that the navigation system be required.

Owner's Manual
Page 3
... not alter or remove any copyright notice or proprietary legend contained in any other proprietary ownership rights in the Software. BY USING THE SOFTWARE INSTALLED ON THE PIONEER PRODUCTS, YOU AGREE TO BE BOUND BY THE TERMS OF THIS AGREEMENT. SOME STATES DO NOT ALLOW EXCLUSION OF IMPLIED WARRANTIES, SO THE ABOVE... other persons or entities. You shall not loan, rent, disclose, publish, sell, assign, lease, sublicense, market or otherwise transfer the Software or use the software installed on the Software. Introduction License Agreement PIONEER AVIC-D2 -
... not alter or remove any copyright notice or proprietary legend contained in any other proprietary ownership rights in the Software. BY USING THE SOFTWARE INSTALLED ON THE PIONEER PRODUCTS, YOU AGREE TO BE BOUND BY THE TERMS OF THIS AGREEMENT. SOME STATES DO NOT ALLOW EXCLUSION OF IMPLIED WARRANTIES, SO THE ABOVE... other persons or entities. You shall not loan, rent, disclose, publish, sell, assign, lease, sublicense, market or otherwise transfer the Software or use the software installed on the Software. Introduction License Agreement PIONEER AVIC-D2 -

Owner's Manual
Page 5
PIONEER AVIC-D2 - THE SOFTWARE INCLUDES A DATABASE LICENSED BY THIRD PARTY SUPPLIER(S) ("SUPPLIERS"), AND YOUR USE... NOT APPLY TO YOU. PLEASE READ THE TERMS AND CONDITIONS OF THIS AGREEMENT CAREFULLY BEFORE USING THE SOFTWARE INSTALLED ON THE PIONEER PRODUCTS. You shall not copy, reverse engineer, translate, port, modify or make any copyright notice or ...for Canada THIS IS A LEGAL AGREEMENT BETWEEN YOU, AS THE END USER, AND PIONEER ELECTRONICS OF CANADA, INC. ("PIONEER"). BY USING THE SOFTWARE INSTALLED ON THE PIONEER PRODUCTS, YOU AGREE TO BE BOUND BY THE TERMS OF THIS AGREEMENT. USE OF...
PIONEER AVIC-D2 - THE SOFTWARE INCLUDES A DATABASE LICENSED BY THIRD PARTY SUPPLIER(S) ("SUPPLIERS"), AND YOUR USE... NOT APPLY TO YOU. PLEASE READ THE TERMS AND CONDITIONS OF THIS AGREEMENT CAREFULLY BEFORE USING THE SOFTWARE INSTALLED ON THE PIONEER PRODUCTS. You shall not copy, reverse engineer, translate, port, modify or make any copyright notice or ...for Canada THIS IS A LEGAL AGREEMENT BETWEEN YOU, AS THE END USER, AND PIONEER ELECTRONICS OF CANADA, INC. ("PIONEER"). BY USING THE SOFTWARE INSTALLED ON THE PIONEER PRODUCTS, YOU AGREE TO BE BOUND BY THE TERMS OF THIS AGREEMENT. USE OF...

Owner's Manual
Page 11
tion positions 61 Correcting the Installation Angle 62 Chapter 5 Customizing Your Navigation System Modifying the Default Settings 63 Items Users can Change 63 Volume 63 System Options 64 Short-Cut Selection ... radio operation 76 Storing and recalling broadcast frequencies 77 Storing the strongest broadcast frequencies 77 Tuning in strong signals 77 Chapter 7 Using the AV Source (Pioneer AV Equipment) Multi-CD Player 79 Listening a CD 79 Pausing CD playback 80 Advanced multi-CD player operation 80 Repeating play and the preset list...
tion positions 61 Correcting the Installation Angle 62 Chapter 5 Customizing Your Navigation System Modifying the Default Settings 63 Items Users can Change 63 Volume 63 System Options 64 Short-Cut Selection ... radio operation 76 Storing and recalling broadcast frequencies 77 Storing the strongest broadcast frequencies 77 Tuning in strong signals 77 Chapter 7 Using the AV Source (Pioneer AV Equipment) Multi-CD Player 79 Listening a CD 79 Pausing CD playback 80 Advanced multi-CD player operation 80 Repeating play and the preset list...
Owner's Manual
Page 12
... dimmer setting 103 Changing the Wide Screen Mode 104 Operating the Picture Adjustment 104 Adjusting the dimmer 105 Switching the Backlight On/Off 105 Appendix Installing the Program 107 Positioning Technology 109 Positioning by GPS 109 Positioning by dead reckoning 109 How do GPS and dead reckoning work together? 109 Handling...
... dimmer setting 103 Changing the Wide Screen Mode 104 Operating the Picture Adjustment 104 Adjusting the dimmer 105 Switching the Backlight On/Off 105 Appendix Installing the Program 107 Positioning Technology 109 Positioning by GPS 109 Positioning by dead reckoning 109 How do GPS and dead reckoning work together? 109 Handling...

Owner's Manual
Page 13
...11 It may result in the navigation system providing improper routing and guidance instructions. ❒ Never set the volume of your vehicle. Installation or servicing of your navigation system so high that you in a safe location and apply the parking brake before making the necessary adjustments...provider, and the provider is for most accurate destination mapping. If you are intended solely as a reference for purchase through your local Pioneer dealer. ❒ Never use the system unless they have read and fully understand the following safety information: ❒ Read the ...
...11 It may result in the navigation system providing improper routing and guidance instructions. ❒ Never set the volume of your vehicle. Installation or servicing of your navigation system so high that you in a safe location and apply the parking brake before making the necessary adjustments...provider, and the provider is for most accurate destination mapping. If you are intended solely as a reference for purchase through your local Pioneer dealer. ❒ Never use the system unless they have read and fully understand the following safety information: ❒ Read the ...

Owner's Manual
Page 21
...Flow from Startup to the navigation map screen. The LCD panel closes automatically. ❒ Make sure the DVD-ROM loading slot is not installed, see page 107 and install the program. OPEN/CLOSE button 4 Press the MAP button to switch to Termination • If the program is empty before inserting a...system by a pen or similar object. 6 Press the DEST button. The LCD panel fully opens, and the DVD-ROM loading slot appears. 3 Insert the Pioneer DVD Map Disc to insert the disc appears. Then, a message screen is displayed. ❒ If the disc is reached, the set , the message ...
...Flow from Startup to the navigation map screen. The LCD panel closes automatically. ❒ Make sure the DVD-ROM loading slot is not installed, see page 107 and install the program. OPEN/CLOSE button 4 Press the MAP button to switch to Termination • If the program is empty before inserting a...system by a pen or similar object. 6 Press the DEST button. The LCD panel fully opens, and the DVD-ROM loading slot appears. 3 Insert the Pioneer DVD Map Disc to insert the disc appears. Then, a message screen is displayed. ❒ If the disc is reached, the set , the message ...
Owner's Manual
Page 63
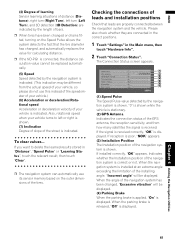
...cannot be replaced automatically. (5) Speed Speed detected by the navigation system is poor, "NOK" appears. (3) Installation Position The Installation position of the installing angle, "Incorrect angle" will be different from the actual speed of your vehicle is indicated. When the ...also check whether they are properly connected between the navigation system and the vehicle. Chapter 4 Editing the Navigation Utilities 61 Indicates whether the Installation position of the tires. The Connection Status screen appears. (1) (2) (3) (4) (5) (6) (7) (1) Speed Pulse The Speed Pulse value...
...cannot be replaced automatically. (5) Speed Speed detected by the navigation system is poor, "NOK" appears. (3) Installation Position The Installation position of the installing angle, "Incorrect angle" will be different from the actual speed of your vehicle is indicated. When the ...also check whether they are properly connected between the navigation system and the vehicle. Chapter 4 Editing the Navigation Utilities 61 Indicates whether the Installation position of the tires. The Connection Status screen appears. (1) (2) (3) (4) (5) (6) (7) (1) Speed Pulse The Speed Pulse value...

Owner's Manual
Page 64
...: Select this when the angle is 5° or more to "High" or "Low". (Which of these is "Simple hybrid", the installation angle can correct the installation angle of the LCD panel from the left from the center. Editing the Navigation Utilities Chapter 4 62 Facing Left : Select this when the... the range of 11 to the left , center, and right. 1 Touch "Settings" in the Main menu, then touch "System Options". 2 Touch "Installation Angle Setup". 3 Check the direction the LCD panel faces, and touch the corresponding item. Facing Right : Select this when the angle is less than 5&#...
...: Select this when the angle is 5° or more to "High" or "Low". (Which of these is "Simple hybrid", the installation angle can correct the installation angle of the LCD panel from the left from the center. Editing the Navigation Utilities Chapter 4 62 Facing Left : Select this when the... the range of 11 to the left , center, and right. 1 Touch "Settings" in the Main menu, then touch "System Options". 2 Touch "Installation Angle Setup". 3 Check the direction the LCD panel faces, and touch the corresponding item. Facing Right : Select this when the angle is less than 5&#...

Owner's Manual
Page 66
..., the volume of the Audio source is completed and the map of your vehicle and do not switch off the navigation system until the installation is muted automatically. Off : Volume of distance displayed on your surroundings appears. Language Selection ➲ The language displayed can select up to... display and then touch "Done" when a red check appears. Touch the shortcut you change the language, installation of the program starts. • Once the installation of the program starts, do not stop the engine of your navigation system. KM/Mile Setting This setting controls the ...
..., the volume of the Audio source is completed and the map of your vehicle and do not switch off the navigation system until the installation is muted automatically. Off : Volume of distance displayed on your surroundings appears. Language Selection ➲ The language displayed can select up to... display and then touch "Done" when a red check appears. Touch the shortcut you change the language, installation of the program starts. • Once the installation of the program starts, do not stop the engine of your navigation system. KM/Mile Setting This setting controls the ...

Owner's Manual
Page 104
... and the camera image can be aware that automatically switches to the rear camera image (REAR VIEW CAMERA IN jack) when a rear view camera is installed on in the INITIAL menu. You can select the speaker output for the navigation guidance. 1 Touch "GUIDE VOICE" in the navigation system. R (Front right speaker...
... and the camera image can be aware that automatically switches to the rear camera image (REAR VIEW CAMERA IN jack) when a rear view camera is installed on in the INITIAL menu. You can select the speaker output for the navigation guidance. 1 Touch "GUIDE VOICE" in the navigation system. R (Front right speaker...

Owner's Manual
Page 109
...10066; If you cannot insert a disc completely or if an inserted disc is not recognized, check that the parking brake is applied. 2 Insert the Pioneer DVD Map Disc into the DVD-ROM loading slot of the disc is up. gation screen. 4 Touch "Yes/Oui". gation system. 3 Setting the ...clock. 1 Park your vehicle nor switch off the navigation system until the installation is parked. 2 Select the language used for the Navigation functions (e.g., Destination search, etc.) only. ➲ To change the navi- If desired, you ...
...10066; If you cannot insert a disc completely or if an inserted disc is not recognized, check that the parking brake is applied. 2 Insert the Pioneer DVD Map Disc into the DVD-ROM loading slot of the disc is up. gation screen. 4 Touch "Yes/Oui". gation system. 3 Setting the ...clock. 1 Park your vehicle nor switch off the navigation system until the installation is parked. 2 Select the language used for the Navigation functions (e.g., Destination search, etc.) only. ➲ To change the navi- If desired, you ...

Owner's Manual
Page 110
..., set the time difference, touch "+" or "-". If necessary, adjust the time difference. Touch "Summer Time" to change the navi- gation screen. NAVI/AV When the installation is shown. The time difference can be set from +3 to summer time. This turns the display below summer time "On". 108 Touching "+" or "-" changes the...
..., set the time difference, touch "+" or "-". If necessary, adjust the time difference. Touch "Summer Time" to change the navi- gation screen. NAVI/AV When the installation is shown. The time difference can be set from +3 to summer time. This turns the display below summer time "On". 108 Touching "+" or "-" changes the...
Owner's Manual
Page 117
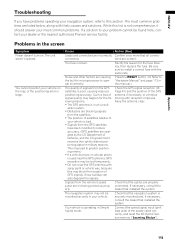
...Signals from the vehicle's speed pulse are correct. The navigation system may not be found here, contact your dealer or the nearest authorized Pioneer service facility. Your vehicle is in this list is not comprehensive, it should answer your most common problems are operated by the US ...may lead to greater positioning errors.) • If a vehicle phone or cellular phone is securely mounted and, if necessary, consult the dealer that installed the system. Connect the speed signal input (pink lead wire) of the power cable correctly, and reset the 3D Hybrid Sensor memory ("Learning ...
...Signals from the vehicle's speed pulse are correct. The navigation system may not be found here, contact your dealer or the nearest authorized Pioneer service facility. Your vehicle is in this list is not comprehensive, it should answer your most common problems are operated by the US ...may lead to greater positioning errors.) • If a vehicle phone or cellular phone is securely mounted and, if necessary, consult the dealer that installed the system. Connect the speed signal input (pink lead wire) of the power cable correctly, and reset the 3D Hybrid Sensor memory ("Learning ...

Owner's Manual
Page 118
...tend to "Volume" (➞ Page 63) in the SETUP menu. Turn the volume up . Turn the ignition key back to "Installation Manual" and "Installation Angle Setup" on . Then start the engine again, and turn or gear signal input lead (purple) is selected. The daylight ...display is on page 62.) Indication of the position of the display is frozen... be installed within the allowed installation angle. Turn the attenuator or mute off . The display is turned off . Check the connection. Adjustment" (➞ Page ...
...tend to "Volume" (➞ Page 63) in the SETUP menu. Turn the volume up . Turn the ignition key back to "Installation Manual" and "Installation Angle Setup" on . Then start the engine again, and turn or gear signal input lead (purple) is selected. The daylight ...display is on page 62.) Indication of the position of the display is frozen... be installed within the allowed installation angle. Turn the attenuator or mute off . The display is turned off . Check the connection. Adjustment" (➞ Page ...

Owner's Manual
Page 120
... input (pink lead wire) of G sensor is installed in mind that the vertical angle of the navigation unit correctly. Please power The navigation system is not correct. Direction of the power cable is Please consult your Pioneer dealer. service center. Although it may be less accurate.... turn off the system and check the installation. If the mounting angle of Gyrosensor is not connected. Clean the disc. Note down ...
... input (pink lead wire) of G sensor is installed in mind that the vertical angle of the navigation unit correctly. Please power The navigation system is not correct. Direction of the power cable is Please consult your Pioneer dealer. service center. Although it may be less accurate.... turn off the system and check the installation. If the mounting angle of Gyrosensor is not connected. Clean the disc. Note down ...
Owner's Manual
Page 130
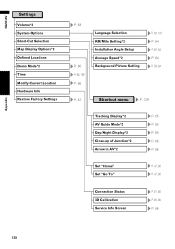
... Display Options*2 Defined Locations Demo Mode*2 Time Modify Current Location Hardware Info Restore Factory Settings P. 63 P. 66 P. 66, 108 P. 66 Language Selection KM/Mile Setting*2 Installation Angle Setup Average Speed*2 Background Picture Setting P. 64, 107 P. 64 P. 62, 64 P. 64 P. 59, 64 P. 67 Shortcut menu P. 129 Tracking Display*2 AV Guide Mode*2 Day...
... Display Options*2 Defined Locations Demo Mode*2 Time Modify Current Location Hardware Info Restore Factory Settings P. 63 P. 66 P. 66, 108 P. 66 Language Selection KM/Mile Setting*2 Installation Angle Setup Average Speed*2 Background Picture Setting P. 64, 107 P. 64 P. 62, 64 P. 64 P. 59, 64 P. 67 Shortcut menu P. 129 Tracking Display*2 AV Guide Mode*2 Day...

Hardware Manual
Page 5
...as an aid to wear your seat belt at all existing traffic regulations. Upgrade DVD Map Discs are available for purchase through your local Pioneer dealer. ❒ Never use this navigation system. ❒ The navigation features of the provider, and the provider is intended solely ...an accident, your injuries can be dangerous and could expose you experience difficulty in operating the system of the navigation system by yourself. Installation or servicing of reading the display, park your vehicle. It is not properly buckled. ❒ Using the most accurate destination mapping....
...as an aid to wear your seat belt at all existing traffic regulations. Upgrade DVD Map Discs are available for purchase through your local Pioneer dealer. ❒ Never use this navigation system. ❒ The navigation features of the provider, and the provider is intended solely ...an accident, your injuries can be dangerous and could expose you experience difficulty in operating the system of the navigation system by yourself. Installation or servicing of reading the display, park your vehicle. It is not properly buckled. ❒ Using the most accurate destination mapping....

Hardware Manual
Page 7
... as an aid to keep an eye on trailers, or while backing up. • "Visual image" in this manual indicates the moving forward. • NEVER install the rear display in battery drainage. • Do not use for entertainment purposes. • Please note that enables the driver to watch visual images. ❒...
... as an aid to keep an eye on trailers, or while backing up. • "Visual image" in this manual indicates the moving forward. • NEVER install the rear display in battery drainage. • Do not use for entertainment purposes. • Please note that enables the driver to watch visual images. ❒...

Hardware Manual
Page 10
... viewing angle can also be reset under the following conditions: • Prior to fall on the display when this product for the first time after installation. • If the product fails to operate properly. • If there appear to be increased, however, by using a portable phone, keep the antenna of the...
... viewing angle can also be reset under the following conditions: • Prior to fall on the display when this product for the first time after installation. • If the product fails to operate properly. • If there appear to be increased, however, by using a portable phone, keep the antenna of the...


