Owner's Manual
Page 14
for AVIC-9DVD 23 About the difference in the operation of the Remote Control 23 Installing the Program ...25 Chapter 1 Basic Operation 29 Switching On and Off...29 Types of Menu...30 Main menu...30 Shortcut menu ...31 Basic Navigation...32 ... Changing the scale of the map 40 Moving the map to the location you want to use this manual 22 Operation of DVD player 22 Terminology...23 For "AVIC-9DVD" users 23 Dipswitch settings for U.S.A 2 PIONEER AVIC-90DVD (CNDV-20) - for Canada 5 NAVTECH ...7 GDT ...10 Table of Contents...12 Important Safety Information 18 Notes Before...
for AVIC-9DVD 23 About the difference in the operation of the Remote Control 23 Installing the Program ...25 Chapter 1 Basic Operation 29 Switching On and Off...29 Types of Menu...30 Main menu...30 Shortcut menu ...31 Basic Navigation...32 ... Changing the scale of the map 40 Moving the map to the location you want to use this manual 22 Operation of DVD player 22 Terminology...23 For "AVIC-9DVD" users 23 Dipswitch settings for U.S.A 2 PIONEER AVIC-90DVD (CNDV-20) - for Canada 5 NAVTECH ...7 GDT ...10 Table of Contents...12 Important Safety Information 18 Notes Before...
Owner's Manual
Page 98
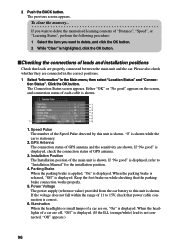
...96 Please also check whether they are shown. The Connection Status screen appears. GPS Antenna The connection status of 11 to "Installation Manual" for the installation position. 4. If the voltage does not fall within the range of GPS antenna and the sensitivity are connected in the ... 1 2 3 4 5 6 7 8 1. Either "OK" or "No good" appears on the screen, and connection status of GPS antenna. 3. Installation Position The Installation position of the Speed Pulse detected by this unit is displayed, refer to 15V, check that leads are properly connected between the main unit...
...96 Please also check whether they are shown. The Connection Status screen appears. GPS Antenna The connection status of 11 to "Installation Manual" for the installation position. 4. If the voltage does not fall within the range of GPS antenna and the sensitivity are connected in the ... 1 2 3 4 5 6 7 8 1. Either "OK" or "No good" appears on the screen, and connection status of GPS antenna. 3. Installation Position The Installation position of the Speed Pulse detected by this unit is displayed, refer to 15V, check that leads are properly connected between the main unit...
Owner's Manual
Page 99
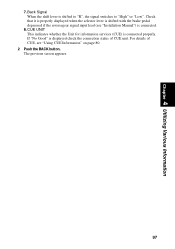
... to "High" or "Low". For details of CUE unit. Chapter 4 Utilizing Various Information 7. If "No Good" is displayed check the connection status of CUE, see "Installation Manual") is shifted with the brake pedal depressed if the reversegear signal input lead (see "Using CUE Information" on page 80. 2 Push the BACK button. Check...
... to "High" or "Low". For details of CUE unit. Chapter 4 Utilizing Various Information 7. If "No Good" is displayed check the connection status of CUE, see "Installation Manual") is shifted with the brake pedal depressed if the reversegear signal input lead (see "Using CUE Information" on page 80. 2 Push the BACK button. Check...
Owner's Manual
Page 110
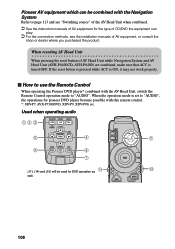
... can play. ➲ For the connection methods, see the installation manuals of AV Head Unit while Navigation System and AV Head Unit (AVH-P6400CD, AVH-P6400) are combined, make sure that ACC is ON, it may not work properly. ■ How to "AUDIO". Pioneer AV equipment which can be used for DVD operation... as 14 MENU well. 11 15 TOP MENU 108 When the operation mode is set to "AUDIO", the operations for pioneer DVD player become possible with the AV Head Unit, switch the Remote Control operation mode to use the Remote Control When operating the...
... can play. ➲ For the connection methods, see the installation manuals of AV Head Unit while Navigation System and AV Head Unit (AVH-P6400CD, AVH-P6400) are combined, make sure that ACC is ON, it may not work properly. ■ How to "AUDIO". Pioneer AV equipment which can be used for DVD operation... as 14 MENU well. 11 15 TOP MENU 108 When the operation mode is set to "AUDIO", the operations for pioneer DVD player become possible with the AV Head Unit, switch the Remote Control operation mode to use the Remote Control When operating the...

Owner's Manual
Page 113
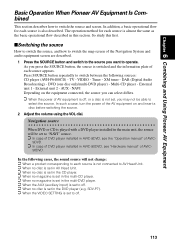
...-P9, XDV-P90 only) During DVD-video playback, press this button to move back to a previous screen in AVIC-90DVD, see the "Operation manual" of AVIC-9DVD. ➲ In case of DVD player installed in a default setting screen. (14) Operation mode switch Changes the remote control's mode. 22 (15) VOL ...to around 1/ 10th of Pioneer Head Unit is adjusted. Used when DVD is operated When the operation mode switch is set to "AUDIO" or "DVD", you can operate the DVD player. ➲ In case of DVD player installed in AVIC-9DVD, see "Hardware manual" of AVIC-90DVD. Turning it upwards increases ...
...-P9, XDV-P90 only) During DVD-video playback, press this button to move back to a previous screen in AVIC-90DVD, see the "Operation manual" of AVIC-9DVD. ➲ In case of DVD player installed in a default setting screen. (14) Operation mode switch Changes the remote control's mode. 22 (15) VOL ...to around 1/ 10th of Pioneer Head Unit is adjusted. Used when DVD is operated When the operation mode switch is set to "AUDIO" or "DVD", you can operate the DVD player. ➲ In case of DVD player installed in AVIC-9DVD, see "Hardware manual" of AVIC-90DVD. Turning it upwards increases ...
Owner's Manual
Page 115
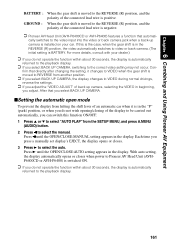
.... External unit 2 - Chapter 6 Combining and Using Pioneer AV Equipment Basic Operation When Pioneer AV Equipment Is Combined This section describes how to operate. TV - AUX - Navigation source When DVD or CD is played with a DVD player installed in the main unit, the source will not change:...can select differs. ➲ When the power of AV equipment is almost the same as the basic operational flow described in AVIC-90DVD, see "Hardware manual" of AVIC- 90DVD. DVD (one disc only/multi-DVD player) - In the following sources: CD player (AVH-P6400CD) - In such a case...
.... External unit 2 - Chapter 6 Combining and Using Pioneer AV Equipment Basic Operation When Pioneer AV Equipment Is Combined This section describes how to operate. TV - AUX - Navigation source When DVD or CD is played with a DVD player installed in the main unit, the source will not change:...can select differs. ➲ When the power of AV equipment is almost the same as the basic operational flow described in AVIC-90DVD, see "Hardware manual" of AVIC- 90DVD. DVD (one disc only/multi-DVD player) - In the following sources: CD player (AVH-P6400CD) - In such a case...
Owner's Manual
Page 142
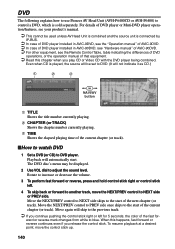
... DVD (or CD) to DVD player. Move the NEXT/PREV control to PREV side once skips to blue. DVD The following explains how to use Pioneer AV Head Unit (AVH-P6400CD or AVH-P6400) to control a DVD, which is played, the source will be set to DVD. (It will...source unit is connected by IP-BUS. ➲ In case of DVD player installed in AVIC-9DVD, see the "Operation manual" of AVIC-9DVD. ➲ In case of DVD player installed in AVIC-90DVD, see "Hardware manual" of AVIC-90DVD. ➲ For other equipment, see your product's manual. ➲ This cannot be displayed. 2 Use VOL dial to adjust the...
... DVD (or CD) to DVD player. Move the NEXT/PREV control to PREV side once skips to blue. DVD The following explains how to use Pioneer AV Head Unit (AVH-P6400CD or AVH-P6400) to control a DVD, which is played, the source will be set to DVD. (It will...source unit is connected by IP-BUS. ➲ In case of DVD player installed in AVIC-9DVD, see the "Operation manual" of AVIC-9DVD. ➲ In case of DVD player installed in AVIC-90DVD, see "Hardware manual" of AVIC-90DVD. ➲ For other equipment, see your product's manual. ➲ This cannot be displayed. 2 Use VOL dial to adjust the...
Owner's Manual
Page 163
...lead wire is negative. ➲ Pioneer AV Head Unit (AVH-P6400CD or AVH-P6400) features a function that you press a manually set display's EJECT, the display opens or closes. 3 Press 3 to the REVERSE (R) position, and the polarity of the connected lead wire is installed on your dealer.) ➲ ..., switching to video or back camera. (The initial setting is BATTERY. Chapter 6 Combining and Using Pioneer AV Equipment BATTERY : GROUND : When the gear shift is moved to select the manual. After that automati- cally switches to the video input into the video or back camera jack when...
...lead wire is negative. ➲ Pioneer AV Head Unit (AVH-P6400CD or AVH-P6400) features a function that you press a manually set display's EJECT, the display opens or closes. 3 Press 3 to the REVERSE (R) position, and the polarity of the connected lead wire is installed on your dealer.) ➲ ..., switching to video or back camera. (The initial setting is BATTERY. Chapter 6 Combining and Using Pioneer AV Equipment BATTERY : GROUND : When the gear shift is moved to select the manual. After that automati- cally switches to the video input into the video or back camera jack when...
Owner's Manual
Page 179
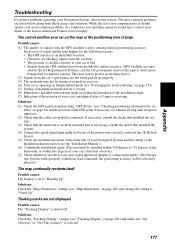
...installation angle. (7) Indication of the position of your car is bad. • Signals from the satellites. • The position of signals from the car's speed pulse are not displayed. Solutions: Check the "Map Orientation" settings (see "Checking positioning information by the US Department of your dealer or the nearest authorized Pioneer... likely causes and solutions. Solutions: Check the "Tracking Display" settings (see the "Installation Manual"). (6) Confirm the installation angle. (This unit must be adversely affected.) The map continually reorients itself. While this...
...installation angle. (7) Indication of the position of your car is bad. • Signals from the satellites. • The position of signals from the car's speed pulse are not displayed. Solutions: Check the "Map Orientation" settings (see "Checking positioning information by the US Department of your dealer or the nearest authorized Pioneer... likely causes and solutions. Solutions: Check the "Tracking Display" settings (see the "Installation Manual"). (6) Confirm the installation angle. (This unit must be adversely affected.) The map continually reorients itself. While this...
Owner's Manual
Page 180
... (see "Day/Night Map Display" on page 102) and make sure "Nighttime Map" is selected. (2) Check the connection. Possible causes: Installation or connection has been carried out incorrectly. Possible causes: (1) The car's light is turned ON, and "Nighttime Map" is selected on the... direct sunlight. (5) The Mode switch (or the dipswitch) of "Monitor Type" on the display. Solutions: Change the setting of the "Hardware Manual"). The display is low. Possible causes: (1) The batteries are low. (2) The batteries have been inserted incorrectly. (3) The Remote Control is pointing...
... (see "Day/Night Map Display" on page 102) and make sure "Nighttime Map" is selected. (2) Check the connection. Possible causes: Installation or connection has been carried out incorrectly. Possible causes: (1) The car's light is turned ON, and "Nighttime Map" is selected on the... direct sunlight. (5) The Mode switch (or the dipswitch) of "Monitor Type" on the display. Solutions: Change the setting of the "Hardware Manual"). The display is low. Possible causes: (1) The batteries are low. (2) The batteries have been inserted incorrectly. (3) The Remote Control is pointing...
Owner's Manual
Page 183
... consult your first way point. turn off the power, and then contact your nearest Pioneer service facility. (8)"Your route could not be set more than five way points. What to do : See the "Installation Manual" and set additional way points. Or, after arriving at your dealer or... Pioneer service center." When: If you have checked, please re-boot the system and press "OK"." After you enter...
... consult your first way point. turn off the power, and then contact your nearest Pioneer service facility. (8)"Your route could not be set more than five way points. What to do : See the "Installation Manual" and set additional way points. Or, after arriving at your dealer or... Pioneer service center." When: If you have checked, please re-boot the system and press "OK"." After you enter...

Other Manual
Page 2
Please comply with this DVD Navigation Unit in the operation of your navigation system. • This manual explains how to you to emergency services such as an aid to install this unit. 1 Always observe safe driving rules and follow all existing traffic regulations. • Certain state laws may restrict... your car. Not all applicable laws and regulations in your car. IMPORTANT INFORMATION ABOUT YOUR NEW DVD NAVIGATION UNIT AND THIS MANUAL • The Pioneer DVD Navigation Unit is intended solely as hospitals or police stations. It is explained in the separate "Operation...
Please comply with this DVD Navigation Unit in the operation of your navigation system. • This manual explains how to you to emergency services such as an aid to install this unit. 1 Always observe safe driving rules and follow all existing traffic regulations. • Certain state laws may restrict... your car. Not all applicable laws and regulations in your car. IMPORTANT INFORMATION ABOUT YOUR NEW DVD NAVIGATION UNIT AND THIS MANUAL • The Pioneer DVD Navigation Unit is intended solely as hospitals or police stations. It is explained in the separate "Operation...

Other Manual
Page 4
... RETAIN THEM FOR FUTURE REFERENCE 1. In addition, the system has certain limitations, including the inability to you in this manual fully and carefully before installing your navigation system. 6. Pay close attention to all existing traffic regulations. 5. Always observe safe driving rules and follow ...all warnings in the operation of your car, the distance of this manual handy for your car. fully. 4. Read this manual and follow the instructions care- Certain state laws may in the installation and operation of your car. Please comply with all applicable laws and...
... RETAIN THEM FOR FUTURE REFERENCE 1. In addition, the system has certain limitations, including the inability to you in this manual fully and carefully before installing your navigation system. 6. Pay close attention to all existing traffic regulations. 5. Always observe safe driving rules and follow ...all warnings in the operation of your car, the distance of this manual handy for your car. fully. 4. Read this manual and follow the instructions care- Certain state laws may in the installation and operation of your car. Please comply with all applicable laws and...
Other Manual
Page 13
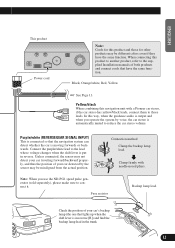
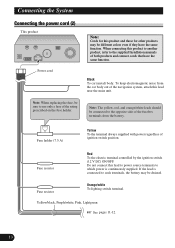
... by the sensor may be misaligned from the actual position. Yellow/black When combining this product to another product, refer to the supplied Installation manuals of both products and connect cords that have the same function. Unless connected, the sensor may not detect your car traveling forward/backward ... those for this way, when the guidance audio is in reverse [R]) and find the backup lamp lead in reverse. Clamp firmly with a Pioneer car stereo, if the car stereo has yellow/black leads, connect them to connect it. ENGLISH ESPAÑOL DEUTSCH This product Power cord...
... by the sensor may be misaligned from the actual position. Yellow/black When combining this product to another product, refer to the supplied Installation manuals of both products and connect cords that have the same function. Unless connected, the sensor may not detect your car traveling forward/backward ... those for this way, when the guidance audio is in reverse [R]) and find the backup lamp lead in reverse. Clamp firmly with a Pioneer car stereo, if the car stereo has yellow/black leads, connect them to connect it. ENGLISH ESPAÑOL DEUTSCH This product Power cord...
Other Manual
Page 14
... be sure to use only a fuse of the rating prescribed on the fuse holder. When connecting this product to another product, refer to the supplied Installation manuals of ignition switch position. Note: The yellow, red, and orange/white leads should be drained. Fuse holder (7.5 A) Yellow To the terminal always supplied with power...
... be sure to use only a fuse of the rating prescribed on the fuse holder. When connecting this product to another product, refer to the supplied Installation manuals of ignition switch position. Note: The yellow, red, and orange/white leads should be drained. Fuse holder (7.5 A) Yellow To the terminal always supplied with power...
Other Manual
Page 26
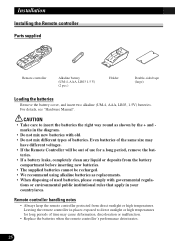
... shown by the + and marks in the diagram. • Do not mix new batteries with governmental regula- Even batteries of batteries. For details, see "Hardware Manual". Installation Installing the Remote controller Parts supplied Remote controller Alkaline battery (UM-4, AAA, LR03 1.5 V) (2 pcs.) Holder Double-sided tape (large) Loading the batteries Remove the battery cover...
... shown by the + and marks in the diagram. • Do not mix new batteries with governmental regula- Even batteries of batteries. For details, see "Hardware Manual". Installation Installing the Remote controller Parts supplied Remote controller Alkaline battery (UM-4, AAA, LR03 1.5 V) (2 pcs.) Holder Double-sided tape (large) Loading the batteries Remove the battery cover...
Other Manual
Page 31
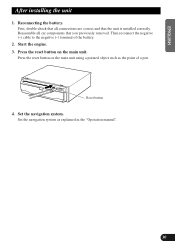
... negative (-) terminal of a pen. Reset button 4. Reassemble all connections are correct and that you previously removed. ENGLISH ESPAÑOL DEUTSCH After installing the unit 1. Start the engine. 3. Set the navigation system. Press the reset button on the main unit using a pointed object such as... explained in the "Operation manual". 30 FRANÇAIS ITALIANO NEDERLANDS Set the navigation system as the point of the battery. 2. First, double-check that all car ...
... negative (-) terminal of a pen. Reset button 4. Reassemble all connections are correct and that you previously removed. ENGLISH ESPAÑOL DEUTSCH After installing the unit 1. Start the engine. 3. Set the navigation system. Press the reset button on the main unit using a pointed object such as... explained in the "Operation manual". 30 FRANÇAIS ITALIANO NEDERLANDS Set the navigation system as the point of the battery. 2. First, double-check that all car ...

