Owner's Manual
Page 19
... the channel 148 Display the ID Code 148 Other sources...149 When source is EXT 149 When source is AUX 150 When source is VIDEO 150 Audio Adjustments...151 Displaying the AUDIO MENU 151 Setting the sound focus equalizer 152 Using balance adjustment 152 Using the equalizer 153 Adjusting ... rear output and subwoofer controller 159 Switching the Telephone Muting/Attenuation 159 Other Functions...160 Displaying the SET UP MENU 160 Selecting the video 160 Setting the automatic open mode 161 Switching the image of rear display 162 Calling Radio Stations or TV Stations by Voice 163 17
... the channel 148 Display the ID Code 148 Other sources...149 When source is EXT 149 When source is AUX 150 When source is VIDEO 150 Audio Adjustments...151 Displaying the AUDIO MENU 151 Setting the sound focus equalizer 152 Using balance adjustment 152 Using the equalizer 153 Adjusting ... rear output and subwoofer controller 159 Switching the Telephone Muting/Attenuation 159 Other Functions...160 Displaying the SET UP MENU 160 Selecting the video 160 Setting the automatic open mode 161 Switching the image of rear display 162 Calling Radio Stations or TV Stations by Voice 163 17
Owner's Manual
Page 23
... of the map screen of the navigation slightly differ from those shown. You cannot use other than Map Disc. See page 107 for playing DVD-VIDEO or CD other discs. When driving at night, the colors you see "Day/Night Map Display" on page 102). About this disc Only use this... night To prevent the normal display from Rear display output on AV Head Unit, the images may differ from a standard NTSC style. To use the Pioneer Map disc with this unit, make sure to a darker color when you when driving after dark or in this manual are illustrated using this product...
... of the map screen of the navigation slightly differ from those shown. You cannot use other than Map Disc. See page 107 for playing DVD-VIDEO or CD other discs. When driving at night, the colors you see "Day/Night Map Display" on page 102). About this disc Only use this... night To prevent the normal display from Rear display output on AV Head Unit, the images may differ from a standard NTSC style. To use the Pioneer Map disc with this unit, make sure to a darker color when you when driving after dark or in this manual are illustrated using this product...
Owner's Manual
Page 109
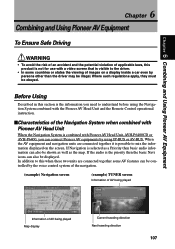
... Head Unit and the Remote Control operational instruction. ■Characteristics of the Navigation System when combined with Pioneer AV Head Unit When the Navigation System is combined with a video screen that is visible to mix the information displayed on a display inside a car even by the voice control system of the... WARNING • To avoid the risk of an accident and the potential violation of applicable laws, this product is not for use with Pioneer AV Head Unit, AVH-P6400CD or AVH-P6400, you can also be displayed. Before Using Described in this when these two units are ...
... Head Unit and the Remote Control operational instruction. ■Characteristics of the Navigation System when combined with Pioneer AV Head Unit When the Navigation System is combined with a video screen that is visible to mix the information displayed on a display inside a car even by the voice control system of the... WARNING • To avoid the risk of an accident and the potential violation of applicable laws, this product is not for use with Pioneer AV Head Unit, AVH-P6400CD or AVH-P6400, you can also be displayed. Before Using Described in this when these two units are ...

Owner's Manual
Page 113
... is used to stop the playback of the disc when playing DVD. (19) e (CANCEL ROUTE) button (XDV-P9, XDV-P90 only) During DVD-video playback, press this for selecting items on the DVD is used to forward or rewind chapters when operating a DVD player. 11 (11) Control stick and...can operate the DVD player. ➲ In case of DVD player installed in AVIC-9DVD, see the "Operation manual" of AVIC-9DVD. ➲ In case of DVD player installed in AVIC-90DVD, see "Hardware manual" of AVIC-90DVD. The volume of Pioneer Head Unit is activated. Push the control stick to the left during playback for...
... is used to stop the playback of the disc when playing DVD. (19) e (CANCEL ROUTE) button (XDV-P9, XDV-P90 only) During DVD-video playback, press this for selecting items on the DVD is used to forward or rewind chapters when operating a DVD player. 11 (11) Control stick and...can operate the DVD player. ➲ In case of DVD player installed in AVIC-9DVD, see the "Operation manual" of AVIC-9DVD. ➲ In case of DVD player installed in AVIC-90DVD, see "Hardware manual" of AVIC-90DVD. The volume of Pioneer Head Unit is activated. Push the control stick to the left during playback for...
Owner's Manual
Page 114
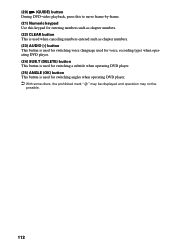
(20) E (GUIDE) button During DVD-video playback, press this to move frame-by-frame. (21) Numeric keypad Use this keypad for entering numbers such as chapter numbers. (22) CLEAR button This ...
(20) E (GUIDE) button During DVD-video playback, press this to move frame-by-frame. (21) Numeric keypad Use this keypad for entering numbers such as chapter numbers. (22) CLEAR button This ...
Owner's Manual
Page 115
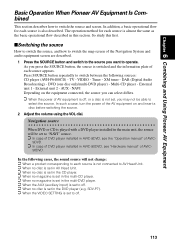
...switch to the source you press the SOURCE button, the source is switched and the information plate of AVIC- 90DVD. Press SOURCE button repeatedly to switch the source and screen. VIDEO - DAB (Digital Audio Broadcasting) - Navigation source When DVD or CD is played with a DVD ...VOL dial. TV - In addition, a basic operational flow for each source appears. Chapter 6 Combining and Using Pioneer AV Equipment Basic Operation When Pioneer AV Equipment Is Combined This section describes how to switch between the following cases, the sound source will be able to switch...
...switch to the source you press the SOURCE button, the source is switched and the information plate of AVIC- 90DVD. Press SOURCE button repeatedly to switch the source and screen. VIDEO - DAB (Digital Audio Broadcasting) - Navigation source When DVD or CD is played with a DVD ...VOL dial. TV - In addition, a basic operational flow for each source appears. Chapter 6 Combining and Using Pioneer AV Equipment Basic Operation When Pioneer AV Equipment Is Combined This section describes how to switch between the following cases, the sound source will be able to switch...
Owner's Manual
Page 116
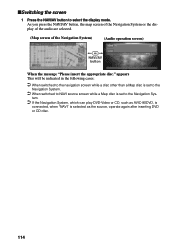
tem. ➲ If the Navigation System, which can play DVD-Video or CD, such as the source, operate again after inserting DVD or CD disc. 114 As you press the NAVI/AV button, the map screen ... is set to the Navigation Sys- ■Switching the screen 1 Press the NAVI/AV button to NAVI source screen while a Map disc is selected as AVIC-90DVD, is connected, when "NAVI" is set to the Navigation System. ➲ When switched to select the display mode.
tem. ➲ If the Navigation System, which can play DVD-Video or CD, such as the source, operate again after inserting DVD or CD disc. 114 As you press the NAVI/AV button, the map screen ... is set to the Navigation Sys- ■Switching the screen 1 Press the NAVI/AV button to NAVI source screen while a Map disc is selected as AVIC-90DVD, is connected, when "NAVI" is set to the Navigation System. ➲ When switched to select the display mode.
Owner's Manual
Page 142
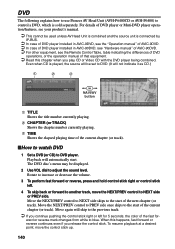
...DVD player installed in AVIC-90DVD, see "Hardware manual" of AVIC-90DVD. ➲ For other equipment, see the Remote Control Table, table indicating the differences of DVD operations, or the operation manual of that equipment. ➲ Read this happens, fast forward or reverse continues even if you play CD or Video CD with the ... If you continue pushing the control stick right or left . 4 To skip back or forward to the start . DVD The following explains how to use Pioneer AV Head Unit (AVH-P6400CD or AVH-P6400) to control a DVD, which is played, the source will be set to DVD. (It will not ...
...DVD player installed in AVIC-90DVD, see "Hardware manual" of AVIC-90DVD. ➲ For other equipment, see the Remote Control Table, table indicating the differences of DVD operations, or the operation manual of that equipment. ➲ Read this happens, fast forward or reverse continues even if you play CD or Video CD with the ... If you continue pushing the control stick right or left . 4 To skip back or forward to the start . DVD The following explains how to use Pioneer AV Head Unit (AVH-P6400CD or AVH-P6400) to control a DVD, which is played, the source will be set to DVD. (It will not ...
Owner's Manual
Page 143
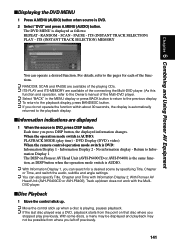
...operation mode switch is AUDIO. ➲ With Information Display 1, you left off previously. 141 No information display - SCAN - DVD Display (DVD's video) When the remote control operation mode switch is DVD. 2 Select "DVD" and press A.MENU (AUDIO) button. PAUSE - ITS (INSTANT TRACK ... the display is automatically returned to Information Display 1 The DISP on that disc where you stopped play time) - Chapter 6 Combining and Using Pioneer AV Equipment ■Displaying the DVD MENU 1 Press A.MENU (AUDIO) button when source is DVD: Information Display 1 - Information Display 2...
...operation mode switch is AUDIO. ➲ With Information Display 1, you left off previously. 141 No information display - SCAN - DVD Display (DVD's video) When the remote control operation mode switch is DVD. 2 Select "DVD" and press A.MENU (AUDIO) button. PAUSE - ITS (INSTANT TRACK ... the display is automatically returned to Information Display 1 The DISP on that disc where you stopped play time) - Chapter 6 Combining and Using Pioneer AV Equipment ■Displaying the DVD MENU 1 Press A.MENU (AUDIO) button when source is DVD: Information Display 1 - Information Display 2...

Owner's Manual
Page 145
... even if you release the control stick. mal playback automatically resumes. ■Stopping Playback 1 Press 7 (STOP) button. ➲ When you stop DVD or Video CD playback (during PBC playback only) by pressing 7 (STOP) button, that point. ➲ If you continue pushing the control stick left . 2 Release... you move ahead one frame. ➲ To return to normal playback, move the control stick up once more. Chapter 6 Combining and Using Pioneer AV Equipment ■Disc Fast Forward/Reverse Fast Forward 1 During play the disc again. ■Still, Frame-by-Frame and Slow Motion Playback...
... even if you release the control stick. mal playback automatically resumes. ■Stopping Playback 1 Press 7 (STOP) button. ➲ When you stop DVD or Video CD playback (during PBC playback only) by pressing 7 (STOP) button, that point. ➲ If you continue pushing the control stick left . 2 Release... you move ahead one frame. ➲ To return to normal playback, move the control stick up once more. Chapter 6 Combining and Using Pioneer AV Equipment ■Disc Fast Forward/Reverse Fast Forward 1 During play the disc again. ■Still, Frame-by-Frame and Slow Motion Playback...
Owner's Manual
Page 151
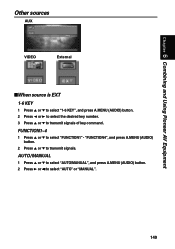
"FUNCTION4", and press A.MENU (AUDIO) button. 2 Press 5 or ∞ to transmit signals of key command. Chapter 6 Combining and Using Pioneer AV Equipment Other sources AUX VIDEO External ■When source is EXT 1-6 KEY 1 Press 5 or ∞ to select "1-6 KEY", and press A.MENU (AUDIO) button. 2 Press 2 or 3 to select the desired key number. 3 Press 5 or ∞ to transmit signals. FUNCTION1~4 1 Press 5 or ∞ to select "AUTO" or "MANUAL". 149 AUTO/MANUAL 1 Press 5 or ∞ to select "AUTO/MANUAL", and press A.MENU (AUDIO) button. 2 Press 3 or 2 to select "FUNCTION1" -
"FUNCTION4", and press A.MENU (AUDIO) button. 2 Press 5 or ∞ to transmit signals of key command. Chapter 6 Combining and Using Pioneer AV Equipment Other sources AUX VIDEO External ■When source is EXT 1-6 KEY 1 Press 5 or ∞ to select "1-6 KEY", and press A.MENU (AUDIO) button. 2 Press 2 or 3 to select the desired key number. 3 Press 5 or ∞ to transmit signals. FUNCTION1~4 1 Press 5 or ∞ to select "AUTO" or "MANUAL". 149 AUTO/MANUAL 1 Press 5 or ∞ to select "AUTO/MANUAL", and press A.MENU (AUDIO) button. 2 Press 3 or 2 to select "FUNCTION1" -
Owner's Manual
Page 152
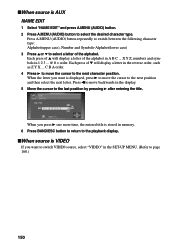
... press 3 one more time, the entered title is stored in memory. 6 Press BAND/ESC button to return to the playback display. ■When source is VIDEO If you want to switch VIDEO source, select "VIDEO" in 1 2 3 ... @ # < order.
... press 3 one more time, the entered title is stored in memory. 6 Press BAND/ESC button to return to the playback display. ■When source is VIDEO If you want to switch VIDEO source, select "VIDEO" in 1 2 3 ... @ # < order.
Owner's Manual
Page 162
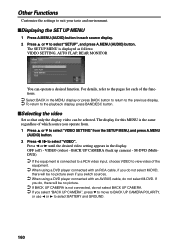
...each source display. 2 Press 5 or ∞ to the playback display, press BAND/ESC button. ■Selecting the video Set so that only the display video can operate a desired function. VIDEO (video) - For details, refer to the pages for this MENU is not connected, do not select BACK UP CAMERA. ...➲ If you operate from. 1 Press 5 or ∞ to select "VIDEO SETTING" from the SETUP MENU, and press A.MENU (AUDIO) button. 2 Press 2 / 3 to select "VIDEO". Press 2 or 3 until the desired video setting appears in the MENU display or press BACK button to return to the previous display...
...each source display. 2 Press 5 or ∞ to the playback display, press BAND/ESC button. ■Selecting the video Set so that only the display video can operate a desired function. VIDEO (video) - For details, refer to the pages for this MENU is not connected, do not select BACK UP CAMERA. ...➲ If you operate from. 1 Press 5 or ∞ to select "VIDEO SETTING" from the SETUP MENU, and press A.MENU (AUDIO) button. 2 Press 2 / 3 to select "VIDEO". Press 2 or 3 until the desired video setting appears in the MENU display or press BACK button to return to the previous display...
Owner's Manual
Page 163
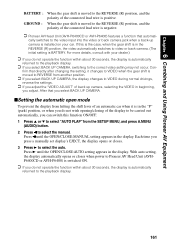
...display is automatically returned to the correct video setting may not occur. Press 2 until the OPEN/CLOSE:AUTO setting appears in the display. Chapter 6 Combining and Using Pioneer AV Equipment BATTERY : GROUND : When the gear shift is moved to VIDEO during normal drivings, reverse the settings. ...➲ If you adjust the "VIDEO ADJUST" of back up camera is negative. ➲ Pioneer AV Head Unit (AVH-P6400CD or AVH-...
...display is automatically returned to the correct video setting may not occur. Press 2 until the OPEN/CLOSE:AUTO setting appears in the display. Chapter 6 Combining and Using Pioneer AV Equipment BATTERY : GROUND : When the gear shift is moved to VIDEO during normal drivings, reverse the settings. ...➲ If you adjust the "VIDEO ADJUST" of back up camera is negative. ➲ Pioneer AV Head Unit (AVH-P6400CD or AVH-...
Owner's Manual
Page 169
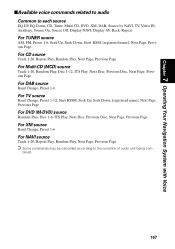
...;Available voice commands related to audio Common to each source EQ UP, EQ Down, CD, Tuner, Multi CD, DVD, XM, DAB, Source by NAVI, TV, Video IN, Auxiliary, Source On, Source Off, Display NAVI, Display AV, Back, Repeat For TUNER source AM, FM, Preset 1-6, Seek Up, Seek Down, Start BSM, [registered...
...;Available voice commands related to audio Common to each source EQ UP, EQ Down, CD, Tuner, Multi CD, DVD, XM, DAB, Source by NAVI, TV, Video IN, Auxiliary, Source On, Source Off, Display NAVI, Display AV, Back, Repeat For TUNER source AM, FM, Preset 1-6, Seek Up, Seek Down, Start BSM, [registered...
Owner's Manual
Page 181
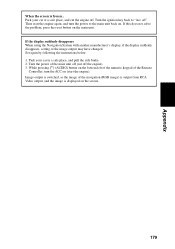
... disappears When using the Navigation System with another manufacturer's display, if the display suddenly disappears, setting of the navigation (RGB image) is output from RCA Video output, and the image is frozen... Turn the power of the Remote Controller, turn the ACC on (start the engine again, and turn the power...
... disappears When using the Navigation System with another manufacturer's display, if the display suddenly disappears, setting of the navigation (RGB image) is output from RCA Video output, and the image is frozen... Turn the power of the Remote Controller, turn the ACC on (start the engine again, and turn the power...
Other Manual
Page 9
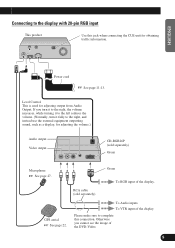
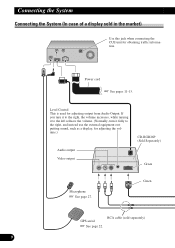
... display. Please make sure to the right, and instead use the external equipment outputting sound, such as a display, for adjusting the volume.) Audio output Video output CD-RGB26P (sold separately) GPS aerial ☞ See page 22. Level Control This is used for obtaining traffic information. Otherwise you turn it to.... To Audio inputs. ESPAÑOL DEUTSCH FRANÇAIS Power cord ☞ See page 11-13. Green To RGB input of the DVD-Video. 8 ITALIANO NEDERLANDS RCA cable (sold separately) Green Microphone ☞ See page 27. To VTR input of the display.
... display. Please make sure to the right, and instead use the external equipment outputting sound, such as a display, for adjusting the volume.) Audio output Video output CD-RGB26P (sold separately) GPS aerial ☞ See page 22. Level Control This is used for obtaining traffic information. Otherwise you turn it to.... To Audio inputs. ESPAÑOL DEUTSCH FRANÇAIS Power cord ☞ See page 11-13. Green To RGB input of the DVD-Video. 8 ITALIANO NEDERLANDS RCA cable (sold separately) Green Microphone ☞ See page 27. To VTR input of the display.
Other Manual
Page 10
... the market) Use this jack when connecting the CUE unit for obtaining traffic information. Level Control This is used for adjusting the volume.) Audio output Video output CD-RGB26P (Sold Separately) Green Microphone ☞ See page 27. Green GPS aerial ☞ See page 22. Power cord ☞ See pages 11-13...
... the market) Use this jack when connecting the CUE unit for obtaining traffic information. Level Control This is used for adjusting the volume.) Audio output Video output CD-RGB26P (Sold Separately) Green Microphone ☞ See page 27. Green GPS aerial ☞ See page 22. Power cord ☞ See pages 11-13...
Other Manual
Page 11
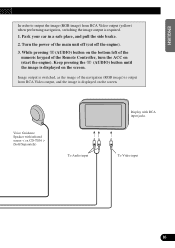
Voice Guidance Speaker with infrared sensor < ex.CD-TS36 > (Sold Separately) To Audio input Display with RCA input jacks To Video input DEUTSCH FRANÇAIS ITALIANO NEDERLANDS 10 While pressing (AUDIO) button on the bottom left of the numeric keypad of the Remote Controller,...switched, as the image of the main unit off (cut off the engine). 3. Turn the power of the navigation (RGB image) is output from RCA Video output (yellow) when performing navigation, switching the image output is required. 1. Keep pressing the (AUDIO) button until the image is displayed on (start the...
Voice Guidance Speaker with infrared sensor < ex.CD-TS36 > (Sold Separately) To Audio input Display with RCA input jacks To Video input DEUTSCH FRANÇAIS ITALIANO NEDERLANDS 10 While pressing (AUDIO) button on the bottom left of the numeric keypad of the Remote Controller,...switched, as the image of the main unit off (cut off the engine). 3. Turn the power of the navigation (RGB image) is output from RCA Video output (yellow) when performing navigation, switching the image output is required. 1. Keep pressing the (AUDIO) button until the image is displayed on (start the...


