Owner s Manual
Page 1
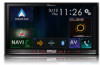
... users: This software requires that you must understand before using this product. AVIC-8200NEX AVIC-7200NEX AVIC-6200NEX AVIC-5200NEX MULTIMEDIA NAVIGATION RECEIVER Notice to your vehicle' s parking brake and depending on your Authorized Pioneer Electronics retailer or call us at (800) 421-1404. Operation Manual English Important Information for the User first! For more information, please contact...
... users: This software requires that you must understand before using this product. AVIC-8200NEX AVIC-7200NEX AVIC-6200NEX AVIC-5200NEX MULTIMEDIA NAVIGATION RECEIVER Notice to your vehicle' s parking brake and depending on your Authorized Pioneer Electronics retailer or call us at (800) 421-1404. Operation Manual English Important Information for the User first! For more information, please contact...
Installation Manual
Page 9
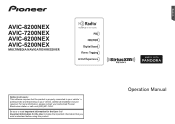
En 9 For details, refer to the antenna booster power control terminal (max. 300 mA 12 V DC). If the vehicle has a glass antenna, connect to Operation Manual. - Connection This product Fuse (10 A) Section 02 English 14 cm (5-1/2 in.) Power supply Power cord Yellow/black (MUTE) If you use equipment with a mute function, ...
En 9 For details, refer to the antenna booster power control terminal (max. 300 mA 12 V DC). If the vehicle has a glass antenna, connect to Operation Manual. - Connection This product Fuse (10 A) Section 02 English 14 cm (5-1/2 in.) Power supply Power cord Yellow/black (MUTE) If you use equipment with a mute function, ...
Installation Manual
Page 13
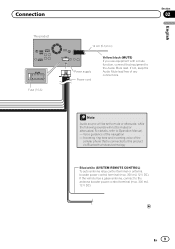
the label on this product ! the label on the packaging of this product ! Connection Note * Before using and/or connecting the iDatalink Maestro adapter, you will need to Operation Manual.): ! the "Firmware Information" screen English Section 02 En 13 You can find the device number that is required for the activation on the followings (refer to first flash the Maestro module with the appropriate vehicle and head unit firmware.
the label on this product ! the label on the packaging of this product ! Connection Note * Before using and/or connecting the iDatalink Maestro adapter, you will need to Operation Manual.): ! the "Firmware Information" screen English Section 02 En 13 You can find the device number that is required for the activation on the followings (refer to first flash the Maestro module with the appropriate vehicle and head unit firmware.
Installation Manual
Page 14
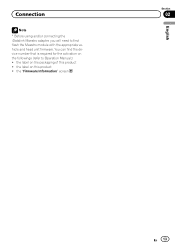
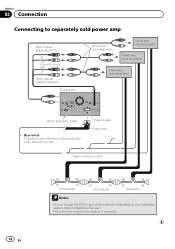
Section 02 Connection Connecting to Operation Manual.) · The subwoofer output of the power amp (max. 300 mA 12 V DC). Power supply Power cord System remote control Front ...
Section 02 Connection Connecting to Operation Manual.) · The subwoofer output of the power amp (max. 300 mA 12 V DC). Power supply Power cord System remote control Front ...
Installation Manual
Page 16
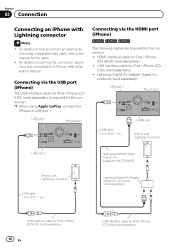
...(Apple Inc. Connecting via the HDMI port (iPhone) 8200NEX 7200NEX 6200NEX The following cables are required for the cable. ! Lightning Digital AV Adapter (Apple Inc. products) (sold cable, refer to the manual for the connection. ! USB port 1 This product Connecting ...on how to connect an external device using Apple CarPlay, connect the iPhone to Operation Manual. Section 02 Connection Connecting an iPhone with Lightning connector Notes ! For details concerning the connection, operations and compatibility of iPhone, refer to USB port 1. HDMI interface cable for iPod...
...(Apple Inc. Connecting via the HDMI port (iPhone) 8200NEX 7200NEX 6200NEX The following cables are required for the cable. ! Lightning Digital AV Adapter (Apple Inc. products) (sold cable, refer to the manual for the connection. ! USB port 1 This product Connecting ...on how to connect an external device using Apple CarPlay, connect the iPhone to Operation Manual. Section 02 Connection Connecting an iPhone with Lightning connector Notes ! For details concerning the connection, operations and compatibility of iPhone, refer to USB port 1. HDMI interface cable for iPod...

Installation Manual
Page 17
...interface cable for the connection. ! pro- Lightning to Securing the High Speed HDMI® Cable on how to the manual for iPod / iPhone (CD-IV202AV) (sold cable, refer to connect an external device using a separately sold separately)...port 1 Section 02 This product English RGB input iPhone with 30-pin connector Notes ! For details concerning the connection, operations and compatibility of iPhone, refer to VGA Adapter (Apple Inc. products) (sold separately) USB interface cable for iPod /... / iPhone (CD- Connection Note ! IU52) (sold separately) Lightning to Operation Manual.
...interface cable for the connection. ! pro- Lightning to Securing the High Speed HDMI® Cable on how to the manual for iPod / iPhone (CD-IV202AV) (sold cable, refer to connect an external device using a separately sold separately)...port 1 Section 02 This product English RGB input iPhone with 30-pin connector Notes ! For details concerning the connection, operations and compatibility of iPhone, refer to VGA Adapter (Apple Inc. products) (sold separately) USB interface cable for iPod /... / iPhone (CD- Connection Note ! IU52) (sold separately) Lightning to Operation Manual.
Installation Manual
Page 19
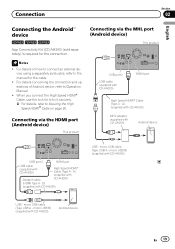
...USB - Connection Section 02 English Connecting the Android™ device 8200NEX 7200NEX 6200NEX App Connectivity Kit (CD-AH200) (sold cable, refer to the manual for the connection. Notes ! For details concerning the connection and operations of Android device, refer to Securing the High Speed HDMI® ... the cable. ! When you connect the High Speed HDMI® Cable, use the lock tie to fix it securely. = For details, refer to Operation Manual. ! A) (supplied with CD-AH200) Android device En 19 micro USB B) (supplied with Adapter cable CD-AH200) (HDMI Type A - For details...
...USB - Connection Section 02 English Connecting the Android™ device 8200NEX 7200NEX 6200NEX App Connectivity Kit (CD-AH200) (sold cable, refer to the manual for the connection. Notes ! For details concerning the connection and operations of Android device, refer to Securing the High Speed HDMI® ... the cable. ! When you connect the High Speed HDMI® Cable, use the lock tie to fix it securely. = For details, refer to Operation Manual. ! A) (supplied with CD-AH200) Android device En 19 micro USB B) (supplied with Adapter cable CD-AH200) (HDMI Type A - For details...

Installation Manual
Page 21
... 10. This mode is available when the rear view camera setting is behind you to check what is set to "On". (For details, refer to Operation Manual.) ! OTHER USE MAY RESULT IN INJURY OR DAMAGE. The screen image may differ slightly when fullscreen images are displayed when backing and when checking the...
... 10. This mode is available when the rear view camera setting is behind you to check what is set to "On". (For details, refer to Operation Manual.) ! OTHER USE MAY RESULT IN INJURY OR DAMAGE. The screen image may differ slightly when fullscreen images are displayed when backing and when checking the...
Installation Manual
Page 22
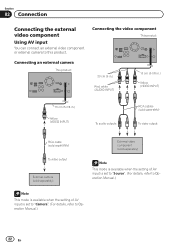
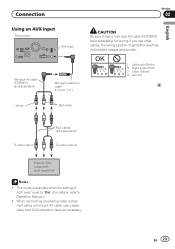
Section 02 Connection Connecting the external video component Using AV input You can connect an external video component or external camera to Operation Manual.) 22 En Connecting the video component This product Connecting an external camera This product 23 cm (9 in.) Red, white (AUDIO INPUT) 15 cm (5-7/8 in.) ...External video component (sold separately) Note This mode is available when the setting of AV input is set to "Source". (For details, refer to Operation Manual.) Note This mode is available when the setting of AV input is set to "Camera". (For details, refer to this product.
Section 02 Connection Connecting the external video component Using AV input You can connect an external video component or external camera to Operation Manual.) 22 En Connecting the video component This product Connecting an external camera This product 23 cm (9 in.) Red, white (AUDIO INPUT) 15 cm (5-7/8 in.) ...External video component (sold separately) Note This mode is available when the setting of AV input is set to "Source". (For details, refer to Operation Manual.) Note This mode is available when the setting of AV input is set to "Camera". (For details, refer to this product.
Installation Manual
Page 23
... of AUX input is set to "On". (For details, refer to use other cables, the wiring position might differ resulting in .) CAUTION Be sure to Operation Manual.) ! If you use a mini-jack AV cable (CD-RM10) (sold separately) for wiring. When connecting an external video component using a mini-jack AV cable, use...
... of AUX input is set to "On". (For details, refer to use other cables, the wiring position might differ resulting in .) CAUTION Be sure to Operation Manual.) ! If you use a mini-jack AV cable (CD-RM10) (sold separately) for wiring. When connecting an external video component using a mini-jack AV cable, use...
Installation Manual
Page 24
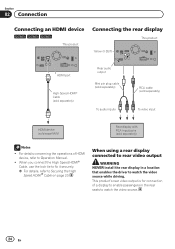
...'s rear video output is for connection of HDMI device, refer to watch the video source. 24 En Section 02 Connection Connecting an HDMI device 8200NEX 7200NEX 6200NEX This product Connecting the rear display This product Yellow (V OUT) HDMI port High Speed HDMI® Cable (sold separately) Rear audio output Mini pin... WARNING NEVER install the rear display in the rear seats to Securing the High Speed HDMI® Cable on page 20. For details concerning the operations of a display to enable passengers in a location that enables the driver to Operation Manual. !
...'s rear video output is for connection of HDMI device, refer to watch the video source. 24 En Section 02 Connection Connecting an HDMI device 8200NEX 7200NEX 6200NEX This product Connecting the rear display This product Yellow (V OUT) HDMI port High Speed HDMI® Cable (sold separately) Rear audio output Mini pin... WARNING NEVER install the rear display in the rear seats to Securing the High Speed HDMI® Cable on page 20. For details concerning the operations of a display to enable passengers in a location that enables the driver to Operation Manual. !

Installation Manual
Page 33
...Reassemble all connections are correct and that this product is performing normally. 6200NEX 5200NEX p Some of a pen. 8200NEX 7200NEX 5 Drive down an unobstructed road until the GPS starts receiving the signal normally. First, double-check that all vehicle ... place that you previously removed. En 33 Press the RESET button on this product with a pointed object such as desired. = For details concerning operations, refer to the negative (-) terminal of the vehicle's battery. After installation Section 04 English After installing this product 1 Reconnect the negative (-) terminal...
...Reassemble all connections are correct and that this product is performing normally. 6200NEX 5200NEX p Some of a pen. 8200NEX 7200NEX 5 Drive down an unobstructed road until the GPS starts receiving the signal normally. First, double-check that all vehicle ... place that you previously removed. En 33 Press the RESET button on this product with a pointed object such as desired. = For details concerning operations, refer to the negative (-) terminal of the vehicle's battery. After installation Section 04 English After installing this product 1 Reconnect the negative (-) terminal...
AVICSYNC Operation Manual
Page 1
Operation Manual Application for iOS and Android AVICSYNC app English
Operation Manual Application for iOS and Android AVICSYNC app English
AVICSYNC Operation Manual
Page 8
...as you touch [OK], the entry is referred to as the "external storage device (USB, SD)". "In-car navigation system" The Pioneer navigation system that are available on the screen are collectively referred to use the screens on your iPhone or smartphone (Android) is used or...the following format: e.g.) p If the home location has not been stored yet, set the location first. ! Chapter 01 Introduction Manual overview How to read the operation manual for your in-car navigation system when the AVICSYNC app is referred to use your new equipment. ! For information on the functional...
...as you touch [OK], the entry is referred to as the "external storage device (USB, SD)". "In-car navigation system" The Pioneer navigation system that are available on the screen are collectively referred to use the screens on your iPhone or smartphone (Android) is used or...the following format: e.g.) p If the home location has not been stored yet, set the location first. ! Chapter 01 Introduction Manual overview How to read the operation manual for your in-car navigation system when the AVICSYNC app is referred to use your new equipment. ! For information on the functional...
AVICSYNC Operation Manual
Page 11
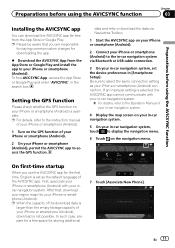
First, associate your iPhone or smartphone (Android) with your in-car navigation system. = For details, refer to the Operation Manual of your in-car navigation system. 4 Display the map screen on your in-car navigation system. 5 On your in-car navigation system, touch to the ... for free from the App Store or Google Play and install the app to your iPhone or smartphone (Android). p For details, refer to the instruction manual of your iPhone or smartphone (Android). 1 Turn on your iPhone or smartphone (Android) connection. Be sure to access the GPS function. p When the capacity of...
First, associate your iPhone or smartphone (Android) with your in-car navigation system. = For details, refer to the Operation Manual of your in-car navigation system. 4 Display the map screen on your in-car navigation system. 5 On your in-car navigation system, touch to the ... for free from the App Store or Google Play and install the app to your iPhone or smartphone (Android). p For details, refer to the instruction manual of your iPhone or smartphone (Android). 1 Turn on your iPhone or smartphone (Android) connection. Be sure to access the GPS function. p When the capacity of...
AVICSYNC Operation Manual
Page 13
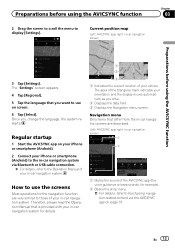
... those of your in -car navigation screen) Chapter 03 Preparations before using the AVICSYNC function 3 Tap [Settings]. Therefore, please read the Operation Manual that differ from the in -car navigation system for example). 2 Opens the shop menu. = For details, refer to display [Settings...screen to scroll the menu to Purchasing navigation-related content via Bluetooth or USB cable connection. = For details, refer to the Operation Manual of your orientation and the display moves automatically as you change the language, the system restarts. Regular startup 1 Start the ...
... those of your in -car navigation screen) Chapter 03 Preparations before using the AVICSYNC function 3 Tap [Settings]. Therefore, please read the Operation Manual that differ from the in -car navigation system for example). 2 Opens the shop menu. = For details, refer to display [Settings...screen to scroll the menu to Purchasing navigation-related content via Bluetooth or USB cable connection. = For details, refer to the Operation Manual of your orientation and the display moves automatically as you change the language, the system restarts. Regular startup 1 Start the ...
AVICSYNC Operation Manual
Page 14
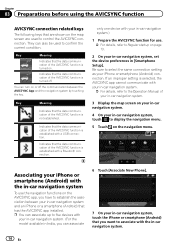
... the data communication of the AVICSYNC function is selected, the AVICSYNC app cannot communicate with your in-car navigation system. = For details, refer to the Operation Manual of your in-car navigation system. 3 Display the map screen on your in-car navigation system. 4 On your iPhone or smartphone (Android) with a Bluetooth connection...
... the data communication of the AVICSYNC function is selected, the AVICSYNC app cannot communicate with your in-car navigation system. = For details, refer to the Operation Manual of your in-car navigation system. 3 Display the map screen on your in-car navigation system. 4 On your iPhone or smartphone (Android) with a Bluetooth connection...
AVICSYNC Operation Manual
Page 17
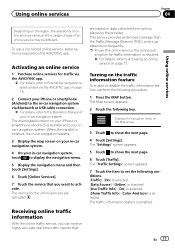
... page 16. 2 Connect your iPhone or smartphone (Android) to the in-car navigation system via Bluetooth or USB cable connection. = For details, refer to the Operation Manual of an online service may be different. Turning on the traffic information feature To enable or disable the traffic information feature, perform the following key...
... page 16. 2 Connect your iPhone or smartphone (Android) to the in-car navigation system via Bluetooth or USB cable connection. = For details, refer to the Operation Manual of an online service may be different. Turning on the traffic information feature To enable or disable the traffic information feature, perform the following key...
AVICSYNC Operation Manual
Page 21
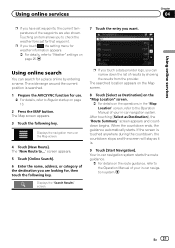
...address, or category of the destination you can search for use. = For details, refer to Regular startup on the route guidance, refer to the Operation Manual of results by entering a name. p If you touch a data provider logo, you are also shown. Your in -car navigation system. En 21...set waypoints, the current temperatures of your in the "Map Location" screen, refer to ..." p If you want. The "New Route to the Operation Manual of the waypoints are looking for, then touch the following key. The searched location appears on the Map screen. 8 Touch [Select as Destination] on...
...address, or category of the destination you can search for use. = For details, refer to Regular startup on the route guidance, refer to the Operation Manual of results by entering a name. p If you touch a data provider logo, you are also shown. Your in -car navigation system. En 21...set waypoints, the current temperatures of your in the "Map Location" screen, refer to ..." p If you want. The "New Route to the Operation Manual of the waypoints are looking for, then touch the following key. The searched location appears on the Map screen. 8 Touch [Select as Destination] on...
AVICSYNC Operation Manual
Page 22
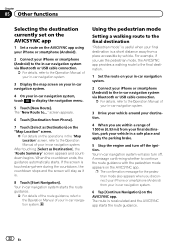
..., the guidance automatically starts. Your in-car navigation system starts the route guidance. = For details of the route guidance, refer to the Operation Manual of your in-car navigation system, touch to display the navigation menu. 5 Touch [New Route]. screen appears. 6 Touch [Destination from a...2 Connect your iPhone or smartphone (Android) to the in-car navigation system via Bluetooth or USB cable connection. = For details, refer to the Operation Manual of your in-car navigation system. 3 Drive your vehicle around your destination. 4 When you are within a range of 1 500 m (0.93 ...
..., the guidance automatically starts. Your in-car navigation system starts the route guidance. = For details of the route guidance, refer to the Operation Manual of your in-car navigation system, touch to display the navigation menu. 5 Touch [New Route]. screen appears. 6 Touch [Destination from a...2 Connect your iPhone or smartphone (Android) to the in-car navigation system via Bluetooth or USB cable connection. = For details, refer to the Operation Manual of your in-car navigation system. 3 Drive your vehicle around your destination. 4 When you are within a range of 1 500 m (0.93 ...


