Owner's Manual
Page 1
... product is properly connected to your vehicle's parking brake and depending on your Authorized Pioneer Electronics retailer or call us at (800) 421-1404. English Important Information for the User first! Operation Manual MULTIMEDIA NAVIGATION RECEIVER AVIC-8100NEX AVIC-7100NEX AVIC-6100NEX AVIC-5100NEX Notice to all users: This software requires that you must understand before using...
... product is properly connected to your vehicle's parking brake and depending on your Authorized Pioneer Electronics retailer or call us at (800) 421-1404. English Important Information for the User first! Operation Manual MULTIMEDIA NAVIGATION RECEIVER AVIC-8100NEX AVIC-7100NEX AVIC-6100NEX AVIC-5100NEX Notice to all users: This software requires that you must understand before using...
Owner's Manual
Page 2
...manual 11 - Inserting and ejecting a disc 17 - Selecting a rear source 25 Turning off the display 20 - Operating the on-screen keyboard 27 On first-time startup of the map 32 Please read the Map screen 31 AV information bar 31 Operating the Map screen 32 - After you for buying this Pioneer...22 - Using the remote control 15 Protecting your model properly. Removing the detachable faceplate 16 - Operating list screens 27 - Introduction Manual overview 11 - Connecting and disconnecting an iPod 19 - Selecting a front source on the AV source selection screen 25 - Changing ...
...manual 11 - Inserting and ejecting a disc 17 - Selecting a rear source 25 Turning off the display 20 - Operating the on-screen keyboard 27 On first-time startup of the map 32 Please read the Map screen 31 AV information bar 31 Operating the Map screen 32 - After you for buying this Pioneer...22 - Using the remote control 15 Protecting your model properly. Removing the detachable faceplate 16 - Operating list screens 27 - Introduction Manual overview 11 - Connecting and disconnecting an iPod 19 - Selecting a front source on the AV source selection screen 25 - Changing ...
Owner's Manual
Page 4
... hands-free phoning Displaying the phone menu 80 - Answering a call 83 - Setting the initial odometer value 60 - Deleting a registered device 76 Connecting a registered Bluetooth device manually 77 Switching visibility 77 Entering the PIN code for nearby Bluetooth devices 74 - Calling a number in the phone book 85 - Adjusting the other party's listening...
... hands-free phoning Displaying the phone menu 80 - Answering a call 83 - Setting the initial odometer value 60 - Deleting a registered device 76 Connecting a registered Bluetooth device manually 77 Switching visibility 77 Entering the PIN code for nearby Bluetooth devices 74 - Calling a number in the phone book 85 - Adjusting the other party's listening...
Owner's Manual
Page 5
...for each device 90 Using the radio Using the touch panel keys 93 Reading the screen 93 Starting procedure 94 Selecting a band 94 Manual tuning 94 Seek tuning 94 Selecting a preset channel from the preset channel list 95 Storing broadcast frequencies 95 Storing the strongest broadcast ...Radio™ reception HD Radio stations 97 Using the touch panel keys 97 Reading the screen 98 Starting procedure 99 Selecting a band 99 Manual tuning 99 Seek tuning 99 Selecting a preset channel from the preset channel list 100 Storing broadcast frequencies 100 Storing the strongest broadcast frequencies...
...for each device 90 Using the radio Using the touch panel keys 93 Reading the screen 93 Starting procedure 94 Selecting a band 94 Manual tuning 94 Seek tuning 94 Selecting a preset channel from the preset channel list 95 Storing broadcast frequencies 95 Storing the strongest broadcast ...Radio™ reception HD Radio stations 97 Using the touch panel keys 97 Reading the screen 98 Starting procedure 99 Selecting a band 99 Manual tuning 99 Seek tuning 99 Selecting a preset channel from the preset channel list 100 Storing broadcast frequencies 100 Storing the strongest broadcast frequencies...
Owner's Manual
Page 7
...-pin connector users 144 - Subscribing to the SiriusXM Satellite Radio service 156 Using the touch panel keys 156 Reading the screen 157 Starting procedure 158 Manual tuning 159 Selecting a preset channel from the preset channel list 159 Storing broadcast channels 159 Selecting a SiriusXM channel directly 159 Selecting a channel from a list of...
...-pin connector users 144 - Subscribing to the SiriusXM Satellite Radio service 156 Using the touch panel keys 156 Reading the screen 157 Starting procedure 158 Manual tuning 159 Selecting a preset channel from the preset channel list 159 Storing broadcast channels 159 Selecting a SiriusXM channel directly 159 Selecting a channel from a list of...

Owner's Manual
Page 11
...! References are indicated like this: e.g.) = For details of the operations, refer to How to read Important Information for the User (a separate manual) which contains warnings, cautions, and other notes are indicated with double quotation marks " ": e.g.) "System" screen or "Audio" screen ! ...Buttons on this product are those for AVIC-8100NEX. "Video image" "Video image" in the following information about the conventions used in brackets [ ]: e.g.) [Disc], [AV Source ...
...! References are indicated like this: e.g.) = For details of the operations, refer to How to read Important Information for the User (a separate manual) which contains warnings, cautions, and other notes are indicated with double quotation marks " ": e.g.) "System" screen or "Audio" screen ! ...Buttons on this product are those for AVIC-8100NEX. "Video image" "Video image" in the following information about the conventions used in brackets [ ]: e.g.) [Disc], [AV Source ...

Owner's Manual
Page 12
...SDHC memory card are collectively referred to operate properly. ! eration of the settings and recorded con- 1 tents will not be reset. 6100NEX 5100NEX Data subject to erasure 1 The information is connected to this product fails to as the "external storage device (USB, SD)".... microprocessor CAUTION Pressing the RESET button resets settings and recorded contents to as "iPod". Settings and recorded contents are reset to using this manual, iPod and iPhone will not be reset under the following conditions: ! tents will be repro- p Do not perform this operation when...
...SDHC memory card are collectively referred to operate properly. ! eration of the settings and recorded con- 1 tents will not be reset. 6100NEX 5100NEX Data subject to erasure 1 The information is connected to this product fails to as the "external storage device (USB, SD)".... microprocessor CAUTION Pressing the RESET button resets settings and recorded contents to as "iPod". Settings and recorded contents are reset to using this manual, iPod and iPhone will not be reset under the following conditions: ! tents will be repro- p Do not perform this operation when...
Owner's Manual
Page 13
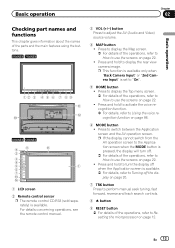
..., refer to How to Using the voice recognition function on page 22. ! For details concerning operations, see the remote control manual. 3 VOL (+/-) button Press to switch between the Application screen and the AV operation screen. Press to adjust the AV (... MAP button ! Press to display the Map screen. = For details of the parts and the main features using the buttons. 8100NEX 7100NEX 12 3 4 5 6 7 8 9 b c a 6100NEX 5100NEX 9 8 b 2 3 4 5 1 6 7 d e 1 LCD screen 2 Remote control sensor p The remote control CD-R33 (sold separately) is available. = For details, refer...
..., refer to How to Using the voice recognition function on page 22. ! For details concerning operations, see the remote control manual. 3 VOL (+/-) button Press to switch between the Application screen and the AV operation screen. Press to adjust the AV (... MAP button ! Press to display the Map screen. = For details of the parts and the main features using the buttons. 8100NEX 7100NEX 12 3 4 5 6 7 8 9 b c a 6100NEX 5100NEX 9 8 b 2 3 4 5 1 6 7 d e 1 LCD screen 2 Remote control sensor p The remote control CD-R33 (sold separately) is available. = For details, refer...
Owner's Manual
Page 17
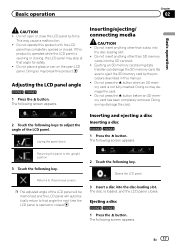
... the SD memory card. Adjusting the LCD panel angle 8100NEX 7100NEX 1 Press the h button. Be sure to that angle for safety. ! Do not operate this manual. ! The disc is not fully inserted. Ejecting an SD memory card during data transfer can on the open or close the LCD panel by the...
... the SD memory card. Adjusting the LCD panel angle 8100NEX 7100NEX 1 Press the h button. Be sure to that angle for safety. ! Do not operate this manual. ! The disc is not fully inserted. Ejecting an SD memory card during data transfer can on the open or close the LCD panel by the...
Owner's Manual
Page 19
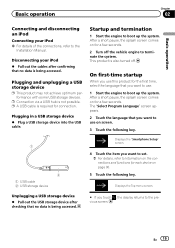
... screen. 3 Touch the following key. This product is not possible. The "Select Program Language" screen appears. 2 Touch the language that you want to the Installation Manual. Unplugging a USB storage device % Pull out the USB storage device after confirming that no data is being accessed. Disconnecting your iPod = For details of the...
... screen. 3 Touch the following key. This product is not possible. The "Select Program Language" screen appears. 2 Touch the language that you want to the Installation Manual. Unplugging a USB storage device % Pull out the USB storage device after confirming that no data is being accessed. Disconnecting your iPod = For details of the...
Owner's Manual
Page 57
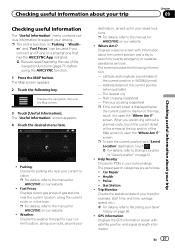
... the top section of gas stations near your current location. Health: ! Police: ! p For details, refer to the manual for AVICSYNC on page 51. ! p For details, refer to the manual for AVICSYNC on the Map screen. 3 Touch [Useful Information]. Fuel Prices: Displays recent gas prices of the Map screen ... city - Previous crossing road/street p If the current street is displayed below the current position marker on the map, touch it to the manual for parking lots near the current location, along your route, around your destination, as well as follows. ! screen.
... the top section of gas stations near your current location. Health: ! Police: ! p For details, refer to the manual for AVICSYNC on page 51. ! p For details, refer to the manual for AVICSYNC on the Map screen. 3 Touch [Useful Information]. Fuel Prices: Displays recent gas prices of the Map screen ... city - Previous crossing road/street p If the current street is displayed below the current position marker on the map, touch it to the manual for parking lots near the current location, along your route, around your destination, as well as follows. ! screen.
Owner's Manual
Page 58
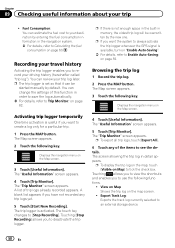
... have not recorded any of trip logs already recorded appears. The screen showing the trip log in memory, the oldest trip log will be started manually by entering the fuel consumption information in order to save the log automatically. = For details, refer to Calculating the fuel consumption on page 59. A blank...
... have not recorded any of trip logs already recorded appears. The screen showing the trip log in memory, the oldest trip log will be started manually by entering the fuel consumption information in order to save the log automatically. = For details, refer to Calculating the fuel consumption on page 59. A blank...
Owner's Manual
Page 68
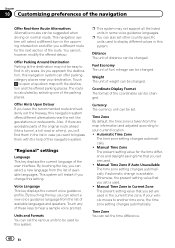
...are used . ! Coordinate Display Format The format of the coordinates can select a new voice guidance language from the list of available languages. Manual Time Zone in this navigation system. This system will restart if you set the various units to your current location. ! Fuel Economy The unit...route and suddenly exit the freeway, this navigation system can be easy to another time zone, the time zone setting changes automatically. Manual Time Zone The present setting value for the next section of the route. As you approach the destination, this navigation system offers...
...are used . ! Coordinate Display Format The format of the coordinates can select a new voice guidance language from the list of available languages. Manual Time Zone in this navigation system. This system will restart if you set the various units to your current location. ! Fuel Economy The unit...route and suddenly exit the freeway, this navigation system can be easy to another time zone, the time zone setting changes automatically. Manual Time Zone The present setting value for the next section of the route. As you approach the destination, this navigation system offers...
Owner's Manual
Page 69
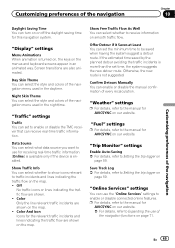
...for AVICSYNC on our website. Screen transitions are shown on the map. ! Show Free Traffic Flow As Well You can select whether to the manual for this navigation system. "Fuel" settings p For details, refer to receive information on the menus and keyboard screens appear in the nighttime. ... traffic incidents and lines indicating the traffic flow are shown. ! "Trip Monitor" settings Enable Auto-Saving = For details, refer to the manual for AVICSYNC on the map. Data Source You can use of the navigation menu used in an animated way. "Traffic" settings Traffic You ...
...for AVICSYNC on our website. Screen transitions are shown on the map. ! Show Free Traffic Flow As Well You can select whether to the manual for this navigation system. "Fuel" settings p For details, refer to receive information on the menus and keyboard screens appear in the nighttime. ... traffic incidents and lines indicating the traffic flow are shown. ! "Trip Monitor" settings Enable Auto-Saving = For details, refer to the manual for AVICSYNC on the map. Data Source You can use of the navigation menu used in an animated way. "Traffic" settings Traffic You ...

Owner's Manual
Page 73
...of the navigation Chapter 10 Preparations before using the AVICSYNC function 1 Download the AVICSYNC App from connected USB memory storage to the Installation Manual. 4 Press the MAP button. Once the association is established, your iPhone or smartphone (Android) is installed. The menus for the...Touch [Online Services]. 13 Touch the service that you want to associate with the navigation system and then touch [Associate]. http://pioneer.naviextras.com Customizing preferences of the USB connections, refer to your USB memory storage by using the computer to which the Naviextras ...
...of the navigation Chapter 10 Preparations before using the AVICSYNC function 1 Download the AVICSYNC App from connected USB memory storage to the Installation Manual. 4 Press the MAP button. Once the association is established, your iPhone or smartphone (Android) is installed. The menus for the...Touch [Online Services]. 13 Touch the service that you want to associate with the navigation system and then touch [Associate]. http://pioneer.naviextras.com Customizing preferences of the USB connections, refer to your USB memory storage by using the computer to which the Naviextras ...

Owner's Manual
Page 74
..., refer to the information on page 86. HFP (Hands-Free Profile) ! The following profiles with the devices featuring Bluetooth wireless technology, refer to the instruction manual of three devices can be connected to device operation). p The "Bluetooth" menu is inactive. 1 Activate the Bluetooth wireless technology on page 76. SPP (Serial Port...
..., refer to the information on page 86. HFP (Hands-Free Profile) ! The following profiles with the devices featuring Bluetooth wireless technology, refer to the instruction manual of three devices can be connected to device operation). p The "Bluetooth" menu is inactive. 1 Activate the Bluetooth wireless technology on page 76. SPP (Serial Port...

Owner's Manual
Page 76
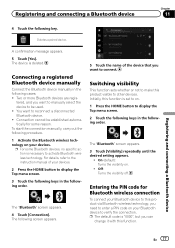
... [Auto Connect] repeatedly until the desired setting appears. ! Deleting a registered device When you have already registered three Bluetooth devices and you want to the instruction manual of the registered devices. For details, refer to add another one, you must first delete one of your Bluetooth device and this product will be...
... [Auto Connect] repeatedly until the desired setting appears. ! Deleting a registered device When you have already registered three Bluetooth devices and you want to the instruction manual of the registered devices. For details, refer to add another one, you must first delete one of your Bluetooth device and this product will be...
Owner's Manual
Page 77
... default code is deleted. The device is "0000", but you want to other devices. Connection cannot be used. ! To start the connection manually, carry out the following procedure. 1 Activate the Bluetooth wireless technology on . ! On (default): Turns the visibility on your devices. 2 ...Press the HOME button to the instruction manual of the device that you can change it with this product visible to reconnect a disconnected Bluetooth device. ! En 77 For details, ...
... default code is deleted. The device is "0000", but you want to other devices. Connection cannot be used. ! To start the connection manually, carry out the following procedure. 1 Activate the Bluetooth wireless technology on . ! On (default): Turns the visibility on your devices. 2 ...Press the HOME button to the instruction manual of the device that you can change it with this product visible to reconnect a disconnected Bluetooth device. ! En 77 For details, ...
Owner's Manual
Page 84
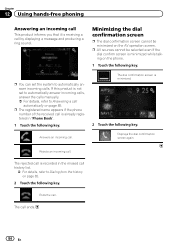
p You can set to automatically answer incoming calls, answer the calls manually. = For details, refer to Answering a call history list. = For details, refer to automatically answer incoming calls. p The registered name appears if the phone number of ...
p You can set to automatically answer incoming calls, answer the calls manually. = For details, refer to Answering a call history list. = For details, refer to automatically answer incoming calls. p The registered name appears if the phone number of ...
Owner's Manual
Page 87
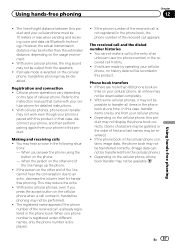
Refer to the instruction manual that case, disconnect your phone, and then perform pairing again from the speakers. ! tions: - When you press the accept button on the other end of ...
Refer to the instruction manual that case, disconnect your phone, and then perform pairing again from the speakers. ! tions: - When you press the accept button on the other end of ...


