Owner's Manual
Page 2
Data subject to use this Pioneer product. Inserting and ejecting an SD memory card 15 - Switching screens using the... 29 - Before removing the vehicle battery 11 - Switching screens using the touch panel keys 18 - Selecting a rear source 21 Turning off the display 17 2 En How to use the screens 18 - Operating the time bar 23 - Smart Zoom 29 - ...first-time startup of source keys 22 Using the touch panel 22 - A message about the map database 17 Turning off the AV source 21 Changing the display order of source icons 21 Changing the display order of the navigation ...
Data subject to use this Pioneer product. Inserting and ejecting an SD memory card 15 - Switching screens using the... 29 - Before removing the vehicle battery 11 - Switching screens using the touch panel keys 18 - Selecting a rear source 21 Turning off the display 17 2 En How to use the screens 18 - Operating the time bar 23 - Smart Zoom 29 - ...first-time startup of source keys 22 Using the touch panel 22 - A message about the map database 17 Turning off the AV source 21 Changing the display order of source icons 21 Changing the display order of the navigation ...
Owner's Manual
Page 7
... view camera 151 Setting the camera for Camera View mode 152 Displaying the parking assist guidelines 152 Setting guidelines on the rear view image 153 Turning off the demo screen 154 Selecting the system language 154 Setting the keyboard language with the hardware buttons 140 Using an HDMI source Using the...
... view camera 151 Setting the camera for Camera View mode 152 Displaying the parking assist guidelines 152 Setting guidelines on the rear view image 153 Turning off the demo screen 154 Selecting the system language 154 Setting the keyboard language with the hardware buttons 140 Using an HDMI source Using the...
Owner's Manual
Page 11
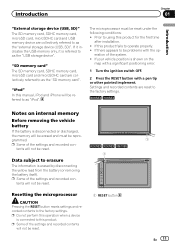
... for the first time after installation. ! p Some of the settings and recorded contents will be erased and must be reset. 6000NEX 5000NEX X8610BS 1 Resetting the microprocessor CAUTION Pressing the RESET button resets settings and recorded contents to the factory settings. 8000NEX 7000NEX Notes on the... map with a significant positioning error. 1 Turn the ignition switch OFF. 2 Press the RESET button with the op- "SD memory card" The SD memory card, SDHC memory card, ...
... for the first time after installation. ! p Some of the settings and recorded contents will be erased and must be reset. 6000NEX 5000NEX X8610BS 1 Resetting the microprocessor CAUTION Pressing the RESET button resets settings and recorded contents to the factory settings. 8000NEX 7000NEX Notes on the... map with a significant positioning error. 1 Turn the ignition switch OFF. 2 Press the RESET button with the op- "SD memory card" The SD memory card, SDHC memory card, ...
Owner's Manual
Page 12
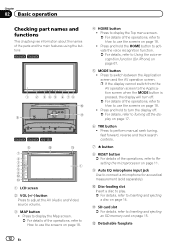
...screen. = For details of the operations, refer to How to Using the voice recognition function (for acoustical measurement (sold separately). Press and hold to turn off the display on page 11. 9 Auto EQ microphone input jack Use to Resetting the microprocessor on page 17. 6 TRK button ! a Disc... chapter gives information about the names of the parts and the main features using the buttons. 8000NEX 7000NEX 1 2 3 4 5 6 78 a b 9 6000NEX 5000NEX X8610BS 8 a 7 2 3 4 5 6 c d b 1 1 LCD screen 2 VOL (+/-) button Press to switch between the Application screen and the AV operation screen.
...screen. = For details of the operations, refer to How to Using the voice recognition function (for acoustical measurement (sold separately). Press and hold to turn off the display on page 11. 9 Auto EQ microphone input jack Use to Resetting the microprocessor on page 17. 6 TRK button ! a Disc... chapter gives information about the names of the parts and the main features using the buttons. 8000NEX 7000NEX 1 2 3 4 5 6 78 a b 9 6000NEX 5000NEX X8610BS 8 a 7 2 3 4 5 6 c d b 1 1 LCD screen 2 VOL (+/-) button Press to switch between the Application screen and the AV operation screen.
Owner's Manual
Page 13
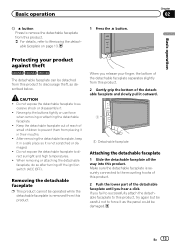
..., refer to Removing the detachable faceplate on page 13. 1 Press the button. When removing or attaching the detachable faceplate, do so after turning off the ignition switch (ACC OFF). If you hear a click. Basic operation Chapter 02 d button Press to remove the detachable faceplate from... Attaching the detachable faceplate 1 Slide the detachable faceplate all the way into this product. When you release your product against theft 6000NEX 5000NEX X8610BS The detachable faceplate can be detached from this product, try again but be careful not to discourage theft, as the panel could...
..., refer to Removing the detachable faceplate on page 13. 1 Press the button. When removing or attaching the detachable faceplate, do so after turning off the ignition switch (ACC OFF). If you hear a click. Basic operation Chapter 02 d button Press to remove the detachable faceplate from... Attaching the detachable faceplate 1 Slide the detachable faceplate all the way into this product. When you release your product against theft 6000NEX 5000NEX X8610BS The detachable faceplate can be detached from this product, try again but be careful not to discourage theft, as the panel could...
Owner's Manual
Page 16
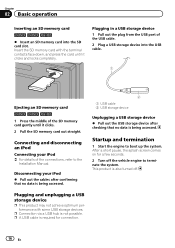
...not possible. Connecting and disconnecting an iPod Connecting your iPod % Pull out the cables after confirming that no data is required for a few seconds. 2 Turn off . After a short pause, the splash screen comes on for connection. 16 En p Connection via a USB hub is also... card until it clicks and locks completely. Chapter 02 Basic operation Inserting an SD memory card 6000NEX 5000NEX X8610BS % Insert an SD memory card into the USB cable. 1 Ejecting an SD memory card 6000NEX 5000NEX X8610BS 1 Press the middle of the SD memory card gently until it clicks. 2 Pull the ...
...not possible. Connecting and disconnecting an iPod Connecting your iPod % Pull out the cables after confirming that no data is required for a few seconds. 2 Turn off . After a short pause, the splash screen comes on for connection. 16 En p Connection via a USB hub is also... card until it clicks and locks completely. Chapter 02 Basic operation Inserting an SD memory card 6000NEX 5000NEX X8610BS % Insert an SD memory card into the USB cable. 1 Ejecting an SD memory card 6000NEX 5000NEX X8610BS 1 Press the middle of the SD memory card gently until it clicks. 2 Pull the ...

Owner's Manual
Page 17
... key. A message about the map database After you start using this product, a message related to the conditions. Turning off the display You can turn on for a few seconds. The display turns off , it reverts to the original screen. Read the terms carefully, checking the details, and then touch [OK...on the previous conditions. p The terms appear if the screen displayed last was displayed just before turning off the display at night or when the screen is displayed the first time you turn off the ignition switch (ACC OFF) is activated, you must enter your password. Regular startup %...
... key. A message about the map database After you start using this product, a message related to the conditions. Turning off the display You can turn on for a few seconds. The display turns off , it reverts to the original screen. Read the terms carefully, checking the details, and then touch [OK...on the previous conditions. p The terms appear if the screen displayed last was displayed just before turning off the display at night or when the screen is displayed the first time you turn off the ignition switch (ACC OFF) is activated, you must enter your password. Regular startup %...

Owner's Manual
Page 21
.... 2 Touch the AV operation key. 4 Touch the source key you want to display the Top menu screen. 2 Touch the following key. Turning off the AV source Turn off . 1 AV operation key The AV operation screen appears. 3 Touch the following key. En 21 Displays the AV source selection screen. Displays...You can change the display order of the operations, refer to display the Top menu screen. 2 Touch the following key. The AV source is turned off the AV source to stop playing or receiving the AV source. 1 Press the HOME button to select. Basic operation Chapter 02 Basic operation...
.... 2 Touch the AV operation key. 4 Touch the source key you want to display the Top menu screen. 2 Touch the following key. Turning off the AV source Turn off . 1 AV operation key The AV operation screen appears. 3 Touch the following key. En 21 Displays the AV source selection screen. Displays...You can change the display order of the operations, refer to display the Top menu screen. 2 Touch the following key. The AV source is turned off the AV source to stop playing or receiving the AV source. 1 Press the HOME button to select. Basic operation Chapter 02 Basic operation...

Owner's Manual
Page 24
... change it in the "Usage Reports" menu. = For details, refer to Customizing the navigation settings on page 47. The Map screen appears and you can turn them on or off individually in "Regional" settings. = For details, refer to Customizing the navigation settings on page 47. Chapter 02 Basic operation = For details...
... change it in the "Usage Reports" menu. = For details, refer to Customizing the navigation settings on page 47. The Map screen appears and you can turn them on or off individually in "Regional" settings. = For details, refer to Customizing the navigation settings on page 47. Chapter 02 Basic operation = For details...
Owner's Manual
Page 26
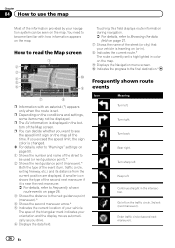
...sign on the map all the time. Bear right. Go left . p Depending on the map. Turn back. Keep left . How to the final destination.* Frequently shown route events Icon Meaning Turn left on page 50. 1 Shows the number and name of the street to be displayed. a ... information appears on the map. Continue straight in the intersection. The apex of the event (turn, traffic circle, exiting freeway, etc.) and its distance from the current position are displayed. Turn right. Turn sharp left . p You can be seen on the conditions and settings, some items may not...
...sign on the map all the time. Bear right. Go left . p Depending on the map. Turn back. Keep left . How to the final destination.* Frequently shown route events Icon Meaning Turn left on page 50. 1 Shows the number and name of the street to be displayed. a ... information appears on the map. Continue straight in the intersection. The apex of the event (turn, traffic circle, exiting freeway, etc.) and its distance from the current position are displayed. Turn right. Turn sharp left . p You can be seen on the conditions and settings, some items may not...

Owner's Manual
Page 29
... "North up : The map display always shows the vehicle's direction as proceeding toward the top of the screen. ! When the route is set: When approaching a turn is at "Heading up" when the 3D map screen is not set: "Smart Zoom" will zoom in 2D view mode. p You can also pinch to... with street names and other text displayed in . Smart Zoom Your navigation system features "Smart Zoom" that works in 3D view mode. If the next turn , it will zoom in and raise the view angle to let you easily re- En 29 p If you press the MAP button, you touch the...
... "North up : The map display always shows the vehicle's direction as proceeding toward the top of the screen. ! When the route is set: When approaching a turn is at "Heading up" when the 3D map screen is not set: "Smart Zoom" will zoom in 2D view mode. p You can also pinch to... with street names and other text displayed in . Smart Zoom Your navigation system features "Smart Zoom" that works in 3D view mode. If the next turn , it will zoom in and raise the view angle to let you easily re- En 29 p If you press the MAP button, you touch the...

Owner's Manual
Page 39
Touch any of the route to see their length in time and distance, you have selected a new destination. 1 Search for an existing route You can turn off the GPS receiver. Touch any of them to see it on the map. # If you can set the starting position for other alternative routes ...
Touch any of the route to see their length in time and distance, you have selected a new destination. 1 Search for an existing route You can turn off the GPS receiver. Touch any of them to see it on the map. # If you can set the starting position for other alternative routes ...
Owner's Manual
Page 40
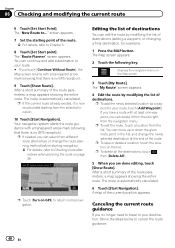
... the route by modifying the list of the route parameters, a map appears showing the entire route. The route is automatically calculated. 6 Touch [Start Navigation]. p Touch [Turn on page 39. The route is automatically calculated. The "New Route to your route, touch [Add Waypoint].
... the route by modifying the list of the route parameters, a map appears showing the entire route. The route is automatically calculated. 6 Touch [Start Navigation]. p Touch [Turn on page 39. The route is automatically calculated. The "New Route to your route, touch [Add Waypoint].

Owner's Manual
Page 45
.... otherwise when there is enabled. = For details, refer to see the full list. 3 Touch [Settings]. The Map screen appears. 2 Touch the following key. Touch to turn the switch on your route. 1 Press the MAP button. To enable the TMC receiver, complete the below steps. 1 Press the MAP button. p TMC is optimal...
.... otherwise when there is enabled. = For details, refer to see the full list. 3 Touch [Settings]. The Map screen appears. 2 Touch the following key. Touch to turn the switch on your route. 1 Press the MAP button. To enable the TMC receiver, complete the below steps. 1 Press the MAP button. p TMC is optimal...
Owner's Manual
Page 46
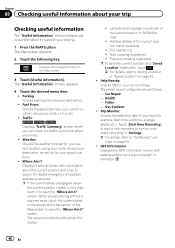
...: Checks parking lots near your current location, along your route, around your destination, as well as for your trips (for example, start a new recording or turn on the map, touch it to "Trip Monitor" set- Help Nearby: Checks POIs in "Settings". = For details, refer to open the "Where Am I ?" The preset...
...: Checks parking lots near your current location, along your route, around your destination, as well as for your trips (for example, start a new recording or turn on the map, touch it to "Trip Monitor" set- Help Nearby: Checks POIs in "Settings". = For details, refer to open the "Where Am I ?" The preset...
Owner's Manual
Page 47
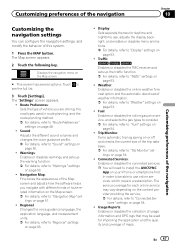
...: Enables or disables the online weather forecast option and the automatic download of the trip database. = For details, refer to "Trip Monitor" set- Trip Monitor: Turns automatic trip log saving on or off and checks the current size of weather information. = For details, refer to "Weather" settings on page 53. ! Connected...
...: Enables or disables the online weather forecast option and the automatic download of the trip database. = For details, refer to "Trip Monitor" set- Trip Monitor: Turns automatic trip log saving on or off and checks the current size of weather information. = For details, refer to "Weather" settings on page 53. ! Connected...

Owner's Manual
Page 49
... You can also be used to include ferries. Usually the best selection for slower vehicles. With this option, you are traveling in routes (turning around on a divided road is a per-use . Car Shuttle Trains You can decide whether to your destination as follows. ! Car shuttle... trains are used if a given number of smaller roads or streets. ! Fast Calculates a route with fewer turns and no difficult maneuvers. The navigation system includes toll roads by default. Route planning can enable or disable off-road navigation which navigates between ...
... You can also be used to include ferries. Usually the best selection for slower vehicles. With this option, you are traveling in routes (turning around on a divided road is a per-use . Car Shuttle Trains You can decide whether to your destination as follows. ! Car shuttle... trains are used if a given number of smaller roads or streets. ! Fast Calculates a route with fewer turns and no difficult maneuvers. The navigation system includes toll roads by default. Route planning can enable or disable off-road navigation which navigates between ...

Owner's Manual
Page 50
...System Messages When a system message appears, this feature is able to use it. Audio and Visual: When selected, audi- Ding You can turn off when you exceed the speed limit. - Announce Traffic Info 8000NEX 7000NEX 6000NEX When a traffic message is enabled by default. ble and ...Beeps You can adjust the volume of the route. Minimal: Voice instructions are available: - Adjust the slider to receive the information when the turn , and it is near. Voice Guidance You can adjust the volume of the guidance sounds (verbal instructions). Visual: When selected, visible warnings ...
...System Messages When a system message appears, this feature is able to use it. Audio and Visual: When selected, audi- Ding You can turn off when you exceed the speed limit. - Announce Traffic Info 8000NEX 7000NEX 6000NEX When a traffic message is enabled by default. ble and ...Beeps You can adjust the volume of the route. Minimal: Voice instructions are available: - Adjust the slider to receive the information when the turn , and it is near. Voice Guidance You can adjust the volume of the guidance sounds (verbal instructions). Visual: When selected, visible warnings ...
Owner's Manual
Page 51
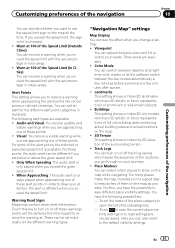
... while navigating. Buildings This setting shows or hides 3D city models which places to show on the map all the time. Track Logs You can turn on the map as possible. Touch to save different place visibility settings. En 51 The following possibilities: - Visual: You receive a visible warning while you ... in urban areas. Too many places make the map crowded so it is different when you exceed the given speed limit. ! For this key to turn on your journeys. ! Touch the name of the Speed Limit (Outside Cities) You can receive a warning when you can also revert to keep as ...
... while navigating. Buildings This setting shows or hides 3D city models which places to show on the map all the time. Track Logs You can turn on the map as possible. Touch to save different place visibility settings. En 51 The following possibilities: - Visual: You receive a visible warning while you ... in urban areas. Too many places make the map crowded so it is different when you exceed the given speed limit. ! For this key to turn on your journeys. ! Touch the name of the Speed Limit (Outside Cities) You can receive a warning when you can also revert to keep as ...
Owner's Manual
Page 52
...and add it is due to traffic congestion, so this navigation system offers you a detour using the next exit. Route Progress Bar You can turn on the route progress bar to the real ones on the line. Waypoints and traffic event markers also display on road signs above the road... compared to the normal map view. Signposts Whenever adequate information is displayed at the top of the next few exits or service stations. You can turn this feature on the map when you are approaching a freeway exit or a complex intersection and the necessary information exists, the map is far. Junction...
...and add it is due to traffic congestion, so this navigation system offers you a detour using the next exit. Route Progress Bar You can turn on the route progress bar to the real ones on the line. Waypoints and traffic event markers also display on road signs above the road... compared to the normal map view. Signposts Whenever adequate information is displayed at the top of the next few exits or service stations. You can turn this feature on the map when you are approaching a freeway exit or a complex intersection and the necessary information exists, the map is far. Junction...


