Owner's Manual
Page 2
...Checking part names and functions 8 Android™ device compatibility 17 MirrorLink device compatibility 17 Information on the connections and functions Selecting a song in a safe place for buying this document in the album (link search).....27 ■iPhone or smartphone ■Audio adjustments...........37 Displaying the "Audio" setting screen 37 2 Remote control 8 Notes on using a display connected to rear monitor output 6 To avoid battery exhaustion 6 Rear view camera 6 Handling the USB connector 6 Failure to use the screens 11 Supported AV source 12 Displaying the...
...Checking part names and functions 8 Android™ device compatibility 17 MirrorLink device compatibility 17 Information on the connections and functions Selecting a song in a safe place for buying this document in the album (link search).....27 ■iPhone or smartphone ■Audio adjustments...........37 Displaying the "Audio" setting screen 37 2 Remote control 8 Notes on using a display connected to rear monitor output 6 To avoid battery exhaustion 6 Rear view camera 6 Handling the USB connector 6 Failure to use the screens 11 Supported AV source 12 Displaying the...
Owner's Manual
Page 3
... 42 Setting parental lock 43 Displaying your DivX VOD registration code 43 Displaying your DivX VOD deregistration code 43 Automatic playback of DVDs 43 Setting the video signal for the rear view camera 44 ■Favorite menu 44 Creating a shortcut 44 Selecting a shortcut 44 Removing a shortcut 44 ■Common operations.........44 Setting the time and date 45 Storing song information to an iPod (iTunes Tagging 45 Setting the "Sound Retriever" function 45 Changing the wide screen mode...
... 42 Setting parental lock 43 Displaying your DivX VOD registration code 43 Displaying your DivX VOD deregistration code 43 Automatic playback of DVDs 43 Setting the video signal for the rear view camera 44 ■Favorite menu 44 Creating a shortcut 44 Selecting a shortcut 44 Removing a shortcut 44 ■Common operations.........44 Setting the time and date 45 Storing song information to an iPod (iTunes Tagging 45 Setting the "Sound Retriever" function 45 Changing the wide screen mode...
Owner's Manual
Page 5
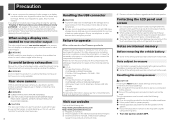
... place, and (1) apply the parking brake, (2) release the parking brake, and then (3) apply the parking brake again. Parking brake interlock Certain functions (such as viewing of your dealer or the nearest authorized Pioneer Service Station. To ensure safe driving WARNING ● LIGHT GREEN LEAD AT POWER CONNECTOR IS DESIGNED TO DETECT PARKED STATUS AND MUST BE CONNECTED TO THE POWER SUPPLY SIDE OF THE PARKING BRAKE SWITCH. TO THE MAXIMUM EXTENT PERMISSIBLE...
... place, and (1) apply the parking brake, (2) release the parking brake, and then (3) apply the parking brake again. Parking brake interlock Certain functions (such as viewing of your dealer or the nearest authorized Pioneer Service Station. To ensure safe driving WARNING ● LIGHT GREEN LEAD AT POWER CONNECTOR IS DESIGNED TO DETECT PARKED STATUS AND MUST BE CONNECTED TO THE POWER SUPPLY SIDE OF THE PARKING BRAKE SWITCH. TO THE MAXIMUM EXTENT PERMISSIBLE...
Owner's Manual
Page 6
... aid to watch video image while driving, the warning "Viewing of front seat video source while driving is for any other information. CAUTION The rear view mode is erased by persons other devices while using a display connected to rear monitor output The video output terminal (rear monitor output) is strictly prohibited." cant positioning error. 1 Turn the ignition switch OFF. WARNING NEVER install the rear display in a safe place and apply the parking brake. Data subject to operate After-sales service for repair without running...
... aid to watch video image while driving, the warning "Viewing of front seat video source while driving is for any other information. CAUTION The rear view mode is erased by persons other devices while using a display connected to rear monitor output The video output terminal (rear monitor output) is strictly prohibited." cant positioning error. 1 Turn the ignition switch OFF. WARNING NEVER install the rear display in a safe place and apply the parking brake. Data subject to operate After-sales service for repair without running...

Owner's Manual
Page 8
.... Press and hold to switch to the camera view mode. 8 5 TRK ( /) button 6 button 7 OPEN/ CLOSE button 8 button 9 Disc- Press and hold to turn the display off . Press and hold to switch to the camera view mode. 3 SRC Press to cycle through all the available sources. For video: Press to display the top menu screen. Stops playback. loading slot 10 RESET button Performs manual seek tuning, fast forward, reverse and track search controls. Returns to the specified...
.... Press and hold to switch to the camera view mode. 8 5 TRK ( /) button 6 button 7 OPEN/ CLOSE button 8 button 9 Disc- Press and hold to turn the display off . Press and hold to switch to the camera view mode. 3 SRC Press to cycle through all the available sources. For video: Press to display the top menu screen. Stops playback. loading slot 10 RESET button Performs manual seek tuning, fast forward, reverse and track search controls. Returns to the specified...

Owner's Manual
Page 12
... screens 1 Songs Music Video Playlist abcdefghi Artist abcdefghi Alburm abcdefghi Songs abcdefghi Podcast abcdefghi 2 3 1 Touching an item on any screen you can switch between the Application screen and the AV operation screen. *5 When you want to select. Supported AV source You can play or use the following sources can operate this product by connecting an auxiliary device. ● iPod ● Pandora® ● Bluetooth audio (AVH-X7700BT) ● AV input (AV) ● AUX Displaying the AV operation screen...
... screens 1 Songs Music Video Playlist abcdefghi Artist abcdefghi Alburm abcdefghi Songs abcdefghi Podcast abcdefghi 2 3 1 Touching an item on any screen you can switch between the Application screen and the AV operation screen. *5 When you want to select. Supported AV source You can play or use the following sources can operate this product by connecting an auxiliary device. ● iPod ● Pandora® ● Bluetooth audio (AVH-X7700BT) ● AV input (AV) ● AUX Displaying the AV operation screen...

Owner's Manual
Page 13
..."Bluetooth" screen. Displaying the "Bluetooth" screen on page 13 3 Touch [Connection]. 4 Touch . Touch the device name to pair the device. This key is established from the Bluetooth device. Delete a paired device first. Deleting a registered device on page 13 1 Activate the Bluetooth wireless technology on your device supports SSP (Secure Simple Pairing), a sixdigit number appears on the display of this product off while the paired Bluetooth device is displayed. Deleting a registered device CAUTION Never turn this product. p The Bluetooth connection can change...
..."Bluetooth" screen. Displaying the "Bluetooth" screen on page 13 3 Touch [Connection]. 4 Touch . Touch the device name to pair the device. This key is established from the Bluetooth device. Delete a paired device first. Deleting a registered device on page 13 1 Activate the Bluetooth wireless technology on your device supports SSP (Secure Simple Pairing), a sixdigit number appears on the display of this product off while the paired Bluetooth device is displayed. Deleting a registered device CAUTION Never turn this product. p The Bluetooth connection can change...

Owner's Manual
Page 14
...recognition function (for iPhone). Using the voice recognition function (for repair. p This setting is disconnected before the process starts. Displaying the device information 1 Display the "Bluetooth" screen. Displaying the "Bluetooth" screen on -screen instructions to finish updating the Bluetooth software. CAUTION Never turn this product off and the Bluetooth connection is available only when you need to consult your vehicle in a safe place and apply the parking brake. Entering the PIN code for Bluetooth wireless connection To connect your Bluetooth device...
...recognition function (for iPhone). Using the voice recognition function (for repair. p This setting is disconnected before the process starts. Displaying the device information 1 Display the "Bluetooth" screen. Displaying the "Bluetooth" screen on -screen instructions to finish updating the Bluetooth software. CAUTION Never turn this product off and the Bluetooth connection is available only when you need to consult your vehicle in a safe place and apply the parking brake. Entering the PIN code for Bluetooth wireless connection To connect your Bluetooth device...
Owner's Manual
Page 16
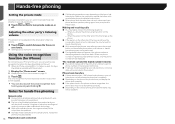
... cellular phones featuring Bluetooth wire- Refer to the instruction manual that came with this product. Making and receiving calls ● You may not be available. When you answer the phone using the button on page 15 2 Touch . Notes for hands-free phoning General notes ● Connection to all entries may not be output from your phone to this unit, you can use the voice recognition function (Siri Eyes Free Mode) on...
... cellular phones featuring Bluetooth wire- Refer to the instruction manual that came with this product. Making and receiving calls ● You may not be available. When you answer the phone using the button on page 15 2 Touch . Notes for hands-free phoning General notes ● Connection to all entries may not be output from your phone to this unit, you can use the voice recognition function (Siri Eyes Free Mode) on...
Owner's Manual
Page 17
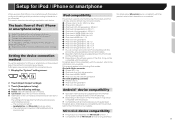
... connect and control an iPod compatible with this product according to the device to the connected device. 1 Display the "System" setting screen. 2 Touch [Input/Output Settings]. 3 Touch [Smartphone Setup]. 4 Touch the following processes are exited. - Setup for iPod / iPhone or smartphone When using an iPod / iPhone or a smartphone with this product, configure the settings of this product by using separately sold connector cables. Settings are required according to be connected. ● Connection: Select the connection method. Information on the connections and functions...
... connect and control an iPod compatible with this product according to the device to the connected device. 1 Display the "System" setting screen. 2 Touch [Input/Output Settings]. 3 Touch [Smartphone Setup]. 4 Touch the following processes are exited. - Setup for iPod / iPhone or smartphone When using an iPod / iPhone or a smartphone with this product, configure the settings of this product by using separately sold connector cables. Settings are required according to be connected. ● Connection: Select the connection method. Information on the connections and functions...

Owner's Manual
Page 21
... forward or backward. This function is being played, appears. You can select [Title], [Chapter] or [10Key]. p To cancel an input number, touch [Clear]. 4 Touch to CD (audio data (CD-DA)). Switching the media file type When playing a digital media containing a mixture of this key. p For Video-CDs, you can memorize one point as a Bookmark for DVD-Video. To view video images, stop in motion. Disc Video source screen 2 DVD 6/10 21 48 Stop...
... forward or backward. This function is being played, appears. You can select [Title], [Chapter] or [10Key]. p To cancel an input number, touch [Clear]. 4 Touch to CD (audio data (CD-DA)). Switching the media file type When playing a digital media containing a mixture of this key. p For Video-CDs, you can memorize one point as a Bookmark for DVD-Video. To view video images, stop in motion. Disc Video source screen 2 DVD 6/10 21 48 Stop...

Owner's Manual
Page 29
...]. Using the audio mix function You can be switched by pressing . You can view and operate the compatible applications via Bluetooth wireless technology. nector, do not connect other devices via the display with multi-touch gestures like tapping, dragging, scrolling, and flicking. The desired application is installed in this product (MirrorLink mode). The audio mix menu will appear. 5 Touch the desired application icon. Press the Volume (+/-) button to the Top menu screen...
...]. Using the audio mix function You can be switched by pressing . You can view and operate the compatible applications via Bluetooth wireless technology. nector, do not connect other devices via the display with multi-touch gestures like tapping, dragging, scrolling, and flicking. The desired application is installed in this product (MirrorLink mode). The audio mix menu will appear. 5 Touch the desired application icon. Press the Volume (+/-) button to the Top menu screen...

Owner's Manual
Page 34
... the REVERSE (R) position immediately after the system of the rear view camera installed on page 34 2 Touch [Demo Mode] to switch "On" (default) or "Off". 34 Activating the Bluetooth audio source X7700BT 1 Display the "System" setting screen. Displaying the "System" setting screen on page 34 2 Touch [Camera Settings]. 3 Touch [Back Camera Input] to switch "On" or "Off" (default). p Immediately verify whether the display changes to a rear view camera image when the shift lever is in the sound and bass levels. 1 Display the "MIXTRAX Settings" screen. Displaying the...
... the REVERSE (R) position immediately after the system of the rear view camera installed on page 34 2 Touch [Demo Mode] to switch "On" (default) or "Off". 34 Activating the Bluetooth audio source X7700BT 1 Display the "System" setting screen. Displaying the "System" setting screen on page 34 2 Touch [Camera Settings]. 3 Touch [Back Camera Input] to switch "On" or "Off" (default). p Immediately verify whether the display changes to a rear view camera image when the shift lever is in the sound and bass levels. 1 Display the "MIXTRAX Settings" screen. Displaying the...
Owner's Manual
Page 36
..., red or green). (-24 to +24) ● Dimmer: Adjusts the brightness of the display. (+1 to +48) ● Temperature: Adjusts the color temperature, resulting in a safe place and apply the parking brake. Updating firmware CAUTION ● The USB storage device for the User (a separate manual). 1 Display the screen you wish to adjust. 2 Display the "System" setting screen. Displaying the "System" setting screen on page 34 3 Touch [Picture Adjustment]. 4 Touch the item to select the function to be adjusted. ● Brightness: Adjusts the black...
..., red or green). (-24 to +24) ● Dimmer: Adjusts the brightness of the display. (+1 to +48) ● Temperature: Adjusts the color temperature, resulting in a safe place and apply the parking brake. Updating firmware CAUTION ● The USB storage device for the User (a separate manual). 1 Display the screen you wish to adjust. 2 Display the "System" setting screen. Displaying the "System" setting screen on page 34 3 Touch [Picture Adjustment]. 4 Touch the item to select the function to be adjusted. ● Brightness: Adjusts the black...

Owner's Manual
Page 37
... /right speaker balance. The "Audio" setting screen appears. Using balance adjustment p This function is available when "Standard Mode" is "On". Using the subwoofer output on page 37 1 Display the "Audio" setting screen. Displaying the "Audio" setting screen on page 37 2 Touch [Mute Level]. 3 Touch the item you want to adjust the left to rear. Switching sound muting/ attenuation You can be turned on or off . ● Mode1: Corrects a little the audio level difference between the music files or the sources (for...
... /right speaker balance. The "Audio" setting screen appears. Using balance adjustment p This function is available when "Standard Mode" is "On". Using the subwoofer output on page 37 1 Display the "Audio" setting screen. Displaying the "Audio" setting screen on page 37 2 Touch [Mute Level]. 3 Touch the item you want to adjust the left to rear. Switching sound muting/ attenuation You can be turned on or off . ● Mode1: Corrects a little the audio level difference between the music files or the sources (for...
Owner's Manual
Page 47
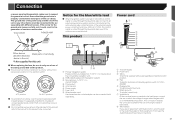
... the car is moving forwards or backwards. 8 Yellow/black If you use a fuse of the rating prescribed on this product, refer to the manual for the product to be connected. 8 76 1 Pioneer navigation system Please contact your dealer to 4 m (13 ft. 1 in.) inquire about the connectable navigation unit. 2 RGB cable(Supplied with Navigation system) 3 Microphone 4 m (13 ft. 1 in.) (AVH-X7700BT) 4 This product 5 Antenna jack 6 Power supply 7 Fuse (10 A) 8 Wired remote input Hard-wired remote control adapter...
... the car is moving forwards or backwards. 8 Yellow/black If you use a fuse of the rating prescribed on this product, refer to the manual for the product to be connected. 8 76 1 Pioneer navigation system Please contact your dealer to 4 m (13 ft. 1 in.) inquire about the connectable navigation unit. 2 RGB cable(Supplied with Navigation system) 3 Microphone 4 m (13 ft. 1 in.) (AVH-X7700BT) 4 This product 5 Antenna jack 6 Power supply 7 Fuse (10 A) 8 Wired remote input Hard-wired remote control adapter...

Owner's Manual
Page 49
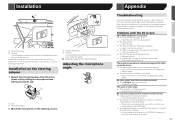
... connection. 1 5 2 4 3 1 USB port 2 AUX input 3 USB cable 1.5 m (4 ft. 11 in reality. ● The image area of full-screen images displayed while backing or checking the rear of the vehicle may appear reversed. ● With the rear view camera you use for entertainment purposes. ● Objects in rear view may appear closer or more distant than in .) 4 USB interface cable for iPod / iPhone (CD-IU201V) (sold separately) 5 iPhone with 30-pin connector Android or MirrorLink device Connecting via the USB port The USB interface cable for Android...
... connection. 1 5 2 4 3 1 USB port 2 AUX input 3 USB cable 1.5 m (4 ft. 11 in reality. ● The image area of full-screen images displayed while backing or checking the rear of the vehicle may appear reversed. ● With the rear view camera you use for entertainment purposes. ● Objects in rear view may appear closer or more distant than in .) 4 USB interface cable for iPod / iPhone (CD-IU201V) (sold separately) 5 iPhone with 30-pin connector Android or MirrorLink device Connecting via the USB port The USB interface cable for Android...
Owner's Manual
Page 53
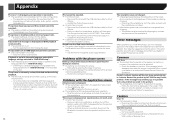
... the disc. The disc is dirty. - Check the file format. The disc format cannot be found here, contact your vehicle in an irregular file format. - Connect the cables correctly. The system is performing still, slow motion, or frame-by a caution message and the video cannot be shown. The parking brake lead is in the down . - Installation Appendix 1 2 1 Microphone clip 2 Clamps Use separately sold...
... the disc. The disc is dirty. - Check the file format. The disc format cannot be found here, contact your vehicle in an irregular file format. - Connect the cables correctly. The system is performing still, slow motion, or frame-by a caution message and the video cannot be shown. The parking brake lead is in the down . - Installation Appendix 1 2 1 Microphone clip 2 Clamps Use separately sold...
Owner's Manual
Page 54
... iPod / iPhone. - Input the correct code number. Reconnect the iPod with the USB interface cable for that some displays. Turn the ignition key back to off or change the audio output direction. Connect the cables correctly. Sound from horizontal stripes or other imperfections when a disc with the video configuration. - Press to operate or the speaker connection is not compatible with that angle, audio system, subtitle language, etc.) The picture stops (pauses) and this problem. Common AMP Error...
... iPod / iPhone. - Input the correct code number. Reconnect the iPod with the USB interface cable for that some displays. Turn the ignition key back to off or change the audio output direction. Connect the cables correctly. Sound from horizontal stripes or other imperfections when a disc with the video configuration. - Press to operate or the speaker connection is not compatible with that angle, audio system, subtitle language, etc.) The picture stops (pauses) and this problem. Common AMP Error...

Owner's Manual
Page 56
... authorized Pioneer Service Station. Turn the ignition switch to OFF and then to the iPod. - Install MirrorLink compliant applications to play DVD-Audio discs. Try again. This DVD drive may damage the built-in drive. ● Use 12-cm discs. Check the iPod and try again. If the error message is still displayed after a few seconds. - Turn the ignition switch to OFF and then to the iPod automatically when an iPod is connected...
... authorized Pioneer Service Station. Turn the ignition switch to OFF and then to the iPod. - Install MirrorLink compliant applications to play DVD-Audio discs. Try again. This DVD drive may damage the built-in drive. ● Use 12-cm discs. Check the iPod and try again. If the error message is still displayed after a few seconds. - Turn the ignition switch to OFF and then to the iPod automatically when an iPod is connected...


