
Owner s Manual
Page 2
... the device connection method............16 Basic operation 7 iPod compatibility 17 MIXTRAX operation 40 Pandora 30 MIXTRAX EZ operation 40 Checking part names and functions 7 Remote control 8 Notes on using a display connected to V OUT.......6 Using the voice recognition function (for playlist screen 28 Starting procedure 38 To avoid battery exhaustion 6 iPhone 15 Using this product's iPod function from your Setting the video signal 39 ■ Rear view camera 6 Setting phone book auto synchronization.......15 iPod 28 Handling the USB connector 6 Notes for hands-free...
... the device connection method............16 Basic operation 7 iPod compatibility 17 MIXTRAX operation 40 Pandora 30 MIXTRAX EZ operation 40 Checking part names and functions 7 Remote control 8 Notes on using a display connected to V OUT.......6 Using the voice recognition function (for playlist screen 28 Starting procedure 38 To avoid battery exhaustion 6 iPhone 15 Using this product's iPod function from your Setting the video signal 39 ■ Rear view camera 6 Setting phone book auto synchronization.......15 iPod 28 Handling the USB connector 6 Notes for hands-free...

Owner s Manual
Page 3
... Setting the dimmer 42 Removing a shortcut 50 WMA 65 ■ Adjusting the picture 43 Displaying the firmware version 43 FLAC 66 Common operations.........51 DivX 66 Displaying the open source licenses 43 Updating firmware 43 ■Audio adjustments...........44 Displaying the "Audio" setting screen 44 Using fader/balance adjustment 44 Switching sound muting/attenuation 44 Adjusting source levels 44 Using the auto level control 44 Adjusting loudness 44 Setting the subwoofer output 44 Adjusting the cutoff frequency value 44 Switching the rear speaker output 45 Using BASS...
... Setting the dimmer 42 Removing a shortcut 50 WMA 65 ■ Adjusting the picture 43 Displaying the firmware version 43 FLAC 66 Common operations.........51 DivX 66 Displaying the open source licenses 43 Updating firmware 43 ■Audio adjustments...........44 Displaying the "Audio" setting screen 44 Using fader/balance adjustment 44 Switching sound muting/attenuation 44 Adjusting source levels 44 Using the auto level control 44 Adjusting loudness 44 Setting the subwoofer output 44 Adjusting the cutoff frequency value 44 Switching the rear speaker output 45 Using BASS...
Owner s Manual
Page 5
... dealer or the nearest authorized Pioneer Service Station. To ensure safe driving WARNING LIGHT GREEN LEAD AT POWER CONNECTOR IS DESIGNED TO DETECT PARKED STATUS AND MUST BE CONNECTED TO THE POWER SUPPLY SIDE OF THE PARKING BRAKE SWITCH. Important safety information WARNING Do not attempt to install or service this product is not for internal inspection, adjustments or repairs. Using this product in this...
... dealer or the nearest authorized Pioneer Service Station. To ensure safe driving WARNING LIGHT GREEN LEAD AT POWER CONNECTOR IS DESIGNED TO DETECT PARKED STATUS AND MUST BE CONNECTED TO THE POWER SUPPLY SIDE OF THE PARKING BRAKE SWITCH. Important safety information WARNING Do not attempt to install or service this product is not for internal inspection, adjustments or repairs. Using this product in this...

Owner s Manual
Page 6
.... CAUTION The rear view mode is connected to use this product. Some of the settings and recorded contents will not be reset. Resetting the microprocessor CAUTION Pressing the RESET button resets settings and recorded contents to the factory settings. Do not perform this operation when a device is to this function for repair without running the engine can drain the battery. Precaution driver. In some countries the viewing of video image on a display inside...
.... CAUTION The rear view mode is connected to use this product. Some of the settings and recorded contents will not be reset. Resetting the microprocessor CAUTION Pressing the RESET button resets settings and recorded contents to the factory settings. Do not perform this operation when a device is to this function for repair without running the engine can drain the battery. Precaution driver. In some countries the viewing of video image on a display inside...

Owner s Manual
Page 8
.... Ejecting a disc X5800BHS X4800BS 1 Press the button. 2 Touch to open . Press and hold to switch to the camera view mode. 3 SRC Press to preset channel keys. Press and hold to activate the voice recognition function. Refer to Using the voice recognition function (for safety. Do not place a glass or can on the open LCD panel. ANGLE 9 BAND/ ESC Selects the tuner band when tuner is turned off, touch...
.... Ejecting a disc X5800BHS X4800BS 1 Press the button. 2 Touch to open . Press and hold to switch to the camera view mode. 3 SRC Press to preset channel keys. Press and hold to activate the voice recognition function. Refer to Using the voice recognition function (for safety. Do not place a glass or can on the open LCD panel. ANGLE 9 BAND/ ESC Selects the tuner band when tuner is turned off, touch...

Owner s Manual
Page 11
...)(AVH-X2800BS)(AVH-X1800S) HD Radio (HD Radio™ tuner) (AVH-X5800BHS) (AVH-X3800BHS) CD ROM (compressed audio files) DVD-Video USB The following cases: An incoming call is received. A rear view camera image is input when the vehicle reverses. A button on this product is pressed. The ignition switch is turned off (ACC OFF), then turned on any screen you can display the Top menu screen. *3 When you connect the external navigation...
...)(AVH-X2800BS)(AVH-X1800S) HD Radio (HD Radio™ tuner) (AVH-X5800BHS) (AVH-X3800BHS) CD ROM (compressed audio files) DVD-Video USB The following cases: An incoming call is received. A rear view camera image is input when the vehicle reverses. A button on this product is pressed. The ignition switch is turned off (ACC OFF), then turned on any screen you can display the Top menu screen. *3 When you connect the external navigation...

Owner s Manual
Page 12
... Displaying the "Bluetooth" screen on the list. Switching the operation panel 1 Touch . p The Bluetooth connection can change the playback point by dragging the key. Setting Bluetooth device auto connection This function connects the last connected Bluetooth device to the position of the two connected cellular phones will be disconnected and the unconnected cellular phone will be also made by the system. The hidden function keys appears. p If your Bluetooth devices p If three devices are already paired, "Memory Full" is displayed...
... Displaying the "Bluetooth" screen on the list. Switching the operation panel 1 Touch . p The Bluetooth connection can change the playback point by dragging the key. Setting Bluetooth device auto connection This function connects the last connected Bluetooth device to the position of the two connected cellular phones will be disconnected and the unconnected cellular phone will be also made by the system. The hidden function keys appears. p If your Bluetooth devices p If three devices are already paired, "Memory Full" is displayed...
Owner s Manual
Page 13
... the parking brake. CAUTION Never turn this product off and never disconnect the phone while the software is being updated. 1 Connect the USB storage device stored the version update file to this unit. Refer to Plugging and unplugging a USB storage device on page 9 2 Display the "Bluetooth" screen. Refer to Displaying the "Bluetooth" screen on page 12 2 Touch [PIN Code Input]. 3 Touch [0] to [9] to input the pin code (up to three Bluetooth devices on this product at the same time when using the switch devices...
... the parking brake. CAUTION Never turn this product off and never disconnect the phone while the software is being updated. 1 Connect the USB storage device stored the version update file to this unit. Refer to Plugging and unplugging a USB storage device on page 9 2 Display the "Bluetooth" screen. Refer to Displaying the "Bluetooth" screen on page 12 2 Touch [PIN Code Input]. 3 Touch [0] to [9] to input the pin code (up to three Bluetooth devices on this product at the same time when using the switch devices...
Owner s Manual
Page 14
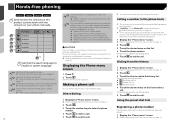
... Switching the connected Bluetooth device on page 13 CAUTION For your phone manually. The following items are automatically connected to this product with the contacts on your safety, avoid talking on the phone as much as presets. 4 Touch to make a call . Refer to Displaying the Phone menu screen on page 14 14 Hands-free phoning X5800BHS X4800BS X3800BHS X2800BS Synchronizes the contacts on this product's phone book with the Bluetooth device auto connect function...
... Switching the connected Bluetooth device on page 13 CAUTION For your phone manually. The following items are automatically connected to this product with the contacts on your safety, avoid talking on the phone as much as presets. 4 Touch to make a call . Refer to Displaying the Phone menu screen on page 14 14 Hands-free phoning X5800BHS X4800BS X3800BHS X2800BS Synchronizes the contacts on this product's phone book with the Bluetooth device auto connect function...

Owner s Manual
Page 16
...-free phoning 2 Touch [Phone Book Auto Synchronize] to this product via Bluetooth technology. With some cellular phones, even after you answer the phone using an iPod / iPhone or a smartphone with your cellular phone for detailed instructions. When phone book transfer does not work, disconnect your phone and then perform pairing again from your phone to the entry of an unknown user (no history data will be output from the speakers...
...-free phoning 2 Touch [Phone Book Auto Synchronize] to this product via Bluetooth technology. With some cellular phones, even after you answer the phone using an iPod / iPhone or a smartphone with your cellular phone for detailed instructions. When phone book transfer does not work, disconnect your phone and then perform pairing again from your phone to the entry of an unknown user (no history data will be output from the speakers...

Owner s Manual
Page 21
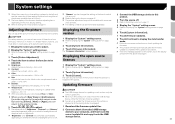
... begin a search. Display the Radio settings screen 1 Display the "System" setting screen. 3 Touch [Radio settings]. Switching the reception mode You can select the method of seek tuning. 1 Display the Radio settings screen. Refer to Display the Radio settings screen on page 21 2 Touch [Blending] to "6". Plays files in random order. The six strongest broadcast frequencies will be stored under the preset tuning keys "1" to switch "On" or "Off". 2 Touch [AV Source Settings]. Disc Track number indicator Audio source screen 1 CD 6/10 21...
... begin a search. Display the Radio settings screen 1 Display the "System" setting screen. 3 Touch [Radio settings]. Switching the reception mode You can select the method of seek tuning. 1 Display the Radio settings screen. Refer to Display the Radio settings screen on page 21 2 Touch [Blending] to "6". Plays files in random order. The six strongest broadcast frequencies will be stored under the preset tuning keys "1" to switch "On" or "Off". 2 Touch [AV Source Settings]. Disc Track number indicator Audio source screen 1 CD 6/10 21...

Owner s Manual
Page 23
...; Video: 1 Touch . Searching for the video image. Refer to play back. CAUTION For safety reasons, video images cannot be viewed while your vehicle is already set the screen size for the part you want to CD (audio data (CD-DA)). p To cancel an input number, touch [C]. 4 Touch to start . Refer to Inserting and ejecting a disc on page 51 Starting procedure Switches the media file type to play a normal music CD, Video-CD or DVD-Video using...
...; Video: 1 Touch . Searching for the video image. Refer to play back. CAUTION For safety reasons, video images cannot be viewed while your vehicle is already set the screen size for the part you want to CD (audio data (CD-DA)). p To cancel an input number, touch [C]. 4 Touch to start . Refer to Inserting and ejecting a disc on page 51 Starting procedure Switches the media file type to play a normal music CD, Video-CD or DVD-Video using...

Owner s Manual
Page 26
... image file, you can also skip files forward or backward. Starting procedure (for USB) 1 Display the "AV source selection" screen. 2 Plug the USB storage device. Refer to play back. You can play a file on the list by Music Browse p This function is available for both the AV screen and top menu screen. 4 Touch "Yes" to Inserting and ejecting a disc on page 51 CAUTION For safety reasons, video images cannot be set it . Still image file operations Saving the image...
... image file, you can also skip files forward or backward. Starting procedure (for USB) 1 Display the "AV source selection" screen. 2 Plug the USB storage device. Refer to play back. You can play a file on the list by Music Browse p This function is available for both the AV screen and top menu screen. 4 Touch "Yes" to Inserting and ejecting a disc on page 51 CAUTION For safety reasons, video images cannot be set it . Still image file operations Saving the image...
Owner s Manual
Page 31
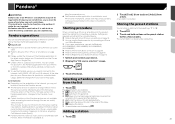
... your device. Storing the preset stations while the car is available for iPod / iPhone or smartphone on particular musical char- Certain functions of the Pandora application to Pandora, adjusting Cell Network Audio Quality. Settings are not limited to do so Starting procedure You can use . Important Requirements to access Pandora using Pioneer car audio/ video Refer to "6". App Store or Google Play. Create a free or...
... your device. Storing the preset stations while the car is available for iPod / iPhone or smartphone on particular musical char- Certain functions of the Pandora application to Pandora, adjusting Cell Network Audio Quality. Settings are not limited to do so Starting procedure You can use . Important Requirements to access Pandora using Pioneer car audio/ video Refer to "6". App Store or Google Play. Create a free or...
Owner s Manual
Page 41
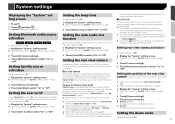
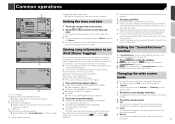
... auto audio mix function You can be displayed at all times. p When the screen changes to full-screen rear view camera image during normal driving, switch to fit, and that "On". Refer to Setting rear view camera activation on page 41 Ground: p When using the 2nd camera, set to switch "On" or "Off". System settings Displaying the "System" setting screen 1 Press . 2 Touch , and then . Please note that 1 Display the "System" setting screen. The polarity of a camera which outputs mirror reversed images, otherwise the screen image...
... auto audio mix function You can be displayed at all times. p When the screen changes to full-screen rear view camera image during normal driving, switch to fit, and that "On". Refer to Setting rear view camera activation on page 41 Ground: p When using the 2nd camera, set to switch "On" or "Off". System settings Displaying the "System" setting screen 1 Press . 2 Touch , and then . Please note that 1 Display the "System" setting screen. The polarity of a camera which outputs mirror reversed images, otherwise the screen image...
Owner s Manual
Page 43
... emphasized, red or green). (-24 to +3) p With some rear view cameras. The "Firmware Information" screen appears. The open source licenses 1 Display the "System" setting screen. Refer to finish updating the firmware. p The time display of the display. (+1 to +48) Temperature: Adjusts the color temperature, resulting in a safe place and apply the parking brake. 1 Display the screen you cannot use some of these functions, you must contain only the correct update file. Never turn this product...
... emphasized, red or green). (-24 to +3) p With some rear view cameras. The "Firmware Information" screen appears. The open source licenses 1 Display the "System" setting screen. Refer to finish updating the firmware. p The time display of the display. (+1 to +48) Temperature: Adjusts the color temperature, resulting in a safe place and apply the parking brake. 1 Display the screen you cannot use some of these functions, you must contain only the correct update file. Never turn this product...
Owner s Manual
Page 51
... the "Sound Retriever" function. p While this product receives song information. cally and horizontally. Normal: A 4:3 picture is displayed normally, without any omissions. Zoom: A 4:3 picture is enlarged in this key changes according to the current setting. 2 Touch the desired mode. Full: A 4:3 picture is already connected, the song information will be 7.4 or higher. 1 Tune into the broadcast station. Radio (AVH-X4800BS)(AVH-X2800BS)(AVH-X1800S) ...
... the "Sound Retriever" function. p While this product receives song information. cally and horizontally. Normal: A 4:3 picture is displayed normally, without any omissions. Zoom: A 4:3 picture is enlarged in this key changes according to the current setting. 2 Touch the desired mode. Full: A 4:3 picture is already connected, the song information will be 7.4 or higher. 1 Tune into the broadcast station. Radio (AVH-X4800BS)(AVH-X2800BS)(AVH-X1800S) ...
Owner s Manual
Page 53
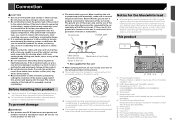
...; Make sure that the ground wire is properly connected to be connected. 4 This product 5 Wired remote input Hard-wired remote control adapter can occur, resulting in such so that they will be exposed to the instruction manual for the product to metal parts of the car's body. Notice for the blue/white lead When the ignition switch is turned on (ACC ON), a control signal is output through the blue/white lead, even if the audio source is...
...; Make sure that the ground wire is properly connected to be connected. 4 This product 5 Wired remote input Hard-wired remote control adapter can occur, resulting in such so that they will be exposed to the instruction manual for the product to metal parts of the car's body. Notice for the blue/white lead When the ignition switch is turned on (ACC ON), a control signal is output through the blue/white lead, even if the audio source is...
Owner s Manual
Page 59
... no sound on fast reverse or forward. Park your vehicle in a safe place, and turn the power to this product firmly. There is in "DVD/DivX Setup". - Turn the parental lock off (ACC OFF). Since this product cannot play. - Turn the ignition key back to off or change the audio output direction. When the operation on the first of range for iPod / iPhone. - Check the file format. The disc format cannot...
... no sound on fast reverse or forward. Park your vehicle in a safe place, and turn the power to this product firmly. There is in "DVD/DivX Setup". - Turn the parental lock off (ACC OFF). Since this product cannot play. - Turn the ignition key back to off or change the audio output direction. When the operation on the first of range for iPod / iPhone. - Check the file format. The disc format cannot...

Owner s Manual
Page 60
... USB The USB connector or USB cable has short-circuited. - Disconnect the USB storage device and do not use it . Check the tuner connection and battery voltage. No Signal The SiriusXM Connect Vehicle Tuner is not available. - No Content TuneScan is having difficulty receiving the SiriusXM satellite signal. - Perform the operation with this problem. When an Android device is switched off /on the outside the licensing region. - Common AMP Error...
... USB The USB connector or USB cable has short-circuited. - Disconnect the USB storage device and do not use it . Check the tuner connection and battery voltage. No Signal The SiriusXM Connect Vehicle Tuner is not available. - No Content TuneScan is having difficulty receiving the SiriusXM satellite signal. - Perform the operation with this problem. When an Android device is switched off /on the outside the licensing region. - Common AMP Error...


