Owner's Manual
Page 2
...-free phone 32 ■Bluetooth audio player.....33 Starting procedure 34 Selecting files from the file name list 34 ■SiriusXM® Satellite ■ Precaution 4 Information to User 4 License, Warranty Disclaimer & Limitation of Liability 5 Important safety information 5 Parking brake interlock 5 When using a display connected to V OUT.......6 To avoid battery exhaustion 6 Rear view camera 6 Handling the USB connector 6 Failure to operate 6 Visit our website 6 Protecting the LCD panel and screen 6 Notes on internal memory...
...-free phone 32 ■Bluetooth audio player.....33 Starting procedure 34 Selecting files from the file name list 34 ■SiriusXM® Satellite ■ Precaution 4 Information to User 4 License, Warranty Disclaimer & Limitation of Liability 5 Important safety information 5 Parking brake interlock 5 When using a display connected to V OUT.......6 To avoid battery exhaustion 6 Rear view camera 6 Handling the USB connector 6 Failure to operate 6 Visit our website 6 Protecting the LCD panel and screen 6 Notes on internal memory...
Owner's Manual
Page 3
...42 Removing a shortcut 50 HD Radio™ Technology 65 Adjusting the picture 42 Displaying the firmware version 42 Updating firmware 43 ■Audio adjustments...........43 Displaying the "Audio" setting screen 43 Using fader adjustment 43 Using balance adjustment 43 Switching sound muting/attenuation 43 Adjusting source levels 43 Using the auto level control 43 Adjusting loudness 44 Using the subwoofer output 44 Adjusting the cutoff frequency value 44 Switching the rear speaker output 44 Boosting the bass 44 Selecting the listening position 44 Adjusting the speaker output...
...42 Removing a shortcut 50 HD Radio™ Technology 65 Adjusting the picture 42 Displaying the firmware version 42 Updating firmware 43 ■Audio adjustments...........43 Displaying the "Audio" setting screen 43 Using fader adjustment 43 Using balance adjustment 43 Switching sound muting/attenuation 43 Adjusting source levels 43 Using the auto level control 43 Adjusting loudness 44 Using the subwoofer output 44 Adjusting the cutoff frequency value 44 Switching the rear speaker output 44 Boosting the bass 44 Selecting the listening position 44 Adjusting the speaker output...
Owner's Manual
Page 5
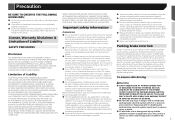
... liquids. Parking brake interlock Certain functions (such as there are disabled unless the vehicle is stopped and/or the parking brake is in place for your dealer or the nearest authorized Pioneer Service Station for operating procedures and safety information. ● Do not install this product by this product, park your vehicle in a safe place, turn the ignition switch off the power immediately and...
... liquids. Parking brake interlock Certain functions (such as there are disabled unless the vehicle is stopped and/or the parking brake is in place for your dealer or the nearest authorized Pioneer Service Station for operating procedures and safety information. ● Do not install this product by this product, park your vehicle in a safe place, turn the ignition switch off the power immediately and...
Owner's Manual
Page 6
... error. 1 Turn the ignition switch OFF. Do not use this function for entertainment purposes. 6 Handling the USB connector CAUTION ● To prevent data loss and damage to the storage device, never remove it from which you purchased the product for connection of a display to enable passengers in LCD screen malfunction due to touch the touch panel keys only with your product. 2 Receive updates on the latest products and technologies. 3 Download owner's manuals...
... error. 1 Turn the ignition switch OFF. Do not use this function for entertainment purposes. 6 Handling the USB connector CAUTION ● To prevent data loss and damage to the storage device, never remove it from which you purchased the product for connection of a display to enable passengers in LCD screen malfunction due to touch the touch panel keys only with your product. 2 Receive updates on the latest products and technologies. 3 Download owner's manuals...
Owner's Manual
Page 8
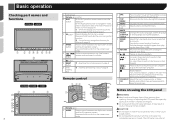
... Disc, USB. Press and hold to switch to the camera view mode. 6 TRK ( /) button Performs manual seek tuning, fast forward, reverse and track search controls. 7 button 8 RESET button Resetting the microprocessor on page 6 9 Discloading slot Inserting and ejecting a disc on using the LCD panel WARNING ● Keep hands and fingers clear of this product until the LCD panel has completely opened or closed. For video: Press to the top menu...
... Disc, USB. Press and hold to switch to the camera view mode. 6 TRK ( /) button Performs manual seek tuning, fast forward, reverse and track search controls. 7 button 8 RESET button Resetting the microprocessor on page 6 9 Discloading slot Inserting and ejecting a disc on using the LCD panel WARNING ● Keep hands and fingers clear of this product until the LCD panel has completely opened or closed. For video: Press to the top menu...
Owner's Manual
Page 11
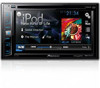
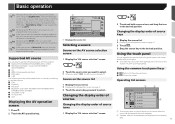
...)(AVH-X2700BS)(AVH-X1700S) ● HD Radio (HD Radio™ tuner) (AVH-X5700BHS) (AVH-X3700BHS) ● CD ● ROM (compressed audio files) ● DVD-Video ● USB The following sources with your finger gently. Operating list screens 1 Songs Music Video Playlist abcdefghi Artist abcdefghi Alburm abcdefghi Songs abcdefghi Podcast abcdefghi 2 3 1 Touching an item on the list allows you connect an iPhone via Bluetooth wireless technology or a smartphone via USB cable, "Smartphone Setup" screen appears by connecting an auxiliary device. ● iPod...
...)(AVH-X2700BS)(AVH-X1700S) ● HD Radio (HD Radio™ tuner) (AVH-X5700BHS) (AVH-X3700BHS) ● CD ● ROM (compressed audio files) ● DVD-Video ● USB The following sources with your finger gently. Operating list screens 1 Songs Music Video Playlist abcdefghi Artist abcdefghi Alburm abcdefghi Songs abcdefghi Podcast abcdefghi 2 3 1 Touching an item on the list allows you connect an iPhone via Bluetooth wireless technology or a smartphone via USB cable, "Smartphone Setup" screen appears by connecting an auxiliary device. ● iPod...
Owner's Manual
Page 12
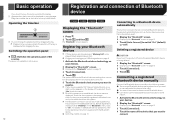
...; : Switches the operation panel of Bluetooth device X5700BHS X4700BS X3700BHS X2700BS Displaying the "Bluetooth" screen 1 Press . 2 Touch , and then . The system searches for Bluetooth devices waiting for some reason. 1 Activate the Bluetooth wireless technology on your devices. 2 Display the "Bluetooth" screen. Displaying the "Bluetooth" screen on page 12 2 Touch [Auto Connect] to "On". Before registration, make sure that you want to connect. Deleting a registered device CAUTION Never turn this product. Delete a paired device first. Plugging and unplugging a USB...
...; : Switches the operation panel of Bluetooth device X5700BHS X4700BS X3700BHS X2700BS Displaying the "Bluetooth" screen 1 Press . 2 Touch , and then . The system searches for Bluetooth devices waiting for some reason. 1 Activate the Bluetooth wireless technology on your devices. 2 Display the "Bluetooth" screen. Displaying the "Bluetooth" screen on page 12 2 Touch [Auto Connect] to "On". Before registration, make sure that you want to connect. Deleting a registered device CAUTION Never turn this product. Delete a paired device first. Plugging and unplugging a USB...
Owner's Manual
Page 15
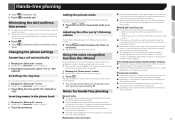
...; Touch to display the dial confirmation screen again. Using the voice recognition function (for iPhone) By connecting your cellular phone for hands-free phoning General notes ● Connection to all entries may not be available. 15 Making and receiving calls ● You may not be performed. ● The registered name will appear if the phone number is available with your iPhone to this unit, you answer the phone using the button...
...; Touch to display the dial confirmation screen again. Using the voice recognition function (for iPhone) By connecting your cellular phone for hands-free phoning General notes ● Connection to all entries may not be available. 15 Making and receiving calls ● You may not be performed. ● The registered name will appear if the phone number is available with your iPhone to this unit, you answer the phone using the button...
Owner's Manual
Page 16
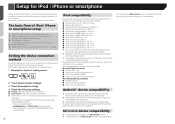
... product supports only the following settings. ● Device: Select the device to the information on the connections and functions for each device on our website. p Depending on the software version of this product according to the device to be compatible with all Android devices is compatible with this product. p Compatibility with this product, refer to the connected device. 1 Display the "System" setting screen. 2 Touch [Input/Output Settings]. 3 Touch [Smartphone Setup]. 4 Touch the following iPod models and iPod software versions. MirrorLink device compatibility...
... product supports only the following settings. ● Device: Select the device to the information on the connections and functions for each device on our website. p Depending on the software version of this product according to the device to be compatible with all Android devices is compatible with this product. p Compatibility with this product, refer to the connected device. 1 Display the "System" setting screen. 2 Touch [Input/Output Settings]. 3 Touch [Smartphone Setup]. 4 Touch the following iPod models and iPod software versions. MirrorLink device compatibility...

Owner's Manual
Page 20
... if the number of seek tuning. 1 Display the Radio settings screen. Display the Radio settings screen on page 20 2 Touch [Blending] to switch "On" (default) or "Off". Switching the reception mode You can select the method of frequencies stored has not reached the limit. 1 Touch the preset channel list display key. 2 Touch to "6". Switches between playback and pause. Storing the strongest broadcast frequencies The BSM (best stations memory) function automatically...
... if the number of seek tuning. 1 Display the Radio settings screen. Display the Radio settings screen on page 20 2 Touch [Blending] to switch "On" (default) or "Off". Switching the reception mode You can select the method of frequencies stored has not reached the limit. 1 Touch the preset channel list display key. 2 Touch to "6". Switches between playback and pause. Storing the strongest broadcast frequencies The BSM (best stations memory) function automatically...
Owner's Manual
Page 22
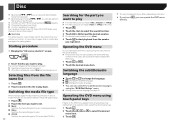
... input the desired number. Switching the subtitle/audio language Touch or to change the language. ● : Changes the subtitle language. ● : Changes the audio language. You can also switch the subtitle/audio languages using the "DVD/DivX Setup" menu. Setting the top-priority languages on the disc. If you touch , you can switch between media file types to play. 1 Touch . 2 Touch the item you want to set , select [Disc] as the playing source. To view video images...
... input the desired number. Switching the subtitle/audio language Touch or to change the language. ● : Changes the subtitle language. ● : Changes the audio language. You can also switch the subtitle/audio languages using the "DVD/DivX Setup" menu. Setting the top-priority languages on the disc. If you touch , you can switch between media file types to play. 1 Touch . 2 Touch the item you want to set , select [Disc] as the playing source. To view video images...
Owner's Manual
Page 41
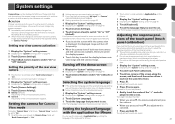
... 40 2 Touch [System Language]. 3 Touch the language that you want to use. p Immediately verify whether the display changes to a rear view camera image when the shift lever is moved to switch "On" (default) or "Off". Setting the camera for seven seconds on the AV operation screen, the camera view will turn off the engine while saving the adjusted position data. 1 Display the "System" setting screen. Displaying the "System" setting screen on page 40 2 Touch [Demo Mode] to REVERSE (R) from...
... 40 2 Touch [System Language]. 3 Touch the language that you want to use. p Immediately verify whether the display changes to a rear view camera image when the shift lever is moved to switch "On" (default) or "Off". Setting the camera for seven seconds on the AV operation screen, the camera view will turn off the engine while saving the adjusted position data. 1 Display the "System" setting screen. Displaying the "System" setting screen on page 40 2 Touch [Demo Mode] to REVERSE (R) from...

Owner's Manual
Page 43
... source you adjust the volume level of the touched point. Using the auto level control This function corrects automatically the audio level difference between sources. The "Firmware Information" screen appears. p Follow the on page 43 2 Touch [Fader]. 3 Touch or to "Right25" is "0". p "+4" to "-4" is displayed as the source volume is selected as the front/rear speaker balance moves from the left /right speaker balance. Using fader adjustment 1 Display the "Audio" setting screen. Displaying the "Audio" setting screen on -screen instructions to rear. Using balance adjustment...
... source you adjust the volume level of the touched point. Using the auto level control This function corrects automatically the audio level difference between sources. The "Firmware Information" screen appears. p Follow the on page 43 2 Touch [Fader]. 3 Touch or to "Right25" is "0". p "+4" to "-4" is displayed as the source volume is selected as the front/rear speaker balance moves from the left /right speaker balance. Using fader adjustment 1 Display the "Audio" setting screen. Displaying the "Audio" setting screen on -screen instructions to rear. Using balance adjustment...

Owner's Manual
Page 46
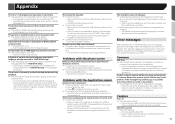
.... Audio adjustments Before operating the Auto EQ function ● Perform Auto EQ in as quiet a place as follows: - Rear speakers (left/right) - Low battery Performing Auto EQ p Auto EQ changes the audio settings as possible, with the vehicle engine and air conditioning switched off . 5 Switch the AV source to use the microphone for acoustical measurement (sold separately). Plug the microphone into the AUX input jack on page 43 2 Touch [Save Settings]. 3 Touch [OK]. p The Bluetooth connection is...
.... Audio adjustments Before operating the Auto EQ function ● Perform Auto EQ in as quiet a place as follows: - Rear speakers (left/right) - Low battery Performing Auto EQ p Auto EQ changes the audio settings as possible, with the vehicle engine and air conditioning switched off . 5 Switch the AV source to use the microphone for acoustical measurement (sold separately). Plug the microphone into the AUX input jack on page 43 2 Touch [Save Settings]. 3 Touch [OK]. p The Bluetooth connection is...

Owner's Manual
Page 53
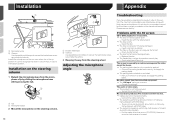
.... T 4 This product 5 Wired remote input Hard-wired remote control adapter can occur, resulting in the car) ● Do not route wires where they will not obstruct or hinder driving. 1 2 3 ● Make sure that the ground wire is properly connected to metal parts of this unit. ● The black cable is switched off. It is extremely dangerous to high temperatures. When installing this unit or any of the Other devices Metal parts of the...
.... T 4 This product 5 Wired remote input Hard-wired remote control adapter can occur, resulting in the car) ● Do not route wires where they will not obstruct or hinder driving. 1 2 3 ● Make sure that the ground wire is properly connected to metal parts of this unit. ● The black cable is switched off. It is extremely dangerous to high temperatures. When installing this unit or any of the Other devices Metal parts of the...
Owner's Manual
Page 56
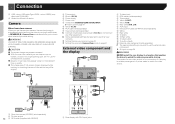
... view camera to watch the video source while driving. CAUTION ● The screen image may differ slightly. 2 1 3 4 This product 5 Brown (R.C IN) 6 Power supply 7 Power cord 8 Violet/white (REVERSE-GEAR SIGNAL INPUT) Power cord on page 54 9 Yellow (F.C IN) a RCA cable (sold separately) b View camera (sold separately) 2 To video output 56 3 RCA cable (supplied with ND-BC6) a cd b 9 3 ef g 1 Rear display with CD-MU200) 4 Android or MirrorLink device Camera About rear view camera When you while driving. This product's rear video output is behind you use the external video...
... view camera to watch the video source while driving. CAUTION ● The screen image may differ slightly. 2 1 3 4 This product 5 Brown (R.C IN) 6 Power supply 7 Power cord 8 Violet/white (REVERSE-GEAR SIGNAL INPUT) Power cord on page 54 9 Yellow (F.C IN) a RCA cable (sold separately) b View camera (sold separately) 2 To video output 56 3 RCA cable (supplied with ND-BC6) a cd b 9 3 ef g 1 Rear display with CD-MU200) 4 Android or MirrorLink device Camera About rear view camera When you while driving. This product's rear video output is behind you use the external video...
Owner's Manual
Page 58
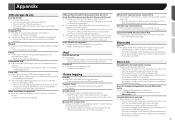
... disc with DVD-Video. - The audio or video skips. This product is . frame playback with the label upward. The disc is not connected or applied. - Problems with likely causes and solutions. Park your problem cannot be played back. - The volume level will not rise. Cables are produced. Connect the cables correctly. The system is performing still, slow motion, or frame-by a caution message...
... disc with DVD-Video. - The audio or video skips. This product is . frame playback with the label upward. The disc is not connected or applied. - Problems with likely causes and solutions. Park your problem cannot be played back. - The volume level will not rise. Cables are produced. Connect the cables correctly. The system is performing still, slow motion, or frame-by a caution message...
Owner's Manual
Page 59
... data is displayed, but operation does not work at the same time. - Switching to prolonged use of the smart- Since this product cannot be heard. The audio output direction may switch automatically when the Bluetooth and USB connections are used at all. An error has occurred. - Park your vehicle in "DVD/DivX Setup" is compatible with the copy guard analog copy protect system, the picture may suffer from the iPod...
... data is displayed, but operation does not work at the same time. - Switching to prolonged use of the smart- Since this product cannot be heard. The audio output direction may switch automatically when the Bluetooth and USB connections are used at all. An error has occurred. - Park your vehicle in "DVD/DivX Setup" is compatible with the copy guard analog copy protect system, the picture may suffer from the iPod...

Owner's Manual
Page 60
...; Device error message displayed in your SiriusXM sub- Please check your dealer. Incompatible USB The connected USB storage device is not a valid SiriusXM channel. - Disconnect your dealer or the nearest authorized Pioneer service center for some reason. - Check that you have requested is switched off /on this product. Disconnect the USB storage device and do not use it with another channel. SiriusXM Satellite Radio Check Antenna...
...; Device error message displayed in your SiriusXM sub- Please check your dealer. Incompatible USB The connected USB storage device is not a valid SiriusXM channel. - Disconnect your dealer or the nearest authorized Pioneer service center for some reason. - Check that you have requested is switched off /on this product. Disconnect the USB storage device and do not use it with another channel. SiriusXM Satellite Radio Check Antenna...
Owner's Manual
Page 61
... the error message is not caught in something or damaged. The connected USB storage device consumes more than maximum allowable current. - Check that can only be saved for iPod / iPhone is full. - Disconnect the USB storage device and do not use it with a compatible USB storage device. Please reset the unit. The USB connector or USB cable is successfully stored. Turn the ignition switch to OFF and then to a different source. Change...
... the error message is not caught in something or damaged. The connected USB storage device consumes more than maximum allowable current. - Check that can only be saved for iPod / iPhone is full. - Disconnect the USB storage device and do not use it with a compatible USB storage device. Please reset the unit. The USB connector or USB cable is successfully stored. Turn the ignition switch to OFF and then to a different source. Change...


