Owner's Manual
Page 2
... LCD panel 19 Radio 20 - Introduction to another title 24 - PBC playback 24 - Resume playback (Bookmark) 25 - After reading, please keep the manual in DVD player ...DVD video disc region numbers 9 ! About AAC 12 - Switching the media file type 23 - CM skip/CM back 25 - When using a display connected to REAR MONITOR OUTPUT 7 - About the SAT RADIO READY mark 13 To protect the LCD screen 13 For viewing the LCD... Operating this PIONEER product. Operating the DVD menu 23 - Parking brake interlock 7 - Storing and recalling broadcast frequencies 21 - Searching for the part you for ...
... LCD panel 19 Radio 20 - Introduction to another title 24 - PBC playback 24 - Resume playback (Bookmark) 25 - After reading, please keep the manual in DVD player ...DVD video disc region numbers 9 ! About AAC 12 - Switching the media file type 23 - CM skip/CM back 25 - When using a display connected to REAR MONITOR OUTPUT 7 - About the SAT RADIO READY mark 13 To protect the LCD screen 13 For viewing the LCD... Operating this PIONEER product. Operating the DVD menu 23 - Parking brake interlock 7 - Storing and recalling broadcast frequencies 21 - Searching for the part you for ...
Owner's Manual
Page 23
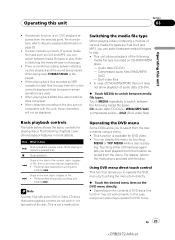
...correctly displayed if fast forward or reverse operations are used. ! In case of DVD-R/RW/ROM, this function may find with this case, using a menu. ! The following chapters cover other playback features in certain parts of various media file types such as DivX and MP3, you can switch between...page 25. ! En 23 23 Performs fast forward by touching the menu item directly. % Touch the desired menu item on the DVD menu directly. # Depending on , DVD playback resumes from the menu. Key What it does de Starts playback, pauses a disc that some playback controls do not work properly....
...correctly displayed if fast forward or reverse operations are used. ! In case of DVD-R/RW/ROM, this function may find with this case, using a menu. ! The following chapters cover other playback features in certain parts of various media file types such as DivX and MP3, you can switch between...page 25. ! En 23 23 Performs fast forward by touching the menu item directly. % Touch the desired menu item on the DVD menu directly. # Depending on , DVD playback resumes from the menu. Key What it does de Starts playback, pauses a disc that some playback controls do not work properly....
Owner's Manual
Page 25
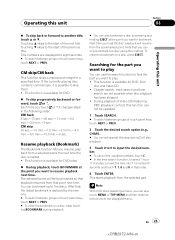
...to five discs. CM skip/CM back This function skips a reproduced image for the part you want to skip them. ! After that, the oldest bookmark is possible to play . ! Searching for a specified time. Note With DVD discs featuring a menu, you can also touch MENU or TOP MENU and then make... selections from that you can use the search function to find the part you want to another title, touch a or b. You can also bookmark ...
...to five discs. CM skip/CM back This function skips a reproduced image for the part you want to skip them. ! After that, the oldest bookmark is possible to play . ! Searching for a specified time. Note With DVD discs featuring a menu, you can also touch MENU or TOP MENU and then make... selections from that you can use the search function to find the part you want to another title, touch a or b. You can also bookmark ...
Installation Manual
Page 2
...BE CONNECTED TO THE POWER SUPPLY SIDE OF THE PARKING BRAKE SWITCH. Engine vibration may eventually cause the insulation to fail at this unit's DVD features should not be used . Where such regulations apply, they must be obeyed and this point. • It is a visible ... APPLICABLE LAW AND MAY RESULT IN SERIOUS INJURY OR DAMAGE. 1 CAUTION • PIONEER does not recommend that it is extremely dangerous to allow any leads. Contents Connecting the Units Connecting the Units 1 Parts supplied 3 Connecting the power cord 5 When connecting to separately sold power amp 7...
...BE CONNECTED TO THE POWER SUPPLY SIDE OF THE PARKING BRAKE SWITCH. Engine vibration may eventually cause the insulation to fail at this unit's DVD features should not be used . Where such regulations apply, they must be obeyed and this point. • It is a visible ... APPLICABLE LAW AND MAY RESULT IN SERIOUS INJURY OR DAMAGE. 1 CAUTION • PIONEER does not recommend that it is extremely dangerous to allow any leads. Contents Connecting the Units Connecting the Units 1 Parts supplied 3 Connecting the power cord 5 When connecting to separately sold power amp 7...
Installation Manual
Page 3
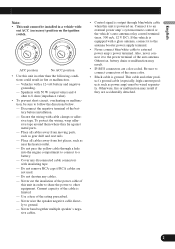
... installation. - Be sure to a battery. - To protect the wiring, wrap adhesive tape around them where they are accidentally detached. Place all cables away from moving parts, such as power amp) must be wired separately. Do not pass the yellow cable through blue/white cable when this unit is equipped with cable...çais Note: • This unit cannot be installed in fire or malfunction. - Otherwise, battery drain or malfunction may result if they lie against metal parts. -
... installation. - Be sure to a battery. - To protect the wiring, wrap adhesive tape around them where they are accidentally detached. Place all cables away from moving parts, such as power amp) must be wired separately. Do not pass the yellow cable through blue/white cable when this unit is equipped with cable...çais Note: • This unit cannot be installed in fire or malfunction. - Otherwise, battery drain or malfunction may result if they lie against metal parts. -
Installation Manual
Page 4
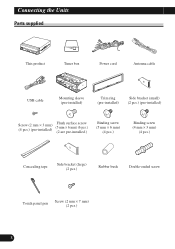
Connecting the Units Parts supplied This product Tuner box Power cord Antenna cable USB cable Mounting sleeve (pre-installed) Trim ring (pre-installed) Side bracket (small) (2 pcs.) (pre-installed) Screw (2 mm × 3 mm) (4 pcs.) (pre-installed) Flush surface screw (5 mm × 6 mm) (6 pcs.) (2 are pre-installed.) Binding screw (5 mm × 6 mm) (4 pcs.) Binding screw (4 mm × 3 mm) (4 pcs.) Concealing tape Side bracket (large) (2 pcs.) Rubber bush Double-ended screw Touch panel pen Screw (2 mm × 7 mm) (2 pcs.) 3
Connecting the Units Parts supplied This product Tuner box Power cord Antenna cable USB cable Mounting sleeve (pre-installed) Trim ring (pre-installed) Side bracket (small) (2 pcs.) (pre-installed) Screw (2 mm × 3 mm) (4 pcs.) (pre-installed) Flush surface screw (5 mm × 6 mm) (6 pcs.) (2 are pre-installed.) Binding screw (5 mm × 6 mm) (4 pcs.) Binding screw (4 mm × 3 mm) (4 pcs.) Concealing tape Side bracket (large) (2 pcs.) Rubber bush Double-ended screw Touch panel pen Screw (2 mm × 7 mm) (2 pcs.) 3
Installation Manual
Page 12
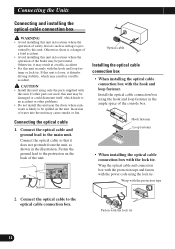
... to the optical cable connection box. Connect the optical cable to the main unit. CAUTION • Install this unit using only the parts supplied with the power code using the hook and loop fastener in the ample space of the console box. Connecting the optical cable 1.... Screw Optical cable Installing the optical cable connection box • When installing the optical cable connection box with the protection tape 2. If other parts are used, this unit may result in the illustration. Hook fastener Loop fastener • When installing the optical cable connection box with the ...
... to the optical cable connection box. Connect the optical cable to the main unit. CAUTION • Install this unit using only the parts supplied with the power code using the hook and loop fastener in the ample space of the console box. Connecting the optical cable 1.... Screw Optical cable Installing the optical cable connection box • When installing the optical cable connection box with the protection tape 2. If other parts are used, this unit may result in the illustration. Hook fastener Loop fastener • When installing the optical cable connection box with the ...

Installation Manual
Page 14
... installation requires drilling of holes or other modifications of the vehicle. • Do not install this area. 13 Dashboard Leave gap LCD panel DIN Front/Rear-mount This unit can be damaged if it may cause malfunctions. • Consult with the dashboard. This ...is installed at the sides of unit chassis). The use unauthorized parts. Installation Note: • Check all connections and systems before final installation. • Do not use of unauthorized parts may interfere with operation of the vehicle. - For details, refer to radiate freely....
... installation requires drilling of holes or other modifications of the vehicle. • Do not install this area. 13 Dashboard Leave gap LCD panel DIN Front/Rear-mount This unit can be damaged if it may cause malfunctions. • Consult with the dashboard. This ...is installed at the sides of unit chassis). The use unauthorized parts. Installation Note: • Check all connections and systems before final installation. • Do not use of unauthorized parts may interfere with operation of the vehicle. - For details, refer to radiate freely....
Installation Manual
Page 15
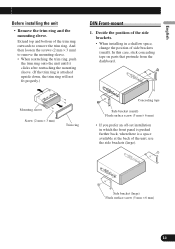
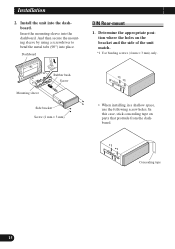
...) 14 English Español Before installing the unit • Remove the trim ring and the mounting sleeve. In this case, stick concealing tape on parts that protrude from the dashboard. Decide the position of the side brackets. • When installing in which the front panel is pushed further back, when...
...) 14 English Español Before installing the unit • Remove the trim ring and the mounting sleeve. In this case, stick concealing tape on parts that protrude from the dashboard. Decide the position of the side brackets. • When installing in which the front panel is pushed further back, when...
Installation Manual
Page 16
... Screw Mounting sleeve Side bracket Screw (2 mm × 3 mm) DIN Rear-mount 1. Install the unit into place. Determine the appropriate position where the holes on parts that protrude from the dashboard. *1 *1 Concealing tape 15 Insert the mounting sleeve into the dashboard. In this case, stick concealing tape on the bracket and...
... Screw Mounting sleeve Side bracket Screw (2 mm × 3 mm) DIN Rear-mount 1. Install the unit into place. Determine the appropriate position where the holes on parts that protrude from the dashboard. *1 *1 Concealing tape 15 Insert the mounting sleeve into the dashboard. In this case, stick concealing tape on the bracket and...


