Owner's Manual
Page 11
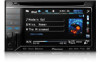
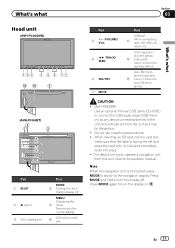
... Section 03 What's what Head unit (AVH-P4300DVD) da 3 (AVH-P3300BT) 2 1 3 4 5 7 6 c8ad9b Part 1 RESET 2 h (eject) 3 Disc loading slot Part MODE 8 Turning the infor- AUX input jack (3.5 mm stereo/ c video jack) Use to connect an auto EQ microphone. Auto EQ microphone input jack d Use to connect an ... USB port b When connecting, open the USB connector lid. Press MODE and hold to its operation manual. CAUTION ! (AVH-P3300BT) Use an optional Pioneer USB cable (CD-U50E) to connect the USB audio player/USB memory as any device connected directly to the normal display....
... Section 03 What's what Head unit (AVH-P4300DVD) da 3 (AVH-P3300BT) 2 1 3 4 5 7 6 c8ad9b Part 1 RESET 2 h (eject) 3 Disc loading slot Part MODE 8 Turning the infor- AUX input jack (3.5 mm stereo/ c video jack) Use to connect an auto EQ microphone. Auto EQ microphone input jack d Use to connect an ... USB port b When connecting, open the USB connector lid. Press MODE and hold to its operation manual. CAUTION ! (AVH-P3300BT) Use an optional Pioneer USB cable (CD-U50E) to connect the USB audio player/USB memory as any device connected directly to the normal display....
Owner's Manual
Page 59
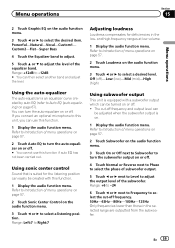
... or off frequency. 50Hz-63Hz-80Hz-100Hz-125Hz Only frequencies lower than those in the low- Range: +12dB to this unit, you connect an optional microphone to -12dB # You can be adjusted when the subwoofer output is on. 1 Display the audio function menu. Adjusting loudness Loudness compensates for the listening position...
... or off frequency. 50Hz-63Hz-80Hz-100Hz-125Hz Only frequencies lower than those in the low- Range: +12dB to this unit, you connect an optional microphone to -12dB # You can be adjusted when the subwoofer output is on. 1 Display the audio function menu. Adjusting loudness Loudness compensates for the listening position...
Owner's Manual
Page 68
...built-in the center of the headrest of an active subwoofer to give accurate results for auto EQ will automatically be overwritten. If the microphone is placed in an unsuitable position the measurement tone may become loud and measurement may take a long time, resulting in a place ... 1 Stop the car in battery drainage. The reflected sound within the car is connected to Recalling equalizer curves on where you place the microphone. Previous settings for the circumstances, so please continue to a power amp with the car engine and air conditioning switched off fre- If desired...
...built-in the center of the headrest of an active subwoofer to give accurate results for auto EQ will automatically be overwritten. If the microphone is placed in an unsuitable position the measurement tone may become loud and measurement may take a long time, resulting in a place ... 1 Stop the car in battery drainage. The reflected sound within the car is connected to Recalling equalizer curves on where you place the microphone. Previous settings for the circumstances, so please continue to a power amp with the car engine and air conditioning switched off fre- If desired...
Owner's Manual
Page 69
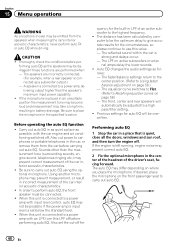
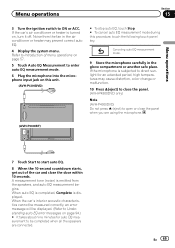
...connected. When the car's interior acoustic characteristics cannot be measured correctly, an error message will be completed when all the speakers are using the microphone. (AVH-P3300BT) 7 Touch Start to start auto EQ. 8 When the 10-second countdown starts, get out of menu operations on page 57. 5...ACC. Menu operations Section 15 Menu operations 3 Turn the ignition switch to enter auto EQ measurement mode. 6 Plug the microphone into the microphone input jack on this unit. (AVH-P4300DVD) # To stop auto EQ, touch Stop. # To cancel auto EQ measurement mode during this procedure, touch ...
...connected. When the car's interior acoustic characteristics cannot be measured correctly, an error message will be completed when all the speakers are using the microphone. (AVH-P3300BT) 7 Touch Start to start auto EQ. 8 When the 10-second countdown starts, get out of menu operations on page 57. 5...ACC. Menu operations Section 15 Menu operations 3 Turn the ignition switch to enter auto EQ measurement mode. 6 Plug the microphone into the microphone input jack on this unit. (AVH-P4300DVD) # To stop auto EQ, touch Stop. # To cancel auto EQ measurement mode during this procedure, touch ...
Owner's Manual
Page 75
stall or service your display unit to the driver. ! Installing or servicing the product may be in the car) En 75 Do not allow the microphone lead to work properly. It is properly connected to 8 W (impedance value). Do not shorten any other than the driver may expose you to remain exposed....unit or any cables. In some countries or states the viewing of this unit's DVD features should ever occur while the vehicle is ground. PIONEER does not recommend that the ground wire is extremely dangerous to allow any bare wiring to risk of electric shock or other hazards. Engine ...
stall or service your display unit to the driver. ! Installing or servicing the product may be in the car) En 75 Do not allow the microphone lead to work properly. It is properly connected to 8 W (impedance value). Do not shorten any other than the driver may expose you to remain exposed....unit or any cables. In some countries or states the viewing of this unit's DVD features should ever occur while the vehicle is ground. PIONEER does not recommend that the ground wire is extremely dangerous to allow any bare wiring to risk of electric shock or other hazards. Engine ...
Owner's Manual
Page 78
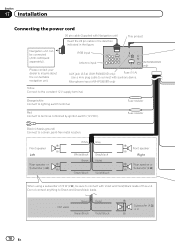
RGB input Antenna input AUX jack (3.5 ø) (AVH-P4300DVD only) Fuse (10 A) Use a mini plug cable to a clean, paint-free metal location. Front speaker Left Rear speaker or Subwoofer (4 ...speaker or Subwoofer (4 Ω) When using a subwoofer of this unit. Fuse resistor Red Connect to the constant 12 V supply terminal. Not used. Microphone input (AVH-P3300BT only) (AVH-P4300DVD only) Yellow Connect to terminal controlled by ignition switch (12 V DC). Fuse resistor Black (chassis ground) Connect to connect with Violet and Violet...
RGB input Antenna input AUX jack (3.5 ø) (AVH-P4300DVD only) Fuse (10 A) Use a mini plug cable to a clean, paint-free metal location. Front speaker Left Rear speaker or Subwoofer (4 ...speaker or Subwoofer (4 Ω) When using a subwoofer of this unit. Fuse resistor Red Connect to the constant 12 V supply terminal. Not used. Microphone input (AVH-P3300BT only) (AVH-P4300DVD only) Yellow Connect to terminal controlled by ignition switch (12 V DC). Fuse resistor Black (chassis ground) Connect to connect with Violet and Violet...
Owner's Manual
Page 79
... with needle-nosed pliers. Light green Used to the back lamp, connect the one in which the voltage changes when the gear shift is in .) Microphone (AVH-P3300BT only) Wired remote input Hard-wired remote control adaptor can be connected to the power supply side of the power amp or auto-antenna relay...
... with needle-nosed pliers. Light green Used to the back lamp, connect the one in which the voltage changes when the gear shift is in .) Microphone (AVH-P3300BT only) Wired remote input Hard-wired remote control adaptor can be connected to the power supply side of the power amp or auto-antenna relay...
Owner's Manual
Page 81
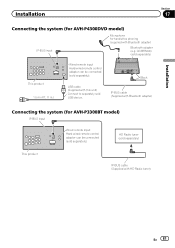
... IP-BUS cable (Supplied with Bluetooth adapter) Bluetooth adapter (e.g. Installation Section 17 Connecting the system (for AVH-P4300DVD model) IP-BUS input Microphone for hands-free phoning (supplied with Bluetooth adapter) Installation Connecting the system (for AVH-P3300BT model) IP-BUS input Wired remote input Hard-wired remote control adaptor can be connected (sold...
... IP-BUS cable (Supplied with Bluetooth adapter) Bluetooth adapter (e.g. Installation Section 17 Connecting the system (for AVH-P4300DVD model) IP-BUS input Microphone for hands-free phoning (supplied with Bluetooth adapter) Installation Connecting the system (for AVH-P3300BT model) IP-BUS input Wired remote input Hard-wired remote control adaptor can be connected (sold...
Owner's Manual
Page 82
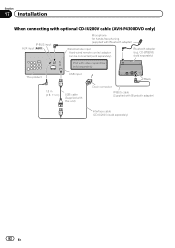
CD-BTB200) (sold separately) iPod with video capabilities (sold separately) This product USB input Black 1.5 m (4 ft. 11 in.) USB cable (Supplied with this unit) Dock connector IP-BUS cable (Supplied with Bluetooth adapter) Wired remote input Hard-wired remote control adaptor can be connected (sold separately) 82 En Bluetooth adapter (e.g. Section 17 Installation When connecting with optional CD-IU200V cable (AVH-P4300DVD only) IP-BUS input AUX input (AUX) Microphone for hands-free phoning (supplied with Bluetooth adapter) Interface cable (CD-IU200V) (sold separately).
CD-BTB200) (sold separately) iPod with video capabilities (sold separately) This product USB input Black 1.5 m (4 ft. 11 in.) USB cable (Supplied with this unit) Dock connector IP-BUS cable (Supplied with Bluetooth adapter) Wired remote input Hard-wired remote control adaptor can be connected (sold separately) 82 En Bluetooth adapter (e.g. Section 17 Installation When connecting with optional CD-IU200V cable (AVH-P4300DVD only) IP-BUS input AUX input (AUX) Microphone for hands-free phoning (supplied with Bluetooth adapter) Interface cable (CD-IU200V) (sold separately).
Owner's Manual
Page 86
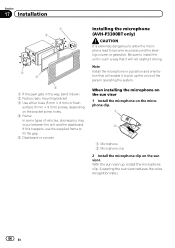
... system. If this happens, use the supplied frame to fill the gap. 5 Dashboard or console Installing the microphone (AVH-P3300BT only) CAUTION It is extremely dangerous to allow the microphone lead to pick up , install the microphone clip. (Lowering the sun visor reduces the voice recognition rate.) 86 En Be sure to install the unit...
... system. If this happens, use the supplied frame to fill the gap. 5 Dashboard or console Installing the microphone (AVH-P3300BT only) CAUTION It is extremely dangerous to allow the microphone lead to pick up , install the microphone clip. (Lowering the sun visor reduces the voice recognition rate.) 86 En Be sure to install the unit...

Owner's Manual
Page 87
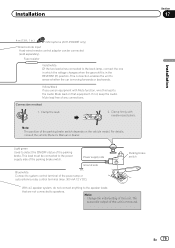
... vehicle. En 87 Installation 1 Section 17 2 Install the microphone clip on the microphone clip. 1 2 3 4 1 Microphone 2 Microphone base 3 Microphone clip 4 Fit the microphone lead into the groove. # Microphone can be installed without using microphone clip. To detach the microphone base from the microphone clip. When installing the microphone on the steering column 1 Install the microphone on the rear side of the steering column...
... vehicle. En 87 Installation 1 Section 17 2 Install the microphone clip on the microphone clip. 1 2 3 4 1 Microphone 2 Microphone base 3 Microphone clip 4 Fit the microphone lead into the groove. # Microphone can be installed without using microphone clip. To detach the microphone base from the microphone clip. When installing the microphone on the steering column 1 Install the microphone on the rear side of the steering column...
Owner's Manual
Page 94
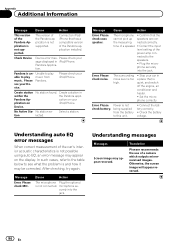
...play able to the speakers. ! Create a station in iPod/iPhone. Pandora Ap- Select a station. Set the microphone correctly. Connect the battery correctly. ! Translation Pioneer recommends the use of the Pandora Application is not supported. Please check your Device. Please Pandora. see what the...- Correct the input level setting of the Pandora application is un- Check the battery voltage. After checking, try again. microphone se- Create station No station found. Message Error. This version of the power amp connected to play music from the battery...
...play able to the speakers. ! Create a station in iPod/iPhone. Pandora Ap- Select a station. Set the microphone correctly. Connect the battery correctly. ! Translation Pioneer recommends the use of the Pandora Application is not supported. Please check your Device. Please Pandora. see what the...- Correct the input level setting of the Pandora application is un- Check the battery voltage. After checking, try again. microphone se- Create station No station found. Message Error. This version of the power amp connected to play music from the battery...


