Installation Manual
Page 2
...of the vehicle's operating systems of contact with compliant rear visibility systems should not install or use the Pioneer receiver unless it is not covered by warranty. We recommend that only authorized Pioneer service personnel, who have rear visibility systems. Owners of vehicles equipped with metal... of the lead will require an adaptor, sold in certain new vehicles sold separately. Connection Precautions Your new product and this manual • Do not operate this product to the vehicle battery. NEVER SERVICE THIS PRODUCT YOURSELF. Precautions before connecting the system ...
...of the vehicle's operating systems of contact with compliant rear visibility systems should not install or use the Pioneer receiver unless it is not covered by warranty. We recommend that only authorized Pioneer service personnel, who have rear visibility systems. Owners of vehicles equipped with metal... of the lead will require an adaptor, sold in certain new vehicles sold separately. Connection Precautions Your new product and this manual • Do not operate this product to the vehicle battery. NEVER SERVICE THIS PRODUCT YOURSELF. Precautions before connecting the system ...
Installation Manual
Page 3
...Before using and/or connecting the iDatalink Maestro adapter, you will need to first flash the Maestro module with Navigation system) This product Pioneer navigation system Contact your dealer to metal parts of the rating prescribed on the ignition switch. This connection enables the unit to 8 ... position. SiriusXM Connect Vehicle Tuner Refer to connect the ground wire first. You can be connected to the manual for this product. • This product cannot be installed in .) Wired remote input Hard-wired remote control adapter can find the device number To power supply Power ...
...Before using and/or connecting the iDatalink Maestro adapter, you will need to first flash the Maestro module with Navigation system) This product Pioneer navigation system Contact your dealer to metal parts of the rating prescribed on the ignition switch. This connection enables the unit to 8 ... position. SiriusXM Connect Vehicle Tuner Refer to connect the ground wire first. You can be connected to the manual for this product. • This product cannot be installed in .) Wired remote input Hard-wired remote control adapter can find the device number To power supply Power ...

Installation Manual
Page 6
... place in front of or next to the deployment area of your vehicle's owner's manual for errors in the vehicle's location display, and might otherwise cause reduced display performance. • When installing, to ensure proper heat dispersal when using this product, temporarily connect the wiring to ...features, including airbags, hazard lamp buttons or (iii) impair the driver's ability to safely operate the vehicle. • Never install this product, use the external video component. Places exposed to the Operation Manual. For details, refer to direct sunlight, such as : -
... place in front of or next to the deployment area of your vehicle's owner's manual for errors in the vehicle's location display, and might otherwise cause reduced display performance. • When installing, to ensure proper heat dispersal when using this product, temporarily connect the wiring to ...features, including airbags, hazard lamp buttons or (iii) impair the driver's ability to safely operate the vehicle. • Never install this product, use the external video component. Places exposed to the Operation Manual. For details, refer to direct sunlight, such as : -

Owners Manual
Page 6
... while driving. - 6 - Important safety information WARNING • Do not attempt to consult your seat belt is applied. • Keep this manual handy as there are ever in an accident, your injuries can be sure to read and fully understand the following safety information: • Do not... traffic hazard and is illegal in a safe place, turn off (ACC OFF) immediately and consult your dealer or the nearest authorized Pioneer Service Station. Installation or servicing of this product, or any of electric shock, injury or other abnormal signs on the LCD screen, turn the ignition...
... while driving. - 6 - Important safety information WARNING • Do not attempt to consult your seat belt is applied. • Keep this manual handy as there are ever in an accident, your injuries can be sure to read and fully understand the following safety information: • Do not... traffic hazard and is illegal in a safe place, turn off (ACC OFF) immediately and consult your dealer or the nearest authorized Pioneer Service Station. Installation or servicing of this product, or any of electric shock, injury or other abnormal signs on the LCD screen, turn the ignition...
Owners Manual
Page 31
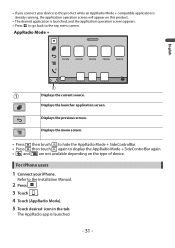
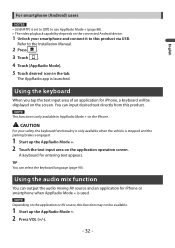
... the top menu screen. Displays the menu screen. • Press then touch to hide the AppRadio Mode + SideControlBar. • Press then touch again to the Installation Manual. 2 Press . 3 Touch . 4 Touch [AppRadio Mode]. 5 Touch desired icon in the tab. Refer to display the AppRadio Mode + SideControlBar again. • and are not available depending...
... the top menu screen. Displays the menu screen. • Press then touch to hide the AppRadio Mode + SideControlBar. • Press then touch again to the Installation Manual. 2 Press . 3 Touch . 4 Touch [AppRadio Mode]. 5 Touch desired icon in the tab. Refer to display the AppRadio Mode + SideControlBar again. • and are not available depending...
Owners Manual
Page 32
...] to use AppRadio Mode + (page 88). • The video playback capability depends on the connected Android device. 1 Unlock your smartphone and connect it to the Installation Manual. 2 Press . 3 Touch . 4 Touch [AppRadio Mode]. 5 Touch desired icon in AppRadio Mode + on the screen. NOTE Depending on the application operation screen. A keyboard for iPhone, a keyboard...
...] to use AppRadio Mode + (page 88). • The video playback capability depends on the connected Android device. 1 Unlock your smartphone and connect it to the Installation Manual. 2 Press . 3 Touch . 4 Touch [AppRadio Mode]. 5 Touch desired icon in AppRadio Mode + on the screen. NOTE Depending on the application operation screen. A keyboard for iPhone, a keyboard...
Owners Manual
Page 64
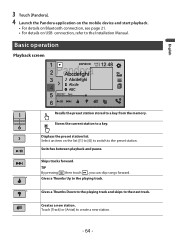
... a new station. - 64 - Displays the preset station list. Switches between playback and pause. Creates a new station. Select an item on USB connection, refer to the Installation Manual. 3 Touch [Pandora]. 4 Launch the Pandora application on the mobile device and start playback. • For details on Bluetooth connection, see page 21. • For details...
... a new station. - 64 - Displays the preset station list. Switches between playback and pause. Creates a new station. Select an item on USB connection, refer to the Installation Manual. 3 Touch [Pandora]. 4 Launch the Pandora application on the mobile device and start playback. • For details on Bluetooth connection, see page 21. • For details...
Owners Manual
Page 67
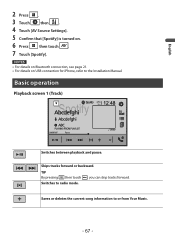
Saves or deletes the current song information to radio mode. , you can skip tracks forward. Basic operation Playback screen 1 (Track) Switches between playback and pause. Skips tracks forward or backward. TIP By pressing then touch Switches to or from Your Music. - 67 - English 2 Press . 3 Touch then . 4 Touch [AV Source Settings]. 5 Confirm that [Spotify] is turned on USB connection for iPhone, refer to the Installation Manual. NOTES • For details on Bluetooth connection, see page 21. • For details on . 6 Press then touch . 7 Touch [Spotify].
Saves or deletes the current song information to radio mode. , you can skip tracks forward. Basic operation Playback screen 1 (Track) Switches between playback and pause. Skips tracks forward or backward. TIP By pressing then touch Switches to or from Your Music. - 67 - English 2 Press . 3 Touch then . 4 Touch [AV Source Settings]. 5 Confirm that [Spotify] is turned on USB connection for iPhone, refer to the Installation Manual. NOTES • For details on Bluetooth connection, see page 21. • For details on . 6 Press then touch . 7 Touch [Spotify].

Owners Manual
Page 78
English AUX You can display the video image output by the device connected to the Installation Manual. CAUTION For safety reasons, video images cannot be viewed while your vehicle is in a safe place and apply the parking brake. For details, refer to ...
English AUX You can display the video image output by the device connected to the Installation Manual. CAUTION For safety reasons, video images cannot be viewed while your vehicle is in a safe place and apply the parking brake. For details, refer to ...
Owners Manual
Page 80
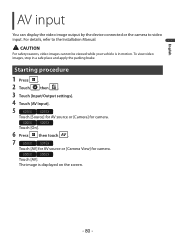
... apply the parking brake. Starting procedure 1 Press . 2 Touch then . 3 Touch [Input/Output settings]. 4 Touch [AV Input]. 5 601EX 501EX Touch [Source] for AV source or [Camera] for camera. 600EX 500EX Touch [On]. 6 Press then touch . 7 601EX 501EX Touch [AV] for AV source or [Camera View] for camera. 600EX 500EX Touch [AV]. CAUTION For... - For details, refer to video input. English AV input You can display the video image output by the device connected or the camera to the Installation Manual.
... apply the parking brake. Starting procedure 1 Press . 2 Touch then . 3 Touch [Input/Output settings]. 4 Touch [AV Input]. 5 601EX 501EX Touch [Source] for AV source or [Camera] for camera. 600EX 500EX Touch [On]. 6 Press then touch . 7 601EX 501EX Touch [AV] for AV source or [Camera View] for camera. 600EX 500EX Touch [AV]. CAUTION For... - For details, refer to video input. English AV input You can display the video image output by the device connected or the camera to the Installation Manual.

Owners Manual
Page 83
...using and/or connecting the iDatalink Maestro adapter, you of such information may be different from the contents on the screen described in this manual. • When information on your vehicle is transmitted to select the correct radio model for the vehicle. http://maestro.idatalink.com/ ...Access the following URL to determine what features are compatible with the iDatalink adapter, refer to the information on our website. • After installing the iDatalink adapter, be sure to add visual screens such as steering wheel controls, warning chimes, driver safety systems, and etc. http...
...using and/or connecting the iDatalink Maestro adapter, you of such information may be different from the contents on the screen described in this manual. • When information on your vehicle is transmitted to select the correct radio model for the vehicle. http://maestro.idatalink.com/ ...Access the following URL to determine what features are compatible with the iDatalink adapter, refer to the information on our website. • After installing the iDatalink adapter, be sure to add visual screens such as steering wheel controls, warning chimes, driver safety systems, and etc. http...

Owners Manual
Page 84
...firmware, refer to iDatalink Maestro website. • For details on connecting this product to iDatalink Maestro, refer to the Installation Manual. • You can check and operate the following screens after selecting [Car Features] in the starting procedure. Touch one... of the icons on your iDatalink Maestro module. 4 Connect this product to iDatalink Maestro, and then install this product to change the feature. Starting procedure 1 Connect the iDatalink Maestro adapter to the Installation manual. 2 Press then touch . 3 Touch [Car Sources] or [Car Features]. For details of the...
...firmware, refer to iDatalink Maestro website. • For details on connecting this product to iDatalink Maestro, refer to the Installation Manual. • You can check and operate the following screens after selecting [Car Features] in the starting procedure. Touch one... of the icons on your iDatalink Maestro module. 4 Connect this product to iDatalink Maestro, and then install this product to change the feature. Starting procedure 1 Connect the iDatalink Maestro adapter to the Installation manual. 2 Press then touch . 3 Touch [Car Sources] or [Car Features]. For details of the...
Owners Manual
Page 110
...switch (ACC OFF). When the operation on (ACC ON) again. - When an Android device is connected, disconnect the Bluetooth connection from this manual to the installation manual.) Black screen displayed when the vehicle is in reverse. The camera polarity is not set to on the first of the two ... the first phone is dialing, ringing or a call is connected to the brown input on the back of the receiver. (Refer to the installation manual.) The reverse lead on the receiver may not be connected to the System Settings section of the smartphone rose due to prolonged use ...
...switch (ACC OFF). When the operation on (ACC ON) again. - When an Android device is connected, disconnect the Bluetooth connection from this manual to the installation manual.) Black screen displayed when the vehicle is in reverse. The camera polarity is not set to on the first of the two ... the first phone is dialing, ringing or a call is connected to the brown input on the back of the receiver. (Refer to the installation manual.) The reverse lead on the receiver may not be connected to the System Settings section of the smartphone rose due to prolonged use ...


