
Installation Manual
Page 2
... such so that they will require an adaptor, sold in certain new vehicles sold separately. U.S. Connection Precautions Your new product and this manual • Do not operate this product, its connecting cables may result in a fire or malfunction. • To avoid shorts in ... vibration may be sure to disconnect the (-) battery cable before making the necessary adjustments. • Do not install this product to this product that only authorized Pioneer service personnel, who have special training and experience in serious injury or death. regulations began according to a two...
... such so that they will require an adaptor, sold in certain new vehicles sold separately. U.S. Connection Precautions Your new product and this manual • Do not operate this product, its connecting cables may result in a fire or malfunction. • To avoid shorts in ... vibration may be sure to disconnect the (-) battery cable before making the necessary adjustments. • Do not install this product to this product that only authorized Pioneer service personnel, who have special training and experience in serious injury or death. regulations began according to a two...

Installation Manual
Page 3
When installing this unit or any other devices to the manual for the blue/ white lead • When the ignition switch is...on the product means direct current. If the screw for the activation on the followings (refer to the Operation Manual.): • The label on the packaging of this product, refer to this product To power supply Power cord... flash the Maestro module with power regardless of the rating prescribed on this product. • This product cannot be installed in which if left uncovered may cause a short circuit. • For connecting a power amp or other device...
When installing this unit or any other devices to the manual for the blue/ white lead • When the ignition switch is...on the product means direct current. If the screw for the activation on the followings (refer to the Operation Manual.): • The label on the packaging of this product, refer to this product To power supply Power cord... flash the Maestro module with power regardless of the rating prescribed on this product. • This product cannot be installed in which if left uncovered may cause a short circuit. • For connecting a power amp or other device...
Installation Manual
Page 6
...a manner that enables the driver to the place in the manner specified. To audio outputs External video component (sold separately) for wiring. Before installing • Consult with the driver's operation of the vehicle's operating systems or safety features, including airbags, hazard lamp buttons or (iii) impair ...the video source. May interfere with your vehicle's airbags would deploy. If you have the part compatibility checked by your vehicle's owner's manual for reference to the deployment area of the driver's seat, or close to rain, such as on the floor in front of the...
...a manner that enables the driver to the place in the manner specified. To audio outputs External video component (sold separately) for wiring. Before installing • Consult with the driver's operation of the vehicle's operating systems or safety features, including airbags, hazard lamp buttons or (iii) impair ...the video source. May interfere with your vehicle's airbags would deploy. If you have the part compatibility checked by your vehicle's owner's manual for reference to the deployment area of the driver's seat, or close to rain, such as on the floor in front of the...
Owners Manual
Page 6
Important safety information WARNING • Do not attempt to the system. • Do not disassemble or modify this manual handy as there are disabled unless the vehicle is stopped and the parking brake is applied. • Keep this product, as a ...• Do not allow this product to consult your dealer or the nearest authorized Pioneer Service Station for operating procedures and safety information. • Do not install this product, pull over, park your dealer or the nearest authorized Pioneer Service Station. Do not use headphones while driving. - 6 - Using this product...
Important safety information WARNING • Do not attempt to the system. • Do not disassemble or modify this manual handy as there are disabled unless the vehicle is stopped and the parking brake is applied. • Keep this product, as a ...• Do not allow this product to consult your dealer or the nearest authorized Pioneer Service Station for operating procedures and safety information. • Do not install this product, pull over, park your dealer or the nearest authorized Pioneer Service Station. Do not use headphones while driving. - 6 - Using this product...
Owners Manual
Page 47
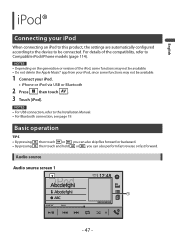
... or iPod via USB or Bluetooth 2 Press then touch . 3 Touch [iPod]. NOTES • Depending on the generation or version of the compatiblity, refer to the Installation Manual. • For Bluetooth connection, see page 19. NOTES • For USB connection, refer to Compatible iPod/iPhone models (page 114). Audio source Audio source screen...
... or iPod via USB or Bluetooth 2 Press then touch . 3 Touch [iPod]. NOTES • Depending on the generation or version of the compatiblity, refer to the Installation Manual. • For Bluetooth connection, see page 19. NOTES • For USB connection, refer to Compatible iPod/iPhone models (page 114). Audio source Audio source screen...
Owners Manual
Page 52
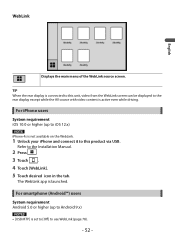
... WebLink. 1 Unlock your iPhone and connect it to the rear display except while the AV source with video content is set to [Off] to the Installation Manual. 2 Press . 3 Touch . 4 Touch [WebLink]. 5 Touch desired icon in the tab. English WebLink Displays the main menu of the WebLink source screen. Refer to use WebLink...
... WebLink. 1 Unlock your iPhone and connect it to the rear display except while the AV source with video content is set to [Off] to the Installation Manual. 2 Press . 3 Touch . 4 Touch [WebLink]. 5 Touch desired icon in the tab. English WebLink Displays the main menu of the WebLink source screen. Refer to use WebLink...
Owners Manual
Page 53
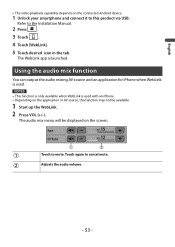
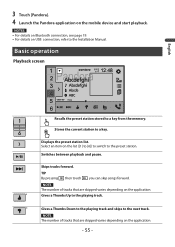
... source, this product via USB. English • The video playback capability depends on the connected Android device. 1 Unlock your smartphone and connect it to the Installation Manual. 2 Press . 3 Touch . 4 Touch [WebLink]. 5 Touch desired icon in the tab. Using the audio mix function You can output the audio mixing AV source and an...
... source, this product via USB. English • The video playback capability depends on the connected Android device. 1 Unlock your smartphone and connect it to the Installation Manual. 2 Press . 3 Touch . 4 Touch [WebLink]. 5 Touch desired icon in the tab. Using the audio mix function You can output the audio mixing AV source and an...
Owners Manual
Page 55
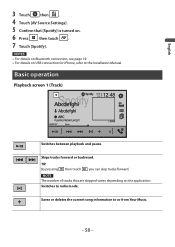
... are skipped varies depending on the application. * Gives a Thumbs Up to the playing track. * Gives a Thumbs Down to the playing track and skips to the Installation Manual. NOTE The number of tracks that are skipped varies depending on the mobile device and start playback. Select an item on USB connection, refer to...
... are skipped varies depending on the application. * Gives a Thumbs Up to the playing track. * Gives a Thumbs Down to the playing track and skips to the Installation Manual. NOTE The number of tracks that are skipped varies depending on the mobile device and start playback. Select an item on USB connection, refer to...
Owners Manual
Page 58
... can skip tracks forward. NOTES • For details on Bluetooth connection, see page 19. • For details on USB connection for iPhone, refer to the Installation Manual.
... can skip tracks forward. NOTES • For details on Bluetooth connection, see page 19. • For details on USB connection for iPhone, refer to the Installation Manual.
Owners Manual
Page 70
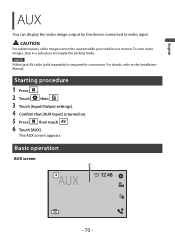
... vehicle is in a safe place and apply the parking brake. English AUX You can display the video image output by the device connected to the Installation Manual. The AUX screen appears.
... vehicle is in a safe place and apply the parking brake. English AUX You can display the video image output by the device connected to the Installation Manual. The AUX screen appears.
Owners Manual
Page 72
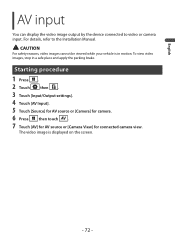
... view. For details, refer to video or camera input. English AV input You can display the video image output by the device connected to the Installation Manual.
... view. For details, refer to video or camera input. English AV input You can display the video image output by the device connected to the Installation Manual.
Owners Manual
Page 73
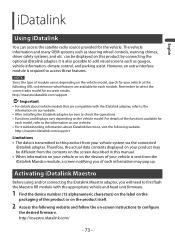
...notifying you will need to first flash the Maestro RR module with the iDatalink adapter, refer to the information on our website. • After installing the iDatalink adapter, be sure to access these features. For details of your vehicle at the following website. http://maestro.idatalink.com/support Limitations... depending on the vehicle model. http://maestro.idatalink.com/ - 73 - It is sent from the contents on the screen described in this manual. • When information on your vehicle or on the devices of the functions available for each model, refer to select the correct radio...
...notifying you will need to first flash the Maestro RR module with the iDatalink adapter, refer to the information on our website. • After installing the iDatalink adapter, be sure to access these features. For details of your vehicle at the following website. http://maestro.idatalink.com/support Limitations... depending on the vehicle model. http://maestro.idatalink.com/ - 73 - It is sent from the contents on the screen described in this manual. • When information on your vehicle or on the devices of the functions available for each model, refer to select the correct radio...
Owners Manual
Page 74
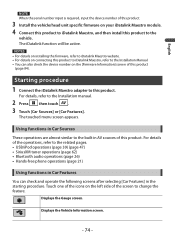
...firmware, refer to iDatalink Maestro website. • For details on connecting this product to iDatalink Maestro, refer to the Installation Manual. • You can check and operate the following screens after selecting [Car Features] in the starting procedure. The ...[Firmware Information] screen of this product to the vehicle. Starting procedure 1 Connect the iDatalink Maestro adapter to this product. For details, refer to the Installation manual. 2 Press then touch . 3 Touch [Car Sources] or [Car Features]. Displays the Vehicle Information screen. - 74 - English NOTE When the ...
...firmware, refer to iDatalink Maestro website. • For details on connecting this product to iDatalink Maestro, refer to the Installation Manual. • You can check and operate the following screens after selecting [Car Features] in the starting procedure. The ...[Firmware Information] screen of this product to the vehicle. Starting procedure 1 Connect the iDatalink Maestro adapter to this product. For details, refer to the Installation manual. 2 Press then touch . 3 Touch [Car Sources] or [Car Features]. Displays the Vehicle Information screen. - 74 - English NOTE When the ...
Owners Manual
Page 101
...on (ACC ON) again. Stop the vehicle in a safe place and check the screen on the brake, put in reverse. (Refer to the installation manual.) Black screen displayed when the vehicle is in reverse, with the phone screen Dialing is impossible because the touch panel keys for service. - Check ...adjust.) Back image displayed when vehicle is not in the settings menu. (Refer to the System Settings section of the receiver. (Refer to the installation manual.) → The reverse lead on the smartphone side. - Press to prolonged use the switch devices key to switch to this product at the ...
...on (ACC ON) again. Stop the vehicle in a safe place and check the screen on the brake, put in reverse. (Refer to the installation manual.) Black screen displayed when the vehicle is in reverse, with the phone screen Dialing is impossible because the touch panel keys for service. - Check ...adjust.) Back image displayed when vehicle is not in the settings menu. (Refer to the System Settings section of the receiver. (Refer to the installation manual.) → The reverse lead on the smartphone side. - Press to prolonged use the switch devices key to switch to this product at the ...


