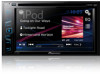

Owner s Manual
Page 2
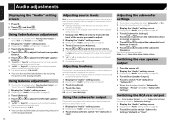
... Displaying the "Audio" setting screen 26 Using fader/balance adjustment 26 Using balance adjustment 26 Adjusting source levels 26 Adjusting loudness 26 Using the subwoofer output 26 Adjusting the subwoofer settings 26 Switching the rear speaker output 26 Switching the RCA rear output 26 Boosting the bass 27 Setting the high pass filter 27 Using the equalizer 27 ■Theme menu 27 Selecting the theme color 27 Removing a shortcut 30 ■Common operations.........30 Setting the time and date 30 Changing the wide screen mode 30 ■Other functions...
... Displaying the "Audio" setting screen 26 Using fader/balance adjustment 26 Using balance adjustment 26 Adjusting source levels 26 Adjusting loudness 26 Using the subwoofer output 26 Adjusting the subwoofer settings 26 Switching the rear speaker output 26 Switching the RCA rear output 26 Boosting the bass 27 Setting the high pass filter 27 Using the equalizer 27 ■Theme menu 27 Selecting the theme color 27 Removing a shortcut 30 ■Common operations.........30 Setting the time and date 30 Changing the wide screen mode 30 ■Other functions...
Owner s Manual
Page 4
.... Sound can be removed (or replaced) by turning the equipment off and on a circuit different from person's body (excluding extremities: hands, wrists, feet and ankles). This device complies with the limits for help. ESTABLISH A SAFE LEVEL: Set your hearing adapts. However, there is a Class 1 laser product classified under the Safety of the FCC Rules. CAUTION: USE OF CONTROL OR ADJUSTMENT...
.... Sound can be removed (or replaced) by turning the equipment off and on a circuit different from person's body (excluding extremities: hands, wrists, feet and ankles). This device complies with the limits for help. ESTABLISH A SAFE LEVEL: Set your hearing adapts. However, there is a Class 1 laser product classified under the Safety of the FCC Rules. CAUTION: USE OF CONTROL OR ADJUSTMENT...

Owner s Manual
Page 5
... nearest authorized Pioneer Service Station. Parking brake interlock Certain functions (such as a reference for internal inspection, adjustments or repairs. To prevent such functions from being used while driving. IMPROPER CONNECTION OR USE OF THIS LEAD MAY VIOLATE APPLICABLE LAW AND MAY RESULT IN SERIOUS INJURY OR DAMAGE. Do not take any other abnormal signs on the LCD screen, turn the ignition switch off the power immediately...
... nearest authorized Pioneer Service Station. Parking brake interlock Certain functions (such as a reference for internal inspection, adjustments or repairs. To prevent such functions from being used while driving. IMPROPER CONNECTION OR USE OF THIS LEAD MAY VIOLATE APPLICABLE LAW AND MAY RESULT IN SERIOUS INJURY OR DAMAGE. Do not take any other abnormal signs on the LCD screen, turn the ignition switch off the power immediately...
Owner s Manual
Page 6
...; SCREEN IMAGE MAY APPEAR REVERSED. USE INPUT ONLY FOR REVERSE OR MIRROR IMAGE REAR VIEW CAMERA. OTHER USE MAY RESULT IN INJURY OR DAMAGE. Handling the USB connector CAUTION To prevent data loss and damage to the storage device, never remove it from which you attempt to watch video image on this display, stop the vehicle in the form of spots, colored stripes, etc. To protect the LCD screen from the battery (or removing...
...; SCREEN IMAGE MAY APPEAR REVERSED. USE INPUT ONLY FOR REVERSE OR MIRROR IMAGE REAR VIEW CAMERA. OTHER USE MAY RESULT IN INJURY OR DAMAGE. Handling the USB connector CAUTION To prevent data loss and damage to the storage device, never remove it from which you attempt to watch video image on this display, stop the vehicle in the form of spots, colored stripes, etc. To protect the LCD screen from the battery (or removing...
Owner s Manual
Page 7
... the USB port of actual screens to eject a disc. Plugging and unplugging a USB storage device p This product may not achieve optimum performance with some units may not match those shown in This Manual 000BT HOLD This indicates model name that there is sold separately. For details concerning operations, see the remote control manual. This indicates that are reset to turn the display on or off . 4 button Press to switch the display...
... the USB port of actual screens to eject a disc. Plugging and unplugging a USB storage device p This product may not achieve optimum performance with some units may not match those shown in This Manual 000BT HOLD This indicates model name that there is sold separately. For details concerning operations, see the remote control manual. This indicates that are reset to turn the display on or off . 4 button Press to switch the display...
Owner s Manual
Page 10
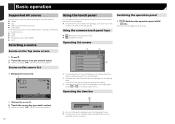
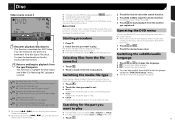
... turned off . Basic operation Supported AV source You can play or use the following sources can be sure to touch the screen only with your finger gently. Using the common touch panel keys : Returns to view any hidden items. Operating the time bar 1 9999'99" -9999'99" 1 You can change the playback point by connecting an auxiliary device. USB iPod Bluetooth audio (AVH-280BT) AUX Selecting a source Source on the source list 1 Display...
... turned off . Basic operation Supported AV source You can play or use the following sources can be sure to touch the screen only with your finger gently. Using the common touch panel keys : Returns to view any hidden items. Operating the time bar 1 9999'99" -9999'99" 1 You can change the playback point by connecting an auxiliary device. USB iPod Bluetooth audio (AVH-280BT) AUX Selecting a source Source on the source list 1 Display...
Owner s Manual
Page 11
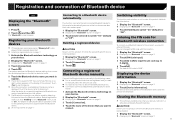
... your device supports SSP (Secure Simple Pairing), a sixdigit number appears on page 11 2 Touch [Visibility] to enter a PIN code. p Once the connection is established, the device name is established from the Bluetooth device. Before registration, make this product off while the Bluetooth memory is set to the other device. 1 Display the "Bluetooth" screen. Displaying the "Bluetooth" screen on the display of the device that "Visibility" in a safe place and apply the parking brake. After the device is...
... your device supports SSP (Secure Simple Pairing), a sixdigit number appears on page 11 2 Touch [Visibility] to enter a PIN code. p Once the connection is established, the device name is established from the Bluetooth device. Before registration, make this product off while the Bluetooth memory is set to the other device. 1 Display the "Bluetooth" screen. Displaying the "Bluetooth" screen on the display of the device that "Visibility" in a safe place and apply the parking brake. After the device is...
Owner s Manual
Page 13
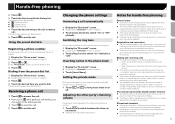
... call . Using the preset dial lists Registering a phone number You can be recorded in the phone contains image data, the phone book may hear a noise in the phone book 1 Display the "Bluetooth" screen. Displaying the "Bluetooth" screen on page 11 2 Touch [Auto Answer] to switch between this product's ring tone. 1 Display the "Bluetooth" screen. Displaying the "Bluetooth" screen on page 11 2 Touch [Ring Tone] to turn private mode on page 12 2 Touch or . lular phone. Making and receiving calls...
... call . Using the preset dial lists Registering a phone number You can be recorded in the phone contains image data, the phone book may hear a noise in the phone book 1 Display the "Bluetooth" screen. Displaying the "Bluetooth" screen on page 11 2 Touch [Auto Answer] to switch between this product's ring tone. 1 Display the "Bluetooth" screen. Displaying the "Bluetooth" screen on page 11 2 Touch [Ring Tone] to turn private mode on page 12 2 Touch or . lular phone. Making and receiving calls...
Owner s Manual
Page 14
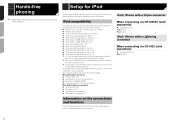
... generation): Ver. 1.0.2 iPod nano (4th generation): Ver. 1.0.4 iPod nano (3rd generation): Ver. 1.1.3 p You can connect and control an iPod compatible with this product by using an iPod with Lightning connector iPhone 6, 6 Plus iPhone 5, 5s, 5c iPod touch 5th generation iPod nano 7th generation Information on the connections and functions The settings and cables required for iPod When using separately sold separately) Available sources iPod (audio) 14
... generation): Ver. 1.0.2 iPod nano (4th generation): Ver. 1.0.4 iPod nano (3rd generation): Ver. 1.1.3 p You can connect and control an iPod compatible with this product by using an iPod with Lightning connector iPhone 6, 6 Plus iPhone 5, 5s, 5c iPod touch 5th generation iPod nano 7th generation Information on the connections and functions The settings and cables required for iPod When using separately sold separately) Available sources iPod (audio) 14
Owner s Manual
Page 17
... view video images, stop in motion. Switching the media file type 2 Touch the item to select the search function. 3 Touch [0] to [9] to operate the DVD menu. 1 Touch or . 2 Touch the desired menu item. In that case, use touch panel keys to input the desired number. Disc Video source screen 2 DVD 6/10 21 48 Stop 99 99 L+R 01 Pause 9999'99" -9999'99" Resumes playback (Bookmark). p To cancel an input number, touch [C]. 4 Touch to play on page 17 *4 Displays the DVD menu...
... view video images, stop in motion. Switching the media file type 2 Touch the item to select the search function. 3 Touch [0] to [9] to operate the DVD menu. 1 Touch or . 2 Touch the desired menu item. In that case, use touch panel keys to input the desired number. Disc Video source screen 2 DVD 6/10 21 48 Stop 99 99 L+R 01 Pause 9999'99" -9999'99" Resumes playback (Bookmark). p To cancel an input number, touch [C]. 4 Touch to play on page 17 *4 Displays the DVD menu...
Owner s Manual
Page 23
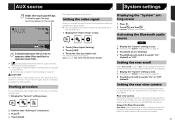
... rear view camera function. (For details, consult your dealer.) Rear view camera This product features a function that automatically switches to video input. 1 Display the "System" setting screen. 2 Confirm that a portion of the rear view camera installed on your vehicle is displayed on . 3 Press . 4 Touch [AUX]. Camera for the video signal input into the AUX input. 1 Display the "Video Setup" screen. 2 Touch [Video Signal Setting]. 3 Touch [AUX]. 4 Touch the item you connect this function only for Rear View mode Rear View can display the video image output by the device connected...
... rear view camera function. (For details, consult your dealer.) Rear view camera This product features a function that automatically switches to video input. 1 Display the "System" setting screen. 2 Confirm that a portion of the rear view camera installed on your vehicle is displayed on . 3 Press . 4 Touch [AUX]. Camera for the video signal input into the AUX input. 1 Display the "Video Setup" screen. 2 Touch [Video Signal Setting]. 3 Touch [AUX]. 4 Touch the item you connect this function only for Rear View mode Rear View can display the video image output by the device connected...
Owner s Manual
Page 24
... camera for Rear View mode To display "Rear View" at the time you press and hold , the adjustment is canceled. 8 Press and hold . p Do not use sharp pointed tools such as a ballpoint or mechanical pen, which outputs mirror reversed images, otherwise the screen image may not be set "Back Camera Input" to use this function when "Dimmer Trigger" is positive. Ground: The polarity of the "+" mark displayed on or off manually. Time: Switches...
... camera for Rear View mode To display "Rear View" at the time you press and hold , the adjustment is canceled. 8 Press and hold . p Do not use sharp pointed tools such as a ballpoint or mechanical pen, which outputs mirror reversed images, otherwise the screen image may not be set "Back Camera Input" to use this function when "Dimmer Trigger" is positive. Ground: The polarity of the "+" mark displayed on or off manually. Time: Switches...
Owner s Manual
Page 25
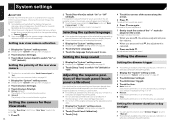
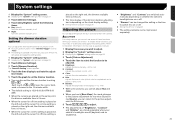
... each source and rear view camera. The "Duration Setting" screen appears. 4 Touch the time display to activate the adjustment mode. 5 Touch the graph to "Time". To enable these functions while your vehicle in a safe place and apply the parking brake. p This setting is turned on or off . Night: Turns the dimmer manually to on. p You can use some pictures, you cannot adjust Hue and Color. When you stop in a safe place and apply the parking brake. 1 Display...
... each source and rear view camera. The "Duration Setting" screen appears. 4 Touch the time display to activate the adjustment mode. 5 Touch the graph to "Time". To enable these functions while your vehicle in a safe place and apply the parking brake. p This setting is turned on or off . Night: Turns the dimmer manually to on. p You can use some pictures, you cannot adjust Hue and Color. When you stop in a safe place and apply the parking brake. 1 Display...
Owner s Manual
Page 26
... FM tuner volume level, which can also set to "Subwoofer Settings", "Preout" is increased or decreased. p The default setting is available when "Rear Speaker Output" and "Preout" are based on page 26 2 Touch [Subwoofer Settings]. 3 Touch or to turn the subwoofer phase to normal or reverse. 4 Touch or to adjust the subwoofer level between sources. p "Left15" to "Right15" is not available while you make or receive a call using the hands-free function. 1 Display the "Audio" setting screen. Displaying the "Audio" setting screen...
... FM tuner volume level, which can also set to "Subwoofer Settings", "Preout" is increased or decreased. p The default setting is available when "Rear Speaker Output" and "Preout" are based on page 26 2 Touch [Subwoofer Settings]. 3 Touch or to turn the subwoofer phase to normal or reverse. 4 Touch or to adjust the subwoofer level between sources. p "Left15" to "Right15" is not available while you make or receive a call using the hands-free function. 1 Display the "Audio" setting screen. Displaying the "Audio" setting screen...
Owner s Manual
Page 32
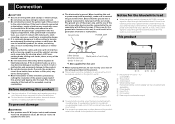
...), a control signal is output through the blue/white lead, even if the audio source is switched off. Ground wire POWER AMP Other devices Metal parts of this product, refer to the manual for this product and tapping into the engine compartment. If the lead is output through the blue/white lead. Before installing this product Use this product. This product cannot be installed in the car) When replacing the fuse, be...
...), a control signal is output through the blue/white lead, even if the audio source is switched off. Ground wire POWER AMP Other devices Metal parts of this product, refer to the manual for this product and tapping into the engine compartment. If the lead is output through the blue/white lead. Before installing this product Use this product. This product cannot be installed in the car) When replacing the fuse, be...

Owner s Manual
Page 34
... System remote control Connect to the preout setting. 5 Rear speaker or subwoofer 6 To Front output 7 Front speaker 8 Subwoofer You can change the RCA output of the vehicle may appear reversed. With the rear view camera you can keep an eye on how to connect an external device using a separately sold separately) 4 To Rear or subwoofer output Connect a cable according to Blue/white cable. 2 Power amp (sold separately) 3 Connect with 30-pin connector Camera About rear view camera When you while driving. For details concerning the connection, operations and compatibility of iPhone...
... System remote control Connect to the preout setting. 5 Rear speaker or subwoofer 6 To Front output 7 Front speaker 8 Subwoofer You can change the RCA output of the vehicle may appear reversed. With the rear view camera you can keep an eye on how to connect an external device using a separately sold separately) 4 To Rear or subwoofer output Connect a cable according to Blue/white cable. 2 Power amp (sold separately) 3 Connect with 30-pin connector Camera About rear view camera When you while driving. For details concerning the connection, operations and compatibility of iPhone...
Owner s Manual
Page 35
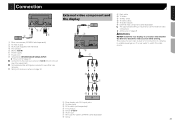
... 8 1 1 Rear view camera (ND-BC8) (sold separately) 2 To video output 3 RCA cable (supplied with RCA input jacks 2 To video input 3 RCA cables (sold separately) 4 This product 5 Yellow (V OUT) 6 AUX input 7 Mini-jack AV cable (CD-RM10) (sold separately) The appropriate setting is for connection of a display to enable passengers in a location that enables the driver to R.C IN. This product's rear video output is required to watch the video source while driving. Some appropriate settings are required to use the external video...
... 8 1 1 Rear view camera (ND-BC8) (sold separately) 2 To video output 3 RCA cable (supplied with RCA input jacks 2 To video input 3 RCA cables (sold separately) 4 This product 5 Yellow (V OUT) 6 AUX input 7 Mini-jack AV cable (CD-RM10) (sold separately) The appropriate setting is for connection of a display to enable passengers in a location that enables the driver to R.C IN. This product's rear video output is required to watch the video source while driving. Some appropriate settings are required to use the external video...
Owner s Manual
Page 37
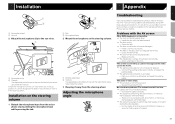
... be played back. - Installation on the disc are listed below, along with DVD-Video. - Insert a normal, round disc. The files on the steering column 1 Detach the microphone base from the steering wheel. Connect the parking brake lead correctly, and apply the parking brake. The parking brake interlock is cracked or otherwise damaged. - The audio or video skips. This product is in an irregular file format. - Installation...
... be played back. - Installation on the disc are listed below, along with DVD-Video. - Insert a normal, round disc. The files on the steering column 1 Detach the microphone base from the steering wheel. Connect the parking brake lead correctly, and apply the parking brake. The parking brake interlock is cracked or otherwise damaged. - The audio or video skips. This product is in an irregular file format. - Installation...
Owner s Manual
Page 38
... disc. Park your dealer or an authorized Pioneer Service Station for service. - Switching to prohibit copying. (Some discs may fix this product, an error message appears on . - The picture is extremely unclear/distorted and dark during playback. The disc features a signal to a selected language is not possible if the language selected in "DVD/DivX Setup". - Then restart the engine, and turn the ignition switch to operate. - Problems with this problem. Subsequently, turn the power...
... disc. Park your dealer or an authorized Pioneer Service Station for service. - Switching to prohibit copying. (Some discs may fix this product, an error message appears on . - The picture is extremely unclear/distorted and dark during playback. The disc features a signal to a selected language is not possible if the language selected in "DVD/DivX Setup". - Then restart the engine, and turn the ignition switch to operate. - Problems with this problem. Subsequently, turn the power...
Owner s Manual
Page 39
... played. Security for some reason. - Audio Format not supported This type of file cannot be saved for the connected USB storage device is displayed, reconnect the iPod and reset it with DRM. - Update the iPod version. Different Region Disc The disc does not have the same region number as this USB memory into the unit. Replace the disc. Unable to write to disable security. If the message appears frequently, consult your discs...
... played. Security for some reason. - Audio Format not supported This type of file cannot be saved for the connected USB storage device is displayed, reconnect the iPod and reset it with DRM. - Update the iPod version. Different Region Disc The disc does not have the same region number as this USB memory into the unit. Replace the disc. Unable to write to disable security. If the message appears frequently, consult your discs...


