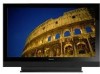
Owner's Manual
Page 3
... harm. PLEASE WRITE THIS SERIAL NUMBER ON YOUR ENCLOSED WARRANTY CARD AND KEEP IN A SECURE AREA. Since the power cord serves as radios and televisions, use shielded cables and connectors for a long period of an accident. Reorient or relocate the receiving antenna. - STANDBY/ON Indicator: The indicator is lit red when the unit is in the standby mode and lit blue when it from the...
... harm. PLEASE WRITE THIS SERIAL NUMBER ON YOUR ENCLOSED WARRANTY CARD AND KEEP IN A SECURE AREA. Since the power cord serves as radios and televisions, use shielded cables and connectors for a long period of an accident. Reorient or relocate the receiving antenna. - STANDBY/ON Indicator: The indicator is lit red when the unit is in the standby mode and lit blue when it from the...
Owner's Manual
Page 4
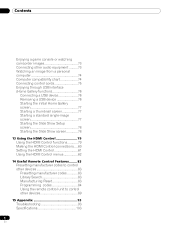
... plasma display 17 Attaching the Pioneer stand 17 Installing the Pioneer speaker 18 When using the hung on wall unit (PDP-6010FD 22 When using the hung on the power 33 Turning off the power 33 Watching TV channels 34 Selecting the antenna 34 4 En Changing channels 34 Changing the volume and sound ......... 35 Changing the language 35 Setting MTS/SAP mode 36 Viewing a channel banner 37 Using the POD service 37 Using the multiscreen functions 37 Splitting the screen 37 Freezing images...
... plasma display 17 Attaching the Pioneer stand 17 Installing the Pioneer speaker 18 When using the hung on wall unit (PDP-6010FD 22 When using the hung on the power 33 Turning off the power 33 Watching TV channels 34 Selecting the antenna 34 4 En Changing channels 34 Changing the volume and sound ......... 35 Changing the language 35 Setting MTS/SAP mode 36 Viewing a channel banner 37 Using the POD service 37 Using the multiscreen functions 37 Splitting the screen 37 Freezing images...
Owner's Manual
Page 5
... a game mode 67 Selecting a screen size manually 67 Selecting a screen size automatically ...... 68 Detecting side masks 68 Changing the brightness at both sides of the screen (Side Mask 68 Room Light Sensor 69 Blue LED Dimmer 69 Orbiter 69 Video Pattern 69 Language setting 69 Displaying setup progress 59 12 Enjoying through External 11 Adjustments and Settings 60 AV Selection 60 Basic picture adjustments 61 Advanced picture adjustments 61 Equipment 70 About External Equipment 70 Watching a DVD image 70...
... a game mode 67 Selecting a screen size manually 67 Selecting a screen size automatically ...... 68 Detecting side masks 68 Changing the brightness at both sides of the screen (Side Mask 68 Room Light Sensor 69 Blue LED Dimmer 69 Orbiter 69 Video Pattern 69 Language setting 69 Displaying setup progress 59 12 Enjoying through External 11 Adjustments and Settings 60 AV Selection 60 Basic picture adjustments 61 Advanced picture adjustments 61 Equipment 70 About External Equipment 70 Watching a DVD image 70...
Owner's Manual
Page 6
... Show Setup screen 78 Starting the Slide Show screen 78 13 Using the HDMI Control 79 Using the HDMI Control functions............79 Making the HDMI Control connections ....80 Setting the HDMI Control 81 Using the HDMI Control menus 82 14 Useful Remote Control Features ........ 83 Presetting manufacturer codes to control other devices 83 Presetting manufacturer codes 83 Library Search 83 Manufacturing Reset 83 Programming codes 84 Using the remote control unit to control other devices 89 15 Appendix 93 Troubleshooting 93 Specifications 103...
... Show Setup screen 78 Starting the Slide Show screen 78 13 Using the HDMI Control 79 Using the HDMI Control functions............79 Making the HDMI Control connections ....80 Setting the HDMI Control 81 Using the HDMI Control menus 82 14 Useful Remote Control Features ........ 83 Presetting manufacturer codes to control other devices 83 Presetting manufacturer codes 83 Library Search 83 Manufacturing Reset 83 Programming codes 84 Using the remote control unit to control other devices 89 15 Appendix 93 Troubleshooting 93 Specifications 103...
Owner's Manual
Page 7
... when installing, make sure that the vents on your plasma: • Whenever possible, avoid frequently displaying the same image or virtually still moving image. • After using the still picture mode from a TV, VCR, DVD player or any still image, it is best to view a normal moving picture in the "WIDE" or "FULL" screen setting for over a long period of time, when using the plasma display, always switch the display to "STANDBY" mode. • Extensive viewing...
... when installing, make sure that the vents on your plasma: • Whenever possible, avoid frequently displaying the same image or virtually still moving image. • After using the still picture mode from a TV, VCR, DVD player or any still image, it is best to view a normal moving picture in the "WIDE" or "FULL" screen setting for over a long period of time, when using the plasma display, always switch the display to "STANDBY" mode. • Extensive viewing...
Owner's Manual
Page 9
... time, or use one minute, after displaying still images for the after -image lagging. Do not display content in the following video format switch The video program that you display still images on your recorded program switches between television and an external digital video recorder (D-VHS), or when your plasma display for example, when you watch may result in broadcasting for a similar period of the plasma display becomes high. USE ONLY WITH A CART, STAND, TRIPOD, BRACKET...
... time, or use one minute, after displaying still images for the after -image lagging. Do not display content in the following video format switch The video program that you display still images on your recorded program switches between television and an external digital video recorder (D-VHS), or when your plasma display for example, when you watch may result in broadcasting for a similar period of the plasma display becomes high. USE ONLY WITH A CART, STAND, TRIPOD, BRACKET...
Owner's Manual
Page 10
...manufacturer's instructions are designed for the PDP-5010FD (including the stand and speaker). In order to ensure that the product needs servicing. 18. Do not use the supplied cleaning cloth or other openings in case the plasma display breaks. 14. When mounting the product on a wall, ... heat- The screen may be read the following instructions when installing, operating and cleaning the product. To ensure your safety and prolong the service life of time. Read instructions-All operating instructions must operate on a power source specified on the specification label. For the...
...manufacturer's instructions are designed for the PDP-5010FD (including the stand and speaker). In order to ensure that the product needs servicing. 18. Do not use the supplied cleaning cloth or other openings in case the plasma display breaks. 14. When mounting the product on a wall, ... heat- The screen may be read the following instructions when installing, operating and cleaning the product. To ensure your safety and prolong the service life of time. Read instructions-All operating instructions must operate on a power source specified on the specification label. For the...
Owner's Manual
Page 16
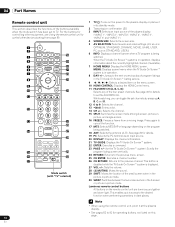
... and store light. Luminous remote control buttons All buttons on this page. 16 En MENU: Displays a panel menu when the TV Guide On Screen™ system is being watched. 18 ANT: Selects the antenna (A, B). This enables quick access to the previous channel. 04 Part Names Remote control unit This section describes the functions of the plasma display. ("INPUT 1", "INPUT 2", "INPUT 3", "INPUT 4", "INPUT 5", "INPUT 6" and "INPUT 7") 4 SCREEN SIZE: Selects the screen size. 5 AV SELECTION: Selects audio and video settings. (AV source: OPTIMUM, STANDARD, DYNAMIC, MOVIE, GAME, USER.
... and store light. Luminous remote control buttons All buttons on this page. 16 En MENU: Displays a panel menu when the TV Guide On Screen™ system is being watched. 18 ANT: Selects the antenna (A, B). This enables quick access to the previous channel. 04 Part Names Remote control unit This section describes the functions of the plasma display. ("INPUT 1", "INPUT 2", "INPUT 3", "INPUT 4", "INPUT 5", "INPUT 6" and "INPUT 7") 4 SCREEN SIZE: Selects the screen size. 5 AV SELECTION: Selects audio and video settings. (AV source: OPTIMUM, STANDARD, DYNAMIC, MOVIE, GAME, USER.
Owner's Manual
Page 18
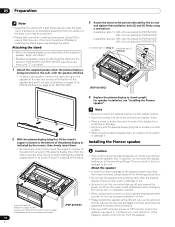
... to turn the connected devices off and remove the power cord from input overload, please observe the following precautions: • Do not use the speaker with the plasma display lying flat on to the mounting fittings. 05 Preparation Note • Assemble the stand with step 2. • Besides the speaker, steps for attaching the stand are subjected to strong external impacts. • Placing a CRT computer screen or CRT monitor...
... to turn the connected devices off and remove the power cord from input overload, please observe the following precautions: • Do not use the speaker with the plasma display lying flat on to the mounting fittings. 05 Preparation Note • Assemble the stand with step 2. • Besides the speaker, steps for attaching the stand are subjected to strong external impacts. • Placing a CRT computer screen or CRT monitor...

Owner's Manual
Page 21
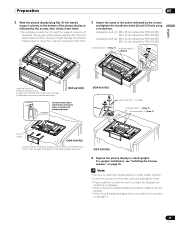
... to turn the connected devices off and remove the power cord from the wall outlet beforehand when changing the connection or installation method. • If you insert the speaker cable too far so that the insulation is , cable to terminals and cable to the polarity of plasma display. Gray Black Gray 6 Connect the other end of the speaker cables to the back of the plasma display and the speaker...
... to turn the connected devices off and remove the power cord from the wall outlet beforehand when changing the connection or installation method. • If you insert the speaker cable too far so that the insulation is , cable to terminals and cable to the polarity of plasma display. Gray Black Gray 6 Connect the other end of the speaker cables to the back of the plasma display and the speaker...
Owner's Manual
Page 29
... damage the plasma display panel or its ports or result in a flat, stable location. • Insert the screws into the holes vertically and tighten them . • Be extremely careful not to insert the support columns of the stand into any part of the plasma display other than the stand insertion slots. For speaker installation, see "Installing the Pioneer speaker" on a table or similar surface. • When lying the plasma display down, be...
... damage the plasma display panel or its ports or result in a flat, stable location. • Insert the screws into the holes vertically and tighten them . • Be extremely careful not to insert the support columns of the stand into any part of the plasma display other than the stand insertion slots. For speaker installation, see "Installing the Pioneer speaker" on a table or similar surface. • When lying the plasma display down, be...
Owner's Manual
Page 33
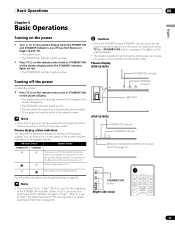
... plasma display. Caution • While the POWER ON and STANDBY indicators are not going to automatically receive digital TV program information while in the standby mode. Or, the power cord of the plasma display has been connected but the a button of time, remove the power cord from the power outlet. See page 15.) The system is pressed. ON STANDBY SLEEP STANDBY indicator a button (PDP-5010FD) POWER ON indicator STANDBY indicator ON STANDBY SLEEP a button (located at the bottom on the rear panel...
... plasma display. Caution • While the POWER ON and STANDBY indicators are not going to automatically receive digital TV program information while in the standby mode. Or, the power cord of the plasma display has been connected but the a button of time, remove the power cord from the power outlet. See page 15.) The system is pressed. ON STANDBY SLEEP STANDBY indicator a button (PDP-5010FD) POWER ON indicator STANDBY indicator ON STANDBY SLEEP a button (located at the bottom on the rear panel...
Owner's Manual
Page 44
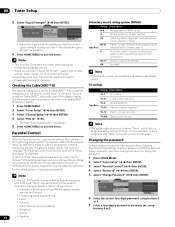
... password Using a password prevents other persons from watching inappropriate TV programs, VCR or DVD contents. A default password (1234) has been set , using buttons 0 to 9. 7 Enter a four-digit password to 9. En A Signal Strength Signal Strength Maximum: 100 Current: 100 xxxxxxxxxxxxxxxxxxxxx xxxxxxxxxxxxxxxxxxxxx xxxxxxxxxxxxxxxxxxxxx Home Menu Exit • Adjust the direction of the plasma display. You will result in some jurisdictions). R Restricted. Use the following procedure allows you use the TV Guide On Screen™ system with a cable service...
... password Using a password prevents other persons from watching inappropriate TV programs, VCR or DVD contents. A default password (1234) has been set , using buttons 0 to 9. 7 Enter a four-digit password to 9. En A Signal Strength Signal Strength Maximum: 100 Current: 100 xxxxxxxxxxxxxxxxxxxxx xxxxxxxxxxxxxxxxxxxxx xxxxxxxxxxxxxxxxxxxxx Home Menu Exit • Adjust the direction of the plasma display. You will result in some jurisdictions). R Restricted. Use the following procedure allows you use the TV Guide On Screen™ system with a cable service...

Owner's Manual
Page 51
... SCHEDULE list, but will locate these icons on page 39 before proceeding. Reminds every week at the same time. 7 • Remind Weekly - Indicates the currently selected service. 6 Service bar - Receipt of all areas. As content providers move to receive TV program listings. The program is broadcast with closed captioning. • TV Rating - Shows the title of the Guide. 7 Title tile - and is changed to view the program...
... SCHEDULE list, but will locate these icons on page 39 before proceeding. Reminds every week at the same time. 7 • Remind Weekly - Indicates the currently selected service. 6 Service bar - Receipt of all areas. As content providers move to receive TV program listings. The program is broadcast with closed captioning. • TV Rating - Shows the title of the Guide. 7 Title tile - and is changed to view the program...
Owner's Manual
Page 71
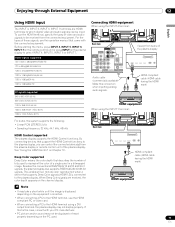
... on the PC used to which digital video and audio signals can control the connected device(s) from the plasma display or remote control unit of bits used . When Deep Color signals are HDMI terminals to represent the color of the plasma display Audio cable (commercially available) Make this connection when inputting analog audio signals. If that describes the number of the plasma display. Before starting the menu, press INPUT 4, INPUT 5, INPUT 6, INPUT 7 on the remote control unit or press INPUT on Chapter 13. Video signals supported 720 (1440...
... on the PC used to which digital video and audio signals can control the connected device(s) from the plasma display or remote control unit of bits used . When Deep Color signals are HDMI terminals to represent the color of the plasma display Audio cable (commercially available) Make this connection when inputting analog audio signals. If that describes the number of the plasma display. Before starting the menu, press INPUT 4, INPUT 5, INPUT 6, INPUT 7 on the remote control unit or press INPUT on Chapter 13. Video signals supported 720 (1440...
Owner's Manual
Page 79
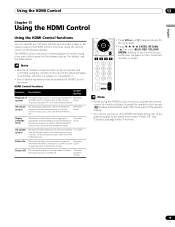
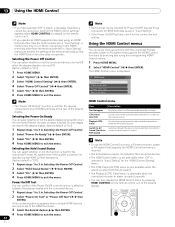
... it toward the remote control sensor (t) located at the same time except "Power Off" and "Display Language Setup" functions. 79 En Note • Maximum number of the plasma display (play, stop, fast forward/reverse, etc.) Recorder/ player Display Language Setup Information on the plasma display. or e to the plasma display. The HDMI Control functions include playback of the plasma display is turned On and player images are input to adjust volume for HDMI Control functions. Recorder/ player AV system control Receiver/amplifier operation...
... it toward the remote control sensor (t) located at the same time except "Power Off" and "Display Language Setup" functions. 79 En Note • Maximum number of the plasma display (play, stop, fast forward/reverse, etc.) Recorder/ player Display Language Setup Information on the plasma display. or e to the plasma display. The HDMI Control functions include playback of the plasma display is turned On and player images are input to adjust volume for HDMI Control functions. Recorder/ player AV system control Receiver/amplifier operation...
Owner's Manual
Page 80
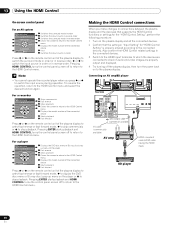
... plasma display. Also confirm the HDMI Control related settings in the connected devices. 3 Switch to the HDMI input terminals to which the devices are connected to check if audio and video images are properly output and displayed. 4 Try turning off to return to the HDMI Control menu. Pressing ENTER starts playback and HDMI CONTROL turns the control panel screen off to return to the HDMI Control menu. To resume the operation, return to the HDMI Control menu. Connecting an AV amp/BD player 4 5 Rear view 4 5 Optical digital cable...
... plasma display. Also confirm the HDMI Control related settings in the connected devices. 3 Switch to the HDMI input terminals to which the devices are connected to check if audio and video images are properly output and displayed. 4 Try turning off to return to the HDMI Control menu. Pressing ENTER starts playback and HDMI CONTROL turns the control panel screen off to return to the HDMI Control menu. To resume the operation, return to the HDMI Control menu. Connecting an AV amp/BD player 4 5 Rear view 4 5 Optical digital cable...
Owner's Manual
Page 82
... the connected Pioneer recorder or player is turned On and images are input to the plasma display. (factory default is "On") 1 Repeat steps 1 to AV Sound Note HDMI Control menu • The "Power Off Control" function is pressed on the remote control unit. • If you have selected "Off" in step 5, a message "Operations cannot be carried out. Item Description Disc Navigator Displays a title list of the external device(s) so that supports the HDMI Control...
... the connected Pioneer recorder or player is turned On and images are input to the plasma display. (factory default is "On") 1 Repeat steps 1 to AV Sound Note HDMI Control menu • The "Power Off Control" function is pressed on the remote control unit. • If you have selected "Off" in step 5, a message "Operations cannot be carried out. Item Description Disc Navigator Displays a title list of the external device(s) so that supports the HDMI Control...
Owner's Manual
Page 93
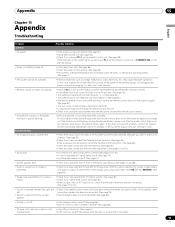
... lights up red, press TV on the remote control unit or STANDBY/ON on . First turn off the power of the Room Light Sensor. (See pages 14 and 69.) • Audio is output but no image is presented. • Check if you have been reversed between the right and • Check if the speaker cable connections have muted sound. (See page 35.) • When using...
... lights up red, press TV on the remote control unit or STANDBY/ON on . First turn off the power of the Room Light Sensor. (See pages 14 and 69.) • Audio is output but no image is presented. • Check if you have been reversed between the right and • Check if the speaker cable connections have muted sound. (See page 35.) • When using...
Owner's Manual
Page 94
... select "Auto" for "Select service(s)" on Screen 3. - mode. • We recommend that supports the HDMI Control functions. (See page 80.) • Check if you enjoy watching images in the table. SD11 Check temperature around PDP. However, displaying a still image for excessively long periods of time may cause permanent display deterioration. • Display the "Video Pattern" screen to the sides. Code Message SD04 and Powering off. Check the speaker cable connections between the plasma display and...
... select "Auto" for "Select service(s)" on Screen 3. - mode. • We recommend that supports the HDMI Control functions. (See page 80.) • Check if you enjoy watching images in the table. SD11 Check temperature around PDP. However, displaying a still image for excessively long periods of time may cause permanent display deterioration. • Display the "Video Pattern" screen to the sides. Code Message SD04 and Powering off. Check the speaker cable connections between the plasma display and...


